- Создание образов и восстановление разделов с помощью Partimage
- Введение
- Загрузка SystemRescueCD
- Создание образа раздела
- Восстановление раздела из образа
- Capture and apply Windows, system, and recovery partitions
- Capture the customized partitions
- Step 1: Determine which partitions to capture
- Step 2: Prepare to capture partitions
- Step 3: Capture images for each customized partition.
- Step 4: Save images to the network or another safe location.
- Apply the images
- Step 1: Prepare to apply partitions
- Step 2: Apply the partitions
- Step 3: Verify that it worked
- Create a Data Image Using DISM
Создание образов и восстановление разделов с помощью Partimage
Существует два основных способа выполнения резервного копирования: копирование отдельных файлов (при этом, часто предусматривается синхронизация копий и используются внешние носители) и создание образа целого раздела диска, со всем его содержимым. В данной статье описан второй способ резервного копирования при помощи программы Partimage.
Отмечу, что я не гарантирую работоспособность описанного ниже способа.
Введение
Partimage можно найти на многофункциональном диске для восстановления системы SystemRescueCD . Данный загрузочный диск используется при работе с операционными системами Linux и Windows и предоставляет live-среду со множеством инструментов для создания разделов жесткого диска, их редактирования и т.д. Загрузите образ SystemRescueCD и запишите его на CD.
Partimage не поддерживает файловую систему ext4, а ntfs — лишь частично. С полным списком поддерживаемых файловых систем можно ознакомиться на сайте программы .
В данном руководстве я буду использовать жесткий диск, с тремя разделами: sda1 — swap раздел, sda2 — корневой раздел Ubuntu Linux 12.04 и sda3 — пустой раздел, на котором достаточно свободного места для образа sda2 .
Загрузка SystemRescueCD
Загрузитесь с CD, на котором записан SystemRescueCD. Появится следующее меню:
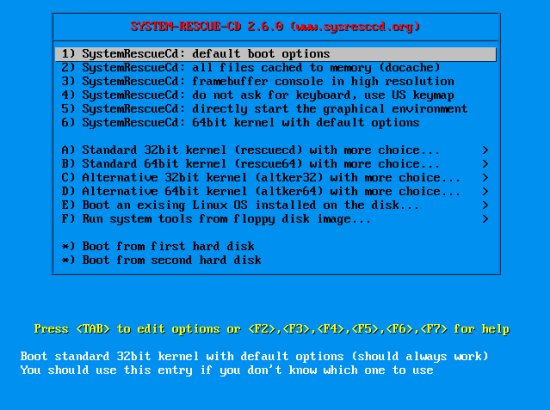
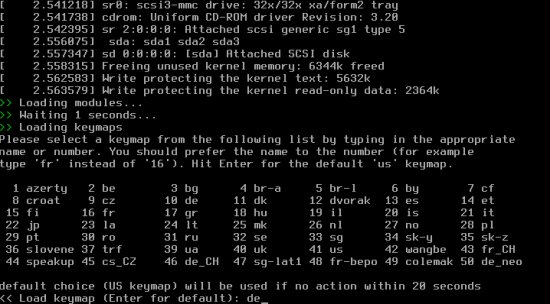
Я предпочитаю графический интерфейс, к тому же, с этого диска он загружается быстро, поэтому выберу пункт 5) . Во время загрузки будет предложено выбрать раскладку клавиатуры — за 20 секунд введите имя или соответствующий номер из предложенного списка:
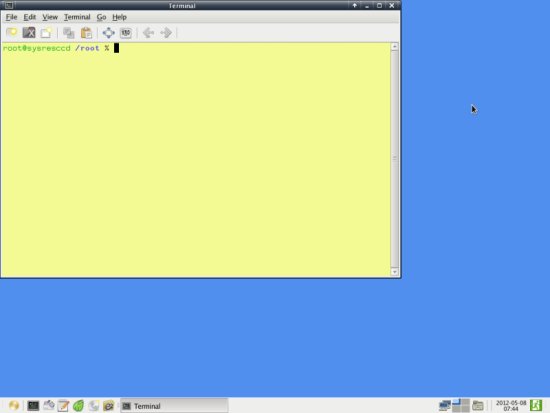
Ниже показан вид графического интерфейса после загрузки. Сразу откроется терминал с правами root.
Создание образа раздела
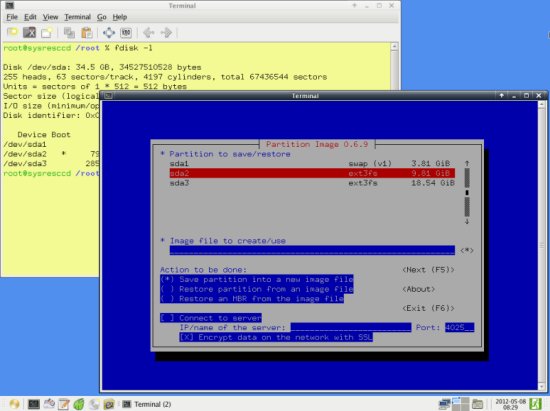
Я создам образ раздела с Ubuntu, sda2 , и сохраню его на sda3 . Если не знаете на какие разделы разбит Ваш диск, введите в терминале команду:
У меня вывод этой команды имеет вид (три последние строки — описания разделов):
Запустите Partimage — в главном меню (кнопка в левом нижнем углу рабочего стола) выберите пункты System > Partimage. Программа откроется в новом окне терминала:
Сначала смонтируйте раздел, на который будет сохранен образ, в отдельную папку, например в /mnt/save . Я буду сохранять образ на sda3 , а вы можете выбрать раздел подходящий Вам:
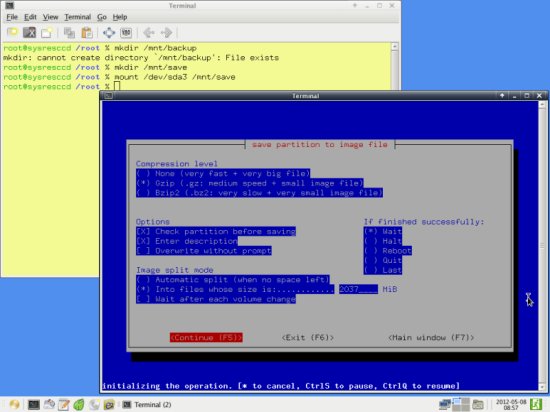
Перейдите в окно Partimage. Для управления программой и перемещения по элементам окна используйте клавиши Tab , Enter , Space и стрелки. Выберите раздел, резервную копию которого необходимо сделать, и перейдите в следующее поле, нажав Tab . В нем введите полный путь к файлу-образу, вместе с именем. Также можно выбрать файл-образ, нажав звездочку справа от поля ввода. Я указал путь /mnt/save/Ubuntu.gz (файл имеет расширение .gz , потому что я буду использовать уровень сжатия gzip. Можно также выбрать bz2):

Выполняя обычное резервное копирование, остальные опции изменять не нужно. Нажав F5 , перейдите на следующую страницу. Заданные на ней настройки по умолчанию тоже можно не изменять, просто ознакомьтесь с их назначением:
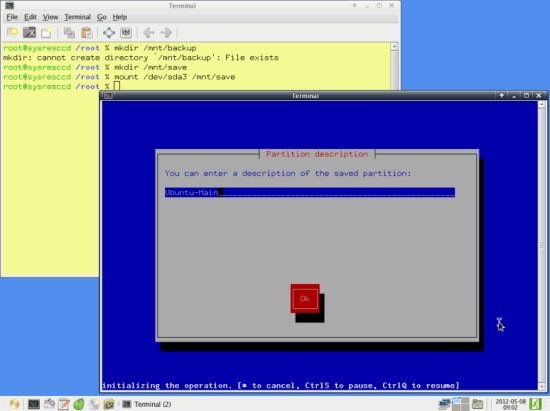
Нажав F5 , перейдите далее и введите описание создаваемой копии, которое будет показано перед восстановлением и позволит убедиться, что выбран правильный файл-образ. Лучше указать какое-нибудь осмысленное имя и дату создания копии. Для примера, я введу просто:
После перехода на следующую страницу Partimage выполнит подготовку к созданию копии. Может быть выдано сообщение об ошибке: Can’t read bitmap block 0 from image . Ошибка бывает вызвана тем, что на разделе, где будет сохранен образ, используется не поддерживаемая файловая система или другой непонятной причиной. Если Вы уверены, что Partimage поддерживает файловую систему, попробуйте перемонтировать раздел с файлом-образом, затем смонтируйте и размонтируйте раздел, копия которого создается. Я вводил следующие команды:
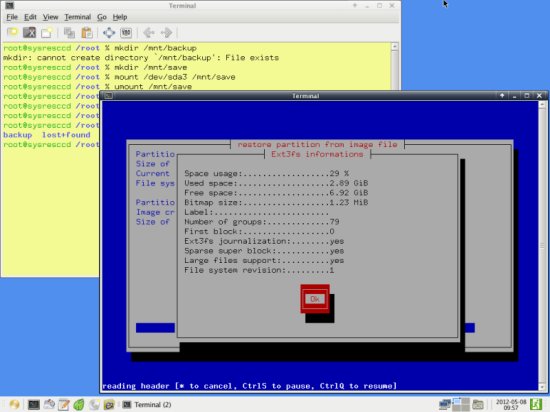
Во всяком случае, мне это помогло. Если подготовка прошла удачно, будет выведено окно с информацией:
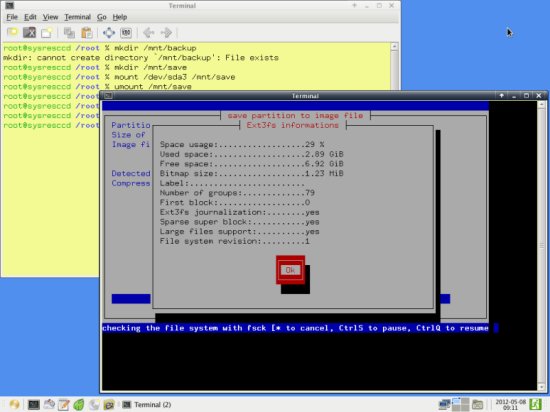
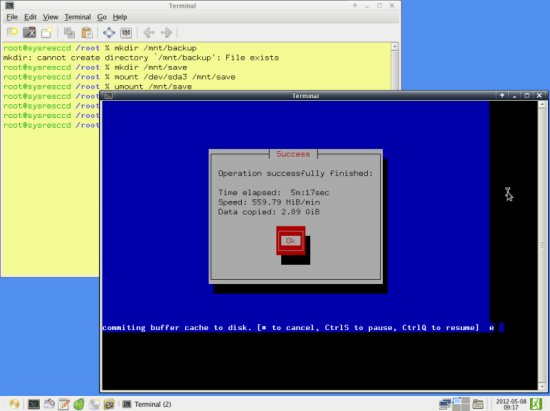
Затем Partimage создаст образ раздела и поместит его в заданный файл:
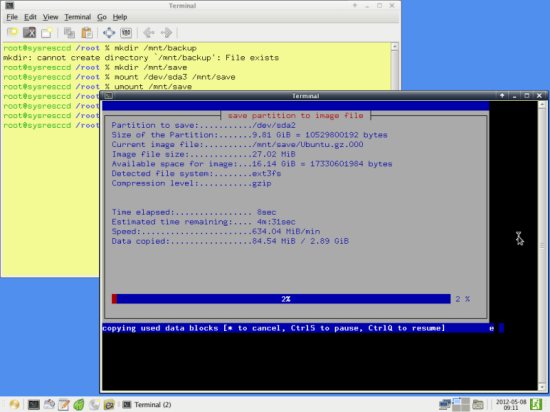
Если копирование завершилось успешно, появится соответствующее сообщение. После нажатия кнопки OK Partimage закроется.
Восстановление раздела из образа
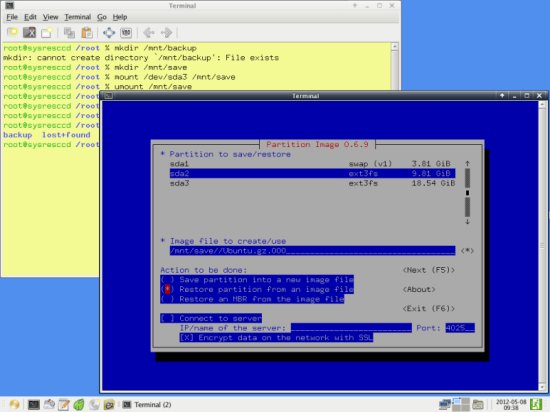
Для восстановления раздела из образа нужно выполнить практически те же действия, что и при создании копии, но задать другие опции в Partimage. Запустите программу и выберите из списка раздел, который должен быть восстановлен (т.е. раздел, который будет перезаписан данными из образа, а не тот, на котором находится файл-образ). Во втором поле введите путь к файлу-образу. (Заметьте, имя файла должно оканчиваться на .000 . Если вы не знаете точного имени файла-образа, нажмите звездочку и найдите необходимый файл. При этом, раздел, на котором находится образ, должен быть примонтирован. Это можно сделать командой:
Только замените раздел и точку монтирования на подходящие Вам.)
Наконец, установите опцию Restore partition from an image file , выделив ее и нажав Space :
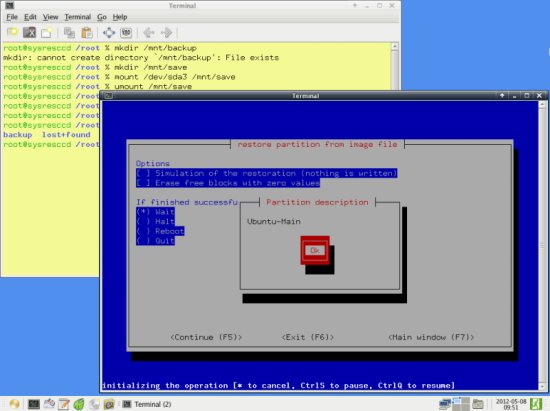
Для перехода далее нажмите F5 . Будет показано описание образа, если оно задавалось при создании копии:
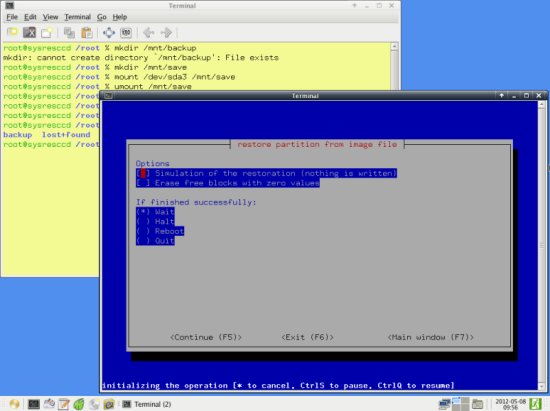
Чтобы проверить, не возникнет ли ошибок в процессе восстановления, можно выполнить сначала его имитацию, установив соответствующую опцию. А затирать свободные блоки нет необходимости; это только изнашивает винчестер:
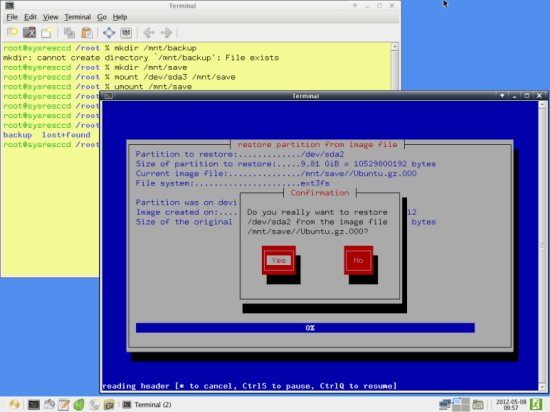
Перейдите далее, нажав F5 . Будет показана сводная информация:
А затем предложено подтвердить намерение восстановить раздел из выбранного образа. Имейте ввиду, данные на разделе будут перезаписаны.
Производится восстановление указанного раздела:

Если все прошло успешно, выведется соответствующее сообщение:
Capture and apply Windows, system, and recovery partitions
When you’re deploying Windows using the WIM format, and using customized partitions, a customized system partition or an additional utility partition, learn how to capture the right partitions to apply to new PCs.
If you don’t need custom partitions, you usually can just capture the Windows partition, and then use files from that image to set up the rest of the partitions on the drive. See Capture and Apply Windows using a single WIM file.
If you’re capturing using the FFU format, you’ll be fine — FFU captures all of the partitions on the drive.
Capture the customized partitions
Step 1: Determine which partitions to capture
This table shows the types of partitions that you must capture and those that are managed automatically.
If you’re deploying both UEFI and BIOS systems, you can reuse your primary and logical partitions across UEFI-based and BIOS-based devices, but not the other partition types.
| Partition type | Should you capture this partition? | Can you reuse the same WIM on UEFI and BIOS firmware? |
|---|---|---|
| System partition (EFI System Partition or BIOS system partition) | Optional. If only a simple set of partition files is required, you don’t have to capture this partition. | No |
| Microsoft Reserved partition (MSR) | No | No |
| Primary partitions (Windows partitions, data / utility partitions that you’ve added) | Yes | Yes |
| Recovery partition | Optional. If you haven’t customized this partition, you don’t have to capture it. | No |
| Extended partition | No | No |
| Logical partitions (Windows partitions, data / utility partitions that you’ve added) | Yes | Yes |
Step 2: Prepare to capture partitions
If you’ve booted the Windows image, generalize it so that it can be deployed to other devices. For more information, see Sysprep (Generalize) a Windows installation.
Start your reference device by using WindowsВ PE.
At the WindowsВ PE command prompt, type diskpart to open the DiskPart tool.
Check to see if the partitions that you want to capture have drive letters assigned.
If any of the partitions you want to capture don’t already have a drive letter assigned, continue:
List the disks in your PC:
Select the primary hard disk:
View the partitions:
Select a partition that needs a drive letter:
Assign a letter to the partition with the assign letter command. For example,
Type exit to return to the WindowsВ PE command prompt.
For more information, see the DiskPart Help from the command line, or Diskpart Command line syntax.
Step 3: Capture images for each customized partition.
At the WindowsВ PE command prompt, capture each customized partition, for example:
For more information about using the DISM tool to capture an image, see DISM Image Management Command-Line Options.
Step 4: Save images to the network or another safe location.
Connect an external drive, or connect to a safe network location, for example:
If prompted, provide your network credentials.
Copy the partitions to your network share. For example,
Apply the images
Step 1: Prepare to apply partitions
Start your destination device by using WindowsВ PE.
Connect an external drive, or connect to a safe network location, for example:
If prompted, provide your network credentials.
Wipe the hard drive and create new partitions.
To apply to multiple devices, save the Diskpart commands into a script and run them on each new device. For examples, see Configure UEFI/GPT-Based Hard Drive Partitions or Configure BIOS/MBR-Based Hard Drive Partitions. Example:
Where D: is a USB flash drive or other file storage location.
In these DiskPart examples, the partitions are assigned the letters: System=S, Windows=W, and Recovery=R.
Change the Windows drive letter to a letter that’s near the end of the alphabet, such as W, to avoid drive letter conflicts. Do not use X, because this drive letter is reserved for Windows PE. After the device reboots, the Windows partition is assigned the letter C, and the other partitions don’t receive drive letters.
If you reboot, WindowsВ PE reassigns disk letters alphabetically, starting with the letter C, without regard to the configuration in Windows Setup. This configuration can change based on the presence of different drives, such as USB flash drives.
Optional: speed up the image capture by setting the power scheme to High performance:
Step 2: Apply the partitions
Windows and data partitions: Apply the image(s), example:
where W: is the Windows partition.
System partition: You can either:
Configure the system partition by using the BCDBoot tool. This tool copies and configures system partition files by using files from the Windows partition. For example:
Apply a custom image
Where S: is the system partition
Recovery partition:
a. You can either:
Copy the Windows Recovery Environment (RE) tools into the recovery tools partition.
Where R: is the recovery partition
Apply a custom image
b. Register the location of the recovery tools, and hide the recovery partition using Diskpart. You can use our sample script or perform the steps manually:
Diskpart steps for UEFI:
Diskpart steps for BIOS:
Step 3: Verify that it worked
Reboot the device ( exit ). Windows should boot.
If the device doesn’t boot, (for example, if you receive the error message: Bootmgr not found. Press CTRL+ALT+DEL) check the steps for setting up the system partition:
- See BCDBoot command-line options for more info about copying boot files to the system partition.
- Use the DiskPart tool to check to make sure that the system partition is set to Active.
Complete the out of box experience (OOBE) as a new user, and check the recovery partition:
Check that in File Explorer that the Recovery partition is not visible.
View the partitions exist, either by right-clicking Start and selecting Disk Management, or by using diskpart (Open a command prompt as an administrator > diskpart > select disk 0 > list partition > exit ).
Create a Data Image Using DISM
To add applications, files, and other resources to Windows during an installation, you can create a data image. By using the Deployment Image Servicing and Management (DISM) tool, you can create additional Windows image (.wim) files that contain only files and applications that you intend to copy to the Windows installation.
Data images enable you to add:
Applications, files, scripts, and other resources to Windows during an installation.
Files, resources, and other data to a partition other than the operating system partition.
NoteВ В Data images must be used only to add new files to a Windows installation. Do not use data images to replace existing Windows files. Overwriting operating system data is unsupported.
Previous methods of transferring data to a Windows installation required the use of $OEM$ folders. These folder structures are still supported, but data images provide an easier and more efficient means of transferring additional data to Windows.
In unattended installations, the Windows image to install is specified by the OSImage setting in the Microsoft-Windows-Setup component. You can add one or more DataImage settings in the Microsoft-Windows-Setup component that represent additional data images that you add to the system. For more information, see the Windows Unattended Setup Reference.
To create a data image
Locate the data that you will create a data image for.
Open a command prompt as an administrator, or boot the computer to Windows PE to open the Windows PE command prompt.
Use DISM to compress your data files to a .wim file. For example:
In this example, everything under the C:\Data\DataFiles directory is added to the .wim file and the .wim file is given the label «MyData». All files and folders under C:\Data\DataFiles are extracted to the root of the drive specified in the answer file.
For more information about how to use DISM, see DISM Image Management Command-Line Options.
Copy the data image to an available location such as another partition or a network share during WindowsВ Setup.
To add a data image path to an answer file
Use WindowsВ System Image Manager (WindowsВ SIM) to create an answer file that contains the path to the data image to install and the location for the installation.
Add the Microsoft-Windows-Setup\ DataImage settings to the appropriate configuration pass for your environment. For example: windowsPE .
Save the answer file and close WindowsВ SIM.
The answer file must resemble the following example:
If you’re specifying a local folder in path , see Path in the Unattended Windows Setup Reference to learn about using relative or absolute paths.
Run Setup.exe, specifying the location of the answer file. For example:
All the files and folders specified in the data image are extracted to the root of the drive during installation. Executable files and scripts are not run when the data image is applied; they are only copied to the drive. You can use FirstLogonCommands to specify commands to run the first time a user logs on to the computer. For more information about FirstLogonCommands , see the Windows Unattended Setup Reference.


