- Creating Multiple Partitions on a USB Drive in Windows 10
- How to Create Multiple Partitions on a USB Drive in Windows 10?
- Partition USB Drive in Windows 10 Using DiskPart
- Create Multiple Partitions on a USB Flash Drive Using PowerShell
- USB Partition Tool/Manager: Partition USB or Create Portable USB Drive
- What’s a USB Partition Tool?
- USB Hard Drive Partition Solution
- Why Choose EaseUS USB Partition Manager as USB Partition Tool
- How to Partition USB with EaseUS Free USB Partition Tool
- How to Create a Portable USB with EaseUS Bootable USB Partition Tool
- A Great USB Flash Drive Partition Tool for Windows
- Scenarios
- Get a free yet useful partition tool for USB flash drive
- Detailed steps to partition flash drive in Windows 7/8/10
- вњ” Resize partition on USB flash drive
- вњ” Format Partition on USB flash drive
- Verdict
Creating Multiple Partitions on a USB Drive in Windows 10
Full multiple partitions support for any USB storage device has appeared in Windows 10 starting with build 1703 (Creators Update). Now, a Windows 10 user can get access to all partitions on a USB flash drive (or SD card), as well as create multiple logical partitions on such a media using the built-in OS tools. Previously, when connecting a USB stick with several partitions (that were created on Linux or using third-party tools) to a computer running Windows, the OS displayed only the first primary partition (all other partitions were ignored). Normal operation with multiple partitions in Windows was available only for the drives identified as fixed (non-removable/local).
Windows 10 Creators Update (and newer) automatically displays all partitions available on a USB stick or SD card and ignores the RMB bit. In this case, the USB drive is still identified as a Removable device.
How to Create Multiple Partitions on a USB Drive in Windows 10?
Let’s try to create several partitions on a USB stick in Windows 10. Suppose that a primary partition is already created on the USB stick, which occupies the entire volume of the USB media. We will compress it and create the second (and subsequent) partitions:
- Connect the USB stick to the computer’s USB port;
- Format the USB flash drive in the NTFS file system and then open the Disk Management (diskmgmt.msc) console;
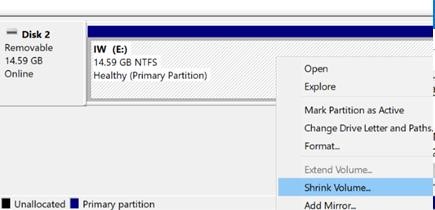
- Right-click the partition on the USB stick and select Shrink Volume in the context menu;

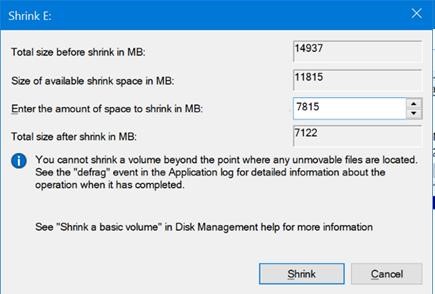
- Specify the size of free space after shrinking and click Shrink. For example, we want to create two partitions of 7 GB and 8 GB on the 15 GB USB flash device;
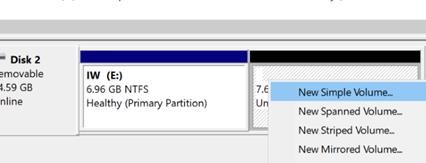
- Right-click on the unallocated disk area and select New Simple Volume to create an additional partition;
- Select the drive letter, volume label and file system type (I formatted the second partition in the FAT32 file system).
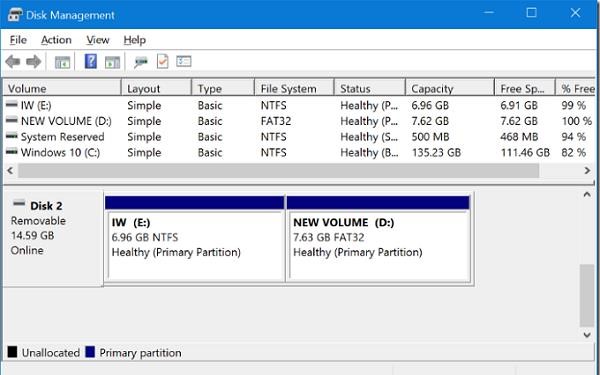
As you can see, we have got the USB stick with two partitions. The first partition is formatted in NTFS, and the second in FAT32. Both partitions are displayed in Windows and ready to use.
Partition USB Drive in Windows 10 Using DiskPart
You can also create several partitions on a USB flash drive using the DiskPart CLI tool. In this example, we will create two partitions: the first partition with the FAT32 file system, and the second with NTFS (you cannot create the first partition with FAT32 from the GUI of the Disk Management console).
Open an elevated command prompt and run the DiskPart command. In the context of Diskpart, you must run the following commands one by one:
list disk
select
clean
create partition primary size=3000
format quick fs=fat32 label=»FirstFAT32Partition»
assign letter=J
active
create partition primary
format fs=ntfs quick label=»Data(NTFS)»
assign letter=K
list vol
exit
Create Multiple Partitions on a USB Flash Drive Using PowerShell
You can also create several partitions on a USB flash drive using PowerShell cmdlets from the built-in Storage module.
Get the USB disk ID on your computer:
Delete the existing partitions on the USB drive:
Get-Partition –DiskNumber 1 | Remove-Partition
Use the following PowerShell commands to create two logical partitions on a USB flash drive and format them:
New-Partition –DiskNumber 1 -Size 4gb -DriveLetter J
Format-Volume -DriveLetter J -FileSystem NTFS -NewFileSystemLabel USBVol1
New-Partition –DiskNumber 1 –UseMaximumSize -DriveLetter K
Format-Volume -DriveLetter K -FileSystem Fat32 -NewFileSystemLabel USBVol2 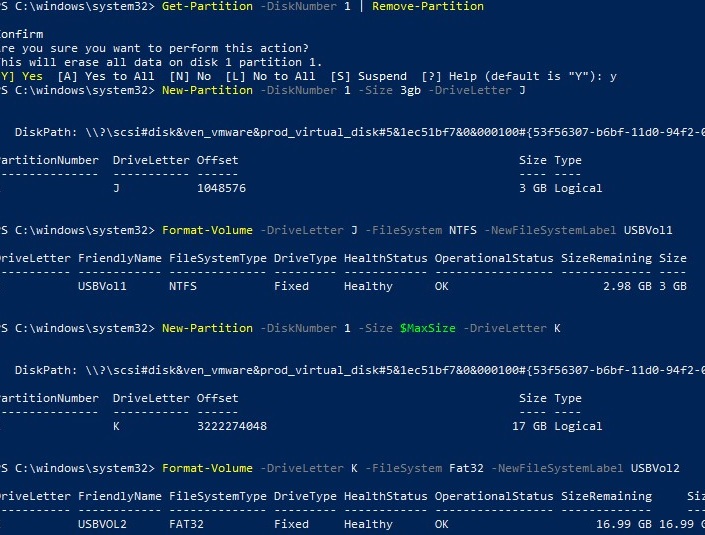
Keep in mind that USB sticks with multiple partitions will be correctly displayed only on Windows 10 1703 and newer. In earlier versions of Windows, only the first partition will be still displayed.
Why might you need several partitions on a USB flash drive?
USB Partition Tool/Manager: Partition USB or Create Portable USB Drive
What’s a USB Partition Tool?
Download the magic USB partition tool so you can easily manage a USB HDD, pendrive, flash drive like this:
- Resize (Extend or shrink) a USB drive
- Split a USB drive into several partitions
- Create one or multiple partitions on a USB drive
- Format/convert a USB drive between NTFS or FAT32
- Create a bootable USB drive for Windows 10/8/7/XP/Vista
As a matter of fact, the USB partition manager we’re going to introduce to you in the next part is so feature-rich that it enables you to fully control your USB flash drive and USB external hard drive without doubt.
USB Hard Drive Partition Solution
As the price of USB hard drive is falling continuously and demand for more hard disk storage is growing, people now tend to buy a USB hard drive for convenience, but how to manage a new USB drive or solve the most common problems occurred to the USB drive?
To optimize the performance of your USB hard drive, a third-party USB partition manager is needed. EaseUS Partition Master Free Edition, a freeware to manage partition, works as a powerful and magic partition software. With this partition freeware, you could enjoy a wonderful experience of managing your partition like magic, such as Resizing, Copying, Merging, Creating, Deleting partitions and so on. Especially you can extend the NTFS system partition and Dynamic Disk Copy.
Why Choose EaseUS USB Partition Manager as USB Partition Tool
This USB partition freeware works perfectly with all Windows OS. Moreover, with a user-friendly interface, you can partition your USB hard drive with very simple operations. So no matter you are a computer expert or not, you can partition a USB hard drive easily. The most shining point of this freeware is that your data is completely protected during the process of partitioning your USB hard drive.
Besides partition, the hard drive is also good at managing disk pace, EaseUS Partition Master — the unique free partition manager has Partition Recovery Wizard to recover deleted or lost partitions. Copying disk and Copying partition in this toolkit is useful if you want to copy or replace disks.
How to Partition USB with EaseUS Free USB Partition Tool
To partition a USB stick or USB HDD with EaseUS Partition Master, you can start at once after connecting the drive to your Windows computer or laptop. It’s so user-friendly that you don’t have to learn the basics in advance.
Now follow the USB partitioning guide and do it yourself to partition a USB drive:
Step 1. Check for free space
To devide a disk partition into multiple ones, you must ensure that there is adequate free space to be allotted.
Step 2. Shrink a disk partition to create unallocated space
By doing so, start with the «Resize/Move» feature. Right-click on a partition with a lot free space and select «Resize/Move»
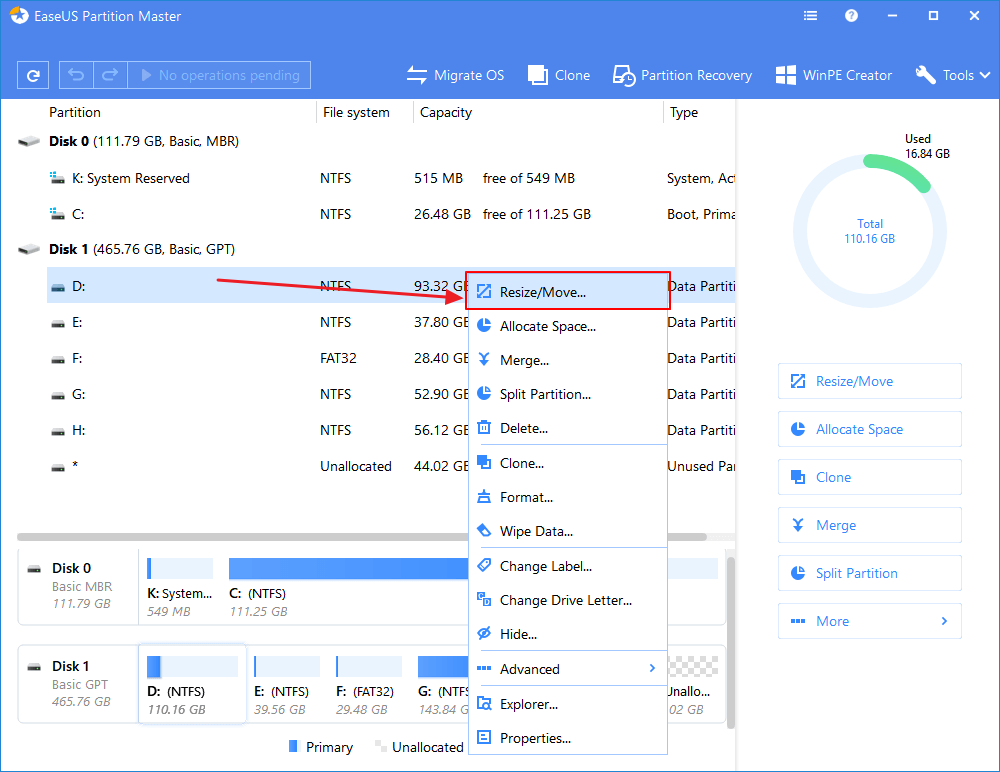
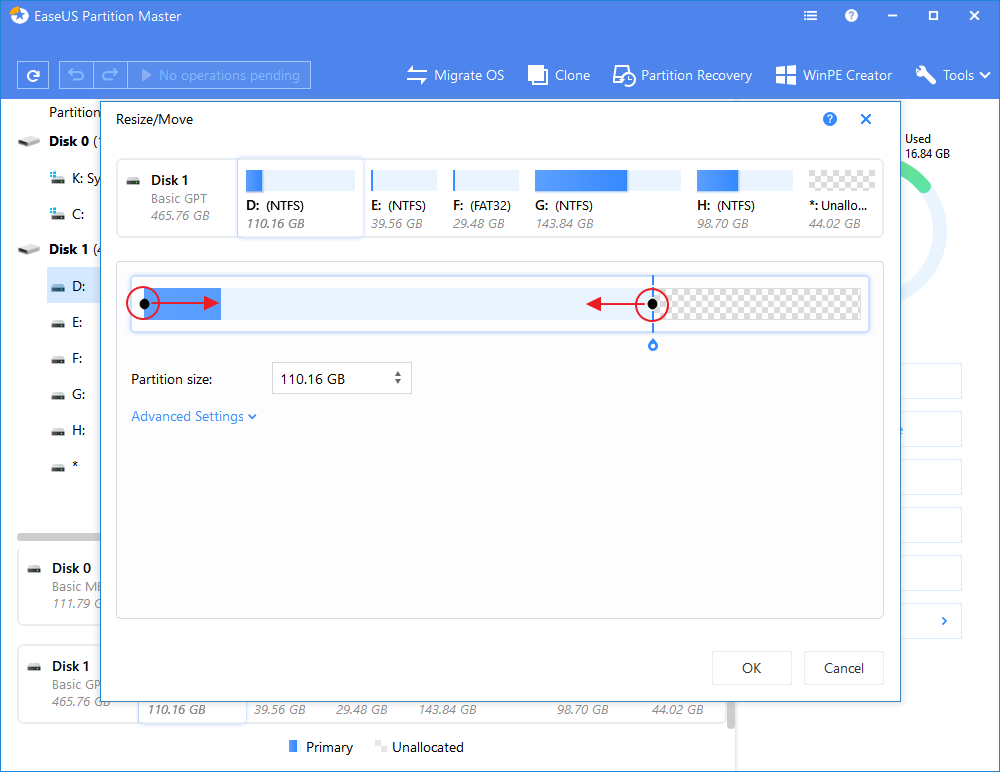
Drag either end of the partition rightwards or leftwards so you can shrink its size as the red arrow does, in order to get ample unallocated space. You can visually know how much space you’ve decreased in the «Partition size» area. Click «OK».
At last, you need to click the «Execute xx Operation» on the top menu and then «Apply» to save all the changes. Go back on the main window, there should be unallocated space appearing under the same disk of the shrinked one.

Step 3. Create a new partition on unallocated space
The last step is to turn the unallocated space into a usable partition drive with a recognized file system. Right-click on the unallocated space and choose «Create. «.
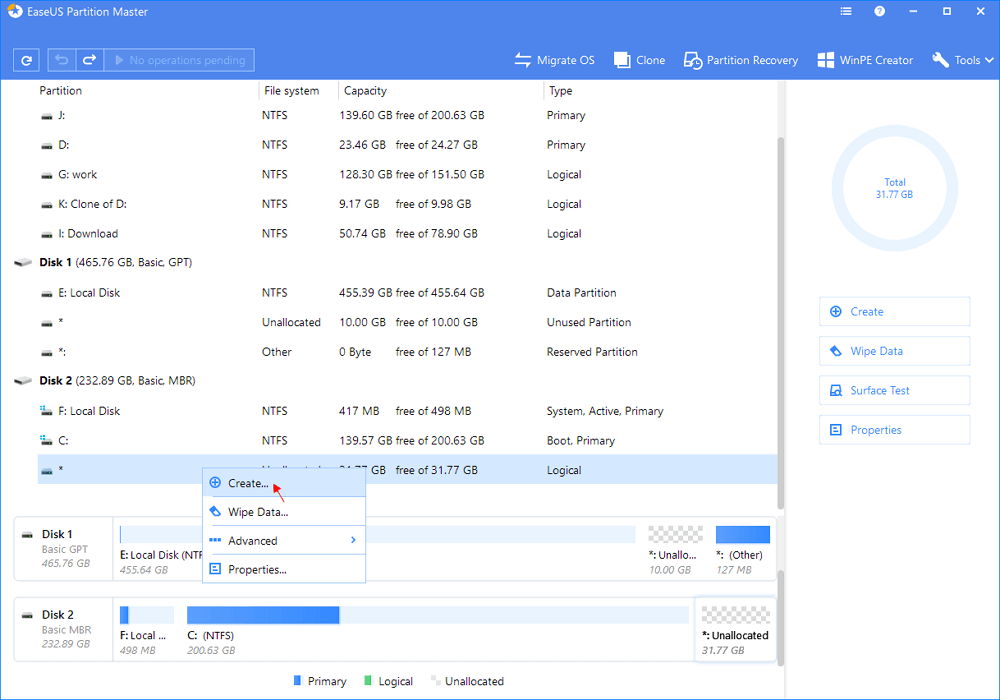
Customize the partition information by choosing a drive letter, partition label, file system (NTFS, FAT32, EXT2. )В and many more settings in the Advanced Settings. Click «OK».

Finally, cick «Apply» to confirm that you want to create a partition on the unallocated space. Repeat the whole steps to partition a hard drive in many more partitions.

How to Create a Portable USB with EaseUS Bootable USB Partition Tool
Sometimes, there is something wrong with the Windows boot drive and you cannot start the Windows as normal. How to access the non-bootable Windows computer and fix the hard drive issues at this moment? You need to use EaseUS partition magic software, which is an upgraded version,В to create a bootable USB drive that can help you enter the computer without booting into Windows.
How to make the EaseUS bootable USB drive? Follow the simple steps:
Step 1. To create a bootable disk of EaseUS Partition Master, you should prepare a storage media, like a USB drive, flash drive or a CD/DVD disc. Then, correctly connect the drive to your computer.
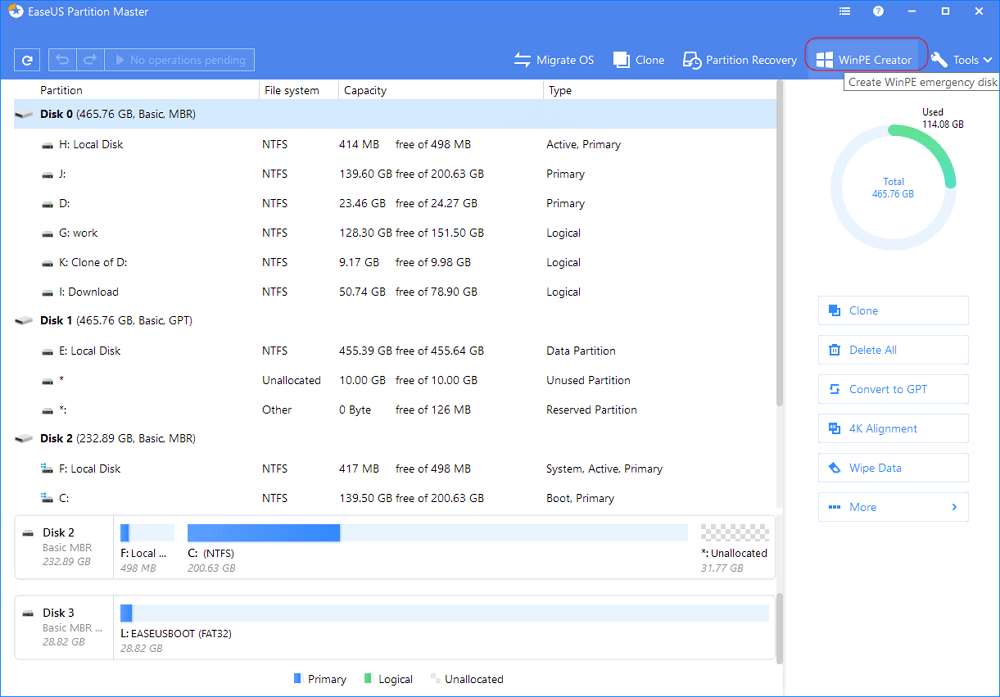
Step 2. Launch EaseUS Partition Master, findВ the «WinPE Creator» feature on the top. Click on it.
Step 3.В You can choose the USB or CD/DVD when the drive is available. However, if you do not have a storage device at hand, you can also save the ISO file to a local drive, and later burn it to a storage media. Once made the option, click the «Proceed» button to begin.
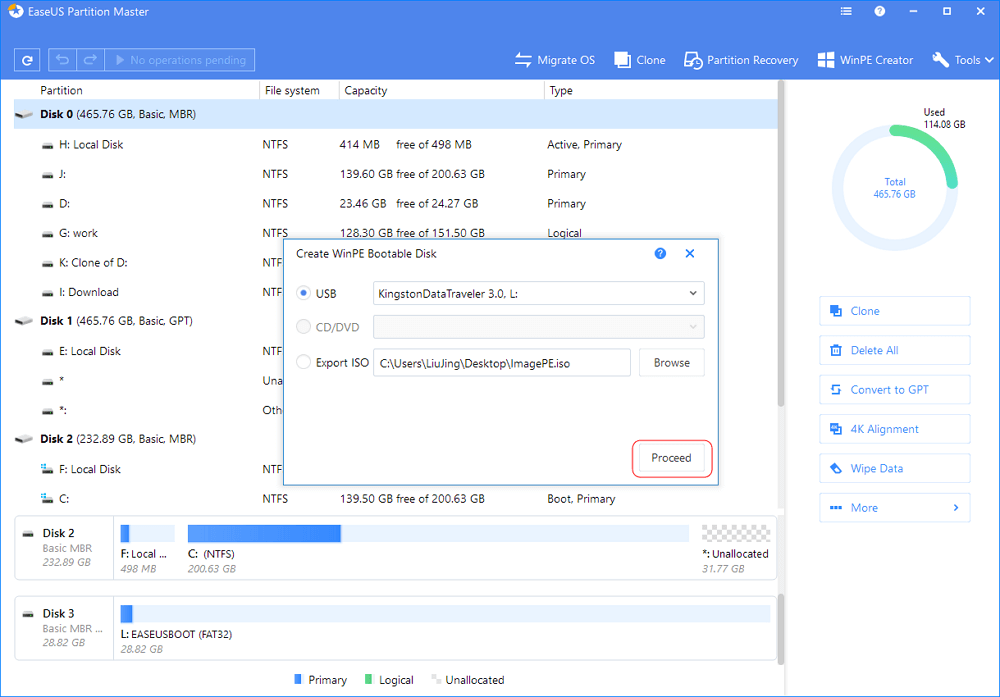
When the process finishes, you have successfully created an EaseUS Partition Master WinPE bootable disk. Now, you can manage your hard disks and partitions through the bootable drive whenever the computer fails to boot normally.
If you have RAID drives, load the RAID driver first by clicking Add Driver from the menu bar, which can help you add the driver of your device under WinPE environment, as some specific device cannot be recognized under WinPE environment without drivers installed, such as RAID or some specific hard disk.
A Great USB Flash Drive Partition Tool for Windows
If you want to partition your USB flash drive effectively and quickly, this reliable and free partition tool – AOMEI Partition Assistant can be your first choice.

By Bryce  / Last Updated November 30, 2020
Scenarios
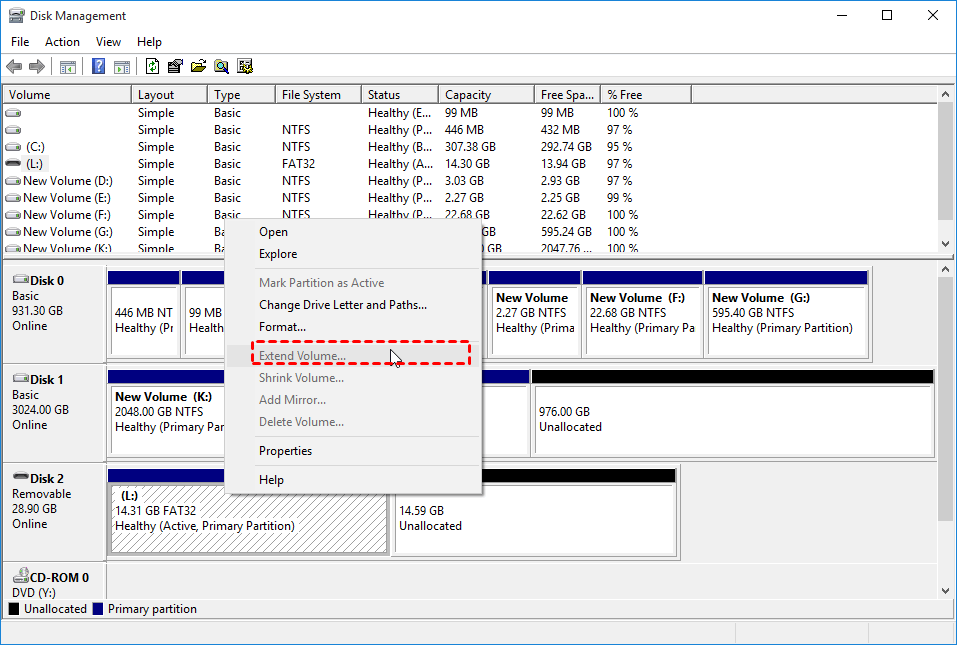
Scenario 1: “My 28GB USB flash drive only shows 14GB in File Explorer. To figure out why, I opened Disk Management and found that there is unallocated space behind partition L. To make full use of the space of my flash drive, I plan to extend partition F with the unallocated space. However, the option “Extend Volume…” is grayed out. Is there a partition tool for USB flash drive that can complete the task? Thanks!”
Scenario 2: “I have a 64GB Samsung USB flash drive that holds one NTFS partition. Now I need to format 64GB drive to FAT32. But I found that FAT32 is not displayed on the file system list in Format window when I tried to change its file system in Disk Management. Then my friend told me that it is not allowed to format partition over 32GB to FAT32 via Disk Management and I need a USB flash drive partition tool. But I don’t know which to choose? Is there any advice”?
Get a free yet useful partition tool for USB flash drive
Actually, there are various partition tools for USB flash drive that can help you to delete partition, resize partition, and format partition on USB flash drive. Here AOMEI Partition Assistant Standard is highly recommended out of the reasons given below:
1. Powerful functions: It can resize partition on USB flash drive easily, which is helpful in solving USB flash drive not showing full capacity; it can format large USB flash drive to FAT32 effortlessly; it supports to create the second partition on USB flash drive and allows you to create NTFS/FAT32/ exFAT/ Ext2/Ext3/Ext4 partition. With great technical support, it has been continuously being updated and improved from the published day.
2. Intuitive and concise graphical user interface: user-friendly GUI design of AOMEI partition Assistant Standard makes it is easy to handle even for users who know little about computer knowledge.
3. Small size of installation package: the file size of AOMEI Partition Assistant Standard is very small; therefore it will not take too much space of your local disk.
4. High compatibility: It is not only can work with Samsung USB flash drive, but also with SanDisk flash drive, Kingston flash drive, and so on.
Detailed steps to partition flash drive in Windows 7/8/10
Preparation work that you should make before partitioning USB flash drive:
➠Check whether your USB flash drive is clean. If it is covered with dust, there are chances that the USB flash drive won’t be detected due to poor contact. If it is clean, plug your USB flash drive into a working computer running Windows.
вћ It is advised to back up important data on the USB flash drive to avoid data loss caused by inappropriate operations.
➠Free download this professional and reliable free USB flash drive partition tool – AOEM Partition Assistant Standard.
вњ” Resize partition on USB flash drive
When you need to resize USB flash drive partition, follow the steps given below:
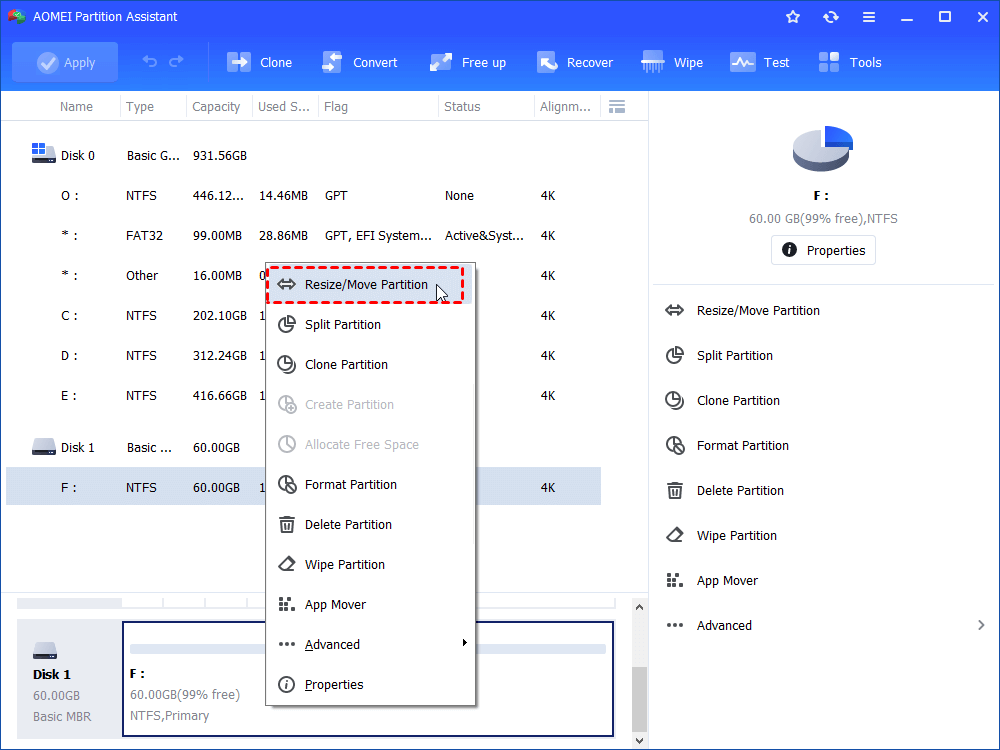
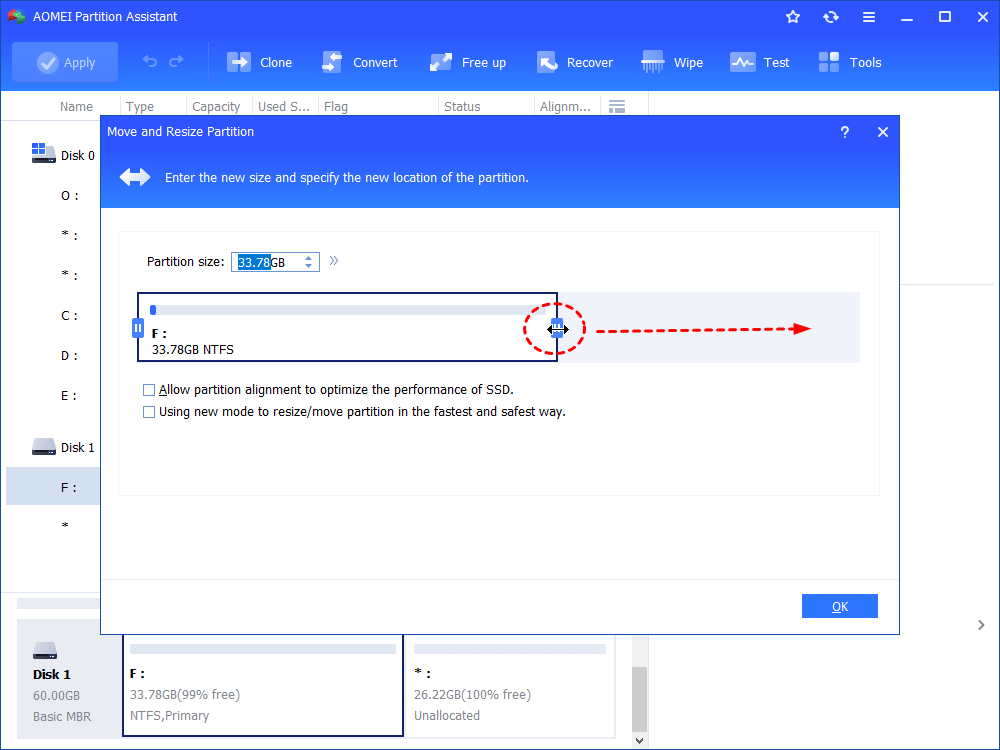
Step 1. Install and fire up AOMEI Partition Assistant. In the main interface, all storage devices will be listed. Locate the USB flash drive, right click the partition on it and choose “Resize Partition”.
Step 2. In this pop-up window, extend the existing partition by dragging slider bar rightwards. Then, click on “OK” button.
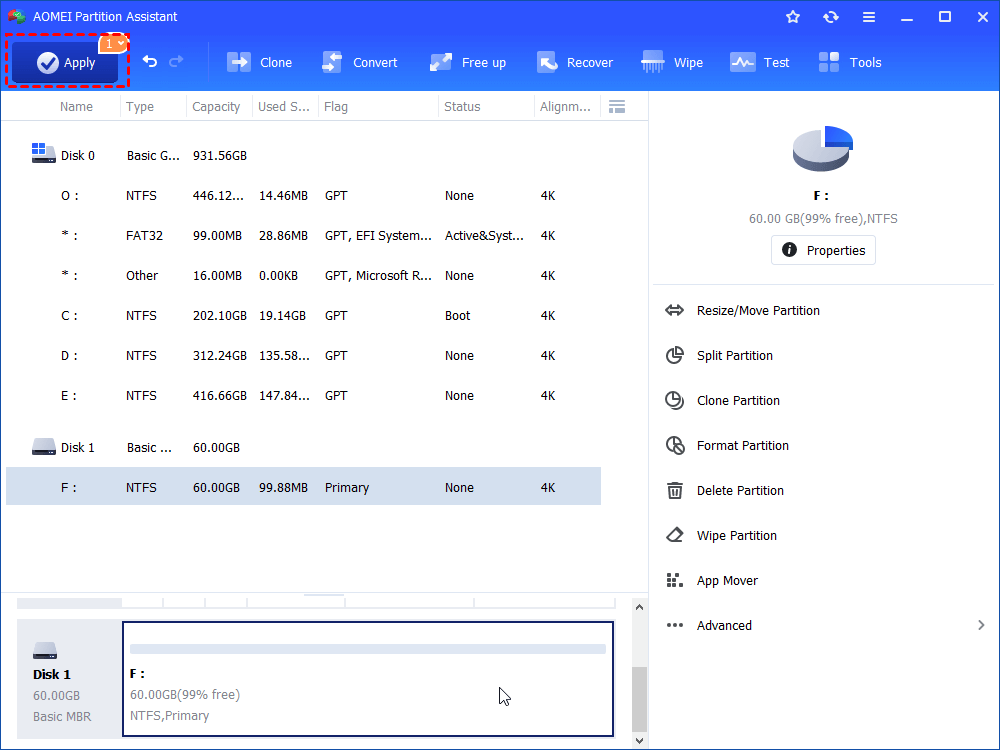
Step 3. Confirm pending operation and click “Apply”>“Proceed” to execute it.
PS.: It is also available to create second partition with the unallocated space behind the existing partition on a flash drive or SD card via this software.
вњ” Format Partition on USB flash drive
The detailed steps to format partition are presented as follows:
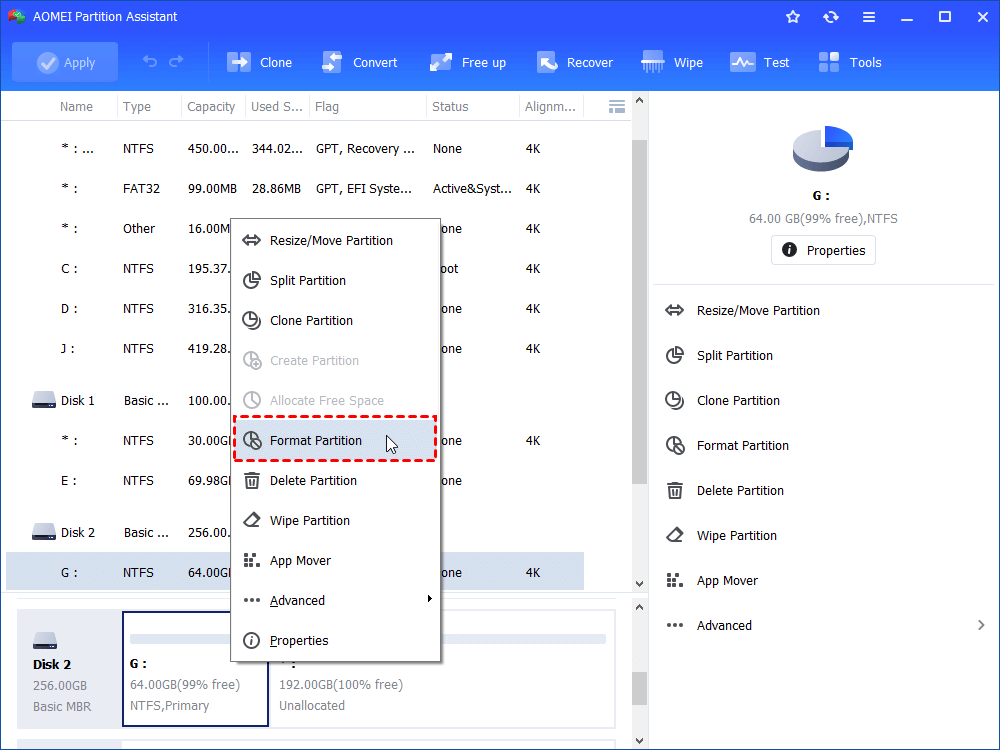
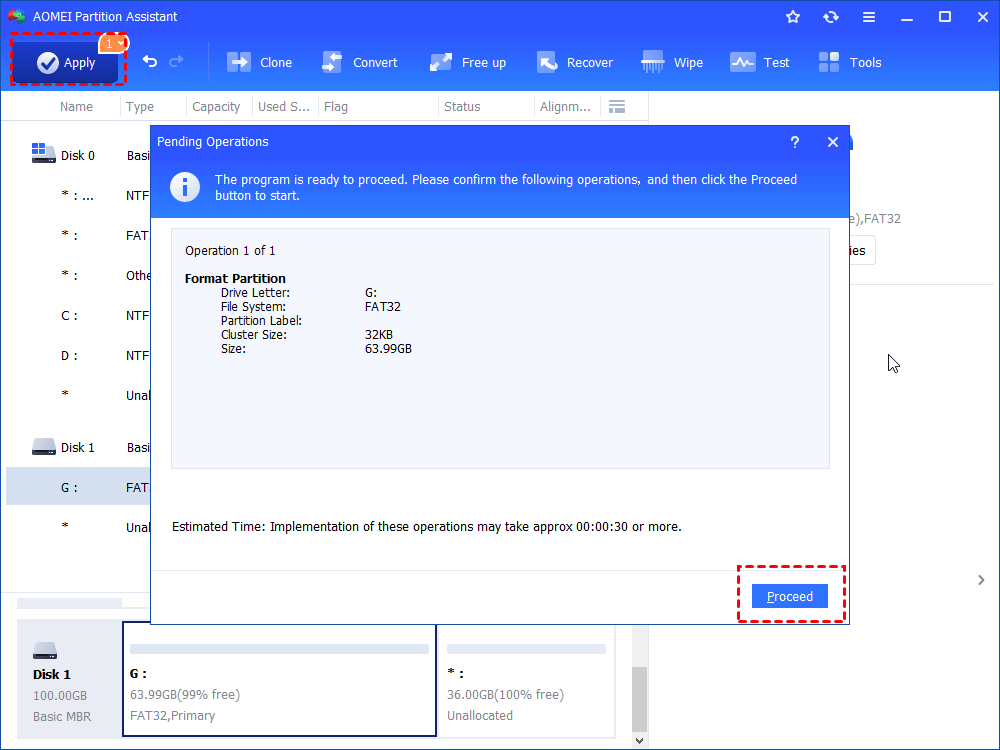
Step 1. Run AOMEI Partition Assistant. In the main interface, right-click the partition on the USB flash drive and choose “Format Partition”.
Step 2. In this small window, choose one among the listed file systems and click “OK”. During this process, it is available to change “Cluster Size” or add “Partition Label”.
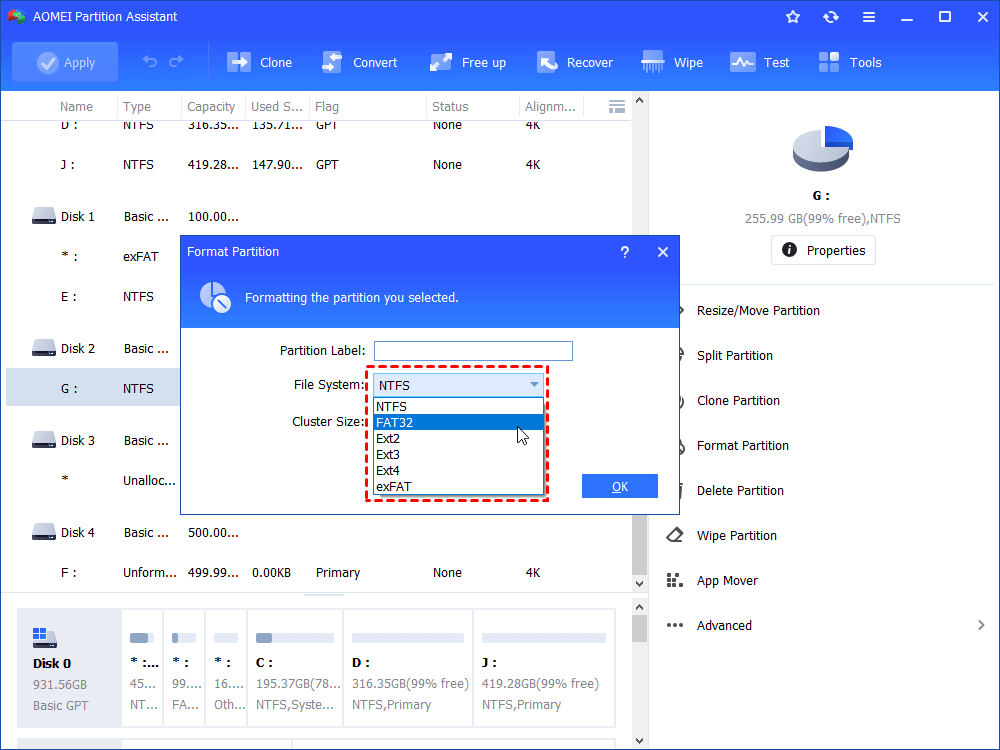
Step 3. You’ll return to the main interface. Click “ Apply”>“ Proce ed” to perform pending operation.
Verdict
Whether you want to resize partition on USB flash drive or format partition over 32GB to FAT32, this great USB flash drive partition tool – AOMEI Partition Assistant Standard can be your nice choice. It can also help you to partition SD card, partition hard drive successfully. You can complete more operations, like recovering deleted partition on USB flash drive, you can upgrade to Professional.


