- Windows 10 Disk Management — The Built-in Disk Partition Manager
- About Windows 10 Disk Management
- Extend Partition with Windows 10 Disk Management
- Better partition&disk management tool for Windows 10/8/7
- Method 1: Extend partition when there is non-contiguous unallocated space
- Method 2: Extend partition when there is no unallocated space
- AOMEI Partition Assistant Pro Vs Windows 10 Disk Management
- How to Partition a Hard Drive
- Hard drives must be partitioned before being formatted in Windows
- What to Know
- What Is Partitioning?
- How to Partition a Hard Drive in Windows
- Advanced Partitioning
Windows 10 Disk Management — The Built-in Disk Partition Manager
Windows 10 Disk Management is a built-in tool which can be used to create, delete, format, extend and shrink partitions, and initialize a new hard drive as MBR or GPT.

By AOMEI  / Last Updated November 27, 2020
About Windows 10 Disk Management
Windows 10 is the latest Operating System (OS) released by Microsoft. It improves much compared with Windows 8 such as adding the Start Menu seen in Windows 7, a virtual desktop system, a voice assistant named Cortana, Xbox app and streaming, and Edge browser.
Disk Management is a built-in tool in Windows 10 which is widely known by PC users. It is able to help you manage hard disk partitions without rebooting system and any interruption. It is a convenient tool for Windows 10 users. The features of Windows 10 Disk Management are as follows:
Create, delete and format partitions.
Change drive letter and paths.
Mark partition as active.
Explore partition to view files.
Extend and shrink partition.
Initialize a brand new disk before you can use it.
Convert empty MBR to GPT disk, and vice versa.
Convert empty dynamic disk to basic disk.
Extend Partition with Windows 10 Disk Management
Maybe most of Windows 10 desktop and laptop users have come across the problem of low disk space, especially for system partition. With Disk Management in Windows 10, you can reduce the influence of low disk space in some ways. To use this tool, you should know how to open Windows 10 Disk Management, so we introduce 3 ways for you.
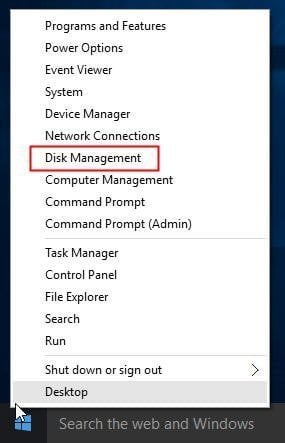
Way 1: The easiest way to open Disk Management in Windows 10 is from computer Desktop. Right click on Start Menu (or press Windows+X hotkey) and then select «Disk Management».
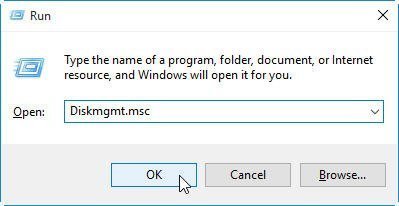
Way 2: Use Windows+R hotkey to open Run window. Then type «Diskmgmt.msc» and click «OK» or hit «Enter» key.
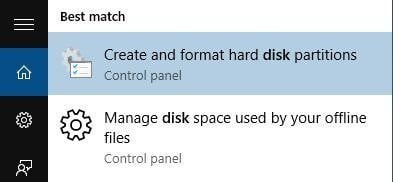
Way 3: Directly type «disk management» in the Search box and choose «Create and format hard disk partitions» from the results.
After you open Disk Management, right click the partition you would like to expand and then choose Extend Volume (e.g. C partition).

When you use Windows 10 Disk Management to extend a partition, sometimes you may find the Extend Volume option is grayed out.

Is there something wrong with this tool? No, the reason is that the function of Extend Volume in Windows 10 is only available when there is contiguous unallocated space behind the partition you would like to extend. What can you do when you don’t have unallocated space on hard drive?
Better partition&disk management tool for Windows 10/8/7
Fortunately, the third-party disk partition software — AOMEI Partition Assistant Professional allows you to extend partition whether or not there is unallocated space next to the partition you plan to extend. What’s more, you can even enlarge partition without unallocated space on hard drive. The following will show you 2 methods to extend partition with Partition Assistant.
Method 1: Extend partition when there is non-contiguous unallocated space
Before you do:
You can merge one or more parts of unallocated space into a partition.
«System Reserved» partition could not be merged.
If there is running applications in the partition you are going to operate, AOMEI Partition Assistant will suggest you to close them or perform the operation under PreOS Mode.
If there is no unallocated space on the disk, please go to Method 2.
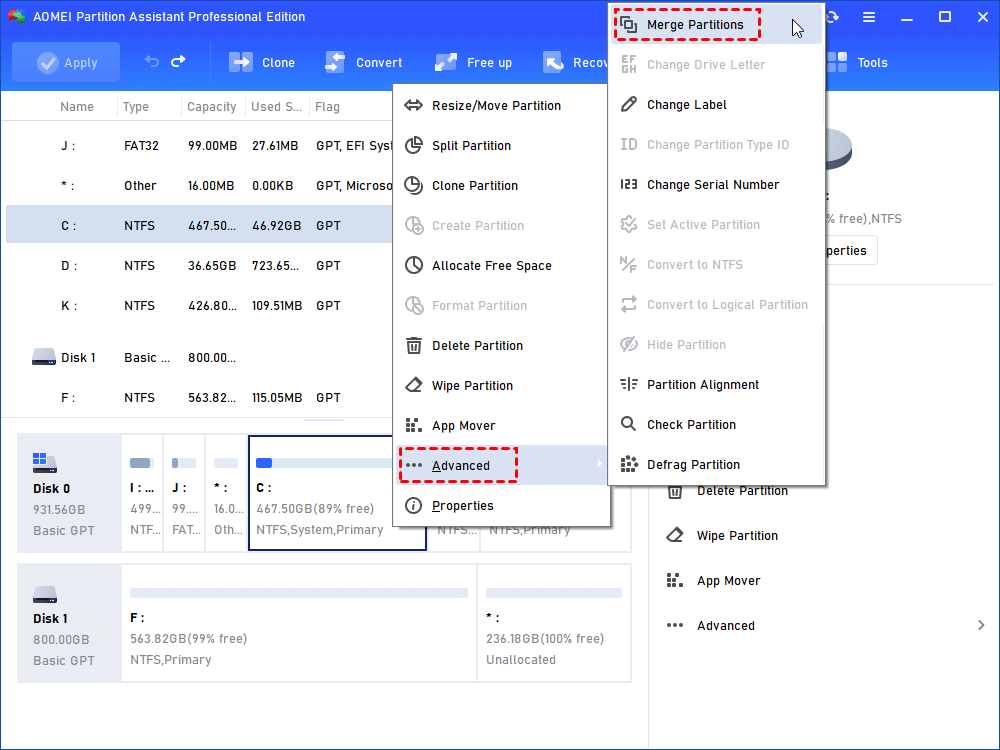
Step1. Install AOMEI Partition Assistant Professional and launch it. Right click on the partition you need to extend (e.g. D Drive) and choose Merge Partitions.
Step2. Tick the checkbox before the unallocated space and then click OK.
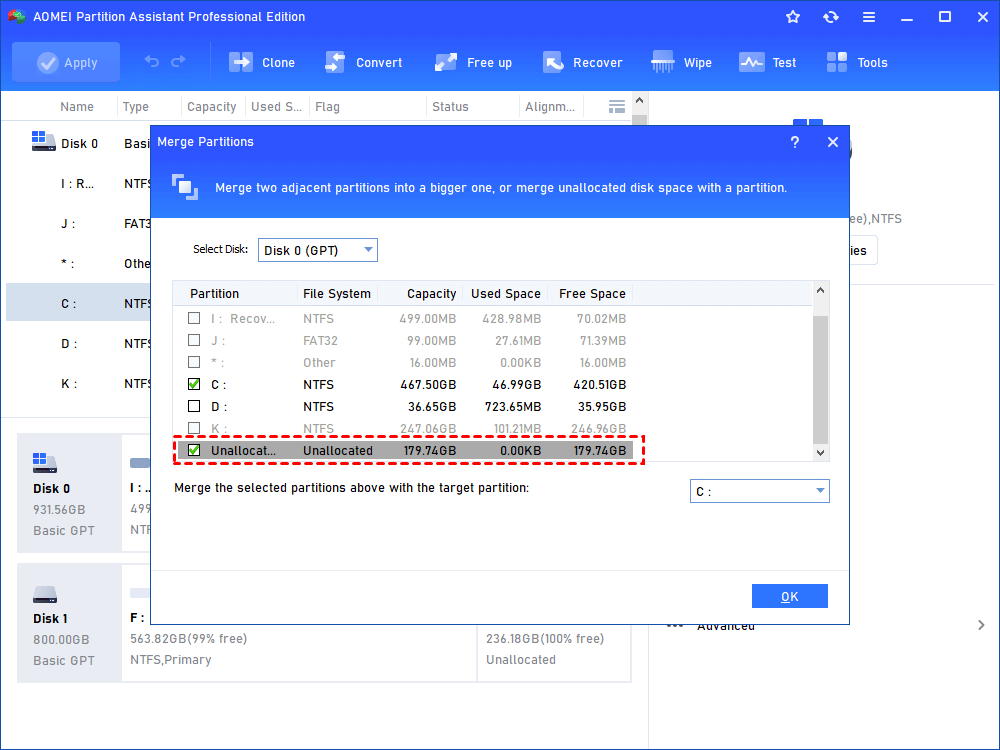
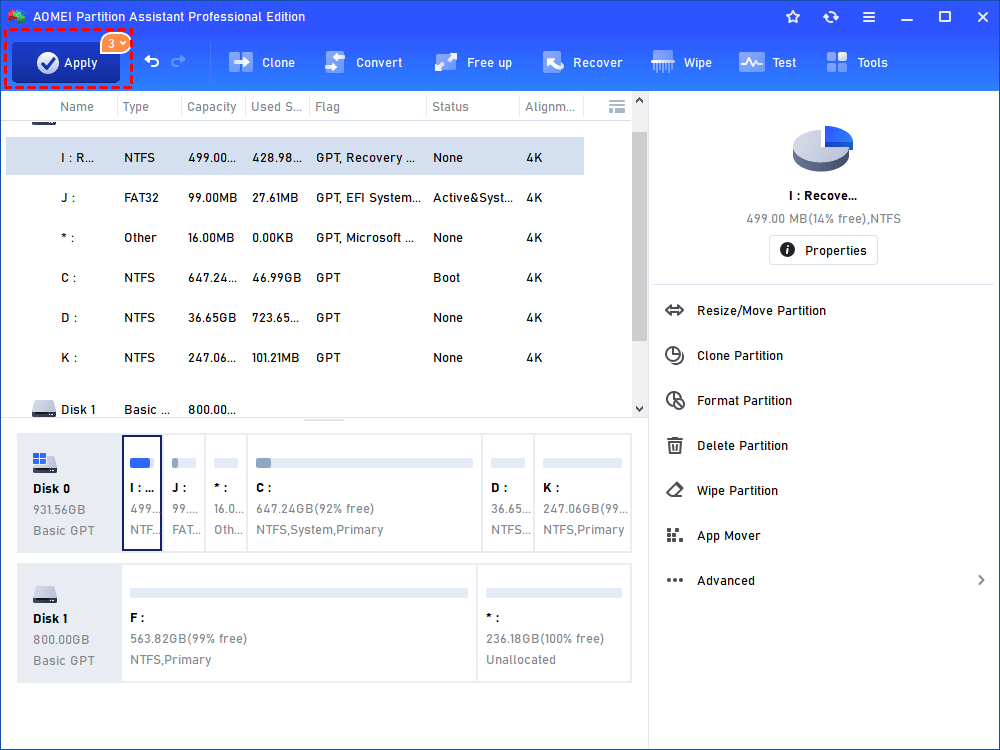
Step3. Now you can preview the unallocated space that has been added into C drive. To save the change, please click Apply button at the top left corner.
Method 2: Extend partition when there is no unallocated space
Before you do:
If there are four primary partitions on a MBR disk, and you want to split one of them, the partition that is being split will be converted to logical partition automatically.
If one disk has four primary partitions, the program would not allow you to split the system partition or boot partition, unless you could convert one of other partitions from primary to logical partition, and then the program will allow you to split system partition. The new generated partition will be automatically set as logical partition.
Step1. Open this software, right-click a partition which has enough space (here is D partition) and then choose Allocate Free Space.

Step2. Enter the size of free space you would like to add into another partition (here is C drive), and then click OK.

Step3. Now you can preview that some free space has been allocated to C drive from D partition. Click Apply to save the changes. Then you will extend partition C.

AOMEI Partition Assistant Pro Vs Windows 10 Disk Management
| Features | AOMEI Partition Assistant Pro | Windows 10 Disk Management | |
| Create partition, delete partition, format partition, change drive letter |  | | |
| Extend/Shrink NTFS partition | | | |
| Extend/Shrink FAT32 partition | |  | |
| Merge partitions, merge unallocated space, move partition | | | |
| Allocate free space from one partition to another | | | |
| Convert MBR to GPT disk, convert GPT to MBR disk without data loss | | | |
| Convert dyanmic disk to basic disk without data loss | | | |
| Convert primary to logical partition, convert logical to primary partition | | | |
| Convert NTFS to FAT32 without formatting | | | |
| Migrate OS to SSD or HDD | | | |
| Make Windows PE bootable disc | | | |
| Partition recovery | | | |
| Copy disk, copy partition | | | |
| Change serial number, change partition type ID | | | |
| Buy AOMEI Partition Assistant Pro Now and Get Limited-Time 18% OFF |
:max_bytes(150000):strip_icc()/tim-fisher-5820c8345f9b581c0b5a63cf.jpg)
:max_bytes(150000):strip_icc()/009_how-to-partition-a-hard-drive-2626081-5c82c5dc46e0fb0001cbf4cc.jpg)
:max_bytes(150000):strip_icc()/001_how-to-partition-a-hard-drive-2626081-5c82ad7c4cedfd000190b160.jpg)
:max_bytes(150000):strip_icc()/002_how-to-partition-a-hard-drive-2626081-5c82c62d46e0fb00010f10b6.jpg)
:max_bytes(150000):strip_icc()/003_how-to-partition-a-hard-drive-2626081-5c82adb846e0fb0001a0be31.jpg)
:max_bytes(150000):strip_icc()/004_how-to-partition-a-hard-drive-2626081-5c82add546e0fb0001a0be33.jpg)
:max_bytes(150000):strip_icc()/005_how-to-partition-a-hard-drive-2626081-5c82adf64cedfd000190b164.jpg)
:max_bytes(150000):strip_icc()/006_how-to-partition-a-hard-drive-2626081-5c82ae1c46e0fb000113662e.jpg)
:max_bytes(150000):strip_icc()/007_how-to-partition-a-hard-drive-2626081-5c82ae48c9e77c0001a3e4f4.jpg)
:max_bytes(150000):strip_icc()/008_how-to-partition-a-hard-drive-2626081-5c82ae75c9e77c0001a6761a.jpg)


