- Создание разделов на SD-карте памяти (Windows)
- Best Free Partition Tool for SD Card — MiniTool Partition Wizard [Partition Manager]
- Summary :
- Quick Navigation :
- About SD Card
- How to Partition SD Card Easily
- ABOUT THE AUTHOR
- Free Partition Tool for SD Card Download (Windows 10, 8, 7)
- Why Need Partition Tool for SD Card?
- Download the Best Free SD Card Partition Tool for PC
- Steps to Partition SD Card in Windows PC
- Summary
- How To Partition A USB Or SD Card With Disk Management In Windows 10
- Partition A USB Or SD Card
- Drive Is Not Visible
- 3 Comments
Создание разделов на SD-карте памяти (Windows)
Воспользуйтесь разбивкой карты памяти с помощью компьютера в случае, если разбивка средствами Вашего Android-устройства не поддерживается.
Внимание! Перед выполнением нижеописанных операций рекомендуем создать резервную копию данных на карте памяти!
Итак, у нас в наличии та же карта что и в примере для предыдущей статьи.

Выключите Android-устройсво, извлеките карту памяти, поместите её в картридер ноутбука или компьютера используя microSD > SD переходник (обычно поставляется вместе с картой памяти).

Запустите программу с ярлыка на рабочем столе или через меню «Пуск» Windows. В открывшемся окне нажмите на кнопку «Launch Application».

Щелкните по карте памяти в списке главного окна приложения, затем нажмите на кнопку «Move/Resize Partition» на панели кнопок сверху.

В открывшемся диалоге возьмитесь указателем мыши за правый край раздела и передвиньте его влево, при этом в самом нижнем поле «Unallocated Space After» Вы будете видеть, сколько места появилось для создания нового раздела.

Нажмите на кнопку «OK», диалоговое окно закроется, а в главном окне программы нажмите на неразмеченную область, помеченную звездочкой, и на панели сверху нажмите на кнопку «Create Partition».

На предупреждение о том, что новый создаваемый раздел не будет доступен в Windows, нажмите на кнопку «Yes».

В появившемся диалоговом окне, в списке «Create As» выберите пункт «Primary». В списке «File System» можно выбрать один из следующих пунктов: «Ext2», «Ext3» или «Ext4» (для приложения Link2SD лучше выбрать «Ext2») и нажмите на кнопку «OK».

Для запуска выполнения запланированных операций нажмите на кнопку «Apply» в главном окне приложения.

В появившемся сообщении, предупреждающем о том, что желательно отключить энергосберегающий режим в компьютере и закрыть остальные работающие приложения, нажмите «OK».

Запустится процесс форматирования, по завершении которого Вы получите сообщение об успешном выполнении всех операций.
Когда Вы вставите карту памяти назад в Android-устройство, то в настройках памяти увидите, что её размер уменьшился на значение, равное созданному размеру второго созданного раздела (не отображаемого в Android).

Если по какой-то причине Вы захотите вернуть состояние карты памяти к первоначальному (чтобы был лишь один раздел занимающий все место на SD-карте), воспользуйтесь одной из следующих инструкций:
Best Free Partition Tool for SD Card — MiniTool Partition Wizard [Partition Manager]
By Rodin | Follow | Last Updated November 29, 2020
Summary :
How to partition SD card? Here in this article you will find a wonderful SD partition tool to partition SD card in Windows 10/8/7 within simple steps, and it is called MiniTool Partition Wizard.
Quick Navigation :
About SD Card
SD card (Secure Digital memory card) is a kind of tiny storage device developed by Matsushita, SanDisk, and Toshiba and is specially designed to use in portable devices. Today SD card has been widely applied in digital cameras, digital camcorders, handheld computers, mobile phones, media players, GPS receivers, video game consoles, and so on.
There are several types of SD cards which can be simply categorized into full SD card, mini SD card, and micro SD card. The capacities of SD card typically can range from 1GB to 2TB (and even larger with time goes by). To help users better understand it, we have made a detailed table related to different SD cards:

Don’t hesitate to share this table to your friends.
How to Partition SD Card Easily
As we can see from the table, SD cards may have a huge capacity. Therefore, some users want to perform partition management with reliable partition manager to increase the internal storage of Android phones. MiniTool Partition Wizard is such a reliable Partition Manager that works perfectly with SD card.
Partition Wizard Free Edition is a powerful SD card partition tool available for Windows home users, and is much more powerful than other partition software in the same category. With free MiniTool Partition Manager, you can Create Partition, Delete Partition, Format Partition, Move/Resize Partition, Split Partition, Copy Partition, Convert File System, Hide/Unhide Partition, Explore Partition, etc.
As freeware, this partition software can take place of some expensive partition management software, such as Partition Table Doctor, Acronis True Image as well as Paragon Partition Manager.
Then let’s see how to partition SD card using MiniTool in Windows (compatible with Windows 10/8.1/7).
Before you do:
1. Download and install Free MiniTool Partition Wizard.
2. Connect SD card via card reader to computer (maybe a previous data backup is necessary).
3. Run MiniTool Partition Wizard Free.
Step-by-step guide:
Step 1: Launch MiniTool Partition Wizard to the main interface and then your SD card is displaying there. If there is no partition on the SD card, please move to Step 3 to partition micro SD card.
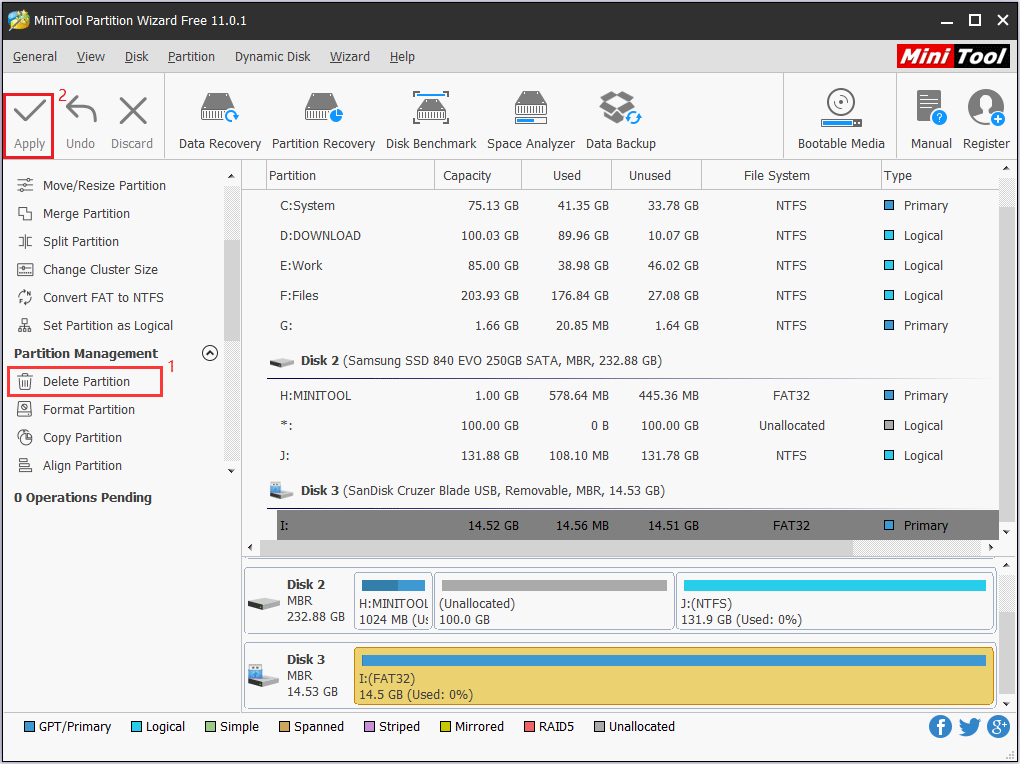
Step 2: Right-click on the SD partition and choose Delete, then click Apply to make it an unallocated space for further use.
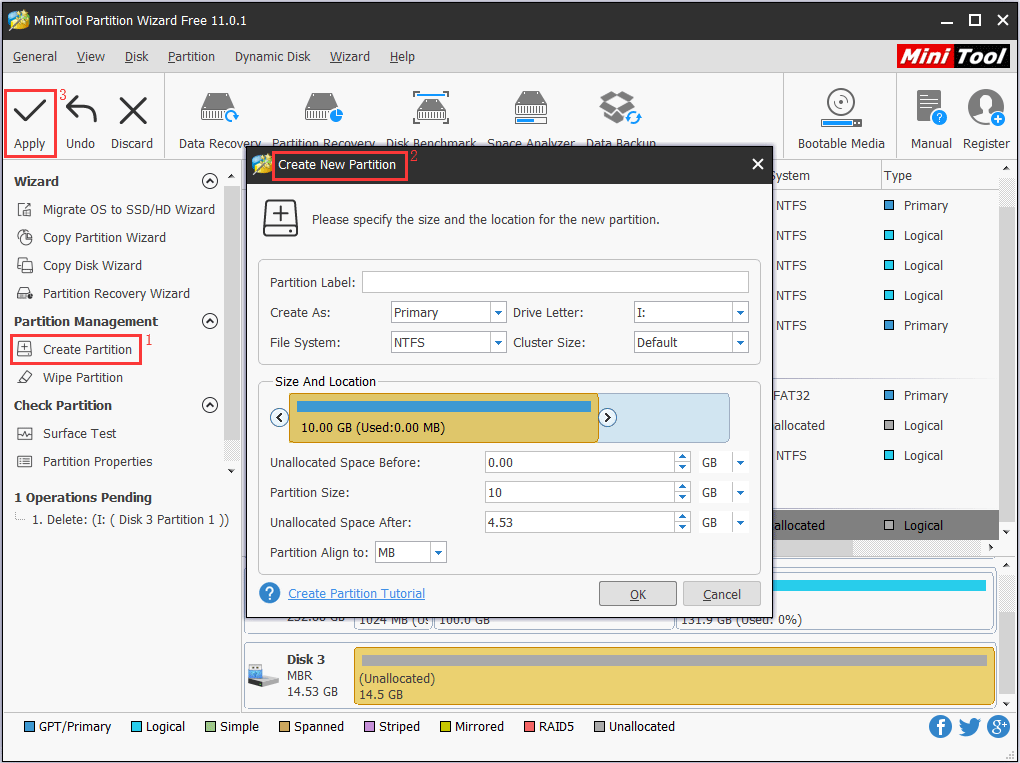
Step 3: Follow the sequence in the picture to create a new partition on the SD card. Please specify the parameters of SD partition (partition label, drive letter, file system, partition size…) on your demands.
Kind remind: Please note that Windows OS earlier than1703 can only recognize and display the first partition on a removable disk.
That’s all for how to partition SD card Windows 10/8/7. Like this post? Share with your social circle!
In addition to partitioning full SD card, mini SD card, and micro SD card, this SD card partition tool can also be applied to partition local hard drives and external hard drives. Now it is your turn to download this free SD partition tool to have a try!
ABOUT THE AUTHOR

Position: Columnist
Rodin is an enthusiastic IT writer focusing on Windows trends, disk partition management and data recovery. She loves to write and share her idea about the useful tips and tricks on personal computers’ maintenance.
If you are looking for methods to improve your computer performance, manage hard drives and recover data from different devices, Rodin can provide reliable solutions for data management.
Free Partition Tool for SD Card Download (Windows 10, 8, 7)
Here, you can free download the best partition tool for SD card, with which you can easily partition your (Micro) SD card in Windows 10, 8, 7.
![]()
By Teresa  / Last Updated December 23, 2020
Why Need Partition Tool for SD Card?
SD cards like SDXC and micro SD card play an important role in storing personal files nowadays. They are largely used in Android devices such as Android phone and Android tablet, PlayStation Consoles like PS3 and PS4, Nintendo 3DS, as well as in XBOX 360. A partition tool for SD card will help users manage SD card space to gain better performance. Briefly, there are two main reasons that need a partition manager for SD card in Windows.
вњ”Convert file system via partition tool. As we know, SD card, in most cases, has only one partition that has been formatted to exFAT, FAT or FAT32. In a few situations, NTFS file system is required. However, most devices compatible with SD card support only FAT32 file system. For example, you need to format SD card for 3DS from NTFS to make it work. To switch file system between NTFS and FAT/FAT32, a partition manager is of great help.
вњ”Resize existing partition and create new partition for better management. As covered before, SD card comes as an entirety and there is only one partition. Nevertheless, this partition layout can be changed. Although Windows PC recognizes only the first primary partition of removable device and you cannot manage partitions of SD card in Windows 7/8/10, the rest partition will be recognized by other systems like Linux and Android. Therefore, repartitioning SD card will help you manage data in order.
Download the Best Free SD Card Partition Tool for PC
It is too bad that you cannot resize SD card and create a new partition there using Windows Disk Management. When right-click the removable device, SD card in Disk Management, you’ll find both “Extend Volume” and “Shrink Volume” are grayed out. The “Format” option is functional, and you can format the SD card to NTFS, FAT32 and exFAT. Got a sigh of relief? I don’t think so. SD card becomes larger and larger in capacity, and Windows will not let you format removable device that is larger than 32GB to FAT32. For example, you cannot format 64GB SD card to FAT32 via Windows tool. What’s worse, formatting will wipe all data on SD card, which is not a smart way to choose.
Fortunately, AOMEI Partition Assistant Standard, a free yet powerful partition tool for micro SD card, will help you manage partitions in a great status. It allows you to resize SD card partition and create new partitions in Windows. Changing file system without formatting is also available, let alone to format it to a desired file system. It has a user-friendly interface and is compatible with Windows 10, 8.1/8, 7, Vista and XP. You can download it and the following will walk you through how to partition SD card in Windows 7.
Steps to Partition SD Card in Windows PC
Install this freeware. Connect SD card to PC via SD card reader, and be sure it is detected. This example shows how to create another new partition from the existing SD card partition, just like splitting your SD card into two partitions.
1. Start AOMEI Partition Assistant Standard. The SD card will be displayed as removable device. Right-click the SD card and select “Create Partition”.
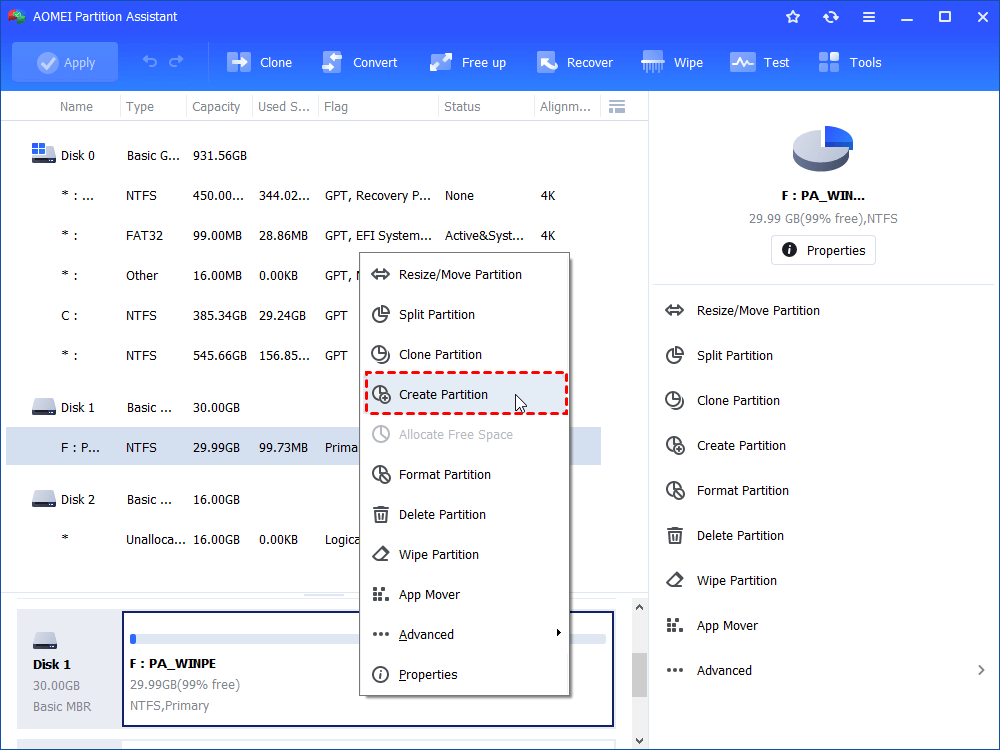
2. In the pop-up window, specify partition size through the double-head arrow or you can input the size manually. Drive letter could be ignored since it won’t be recognized by Windows.
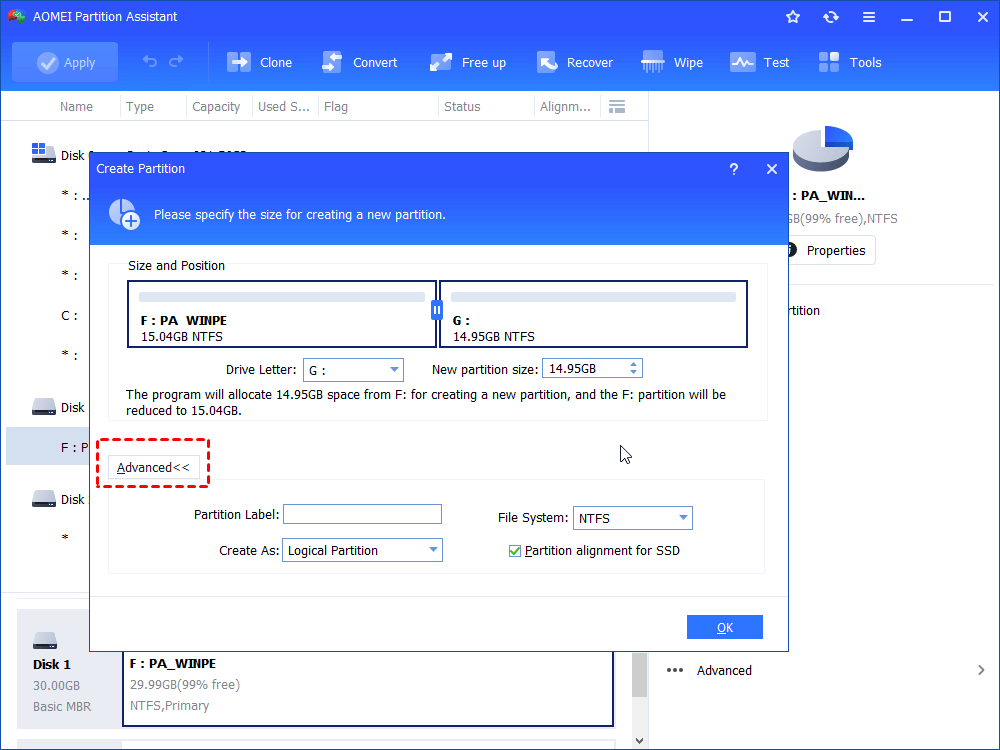
3. Click “Apply” to execute this operation.
4. The process in the example takes up less than one minute. After that, you’ll find one more partition next to the first one.
Tip: When you insert this SD card to other devices with other systems, the second partition will be recognized.
Summary
It is very simple to partition a SD card with the help of AOMEI Partition Assistant, isn’t it? In fact, as a partition tool for SD card, you can use it to partition USB drive in the same way. To enjoy more advanced features like “Allocate Free Space”, «Migrate OS to SSD”, “Align SSD partitions”, and more, you can upgrade to Professional edition.
How To Partition A USB Or SD Card With Disk Management In Windows 10
Nov 13, 2017
Comment
Disk Management is a stock utility in Windows that can manage drives and create partitions of your hard drive. It’s great with both hard drives and SSDs. It’s not so great with a USB or a Micro SD card. In fact, up until the Windows 10 Anniversary update, you couldn’t partition a USB or SD card with disk management. You had to go through the command line and even then, only one partition would appear in File Explorer because Windows didn’t support multiple partitions on USB drives and SD cards. The Creators Update has fixed both these shortcomings. Here’s how you can partition a USB or SD card with disk management in Windows 10.
Partition A USB Or SD Card
Step 1: Insert the USB drive you want to partition. We partitioned an 8GB USB for this tutorial. The USB was blank and newly formatted, and that’s the safe way to go. If you have data on your USB, it’s a good idea to back it up elsewhere.
Step 2: Open Disk Management via Windows search. You will see your USB appear in the list of connected drives. Right-click it and select “Shrink Volume” from the context menu.

Step 3: Select the size of the partitions you want to make. You can accept the suggested disk size, or you can enter a custom one. If you have files in the drive, it won’t let you shrink the drives down to a size where the files will not be able to fit inside either one of the drives. This is why it’s best to start with an empty USB or SD card.

Step 4: It doesn’t take long to partition the drive. Once it’s done, you will see your USB or SD card in Disk Management. At this point, you will only see one partition while the other will appear as an unallocated space.

Step 5: Right-click the unallocated space and select “Create Simple Volume” from the context menu. Follow the on-screen instructions and don’t change anything under the size options. Leave them as they are automatically set. When asked, select a letter to assign the drive,

Step 6: On the Format Partition screen, select ‘NTFS’ from the File system dropdown. Uncheck the quick format option and allow Disk Management to format the drive. When formatting completes, you should see the second drive appear in File Explore.

Drive Is Not Visible
In the event the second partition of your USB isn’t visible in File Explorer, connect your USB to your system and open Disk Management again. You will see two partitions under one USB. It will likely say the second partition is RAW.
Right-click it and select the Format option from the context menu. You only need to make sure a full format is done and that the files system it is partitioned on is NTFS. After the partition has been formatted, it will no longer appear as RAW space. Again, right-click it and select “Chang Drive Letter and Path” from the context menu.

Assign the drive a letter and you’re done. Once the letter has been assigned to the drive, File Explorer will show you the second partition.

3 Comments
The reason being that my sd card was formatted as FAT32. Windows Disk Management does not support FAT16, FAT32, exFAT file systems, it only supports NTFS. So, I formatted my sd card with file system selected as NTFS. The Shrink Volume option works now.


