- How to Partition USB Drive in Windows 7/8/10 Simply?
- How to partition USB drive using Diskpart?
- Partition USB drive with AOMEI Partition Assistant
- Conclusion
- Creating Multiple Partitions on a USB Drive in Windows 10
- How to Create Multiple Partitions on a USB Drive in Windows 10?
- Partition USB Drive in Windows 10 Using DiskPart
- Create Multiple Partitions on a USB Flash Drive Using PowerShell
- Full Guide to Create (Multiple) Partition on USB Drive in Windows [Partition Magic]
- Summary :
- Quick Navigation :
- How to Partition a USB Drive
- Delete Partition
- How to Create Multiple Partitions on USB Flash Drive
- Way 1. Split partition into several parts – works for FAT and NTFS partitions
- Way 2. Resize and create – works for FAT and NTFS partitions
- Best Partition Manager for USB Drive
- Format Partition
- Convert between FAT and NTFS
- Wipe Disk/Partition
- Bottom Line
- Partition USB Drive FAQ
- ABOUT THE AUTHOR
How to Partition USB Drive in Windows 7/8/10 Simply?
Learn how to multi partition you Kingston/Sandisk external USB flash dirve using Diskpart and free partition manager AOMEI Partition Assistant in Windows 10/8/7/XP.
![]()
By Teresa  / Last Updated February 13, 2019
USB hard drive or memory card, as the removable storage, is the most ordinary device in people’s daily life. They are widely used for storing important data and files, system backup images, for example. One of the most important advantages of them, when put into use is their portability. People can transfer data and files between computer and different removable storage devices conveniently and smoothly.
Sometimes, you do need to multi partition your Kingston or SanDisk USB drive, like create a partition or format one partition. For example, the file system of your memory card is showing RAW, it means the partition on the flash drive is corrupted or lost. You need to create a new partition first and then format the damaged one.
Therefore, the question of how to partition USB drive will come into your sight. Actually, you can perform this task using both Diskpart and free partition manager — AOMEI Partition Assistant Standard. Connect USB drive to your PC first and make sure it is detected by Windows.
How to partition USB drive using Diskpart?
Firstly, open Diskpart by pressing Windows key and R key (same time), type in “diskpart” in the pop-up window and then hit Enter. For Windows 7 and XP, click on Windows icon, select “Command Prompt” & click “Run as Administrator”. For Windows 8, press Windows key and X key (same time), click “Command Prompt (Admin)”.
Note: To execute a command line, please press Enter key after your each move.
Secondly, enter “list disk”. Then you will see all your disks (it is important you know which disk is the USB key).
Thirdly, enter “select disk *” (* stands for the USB key)-> enter “clean”-> “list part”.
Fourthly, enter “create partition primary”-> “list part”, and then enter “select part 1”-> “active”-> enter “format fs=fat32 label=’Tabernus’” (label is optional).
The process may take some time. However, all steps in Diskpart are irreversible. So to get better simple and easy-to-use solution, you’d better turn to AOMEI Partition Assistant for help. As a mighty and comprehensive partition manager, AOMEI Partition Assistant can help you under following cases:
- USB drive partition has been corrupted.
- Format USB hard drive or memory card that command line doesn’t work.
- Resetting and wiping out all existing data to become a blank USB drive.
- Make a bootable USB drive.
- Simply reset and reformat a USB drive.
This free tool allows you to partition USB flash drive to NTFS or FAT32 in Windows 10/8/7/XP. Download AOMEI Partition Assistant Standard free edition and have a try.
Partition USB drive with AOMEI Partition Assistant
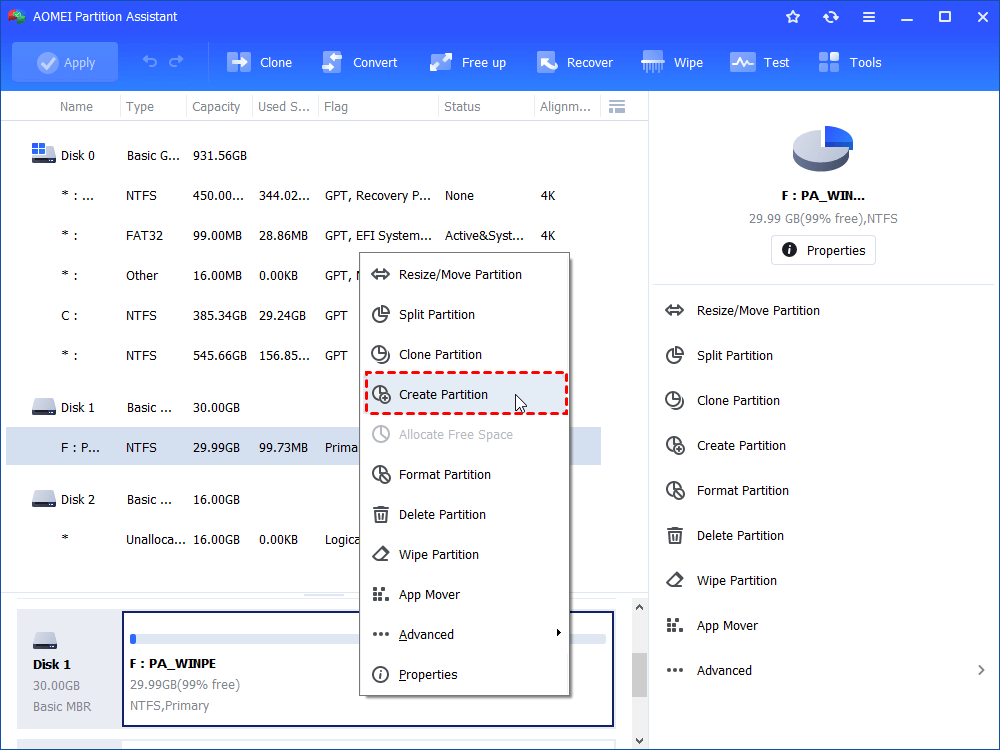
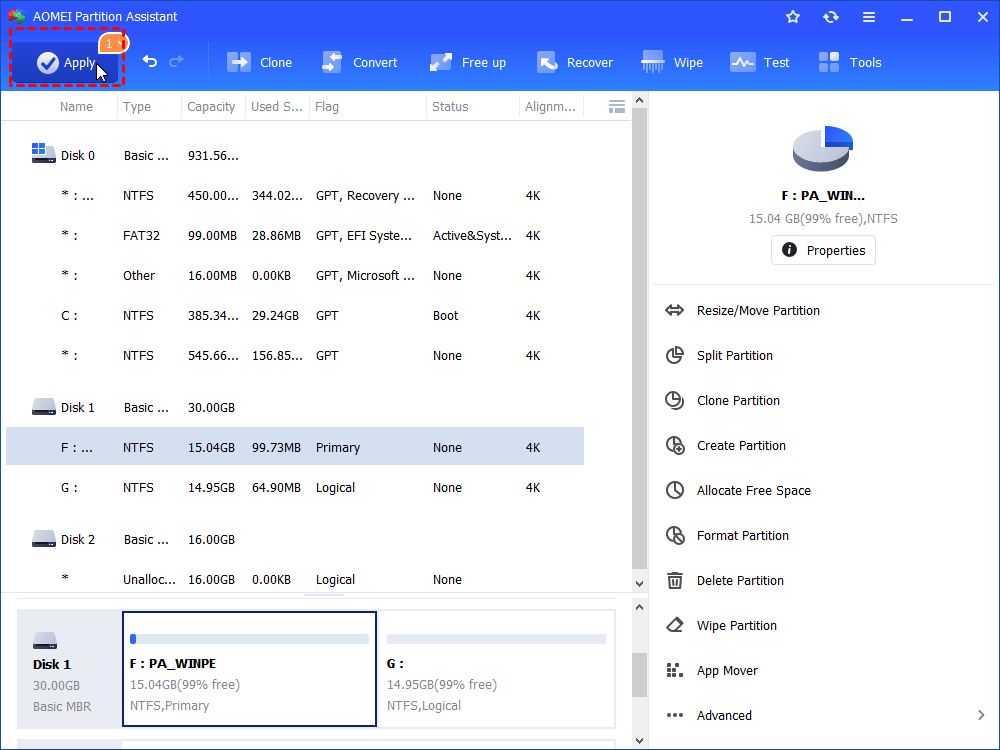
Step 1. Install and launch AOMEI Partition Assistant. Right-click the USB drive, select “Create Partition”. You can pitch on the USB drive and select “Create Partition” on the left panel, too.
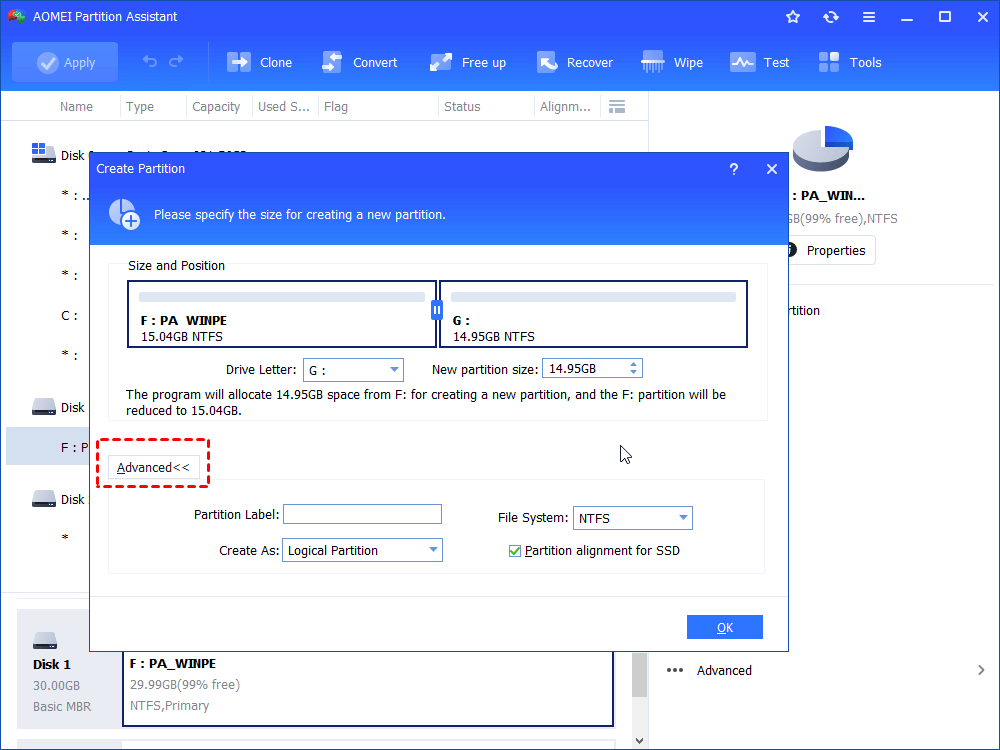
Step 2. Specify the size and drive letter for the new partition. You can also edit partition label, file system under Advanced tab.
Step 3. Then you get a new partition G: in your USB drive. Click “Apply”.
Tips:
*You can multi partition your USB drive via AOMEI Partition Assistant by repeating above steps.
*Please note that Windows will recognize only the first primary partition on a removable device. Therefore, after this operation, the second partition will not have a drive letter and showing in Windows Explorer. However, you can keep two partitions be recognized in other operating systems like Linux.
Conclusion
Here two ways on how to partition USB drive in Windows are offered. You can easily find out which one is simpler and more straightforward. With AOMEI Partition Assistant, you can partition your USB drive in three simple steps instead of complicated command line operations. Other than partitioning USB drive, you can partition C drive, merge partitions or convert NTFS to FAT32 without data loss using AOMEI Partition Assistant. However, nothing is going to be changed unless you download it and start to use it, so just enjoy it. If you have more demands like quick partition, migrating OS from GPT to GPT and so on, you can upgrade AOMEI Partition Assistant to Professional edition.
Creating Multiple Partitions on a USB Drive in Windows 10
Full multiple partitions support for any USB storage device has appeared in Windows 10 starting with build 1703 (Creators Update). Now, a Windows 10 user can get access to all partitions on a USB flash drive (or SD card), as well as create multiple logical partitions on such a media using the built-in OS tools. Previously, when connecting a USB stick with several partitions (that were created on Linux or using third-party tools) to a computer running Windows, the OS displayed only the first primary partition (all other partitions were ignored). Normal operation with multiple partitions in Windows was available only for the drives identified as fixed (non-removable/local).
Windows 10 Creators Update (and newer) automatically displays all partitions available on a USB stick or SD card and ignores the RMB bit. In this case, the USB drive is still identified as a Removable device.
How to Create Multiple Partitions on a USB Drive in Windows 10?
Let’s try to create several partitions on a USB stick in Windows 10. Suppose that a primary partition is already created on the USB stick, which occupies the entire volume of the USB media. We will compress it and create the second (and subsequent) partitions:
- Connect the USB stick to the computer’s USB port;
- Format the USB flash drive in the NTFS file system and then open the Disk Management (diskmgmt.msc) console;
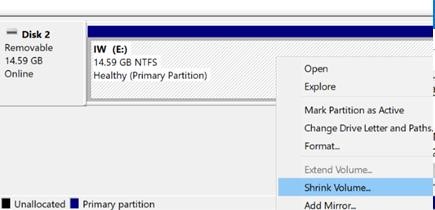
- Right-click the partition on the USB stick and select Shrink Volume in the context menu;

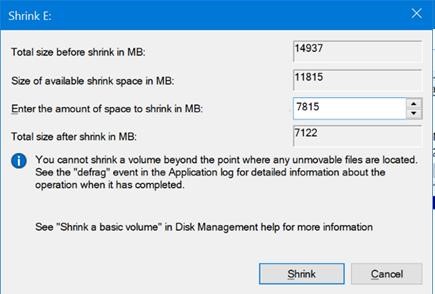
- Specify the size of free space after shrinking and click Shrink. For example, we want to create two partitions of 7 GB and 8 GB on the 15 GB USB flash device;
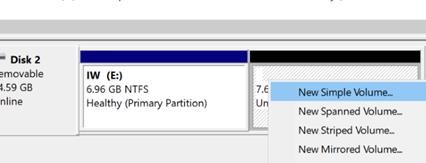
- Right-click on the unallocated disk area and select New Simple Volume to create an additional partition;
- Select the drive letter, volume label and file system type (I formatted the second partition in the FAT32 file system).
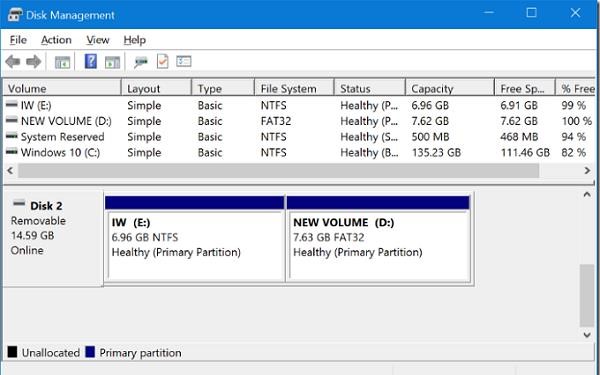
As you can see, we have got the USB stick with two partitions. The first partition is formatted in NTFS, and the second in FAT32. Both partitions are displayed in Windows and ready to use.
Partition USB Drive in Windows 10 Using DiskPart
You can also create several partitions on a USB flash drive using the DiskPart CLI tool. In this example, we will create two partitions: the first partition with the FAT32 file system, and the second with NTFS (you cannot create the first partition with FAT32 from the GUI of the Disk Management console).
Open an elevated command prompt and run the DiskPart command. In the context of Diskpart, you must run the following commands one by one:
list disk
select
clean
create partition primary size=3000
format quick fs=fat32 label=»FirstFAT32Partition»
assign letter=J
active
create partition primary
format fs=ntfs quick label=»Data(NTFS)»
assign letter=K
list vol
exit
Create Multiple Partitions on a USB Flash Drive Using PowerShell
You can also create several partitions on a USB flash drive using PowerShell cmdlets from the built-in Storage module.
Get the USB disk ID on your computer:
Delete the existing partitions on the USB drive:
Get-Partition –DiskNumber 1 | Remove-Partition
Use the following PowerShell commands to create two logical partitions on a USB flash drive and format them:
New-Partition –DiskNumber 1 -Size 4gb -DriveLetter J
Format-Volume -DriveLetter J -FileSystem NTFS -NewFileSystemLabel USBVol1
New-Partition –DiskNumber 1 –UseMaximumSize -DriveLetter K
Format-Volume -DriveLetter K -FileSystem Fat32 -NewFileSystemLabel USBVol2 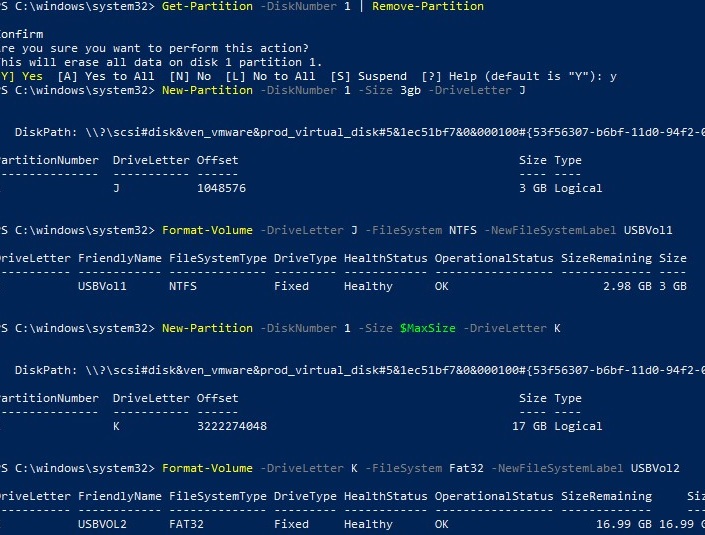
Keep in mind that USB sticks with multiple partitions will be correctly displayed only on Windows 10 1703 and newer. In earlier versions of Windows, only the first partition will be still displayed.
Why might you need several partitions on a USB flash drive?
Full Guide to Create (Multiple) Partition on USB Drive in Windows [Partition Magic]
By Rodin | Follow | Last Updated November 22, 2020
Summary :

You may want to partition a USB drive because it’s portable and convenient to use. This post will show you several solutions to how to partition a USB drive that you can choose from. With the step and screenshots to each method, you are able to operate step by step according to the instructions.
Quick Navigation :
While many users use USB drives to save data and keep it carry-on due to its increased capacity and small size, they sometimes need to repartition the USB drive. For instance, since Windows 10 Version 1703 supports multiple partitions on removable media like USB Sticks, they want to divide the USB drive into several parts because of its large capacity. Or they want to recreate partition on the USB drive because it has a RAW file system or has an unsupported file system.
Do you know how to partition USB drive? Follow our guide if you haven’t come up with any good idea.
Partition Wizard is the best partition tool for SD card that provides safe and easy partition features, with which users can manage SD partitions without any difficulty.
How to Partition a USB Drive
How to partition USB flash drive? When it comes to USB drive management, users are suggested to download MiniTool Partition Wizard Free to do the job.
The reason? As one of the best disk partition managers, MiniTool Partition Wizard Free is not only easy to use but also is full of abilities. For instance, it can create/resize/merge/split/delete/format partition on USB drive, copy partition on USB drive, wipe USB drive, and more. Besides, this partition manager is very easy to use even for green hands. Its clear interface and user-friendly wizards can lead you to go over the steps without any difficulty.
To partition a USB drive, see the details below:
Create Partition
If there is no partition on the USB drive or the partition gets deleted/lost, you will need to create a new partition on it before you can use it. Here is how to use MiniTool Partition Wizard to partition USB thumb drive.
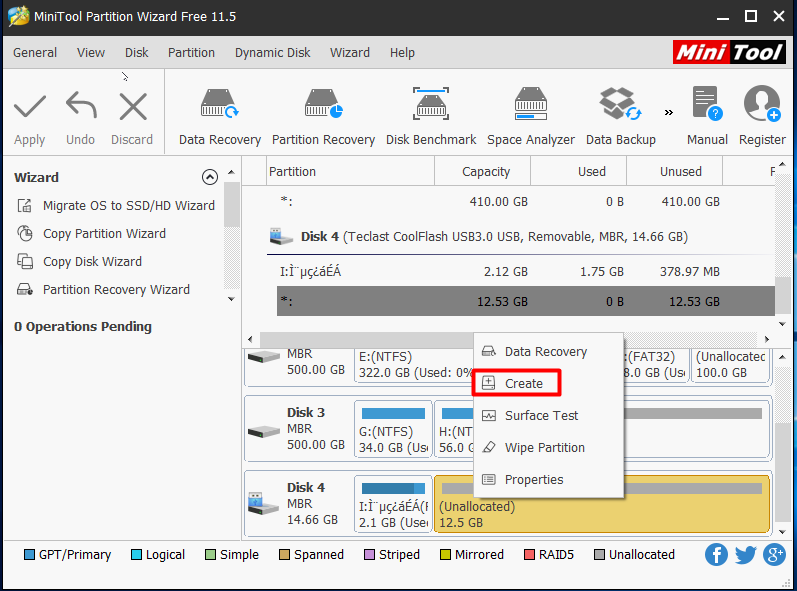
- Launch MiniTool Partition Wizard to get the main interface. Then at the disk map area, select the unallocated space on the USB drive and choose Create Partition from the action panel.
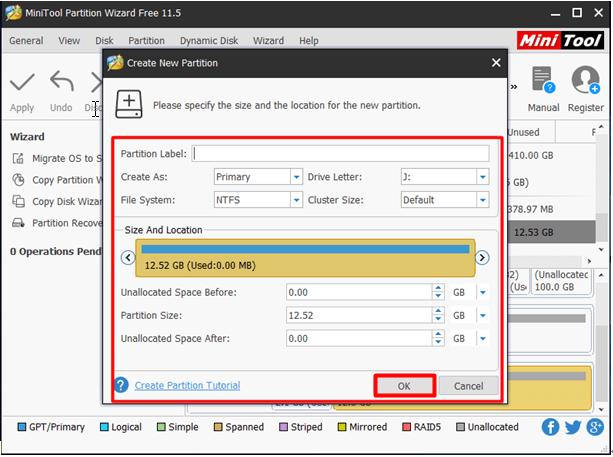
- In the new emerging window, customize the partition label, partition type, drive letter, file system, cluster size and adjust the partition size by moving the slider bar or entering partition size before you click OK button.
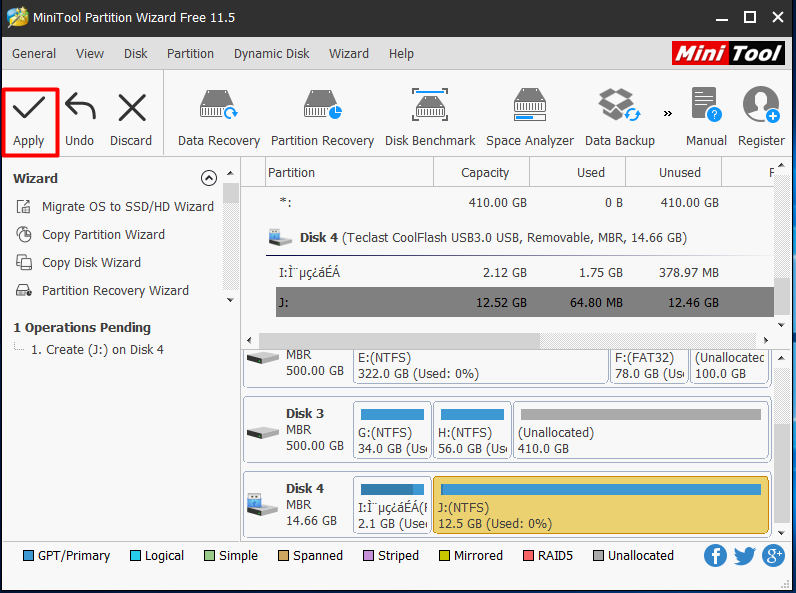
- In the end, click Apply to save this change.
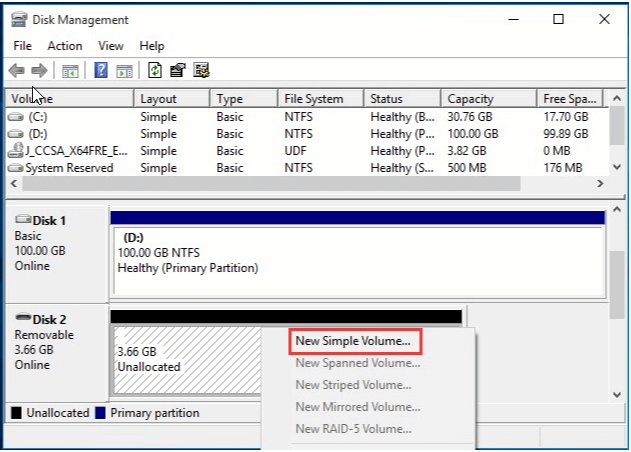
In Disk Management (you can run «diskmgmt.msc» to get its main window or you can right-click This PC, choose Management and then Disk Management to reach this interface), right-click on the unallocated space of the USB drive and choose «New Simple Volume» feature from the context menu. Follow the instruction of the wizard to finish the process by determining the volume size, drive letter, file system, allocation unit size and volume label by yourself.
In CMD, type the following commands and end up each one with the Enter key.
- Diskpart
- List disk
- Select disk n (n should be replaced with the exact disk number of the USB drive)
- Create partition primary size=n (note that n represents the volume size and the unit is MB)
- Format quick
- Exit (exit diskpart)
- Exit (exit CMD)
Delete Partition
In short, if a partition on the USB drive is no longer needed, you can go ahead and delete it. Also, to reparation USB hard drive, you may need to delete the existing partitions and then create new partitions with the desired partition size and file system.
MiniTool Partition Wizard Free makes it easy for you to delete partition. See the guide below:
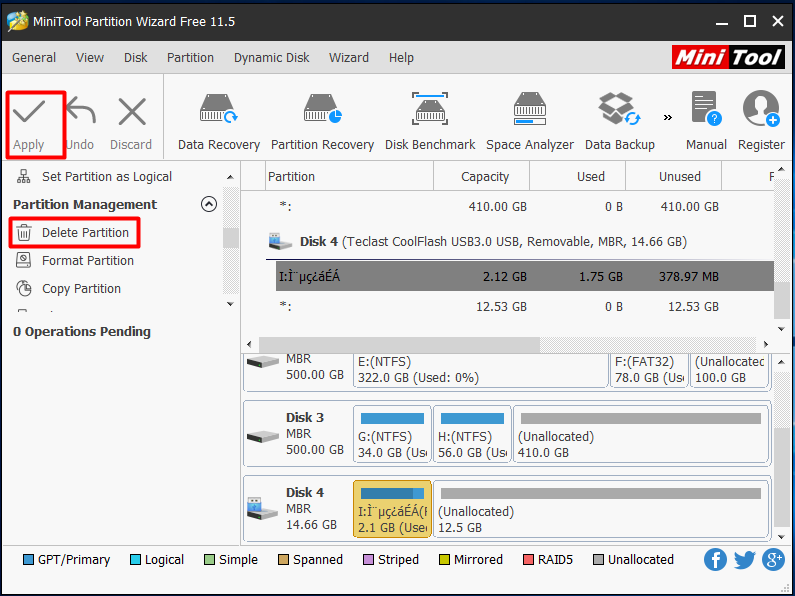
- Select the partition on the USB drive and choose Delete Partition from the action panel.
- Click Apply on the toolbar to execute. After a minute, the partition turns into unallocated space.
Now you can select the unallocated space and then choose Create Partition. Then follow the wizard to finish.
How to Create Multiple Partitions on USB Flash Drive
Is it possible to create multiple partitions on a USB flash drive?
Since Windows 10 Version 1703 supports multiple partitions on removable disks, users are eager to know how to create multiple partitions on USB drive. After all, the capacity of USB drive keeps increasing and it is unwise to put all eggs in one basket. Here you can find the easiest way to do this task.
MiniTool Partition Wizard Free is also the best recommendation. Like what we have mentioned in the beginning, it offers Split Partition feature that helps divide a partition into several parts. What’s more, more solutions are offered by this flexible partition manager. Detailed steps are shown below:
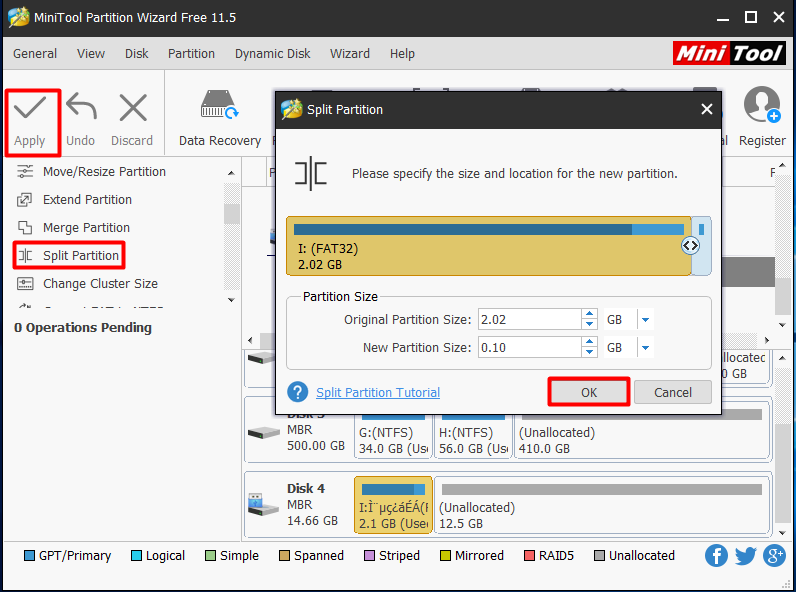
Way 1. Split partition into several parts – works for FAT and NTFS partitions
- Select the USB drive partition and choose Split Partition from the action panel.
- In the Split Partition window, you see MiniTool Partition Wizard automatically divides the partition into two parts and determines their partition size for you. But you can also move the slider leftwards/rightwards to determine the partition size by yourself. After doing this, click the OK button.
- Click Apply on the toolbar and confirm the operation if you see a prompt message.
Repeat the above steps if you want more partitions.
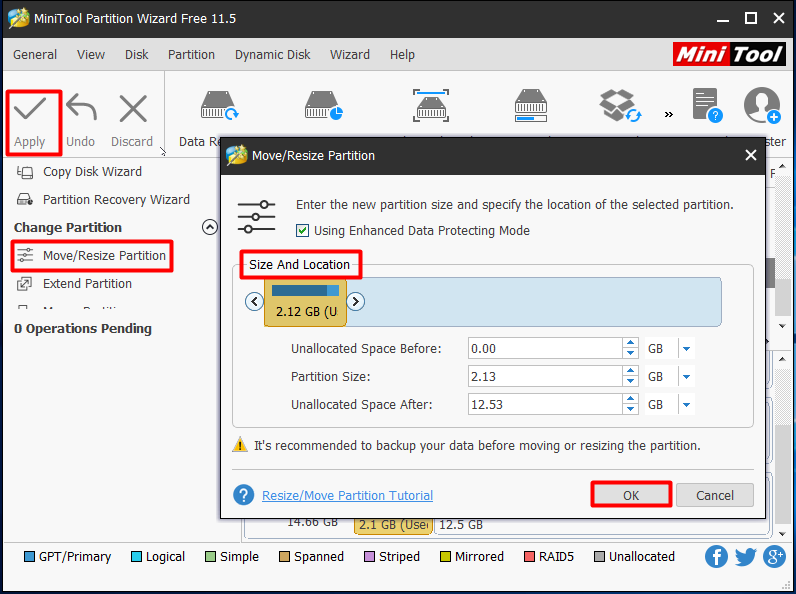
Way 2. Resize and create – works for FAT and NTFS partitions
The second choice for you is to shrink the current partition and then make use of the unallocated space to create new partitions.
- Select the partition on the USB drive and choose Move/Resize Partition from the left panel.
- In the Move/Resize Partition window, drag the slider leftwards to allocate some disk space. You can also accurate the partition size by entering the partition size directly. Then click OK to go back to the main interface.
- Click Apply.
- Select the unallocated space just released and choose Create Partition from the left panel. Follow the guide to finish creating another partition.

What if the partition has other file systems instead of FAT and NTFS? In that case, you should first of all back up important data first, delete the existing partition then and create partitions one by one on the USB drive finally.
It is said that you can also create multiple partitions on USB drive within Disk Management on condition that the operating system your PC is running is Windows 10 Version 1703. Please make sure the most recent version of Windows ADK is installed. Then you can follow the guide below to create multiple partitions on USB drive:
- Right-click the partition on the USB drive and select «Shrink Volume» from the context menu. (Tip: you should know that Windows can only shrink a partition that has NTFS or RAW file system. Hence, you need to format the partition to NTFS if it has other file systems.)
- Immediately Disk Management is querying shrink space for you. In the next interface, you can enter the amount of space to shrink in MB and then click Shrink button.
- Now right-click on the unallocated space released just now and then choose «New Simple Volume«. Follow the New Simple Volume Wizard and determine the volume size, drive letter, file system, allocation unit size, volume label and click Next -> Finish.
Knowing how to partition USB flash drive/thumb drive, how to further manage the already created partitions? Don’t worry, MiniTool Partition Wizard makes everything easy. Here we would like to show you some features that can be used frequently.
Best Partition Manager for USB Drive
From the above operations you know MiniTool Partition Wizard is really of great help when it comes to partitioning hard drive. In fact, it is much more powerful. Here you can see more features it owns to help you manager USB drive batter.
Format Partition
As USB drives are always taken away and connected to computers with different operating systems, sometimes you may find the USB drive is not accessible on a different PC. Besides, a USB drive may become inaccessible because of the RAW file system and Windows asks you to format it. If these are the cases you encounter, you should consider changing the file system of the USB drive.
But how to change file system when a partition is already created? The easier way we think is to format the hard drive with new file system. But remember formatting will lead to data loss, so you need to transfer important files to a safe location beforehand to avoid data loss.
- Select the USB partition and choose Format Partition from the action panel.
- Drop down the file system list to choose the file system you need before you click OK.
- When you see the main interface again, press Apply on the toolbar.

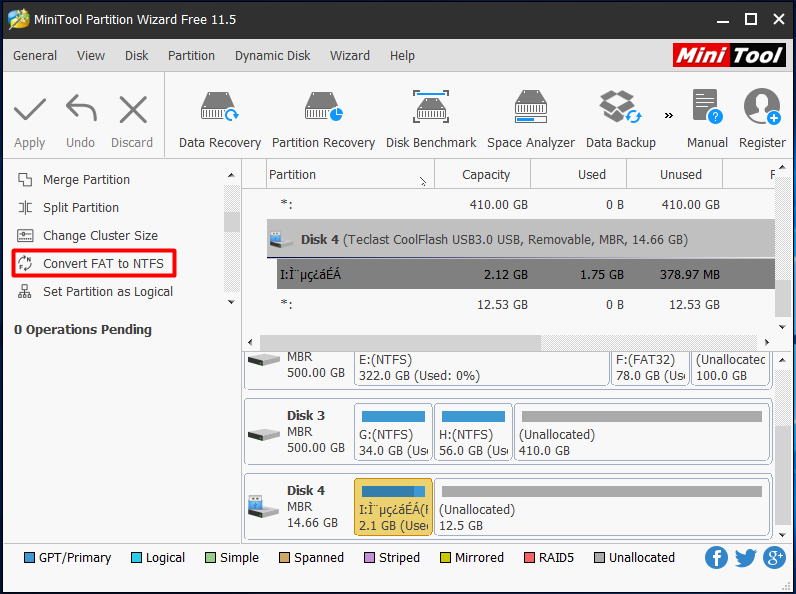
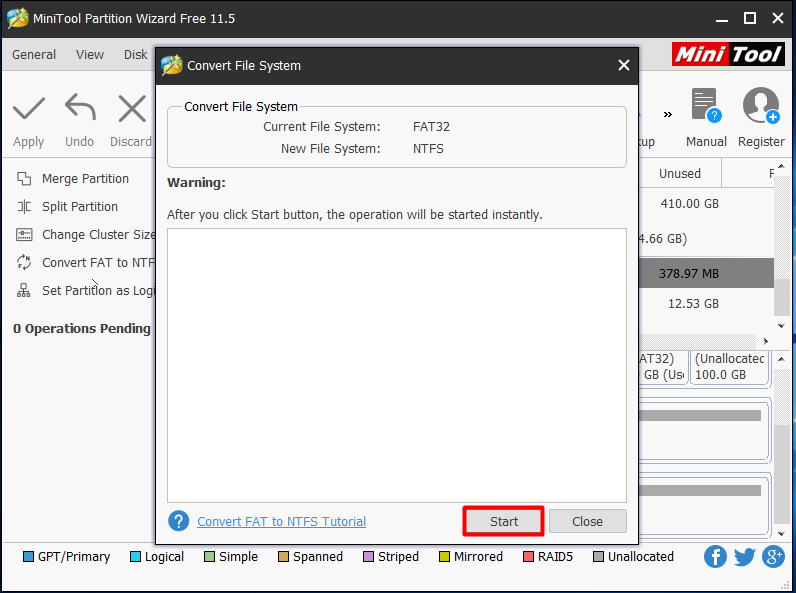
Convert between FAT and NTFS
Sometimes you may just want to convert a FAT/FAT32 partition to NTFS because you are going to save individual files larger than 4GB to the USB drive but Windows says «file is too large for the destination file system». MiniTool Partition Wizard helps you do the conversion without data loss. Just select the FAT/FAT32 partition on the USB drive and choose Convert FAT to NTFS from the action panel and then click Start button in the pop-up window.
Also, if you use the USB drive on PS3/PS4 to play games, you will find that NTFS is not supported. In this case, you have to convert the NTFS partition to FAT32. Similarly, MiniTool Partition Wizard offers the way to convert NTFS back to FAT32 without data loss. However, you should know this is a paid feature that is available only in the Pro and more advanced editions (view Edition Comparison). Get a copy of the Pro edition if you are interested.
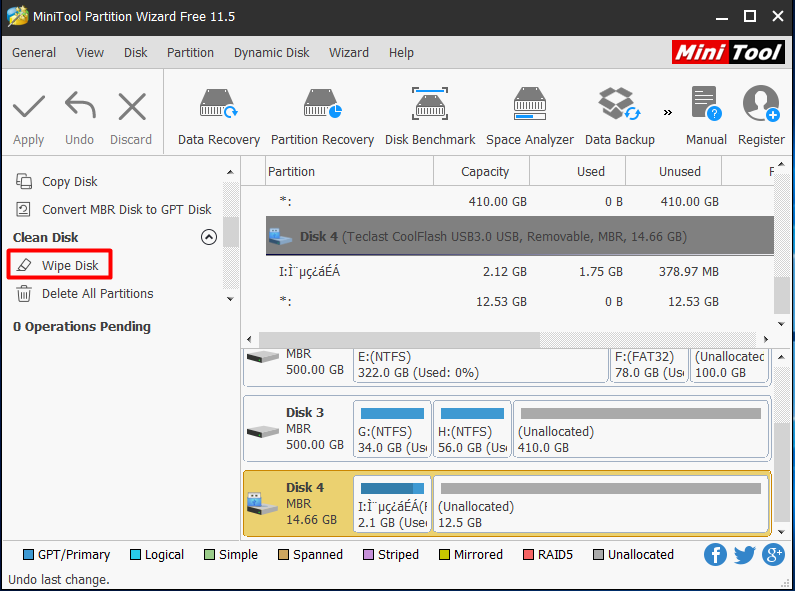
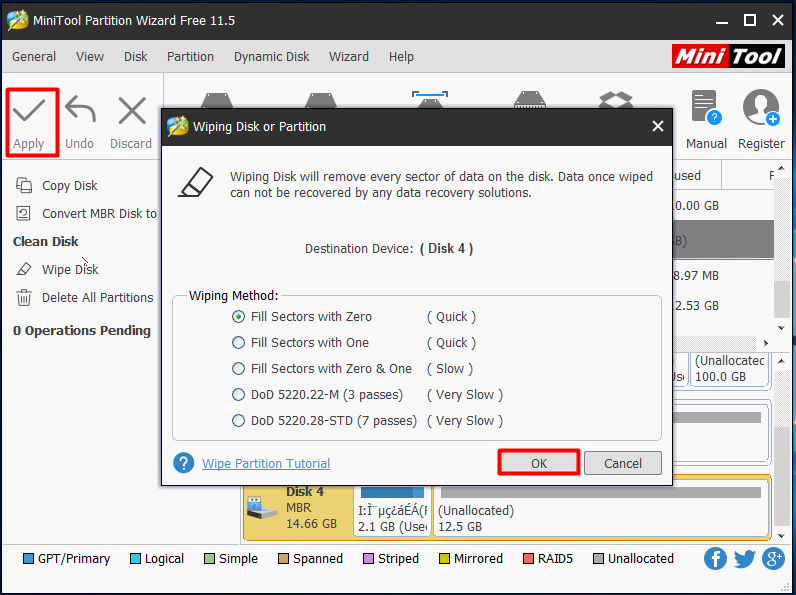
Wipe Disk/Partition
In many cases, a USB drive can be used by multiple people. So it is significant to prevent privacy from leakage. As we know, professional data recovery software can easily recover lost/deleted data from deleted/formatted/damaged partitions. The safest way to prevent privacy leaks is to wipe the disk partition thoroughly. Luckily, MiniTool Partition Wizard offers such kind of features called «Wipe Disk» and «Wipe Partition».
We take Wipe Disk for instance.
- Select the USB drive from the disk map, and then choose Wipe Disk from the action panel.
- In the pop-up window, select a wiping method and click OK to return to the main interface. Note that the slower the wiping process, the higher security you get. However, to maintain the service life of the USB drive, do not wipe disk frequently unless you have to do it.
- Click Apply on the top left corner. Note that the wiping process can last long, please wait patiently.
Bottom Line
Here comes to the end of this post. Now you know how to partition USB flash drive and how to create multiple partitions on USB flash drive. We hope you can benefit from this post. If you have any questions or nice suggestions while using MiniTool Partition Wizard, welcome to leave us comments in the following section. Also, you can contact our support by sending an email to [email protected] . Much appreciated!
Partition USB Drive FAQ
Usually, you are suggested to partition USB drive using free partition manager MiniTool Partition Wizard.
- Connect the USB drive to computer.
- Launch MiniTool Partition Wizard.
- Find the USB drive in the disk map of MiniTool Partition Wizard.
- Create multiple partitions if the USB drive is whole unallocated or split partition if it has a big partition.
To make an active partition on a UBS flash drive, using MiniTool Partition Wizard Free to help:
- Connect the USB flash drive to computer.
- Run MiniTool Partition Wizard Free and get its main interface.
- Select the partition on the flash drive you want to set active and choose Set Active.
- Click Apply on the toolbar.
ABOUT THE AUTHOR

Position: Columnist
Rodin is an enthusiastic IT writer focusing on Windows trends, disk partition management and data recovery. She loves to write and share her idea about the useful tips and tricks on personal computers’ maintenance.
If you are looking for methods to improve your computer performance, manage hard drives and recover data from different devices, Rodin can provide reliable solutions for data management.


