- Partitioning
- Disks and partitions under Linux
- Dedicated /home partition
- Top 6 Partition Managers (CLI + GUI) for Linux
- 1. Fdisk
- 2. GNU Parted
- 3. Gparted
- 4. GNOME Disks a.k.a ( GNOME Disks Utility)
- 5. KDE Partition Manager
- 6. Qtparted
- If You Appreciate What We Do Here On TecMint, You Should Consider:
- Linux Mint Forums
- [Linux Mint 19 + Cinnamon] Manual install: Correct Partition sizes, Partition Order, File System types, and Encryption..
- [Linux Mint 19 + Cinnamon] Manual install: Correct Partition sizes, Partition Order, File System types, and Encryption..
- How to partition your hard drive to install Linux Mint
- How to partition your hard drive for Linux Mint
- The swap file
- About Sergey Tkachenko
- 30 thoughts on “ How to partition your hard drive to install Linux Mint ”
Partitioning
Disks and partitions under Linux
If you are not familiar with the Linux naming scheme for devices and partitions, or the concept of filesystems and mount points, read:
Dedicated /home partition
In Linux, the /home directory is used to store user data and preferences.
This directory contains one subdirectoy for each user account. Say your username is john , your home directory is /home/john , your downloads are in /home/john/Downloads , your documents in /home/john/Documents , your Firefox bookmarks somewhere in /home/john/.mozilla and so on…
By giving /home its own dedicated partition, you separate the user data from the rest of the operating system.
The advantage is that you can wipe the operating system and replace it without affecting the user data.
When installing Linux Mint:
- Assign the / mount point to the partition dedicated to the operating system, and tell the installer to format it.
- Assign the /home mount point to the partition dedicated to the user data, and if it contains user data already, make sure to tell the installer not to format it.
This is not recommended for novice users. A misstep during the installation could wipe all your data. Always make backups, make sure to select the right partitions and to carefully review formatting options.
A Linux Mint operating system takes about 15GB and grows as you install additional software. If you can spare the size, give it 100GB. Keep most of your free space for the home partition. User data (downloads, videos, pictures) takes a lot more space.
© Copyright 2017, Linux Mint Revision 11740971 .
Источник
Top 6 Partition Managers (CLI + GUI) for Linux
Are you looking to tweak or manage your disks partitions in Linux? In this article, we will review some of the best tools that help Linux users partition and manage their disks. We will see both command line utilities as well as GUI applications for managing disk partitions in Linux.
I favor the command line over GUI (graphical user interface), I will start by describing the text based utilities and then GUI applications as follows.
1. Fdisk
fdisk is a powerful and popular command line tool used for creating and manipulating disk partition tables. It supports multiple partition tables formats, including MS-DOS and GPT. It provides a user-friendly, text based and menu driven interface to display, create, resize, delete, modify, copy and move partitions on disks.
![]() Fdisk Partition Tool
Fdisk Partition Tool
2. GNU Parted
Parted is a popular command line tool for managing hard disk partitions. It supports multiple partition table formats, including MS-DOS, GPT, BSD and many more. With it, you can add, delete, shrink and extend disk partitions along with the file systems located on them.
![]() Parted Partition Program
Parted Partition Program
It can help you create space for installing new operating systems, reorganizing disk usage, and move data to new hard disks.
3. Gparted
GParted is a free, cross platform and advanced graphical disk partition manager that works on Linux operating systems, Mac OS X and Windows.
![]() GParted Partition Manager and Editor
GParted Partition Manager and Editor
It is used to resize, copy, move, label, check or delete partitions without data loss, enabling you to grow or shrink root partition, create space for new operating systems and attempt data rescue from lost partitions. It can be used to manipulate file systems including EXT2/3/4.
4. GNOME Disks a.k.a ( GNOME Disks Utility)
GNOME Disks is a core system utility used for disk partition management and S.M.A.R.T monitoring. It is used to format and create partition on drives, mount and unmount partitions. It ships in with the well known GNOME desktop environment.
![]() Gnome Disks
Gnome Disks
Lately, it’s been gaining features for advanced usage. The latest version (at the time of this writing) has a new feature for adding, resizing partitions, checking filesystems for any damages and repairing them.
5. KDE Partition Manager
KDE partition manager is a useful graphical utility for managing disk devices, partitions and file systems on your computer. It comes with the KDE desktop environment.
![]() KDE Partition Manager
KDE Partition Manager
Most of its underlying work is performed by programs. It can be used to easily create, copy, move, delete, resize without losing data, backup and restore partitions. It supports various including EXT2/3/4, BTRFS NTFS, FAT16/32, XFS, and more.
6. Qtparted
In addition, you can also use Qtparted, is a Partition Magic (proprietary software for Windows) clone and Qt front-end to GNU Parted. Note that it still in development and you may likely experience any kind of problem with latest release. In that case try to use the CVS version or a previous stable version.
![]() QTParted Partition Magic
QTParted Partition Magic
It may not be one of the best options now but you can give it a try. More features are yet being added to it.
You might also like to read these following related articles.
These are the best partition managers and editors available for Linux operating systems. Which tool do you use? Let us know via the comment section below. Also let us know of any other partition managers for Linux, missing in the list above.
If You Appreciate What We Do Here On TecMint, You Should Consider:
TecMint is the fastest growing and most trusted community site for any kind of Linux Articles, Guides and Books on the web. Millions of people visit TecMint! to search or browse the thousands of published articles available FREELY to all.
If you like what you are reading, please consider buying us a coffee ( or 2 ) as a token of appreciation.

We are thankful for your never ending support.
Источник
Linux Mint Forums
Welcome to the Linux Mint forums!
[Linux Mint 19 + Cinnamon] Manual install: Correct Partition sizes, Partition Order, File System types, and Encryption..
[Linux Mint 19 + Cinnamon] Manual install: Correct Partition sizes, Partition Order, File System types, and Encryption..
Post by iunlock » Tue Oct 16, 2018 1:58 am
1024GB for Linux, nothing else.)
- 24GB RAM
- I am really OCD.
Instead of installing LM19 the default way of «Erase disk and install Linux Mint*,» I would like to install it manually via «Something else,» option so that I can:
- . manage the swap area to my desired size. (I don’t need 24GB of swap area. Is 1GB enough? I don’t use hibernate, sleep etc. )
- . possibly set aside some unallocated space for provisioning? (Even necessary for SSD health with newer drives?) Update: The answer is NO. Newer SSD’s come already provisioned from the factory so unless you plan to provision 10%, in my case 100GB which is unreasonable and irrelevant to my usage scenario, don’t bother provisioning.)
- . Encrypt the partitions / volumes that need to be encrypted.
Can someone please confirm the following and verify that the:
1. Partition Sizes,
2. Partition Order,
3. Mount points,
4. File Type(s)
. are all correct for a Manual Install?
=======================copy/paste================================
- Partition 1: boot /efi (512MB) -> fat32?
+ Type for the new partition: Primary
+ Location: Beginning of this space
- Partition 2: boot (732MB) -> ext4 or ext2?
- Partition 3: main partition (rest of what’s available) -> ext4
- Partition 4: swap (1GB) -> swap area
==========================end==================================
Questions:
The reason I have listed (boot /efi) and (boot) + the partition sizes shown is because that is what it showed in ‘gparted’ on my default* (Erase disk and install Linux Mint) install, therefore I had just mimicked that. Is having both even necessary?
When creating the boot partition, should I keep it ext4 (journaled) or ext2 (not journaled)? The boot partition doesn’t need to be journaled correct? If so, I’m curious as to why by default LM19 creates the /boot as ext4 if it doesn’t need to be journaled and why some people say to set it to ext2 since it does not need to be journaled?
* Please see the attached picture(s) of the gparted screen shot of my default* install. You’ll see that the first two partitions are boot/efi (fat32) and the second partition as /boot (ext4). Also, the swap area is nowhere to be seen as it’s hidden within the main encrypted volume, which is why I am not able to resize it.
It is to my understanding that only the boot /EFI needs to be first in order. Correct?
Encryption:
If I’m wanting to Encrypt my Home folder, should anything else be encrypted as well or is there no need to encrypt other non essential partitions such as the /boot etc. ?
Is it best to Encrypt everything or to leave everything unencrypted and to just encrypt individual folders within the system?
I’m aware that this is personal preference with the con’s of encrypting your drive, potentially making it difficult for when it comes to data recovery, but I was just curious what method some of you who do encrypt use.
For the other question specifically regarding encryption and swap area, please see the 3rd post below titled:
[Linux Mint 19 + Cinnamon] How to resize swap area on an encrypted volume?
Thanks in advance to those that can shed light on this. I really appreciate it very much. Upon my hours of researching this, there are so many ways around the mountain, but all I’d like for me and for others who may be seeking this info, is a clean, basic, straight forward and concise answer for a basic manual install.
Would you be able to please copy/paste the partition info above, make edits and reply as I’ll create it in that order when performing the manual install.
* I’ll update the OP accordingly for those who may be seeking this info in the future.
Источник
How to partition your hard drive to install Linux Mint
Starting today, I would like to cover Linux here at Winaero! There’s no need to panic. It will not replace our regular Windows articles and we will not shift the focus from Windows to Linux manuals and tutorials. However, it will be a nice addition for everyone who wants to give Linux a try for the first time if they are not satisfied with Windows. We will show on our blog how to prepare your PC to install Linux in a dual boot configuration. Today’s article is about how to partition the disk drive and optionally make it use a single partition. If you plan to switch to Linux in the future, or if you are just curious about this operating system, you will enjoy it.
These days, more and more users are interested in trying out some alternative OS besides Windows. The latest Windows versions have become unsatisfactory even for people who were in the Windows camp for many years.
Today, Linux has made huge strides in end user usability and aesthetics. Previously, it was a bit geeky and installation wasn’t that simple. You were given too many choices and still had to resort to the command line for some operation. Modern Linux distros have a simple graphical installer which makes installation a breeze. It is as easy as installing Windows.
How to partition your hard drive for Linux Mint
It is a myth that Linux requires many partitions on the hard drive. Actually, there is no reason to have lots of partitions. When installing, you can omit most of them and have only a single partition where your Linux distribution will be installed.
Personally, I prefer having the following partition layout:
/boot — 300MB
/ — root partition of 20 GB
/home — the largest partition.
/swap — 2 x size of RAM
The boot partition has the boot loader files. The root partition contains the operating system files, logs and configuration files. The swap partition is used when your system needs to move memory pages between the RAM and the disk. And the Home partition contains all the user data, that is why it has the largest size.
But there is no actual reason to have a separate /boot partition unless you have some exotic or encrypted file system for the root (/) partition which cannot be read by the Linux kernel directly.
The reason I made a separate /home partition is for data safety. That way, you can unmount the /home partition and perform system maintenance without risk of data loss. You can even reinstall the operating system and format all the other partitions and keep your /home partition with all your data and app preferences intact!
As I said above, you can omit all these separate partitions and you can have only the /root partition. As for the swap partition, you can instead have a swap file. A swap file is slightly slower than a dedicated partition but is still quite usable. If you worry about slowdown issues, then just create the swap partition 2 x the size of your RAM.
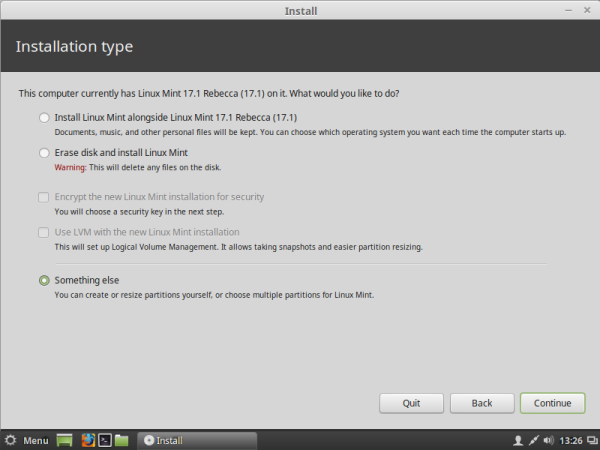
To create the desired partition layout when installing Linux Mint, switch the installer’s page to «something else»:
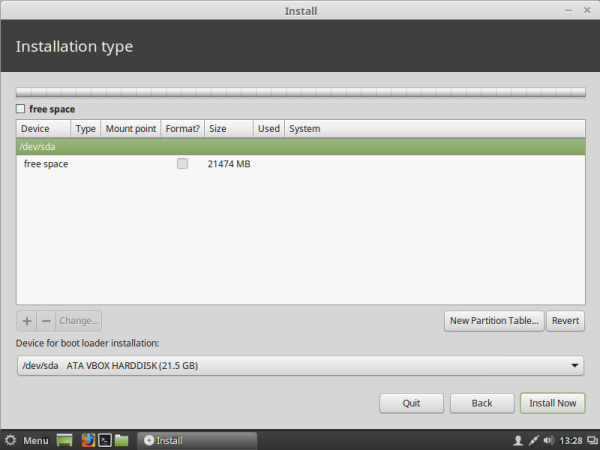
It will show you the partitions on your hard drive. Mine has no partitions:
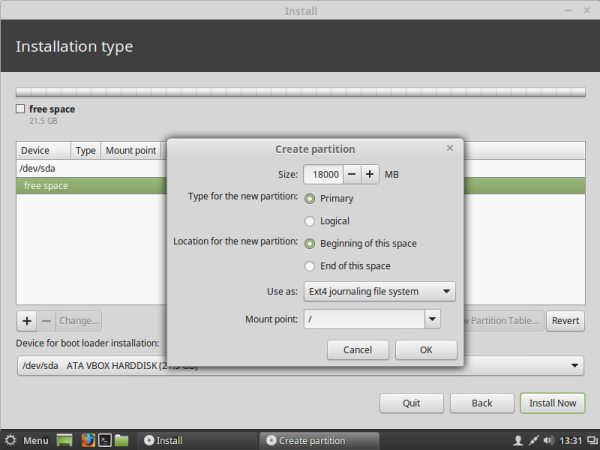
 Press the «+» button to add a new partition. Adjust the partition size you want to give to Linux Mint, set the mount point to «/» (root) and leave the file system as ext4:
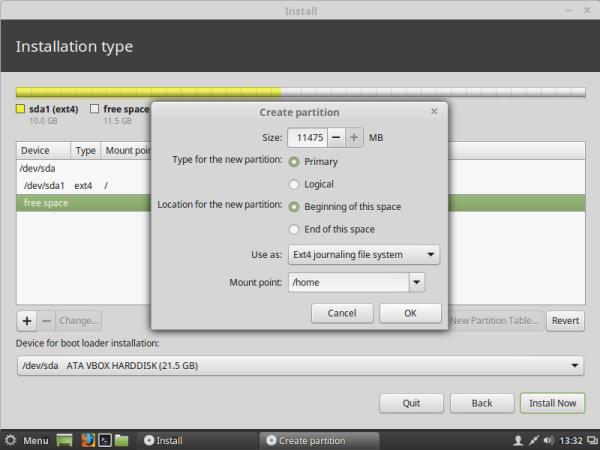
 If you decide to separate the home partition, create it now as a primary partition with the desired size:
 You can get something like this:
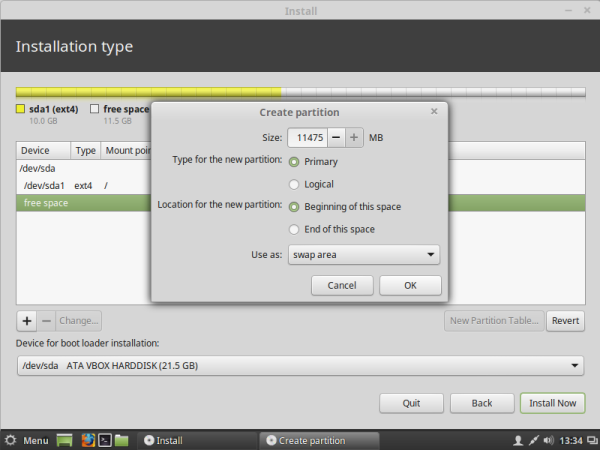
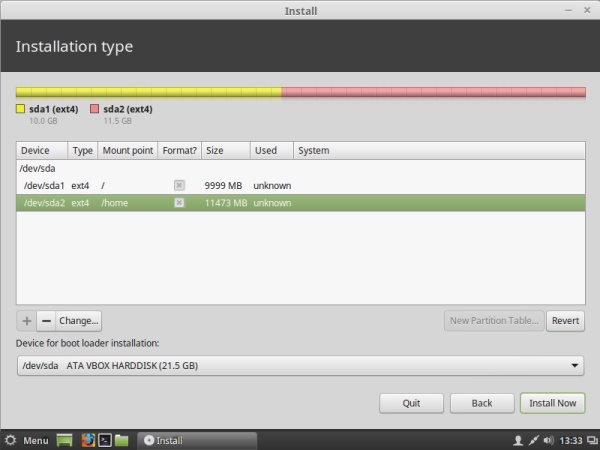 To create the swap partition, you need to create a new primary partition and select «swap area» as its file system:
 In my case I created the following layout:
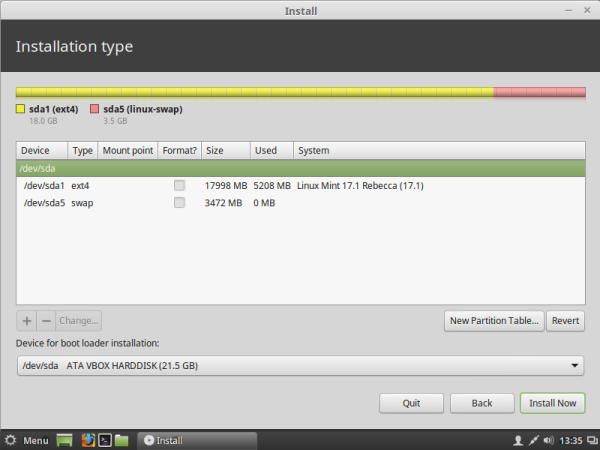 It has one root partition which contains all the user and system data, and the swap partition as well.
The swap file
If you decided to not create a swap partition and use the swap file instead, you need to do the following steps after the installation:
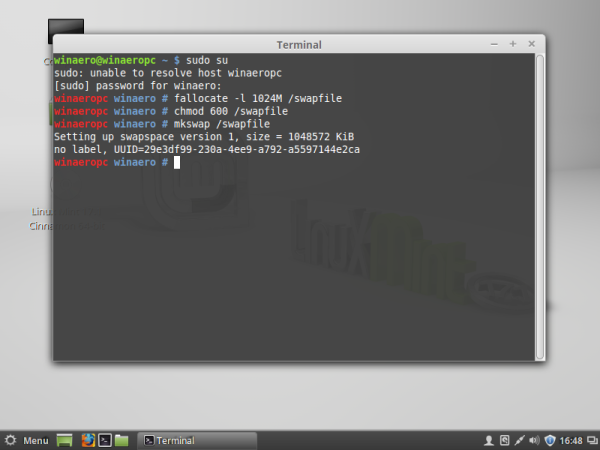
- Open the terminal app.
- Type the following:
- Adjust permissions for the /swapfile file using the following command:
- Format the file to be used as a swap file:

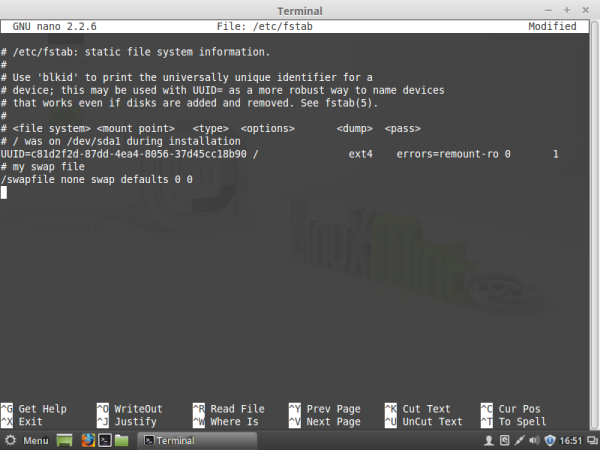
- You just created a ready-to-use swap file. Now you need to make it active. Open the /etc/fstab file with any text editor. Nano text editor is pretty good for this task:
- Type the following line in Nano:
- Press Ctrl + O to save the /etc/fstab file.
- Press Ctrl + X to exit Nano.
Type your current password to get root privileges. The prompt will change from the
symbol to #: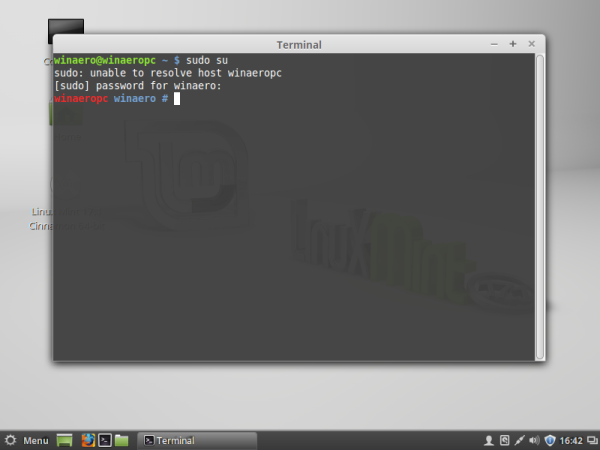
Type the following in the terminal:
This will create a new file, /swapfile with 1 GB of size. Adjust the size to the desired value.
You are done. After rebooting, the operating system will use the file /swapfile as the swap file. To check how your operating system is using the swap partition or the swap file, type the following command in the terminal:
It will show you which device, partition or file you are using for swapping purposes and how it is used at that moment: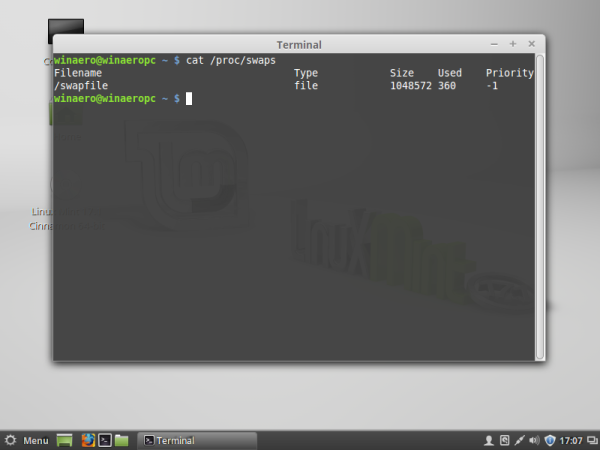
That’s it. So, it is possible to use only one partition to run the Linux Mint operating system smoothly.
Winaero greatly relies on your support. You can help the site keep bringing you interesting and useful content and software by using these options:
Share this post
About Sergey Tkachenko
Sergey Tkachenko is a software developer from Russia who started Winaero back in 2011. On this blog, Sergey is writing about everything connected to Microsoft, Windows and popular software. Follow him on Telegram, Twitter, and YouTube.
30 thoughts on “ How to partition your hard drive to install Linux Mint ”
After this tutorial, I’m waiting for your tutorial to install Linux alongside Windows (dual booting) as soon as possible.
Why not? I will write
Ну очень мне нравится это граф окружение
congratulations,for universal vision of internet,and continue with readineness about Linux Mint,write more tutorials and thankyou,for my english,i am brazilian.
Thank you. I will try.
i try to install linux mint 17.3 in windows 7.. as demo version.. can it possible ? :/
Well, you can start with a virtual machine setup. Install it in VirtualBox
that means linux mint 16 only can demo vertion. good for double boot system. not all version . thnkss 🙂
and one question.. what’s mean by /swap – 2x size of RAM ?? can u plz tell me. :/ i can’t understand and install it.
If you RAM size is 2Gb, means your swap partition is recommended to be 4Gb.
hmmm.. i’m using corsair 4gb ram that means ,my swap partition is recommd to be 8 gb ( 8192 mb ) 😉 i get it, thnkss for guid me sir 🙂
Indeed.
You are welcome
I type this from Linux Mint setup on a new PC I got, afraid to screw up the partitions. Suppose I have Windows 8.1 installed on a modern PC with UEFI BIOS and GPT disk. It created a Recovery Partition for WinRE, another EFI system partition, a Microsoft Reserved Partition and the partition where Windows is installed. I created yet another partition for Linux. So far so good. Now my disk already has 5 partitions. So now I want to avoid more partitions. Is there a way to make the Linux Mint setup share its /boot partition with any of the existing partitions Windows created and have the rest 3 that Linux needs (root, home and swap) on a single partition I created for Linux Mint? Or it will create at least 1 more as Linux /boot partition?
I guess I should set the “Device for boot loader installation” to /dev/sda and not any of the partitions. That way, Linux’s boot loader will take over the Windows one and give me the option of which to boot? Or another option is /dev/sda5 (which is my ext4 partition) and then use EasyBCD from Windows to add Linux to the Windows boot loader.
Well it looks like first option is my only choice since evil Microsoft has blocked the loading of legacy or non-Windows operating systems from the BCD menu when in UEFI mode.
Tried all! Even set /dev/sda as boot device and reinstalled again using Mint Setup but it will only boot Windows 8.1 and not even show the Linux boot manager, GRUB. Looks like on EFI system, it is not as easy as legacy MBR.
Well finally thanks to this article and some more research, I got it working. On an EFI system, if GRUB isn’t becoming the default, move the files to \EFI\Boot\ and rename the main file as bootx64.efi.
Very helpful for someone returning to Linux after many years. Good to see the standard boot-root-swap config has still held up.
A few notes for future readers:
* A good post on shrinking your Windows 10 partition to make room: http://www.everydaylinuxuser.com/2015/11/how-to-shrink-windows-10-to-make-space.html
* With Linux Mint 17.3, Mint’s installer also insists that you make a 1MB partition for Grub, marked as “Reserved for BIOS use.” If you don’t, it’ll prompt you to go back and make one.
* With regards to Bob’s earlier note re: UEFI and bootloading, I had to enable legacy bootloading in my BIOS in order to get things up and running. Then everything came up fine.
Thanks for the post, Sergey!
You lost me after, “It is a myth that Linux requires many partitions on the hard drive” – and then went on to talk about partitions.
I’m an absolute, 100% noob at this. I have an Asus F555LD laptop with a newly upgraded system to Win 10.
I can’t even understand the Windows 10’s boot menu and what to choose once I’ve stumbled upon it so that I can install Linux Mint Rosa from a disc.
In fact, in all the tech ‘info’ on how to dual boot, no one – but NO ONE – tells noobs what to do when they get into Windows 10’s boot menu – provided they can even figure out how to find it in the first place.
This nonsense is becoming a career that I just don’t have time for just to be able to use a Linux distro instead of the much hated Windows OS.
Is there anybody on earth who understands how to explain details (not history lessons with a lot of technical jargonese, mind you, as most tend to do!) on how to actually do this without leaving me with a migraine and sending me in a dozen different directions to read this jibberish and that jibberish?
Hi. Hope you have figured this out. I don’t see a date on this.
So I have an ASUS and finally figured out….after HOURS…..how to get it to boot linux.
a few things to do…
First Go to control panel
Select ‘Power Options’
Select ‘Choose what the power buttons do’
click on ‘change settings that are currently unavailable’
Uncheck the box for ‘fast boot’ or ‘fast start up’
move your mouse to the upper right to bring up the black side bar
select ‘settings’
now!
hold down your shift key and click the “power button” and click “restart”…..ALL WHILE HOLDING SHIFT
When your pc starts back up you will see a blue screen
go to advanced options
go to reset boot options, this will restart your comp to the BIOS
go to ‘security’ and disable secure boot
go to ‘boot’ and disable ‘fast boot’ —should be disabled already
go to launch csm and disable — i saw in one place to have this enabled and another to have it disabled
press f10 to SAVE and exit
boot up normal
REPEAT:
move your mouse to the upper right to bring up the black side bar
select ‘settings’
now!
hold down your shift key and click the “power button” and click “restart”…..ALL WHILE HOLDING SHIFT
When your laptop restarts you will see a blue screen which has an option ‘boot from device-cd/usb/etc’ choose this option and select cd or USB which ever you are using.
now sometimes i have to restart my laptop several times to get it to see the usb, i am not sure what is going on with that but i am going to partition my hard drive and install it
I hope this helps, i pieced together things i saw on several websites to finally get it to work
there is no ‘press f12 or press f2’ to get boot menu list
Nice write-up. Thank you!
Related question that I can’t seem to source the answer to despite MUCH searching:
How to force Mint installer (currently 17.3) to leave my 2nd DOS partition (1st 2gb partition in extended partition) untouched at install time. I need to have a system dual boot as either DOS (PC-DOS 7.01) with primary FAT16 and 1 x logical FAT16 or boot to Mint with the balance of the HDD as Ext4 Root, Home and a 4GB swap partition.
I know, I know….DOS?? Sorry but it is still needed for some ancient programs I still use which require an LPT dongle…..that can only otherwise be used (unstably) via VMWare or VirtualBox + extensions
What always seems to occur is that after installing Mint alongside my DOS install, I either lose access to my DOS logical partition or more fun (!), this logical partition works under DOS but is invisible to Mint which accesses the partition differently and reads/writes to it via a FAT table that DOS cannot access. In other words, a file created on the 2nd FAT16 partition under DOS is invisible to Mint and vice-versus one created under Mint is invisible to DOS.
Any help or tips would be wonderful.
HI.I want to know can I install partitioning sheme like this:
/root
/swap
/home
I mean installing without /boot and I want to know should Linux boot without /boot partition.
This would be useful when making system image with clone zilla
Thanks
It will work perfectly.
I have 3 PCs here with the /root partition only and two with /root and /home.
I prefer these layouts for SoC boards (Banana Pi/Raspberry Pi etc).
Hi Sergey, I am trying to follow your directions to create four partitions for my Linux Mint 19.1, /boot, /root, /home & swap. However, you begin the instructions with the creation of /root followed by /home then /swap, but you do not mention /boot. Am I supposed to create it first? Thank you for your patience with a noob.
Yep, if you want to create a separate boot partition, then create it before your root and home partitions.
Is it necessary for the partitions to be in the same order in each of the following cases?
The first case:
1- boot
2- /
3- home
4- swap
The second case:
1- /
2- home
3- swap
Hello. I don’t know how the partition order is important or not.
But I would follow the order you have mentioned.
My devices are all partitioned using it.
Hi. I want to install Linux mint 20 and Ubuntu studio I have a 250 gb hard disk drive. I plan to completely erase the hard disk before I do this. How do I make partitions/install both operating systems?
Erase the disk
Create one boot partition of 400 Mb
Create one root partition for Linux Mint
Create one home partition for Linux Mint
Install Mint without a swap partition. Format and use the above partitions you have created.
Do not create other partitions.
—
Start Ubuntu Studio
Use the above Boot partition.
Create one more root partition for Ubuntu Studio
Create one more home partition for Ubuntu Studio
—
Swap both OSes to a file like /swapfile.
It is a general recommendation, and can be adjusted. But in most cases it will do its work.
Источник


