- Partition a physical disk in Disk Utility on Mac
- Add a partition
- Delete a partition
- Erase a partition
- Enlarge a partition on a storage device
- Paragon Hard Disk Manager for Mac 1.3.873
- 6 Best Partition Managers for Mac
- 1. Disk Utility
- 2. Stellar Mac Partition Manager
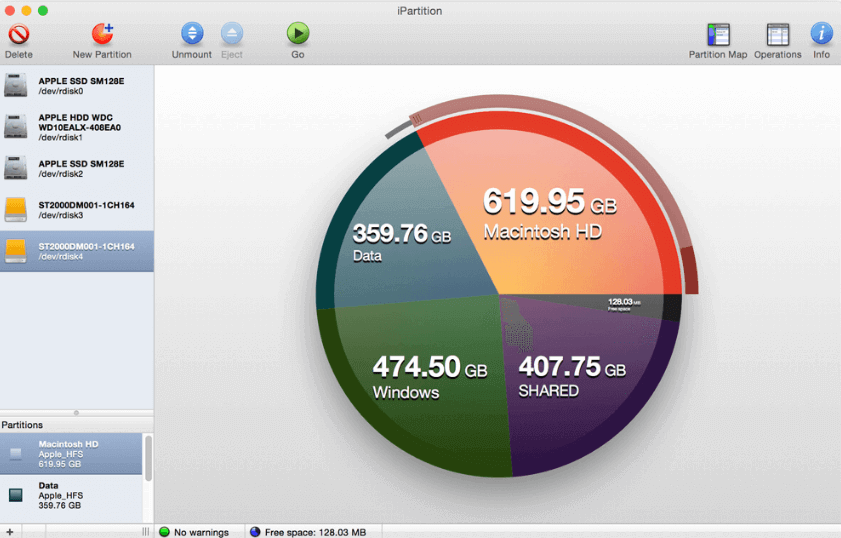
- 3. IPartition for Mac
- 4. Paragon Hard Disk Manager
- 5. GParted (Gnome Partition Editor)
- 6. Partition Magic
Partition a physical disk in Disk Utility on Mac
Partitioning a disk divides it into individual sections known as containers.
However, with APFS, you shouldn’t partition your disk in most cases. Instead, create multiple APFS volumes within a single partition. With the flexible space management provided by APFS, you can even install another version of macOS on an APFS volume.
Important: If you’re partitioning your internal physical disk because you want to install Windows, use Boot Camp Assistant instead. Do not use Disk Utility to remove a partition that was created using Boot Camp Assistant. Instead, use Boot Camp Assistant to remove the partition from your Mac.
Add a partition
Important: As a precaution, it’s best to back up your data before creating new partitions on your device.
In the Disk Utility app  on your Mac, select a volume in the sidebar, then click the Partition button
  in the toolbar.
If Disk Utility isn’t open, click the Launchpad icon  in the Dock, type Disk Utility in the Search field, then click the Disk Utility icon .
If you have multiple storage devices connected to your Mac, make sure you select a volume that’s on the device you want to partition.
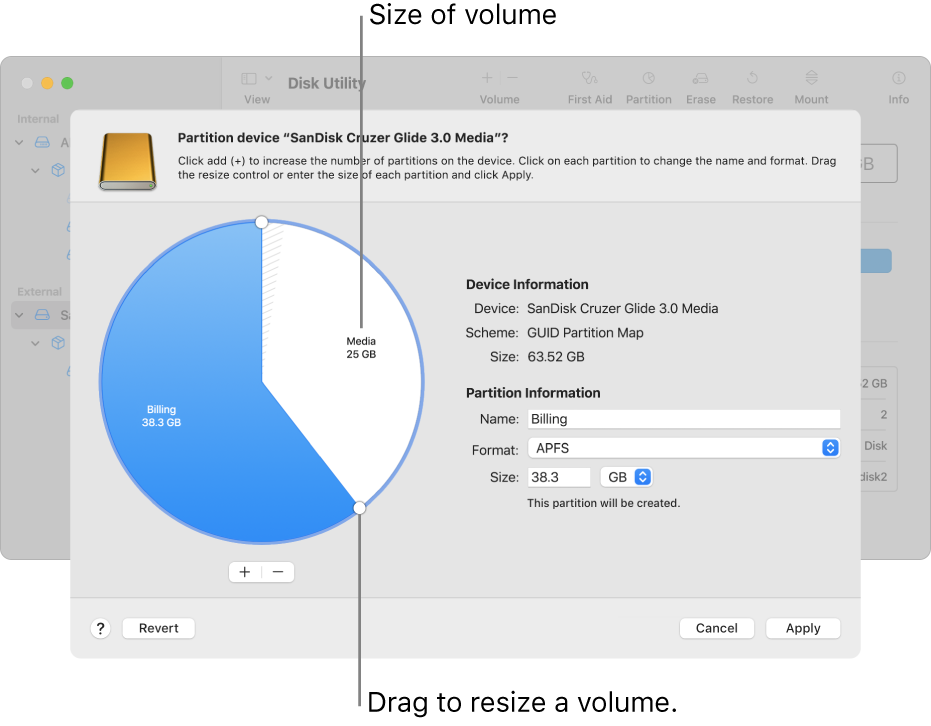
When you select a volume that already has data on it, the pie chart shows a shaded area representing the amount of data on the volume and an unshaded area representing the amount of free space available for another volume. Disk Utility also shows whether the volume can be removed or resized.
Note: If you see a small volume with an asterisk, the partition is smaller than can be represented at the correct scale in the chart.
Click the Add button  below the pie chart.
Read the information in the dialogue that appears, then click Add Partition.
Note: If you click Add Volume instead, you can click the Add button to create an additional APFS volume in the container, or click Cancel to return to the Disk Utility window without making any changes to the storage device.
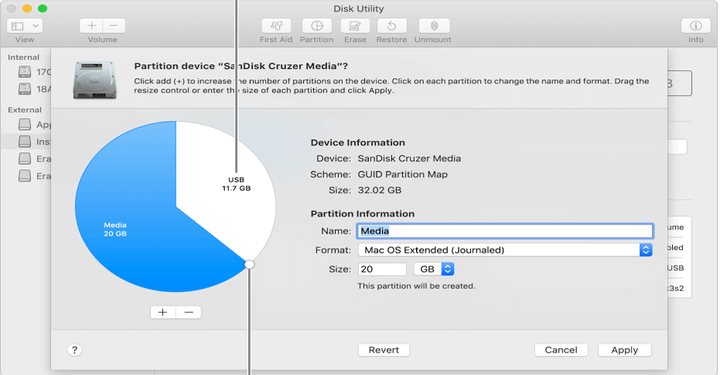
Type a name for the volume in the Name field.
For MS-DOS (FAT) and ExFAT volumes, the maximum length for the volume name is 11 characters.
Click the Format pop-up menu, then choose a file system format.
Enter the size or drag the resize control to increase or decrease the size of the volume.
Read the information in the Partition Device dialogue, then click Partition.
After the operation finishes, click Done.
After you partition a storage device, an icon for each volume appears in both the Disk Utility sidebar and the Finder sidebar.
Delete a partition
WARNING: When you delete a partition, all the data on it is erased. Be sure to back up your data before you begin.
In the Disk Utility app on your Mac, select a volume in the sidebar, then click the Partition button in the toolbar.
If Disk Utility isn’t open, click the Launchpad icon in the Dock, type Disk Utility in the Search field, then click the Disk Utility icon .
In the Apple File System Space Sharing dialogue, click Partition.
In the pie chart, click the partition you want to delete, then click the Delete button  .
.
If the Delete button is dimmed, you can’t delete the selected partition.
Read the information in the Partition Device dialogue, then click Partition.
After the operation finishes, click Done.
Erase a partition
In the Disk Utility app on your Mac, choose View > Show All Devices, then select the container you want to erase in the sidebar.
If Disk Utility isn’t open, click the Launchpad icon in the Dock, type Disk Utility in the Search field, then click the Disk Utility icon .
Click the Erase button  in the toolbar.
If the Erase button is dimmed, you can’t erase the selected container.
Type a name for the volume in the Name field.
Click the Format pop-up menu, then choose a file system format.
After the operation finishes, click Done.
Enlarge a partition on a storage device
If you have multiple partitions on a device and one of them is running out of space, you may be able to enlarge it without losing any of the files on it.
To enlarge a volume, you must delete the volume that comes after it on the device, then move the end point of the volume you want to enlarge into the freed space. You can’t enlarge the last volume on a device.
WARNING: When you delete a volume or partition, all the data on it is erased. Be sure to back up your data before you begin.
In the Disk Utility app on your Mac, select a volume in the sidebar, then click the Partition button .
If Disk Utility isn’t open, click the Launchpad icon in the Dock, type Disk Utility in the Search field, then click the Disk Utility icon .
In the Apple File System Space Sharing dialogue, click Partition.
In the pie chart, select the partition you want to delete, then click the Delete button .
If the Delete button is dimmed, you can’t delete the selected partition.
Read the information in the Partition Device dialogue, then click Partition.
Источник
Paragon Hard Disk Manager for Mac 1.3.873

Paragon Hard Disk Manager for Mac® — это идеальное решение для управления системой и данными Вашего Mac. Надежное резервное копирование, гибкие функции восстановления, быстрое управление разделами, гарантированное затирание данных и многое другое — все, что нужно для Вашего Mac!
- Резервное копирование и восстановление на базе технологии Paragon Snapshot for Mac
- Изменение размера разделов и перераспределение свободного места между ними
- Восстановление пропавших разделов
- Миграция и надежное уничтожение данных
- Простой способ отключения System Integrity Protection
- Полная поддержка новой macOS Sierra
- Поддержка популярных файловых систем: HFS+, NTFS, ExtFS, FAT и exFAT.
Полное управление жестким диском
Paragon Hard Disk Manager for Mac® включает в себя комплекс инструментов от сегментирования диска и работы с разделами до миграции системы и аварийного восстановления после сбоев.
Ежедневная защита данных
Резервное копирование на секторном уровне с технологией моментальных снимков Paragon Snapshot for Mac® позволяет создавать резервные копии системы и приложений в режиме реального времени на высокой скорости. Резервирование в виртуальный контейнер обеспечивает легкую миграцию в виртуальную среду VMWare Fusion. Выборочное восстановление позволяет восстанавливать только необходимые файлы, используя Finder.
Создание аварийного загрузочного носителя
Создайте загрузочную флешку или внешний жесткий диск, и Вы сможете загрузиться с нее и восстановить необходимые данные, даже если Ваша OS X не загружается.
Управление Boot Camp
Все необходимые функции для работы с конфигурацией Boot Camp: резервное копирование, восстановление, изменение размера разделов и параметров загрузки.
Затирание данных
10 военных и правительственных стандартов уничтожения данных при поддержке функции SSD Trim для гарантированного удаления данных с жестких дисков и SSD.
Version 1.3.873:
- Release notes were unavailable when this listing was updated.
Источник
6 Best Partition Managers for Mac
It always feels good to see extra or free space in your Mac device. It allows us to save all downloads and other such files without any hassle and worry related to space constraints. But with time and so many downloads including other storage activities, this free space starts to shrink and that’s when the need arises for a simple yet reliable partition manager to create extra space.
Nowadays it’s not so difficult to look for a good partition manager as various free disk partition programs are available online. Partition Manager lets you expand, shrink, delete, create, split and merge partitions of your hard drive or any other storage device.
Besides, it allows you to control and manage the partition so that you have a well-arranged hard disk. There is no need to worry if you are running out of space on your Mac system as this article will walk you through some of the best partition managers for Mac systems.
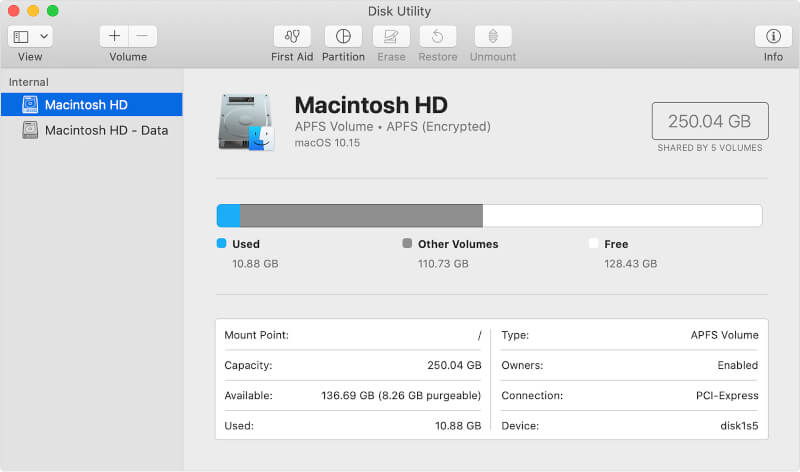
1. Disk Utility
Disk Utility comes built-in in Mac devices and makes the topmost and brilliant choice to solve disk-related issues, even disk partition. This built-in utility is pretty easy to use, it comes with a user-friendly interface that presents you with a pie chart of the remaining space in your hard disk in an easy to understand manner that even the person with no computer expertise can easily comprehend.
Some of the features offered by this utility are to delete, add and resize the hard drive without causing any data loss from the hard drive.
2. Stellar Mac Partition Manager
Stellar Mac Partition Manager is an efficient partition manager from Stellar effectively manages partitions on your Mac’s hard drive. It works by moving already existing partitions to create sufficient space if there is any scattered or free space on the drive.
This reliable and safe software can also perform delete, hide, reformat, and resizing the partitions. In addition, it allows easy resizing of NTFS and Boot Camp partitions. This app works well with macOS Sierra 10.6 to 10.12.R
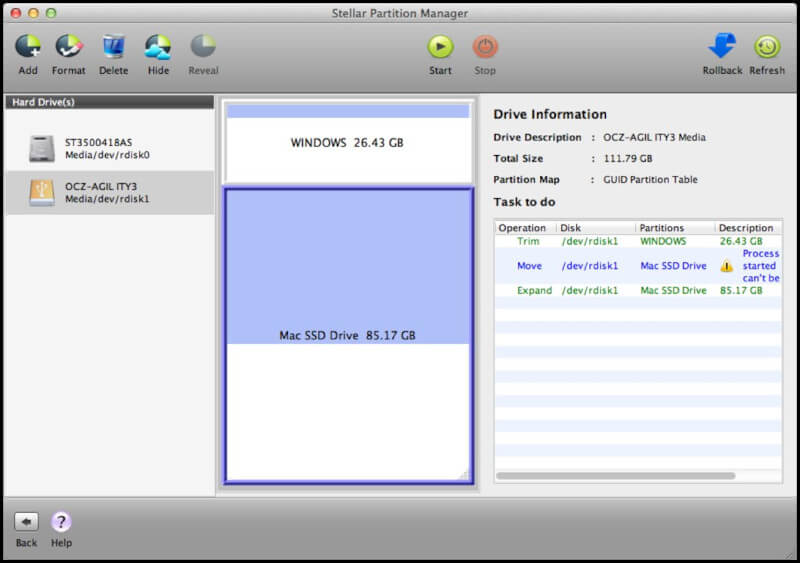
Stellar Mac Partition Manager
3. IPartition for Mac
IPartition provides a great way to manage your hard drive by handling the space. This app offers a graphical representation of your disk space in the form of a pie chart. The resize handle simply lets you resize the partition giving a better representation of the size allotted to each partition.
Additionally, this software showcases any warnings or parameters associated with your partition in a separate window. With iPartition, you can also queue your tasks, edit the partition and resize them easily.
4. Paragon Hard Disk Manager
If you are looking for a complete data management solution for your Mac system then Paragon hard disk manager will cater it for you! It offers all that you need for an effective partitioning, it provides dynamic data recovery and efficient data backup to prevent any data loss and secure your valuable data.
The software allows you to create a clone of your old disk when you change to a new system. Besides, this software is highly compatible with macOS Sierra, High Sierra, Yosemite, Mojave, and El Captain.

Paragon Hard Disk Manager
5. GParted (Gnome Partition Editor)
GParted or Gnome partition editor functions to create space in your Mac disk without causing any loss of data. GParted allows users to delete, create, check, label and move additional space into valuable ones.
It lets you expand your C: drive, make space for a new operating system, and perform data recovery from lost partitions. Besides, with GParted, you can work around with extensions like ufs, NTFS, xfs, btrfs and nilfs.

6. Partition Magic
Partition Magic a reliable partition manager for Mac is geared with all those features which are needed for the safety and security of your drive. With Partition Magic you can mix or resize the partitions, it lets you arrange data, create storage space, modify or edit partitions, perform multitasking, preview, and delete.
Additionally, it has a user-centric interface for ease of use and prevents data loss by saving all your work and the current state of your partition in case the powercut happens in the middle of the partitioning.

Summary:
Partitioning of hard disk offers many benefits such as ease of formatting and data security. An effective partitioning manager is one that helps in deleting, creating and resizing the hard drive.
The market is flooded with several partition managers for Mac OS however, it’s important to select the best and trusted partition manager. We have listed some of the safe and topnotch partition managers for Mac which will surely help you manage your disk space effectively.
Источник


