- Как найти и отредактировать файл Hosts
- Редактирование:
- Бесплатный DNS-хостинг
- Расположение hosts-файла в различных ОС:
- Windows
- Как восстановить содержимое файла Hosts по умолчанию
- Аннотация
- Что такое файл Hosts?
- Решение
- How to Edit the Hosts File in Windows
- What Does The Hosts File Do?
- Why Edit The Hosts File?
- Windows Hosts File Location
- How To Edit The Hosts File
- Opening The Hosts File
- Editing The Hosts File
- Saving The Hosts File
Как найти и отредактировать файл Hosts
В некоторых случаях бывает необходимо отредактировать файл hosts на локальном ПК или удаленном сервере. С помощью этого файла вы можете управлять маршрутизацией трафика и разрешением IP-адресов в имена DNS. Приоритет данного файла позволяет обрабатывать сетевые запросы до их передачи публичным или частным DNS-серверам. Таким образом, реализуется возможность создания своеобразной локальной системы DNS на самой машине.
Сегодня данный файл практически не используется, его функции выполняет служба DNS, преобразующая «имя в адрес» и «адрес в имя». Тем не менее, его использование возможно и сегодня.
Редактирование:
Синтаксис остается одинаковым для всех операционных систем. У большинства файлов hosts несколько записей для loopback (обратной петли). Мы используем это для примера.
Бесплатный DNS-хостинг
- Надёжные DNS-сервера
- Автоматическая миграция
- API
Часть 1: адрес, куда перенаправить;
Часть 2: адрес, который вы хотите перенаправить;
Часть 3: комментарий.
Они могут быть разделены пробелом, но для удобства чтения, как правило, разделены одним или двумя горизонтальными табуляциями.
127.0.0.1 localhosts #loopback
Используйте любой текстовый редактор в привилегированном режиме для внесения изменений.
Расположение hosts-файла в различных ОС:
Windows
В данном примере будет запрещен доступ машины к сайту Facebook и его поддоменам. Это реализуется за счет разрешения запросов DNS на имя facebook.com в несуществующий IP-адрес 0.0.0.0:

При попытке перейти по заблокированному адресу после добавления строки выше в файл hosts вы увидите ошибку, подтверждающую корректность конфигурации:
Как восстановить содержимое файла Hosts по умолчанию
Аннотация
Рекомендации, приведенные в этой статье, позволяют вернуть содержимое файла hosts к используемому по умолчанию.
Что такое файл Hosts?
Файл hosts используется операционной системой для сопоставления удобных для человека имен узлов с номерами IP-адресов, которые определяют и обнаруживают узел в IP-сети. Файл hosts — это один из нескольких системных ресурсов, которые связаны с сетевыми узлами в компьютерной сети, и является общей частью реализации IP-адреса операционной системы.
Файл hosts содержит текстовые строки, которые состоят из IP-адреса, указанного в текстовом поле, и одного или нескольких имен узлов. Каждое поле отделено пробелом (по историческим причинам часто предпочтение отдают знакам табуляции, но пробелы также используются). Файл также может включать строки с примечаниями, обозначенные символом #, который ставится в начале каждой такой строки. Пустые строки в файле игнорируются.
Если файл Hosts изменяется с по умолчанию, сброс может помочь устранить некоторые проблемы подключения.
Решение
Чтобы восстановить параметры файла Hosts по умолчанию, выполните указанные ниже действия в зависимости от используемой версии операционной системы.
Чтобы восстановить параметры файла hosts по умолчанию, выполните указанные ниже действия.
Откройте приложение «Блокнот». Для этого выполните поиск «Блокнота» с помощью Cortana, а затем коснитесь или щелкните значок «Блокнот».
Скопируйте приведенный ниже текст и вставьте его в файл: # Copyright (c) 1993-2006 Microsoft Corp. # # This is a sample HOSTS file used by Microsoft TCP/IP for Windows. # # This file contains the mappings of IP addresses to host names. Each # entry should be kept on an individual line. The IP address should # be placed in the first column followed by the corresponding host name. # The IP address and the host name should be separated by at least one # space. # # Additionally, comments (such as these) may be inserted on individual # lines or following the machine name denoted by a ‘#’ symbol. # # For example: # # 102.54.94.97 rhino.acme.com # source server # 38.25.63.10 x.acme.com # x client host # localhost name resolution is handle within DNS itself. # 127.0.0.1 localhost # ::1 localhost
В меню Файл выберите команду Сохранить как, введите «hosts» в поле Имя файла (как показано на рисунке ниже) и сохраните файл на рабочий стол. 
Закройте приложение «Блокнот».
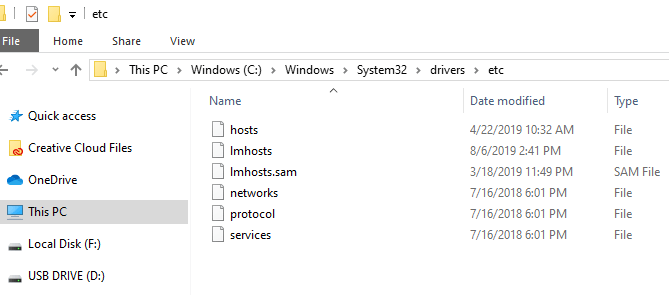
Найдите %WinDir%\System32\Drivers\Etc с помощью Cortana, а затем выберите значок папки «Файл ».
Коснитесь и удерживайте файл Hosts (или щелкните на нем правой кнопкой мыщи), выберите команду Переименовать и присвойте файлу имя «Hosts.old».
Скопируйте или переместите файл Hosts, созданный на этапе 3, с рабочего стола в папку %WinDir%\System32\Drivers\Etc. Если система предложит ввести пароль администратора, нажмите кнопку Продолжить.
Чтобы восстановить параметры файла hosts по умолчанию, выполните указанные ниже действия.
Откройте приложение «Блокнот». Для этого проведите пальцем от правого края экрана, коснитесь элемента Поиск, введите запрос Блокнот и коснитесь значка Блокнот. Если вы используете мышь, наведите указатель на правый верхний угол экрана, переместите его вниз и щелкните кнопку Поиск, введите запрос Блокнот и щелкните значок Блокнот.
Скопируйте приведенный ниже текст и вставьте его в файл: # Copyright (c) 1993-2006 Microsoft Corp. # # This is a sample HOSTS file used by Microsoft TCP/IP for Windows. # # This file contains the mappings of IP addresses to host names. Each # entry should be kept on an individual line. The IP address should # be placed in the first column followed by the corresponding host name. # The IP address and the host name should be separated by at least one # space. # # Additionally, comments (such as these) may be inserted on individual # lines or following the machine name denoted by a ‘#’ symbol. # # For example: # # 102.54.94.97 rhino.acme.com # source server # 38.25.63.10 x.acme.com # x client host # localhost name resolution is handle within DNS itself. # 127.0.0.1 localhost # ::1 localhost
В меню Файл выберите команду Сохранить как, введите «hosts» в поле Имя файла (как показано на рисунке ниже) и сохраните файл на рабочий стол. 
Закройте приложение «Блокнот».
Откройте папку %WinDir%\System32\Drivers\Etc. Для этого выполните следующие действия:
Проведите пальцем от правого края экрана, коснитесь кнопки Поиск, введите слово выполнить, а затем коснитесь значка Выполнить. Если вы используете мышь, наведите указатель на правый верхний угол экрана, переместите его вниз, щелкните Поиск, введите выполнить и щелкните значок Выполнить.
В поле Открыть введите команду %WinDir%\System32\Drivers\Etc и нажмите кнопку ОК.
Выберите файл Hosts, выберите команду Переименовать и присвойте файлу имя «Hosts.old».
Скопируйте или переместите файл Hosts, созданный на этапе 3, в папку %WinDir%\System32\Drivers\Etc. Если будет предложено ввести пароль администратора, нажмите или коснитесь кнопки Продолжить.
Чтобы самостоятельно восстановить параметры файла hosts до значений по умолчанию, сделайте следующее:
Нажмите кнопку Пуск, щелкните команду Выполнить, введите слово «Блокнот», а затем нажмите кнопку ОК.
Скопируйте в файл приведенный ниже текст.
Windows 7 # Copyright (c) 1993-2006 Microsoft Corp. # # This is a sample HOSTS file used by Microsoft TCP/IP for Windows. # # This file contains the mappings of IP addresses to host names. Each # entry should be kept on an individual line. The IP address should # be placed in the first column followed by the corresponding host name. # The IP address and the host name should be separated by at least one # space. # # Additionally, comments (such as these) may be inserted on individual # lines or following the machine name denoted by a ‘#’ symbol. # # For example: # # 102.54.94.97 rhino.acme.com # source server # 38.25.63.10 x.acme.com # x client host # localhost name resolution is handle within DNS itself. # 127.0.0.1 localhost # ::1 localhost Windows Vista или Windows Server 2008 # Copyright (c) 1993-2006 Microsoft Corp. # # This is a sample HOSTS file used by Microsoft TCP/IP for Windows. # # This file contains the mappings of IP addresses to host names. Each # entry should be kept on an individual line. The IP address should # be placed in the first column followed by the corresponding host name. # The IP address and the host name should be separated by at least one # space. # # Additionally, comments (such as these) may be inserted on individual # lines or following the machine name denoted by a ‘#’ symbol. # # For example: # # 102.54.94.97 rhino.acme.com # source server # 38.25.63.10 x.acme.com # x client host 127.0.0.1 localhost ::1 localhost Windows XP или Windows Server 2003 # Copyright (c) 1993-1999 Microsoft Corp. # # This is a sample HOSTS file used by Microsoft TCP/IP for Windows. # # This file contains the mappings of IP addresses to host names. Each # entry should be kept on an individual line. The IP address should # be placed in the first column followed by the corresponding host name. # The IP address and the host name should be separated by at least one # space. # # Additionally, comments (such as these) may be inserted on individual # lines or following the machine name denoted by a ‘#’ symbol. # # For example: # # 102.54.94.97 rhino.acme.com # source server # 38.25.63.10 x.acme.com # x client host 127.0.0.1 localhost
В меню Файл выберите команду Сохранить как, введите «hosts» в поле Имя файла, а затем сохраните файл на рабочий стол.
Нажмите кнопку Пуск и выберите элемент Выполнить, введите команду %WinDir%\System32\Drivers\Etc и нажмите кнопку ОК.
Выберите файл hosts и переименуйте его в hosts.old.
Скопируйте или переместите файл Hosts, созданный на этапе 3, в папку %WinDir%\System32\Drivers\Etc. Если система предложит ввести пароль администратора, нажмите кнопку Продолжить.
Поддержка Windows XP прекращена
Корпорация Майкрософт прекратила поддержку Windows XP с 8 апреля 2014 г. Это могло повлиять на безопасность и своевременную установку обновлений для вашего программного обеспечения. Что это значит и как обеспечить защиту.
Поддержка Windows Server 2003 завершилась 14 июля 2015 г.
Поддержка Windows Server 2003 завершилась 14 июля 2015 г. Это могло повлиять на безопасность и своевременную установку обновлений для вашего программного обеспечения. Что это значит и как обеспечить защиту.
How to Edit the Hosts File in Windows
Can be useful for anyone in IT
The hosts file is a text-based file located in the same place in all modern Windows versions. Most people don’t ever need to get into it, but if you do, you’ll need to know how to open and edit the hosts file.
However, in some versions of Windows, editing the hosts file directly isn’t allowed. In fact, you’ll get an error if you try to save the changes. Fortunately, there’s a simple tip you can use to edit the hosts file in Windows 10, 8, 7, Vista, or XP.

What Does The Hosts File Do?
The purpose of the hosts file was originally to be what DNS servers do now – map friendly domain names to unfriendly IP addresses.
It’s much easier to remember a domain name like YouTube.com than an IP address like 172.217.1.238. Instead of having to type the IP address into the address bar each time you want to watch YouTube videos, you can just enter the domain name, and the DNS server your device is using will map the name to the right address so you can get to the webpage a lot easier.
The hosts file, since it serves as a sort of DNS server, works the same way. You can enter an IP address that a domain name should be resolved to. In other words, you could order your computer to load a different IP address than the DNS server would, essentially letting you do a few cool things.

Why Edit The Hosts File?
One reason to edit the hosts file is if you want a super basic way to block websites from loading on your computer. Enter an invalid or wrong IP address for the site you want to block, and each time you try accessing it, the hosts file will load the IP address you chose. Depending on what you picked, it might completely block the website.
You can use the same technique to make the hosts file block malicious sites. There are even lists of hosts file entries (such as this one) you can download and import into your hosts file to block hundreds of malicious sites or ads.
Another use for the hosts file is to speed up your web browsing. If the DNS server you’re using is down or not working quickly enough, manually entering the IP address and domain name mappings in your hosts file lets your computer find those addresses nearly instantly instead of relying on the DNS server.
Tip: Learn how to use alternate DNS servers to get faster internet access.
Windows Hosts File Location
You need to know where to go to find the hosts file before you can open it for editing. This is the hosts file location in Windows 10 through Windows XP:
C:\Windows\system32\drivers\etc
How To Edit The Hosts File
The hosts file is a text file, meaning that you need a text editor to make changes to it. However, since the hosts file is super basic and doesn’t need to deal with hyperlinks, images, etc., you can use a basic text editor (i.e., there’s no need to use a full-fledged editor like Microsoft Word).
Opening The Hosts File
Let’s start with simply opening the hosts file. We’ll use Notepad, which is built into Windows 10 down through Windows XP.
- Open the Run dialog box by holding down the Windows key and then pressing R once.
- Type notepad and then press Enter to open the program.

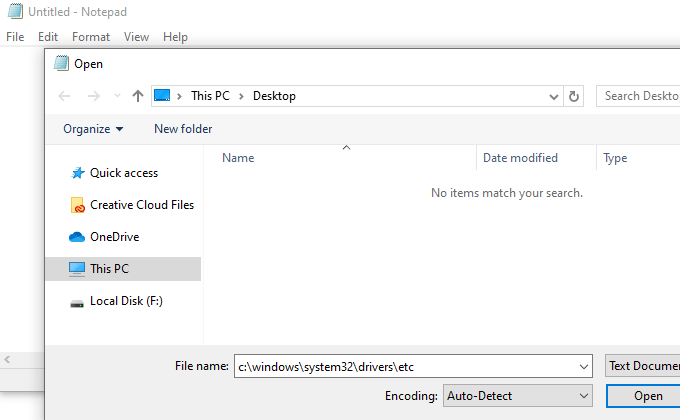
- Go to File >Open.
- In the file name text box at the bottom, type (or copy and paste) the hosts file location shown above and then press Enter.
- Select the menu to the right of the text box to change Text Documents (*.txt) to All Files (*).
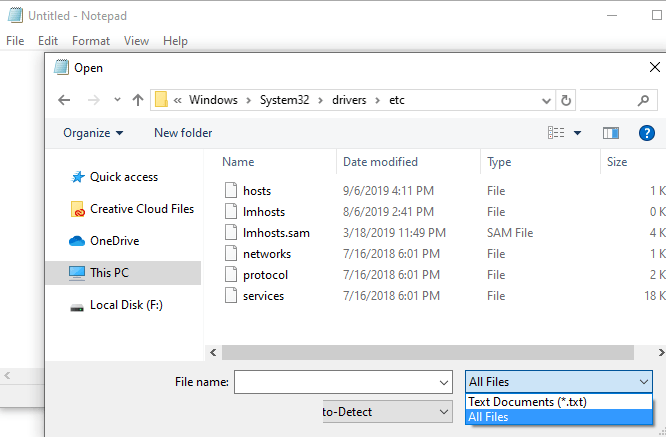
- Double-click hosts from the list of files to open the hosts file for editing in Notepad.
Editing The Hosts File
There are a few examples in the hosts file to show you how to format your entries. You have to put the IP address first followed by the domain name, and the two have to be separated by at least one space (a tab is a good way to format them).
Here are some examples:
127.0.0.1 www.google.com
13.249.79.104 www.bing.com
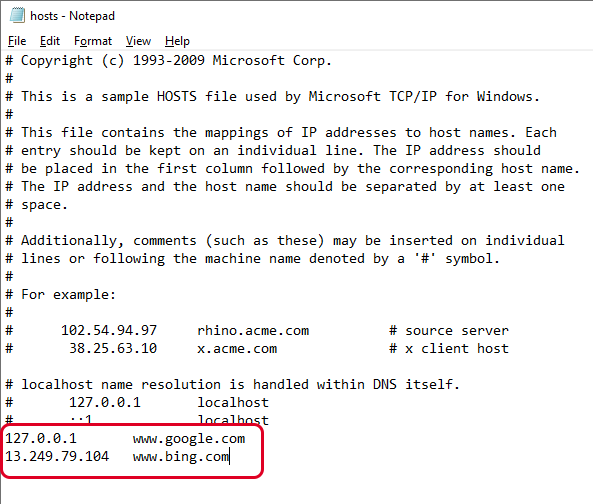
As you can see in the image above and read from the directions in the hosts file, the # symbol is used as a comment, meaning that anything that follows it is avoided. This is why the two example lines we give above are useful in this hosts file; they’re not being followed by that symbol.
If you want to block websites with the hosts file, such as YouTube, Amazon, Google, Reddit.com, etc., you can enter a false IP address like 0.0.0.0.
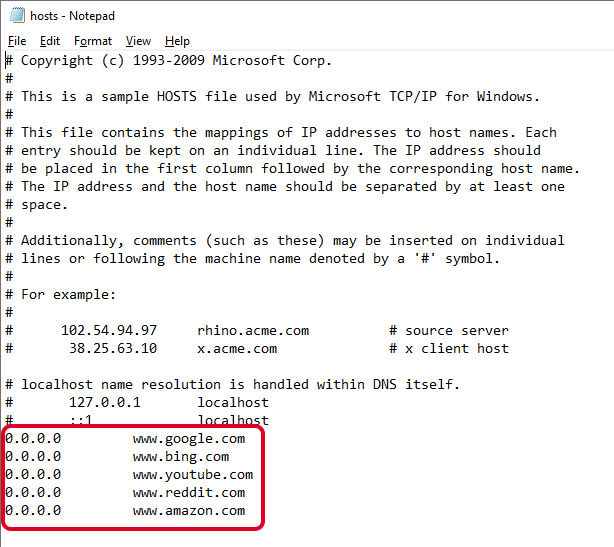
Note: When you enter the URL of the site you want to associate with a specific IP address, be sure to exclude the beginning part and only type the subdomain, such as www or whatever it happens to be for the site you’re adding.
Saving The Hosts File
Here’s how we’ll save the hosts file to make sure it works no matter which operating system you use, which text editor you picked, or how your Windows settings are configured:
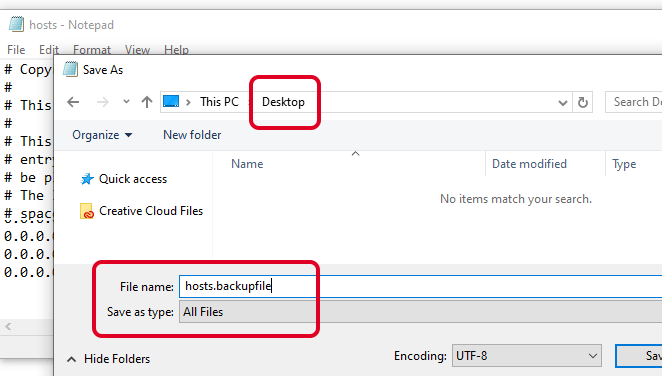
- Go to File >Save As.
- Change the Save as type option to All Files (*).
- Rename the file to hosts.backupfile, and then save it to your desktop.
- Close Notepad and then find the hosts file you just created on the desktop. You want to delete the .backupfile part of the name and leave only hosts (with no period or text after the word).
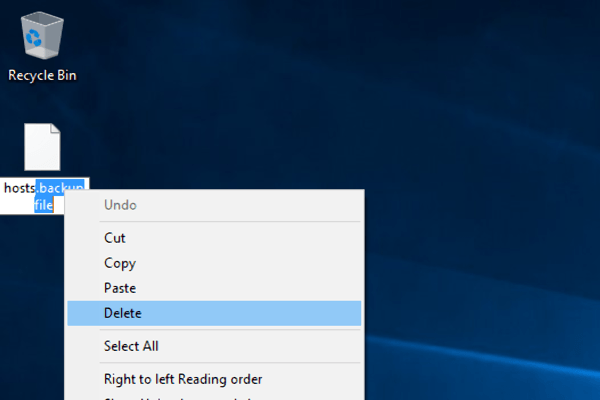
- After you do that, click away from the file to something else on the desktop, and confirm the name change when asked.
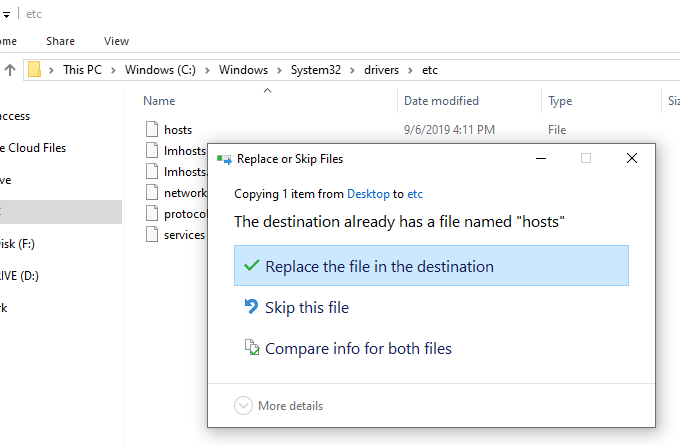
- Copy the hosts file.
- Open the hosts file location you had open before (the etc folder).
- Paste the hosts file you copied from the desktop, and confirm any overwrite prompts if you see them.
Founder of Help Desk Geek and managing editor. He began blogging in 2007 and quit his job in 2010 to blog full-time. He has over 15 years of industry experience in IT and holds several technical certifications. Read Aseem’s Full Bio


