- Ошибка 0xc000000e (. winload.efi) после включения компьютера, Windows не стартует (надпись «Recovery, Your PC/Device needs to be repaired»)
- Что делать с ошибкой 0xc000000e
- ШАГ 1
- ШАГ 2
- ШАГ 3
- Easily Fixed: Winload.efi is Missing or Contains Errors in Windows 10/8/7
- What is Winload.efi file?
- What trigger «Winload.efi missing» boot error?
- How to fix «Winload.efi missing or contains errors» in Windows 10/8/7?
- Method 1. Enable CSM compatibility mode and disable Secure Boot
- Method 2. Check system drive for errors
- Method 3. Run System File Checker to check system file integrity
- Method 4. Rebuild BCD and MBR
- Method 5. Repair EFI bootloader
Ошибка 0xc000000e (. winload.efi) после включения компьютера, Windows не стартует (надпись «Recovery, Your PC/Device needs to be repaired»)
 Доброго времени!
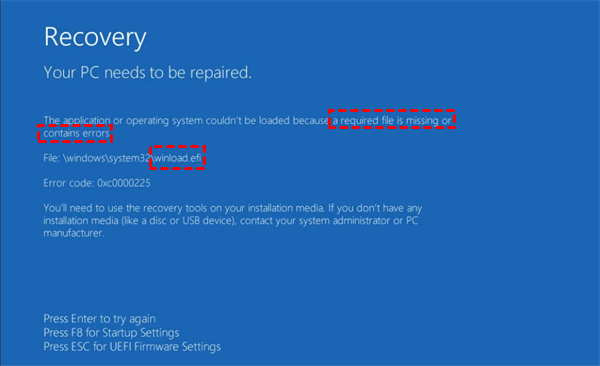
Нередко при работе с разделом диска, на котором установлена ОС Windows (перенос/миграция ОС, подключение доп. диска и пр.) — при включении ПК появляется синее окно «Recovery. « и код ошибки 0xc000000e (пример на скрине ниже в статье 👇). Разумеется, дальше Windows не загружается и ждет от вас какого-нибудь решения.
Как правило, такое «поведение» Windows связано не с повреждением каких-то значимых файлов ОС, а с тем, что том был привязан к определенной букве, и когда система была перемещена на др. диск (скажем так для примера) — эта «связь» нарушается и на старте получаем ошибку.
Не так давно, как раз разбирался с этим «добром», попутно сделав несколько фото. Думаю, это небольшая заметка сможет помочь тем, кто столкнулся с нечто подобным. 👌

Что делать с ошибкой 0xc000000e
ШАГ 1
Для начала обратите внимание на нижнюю часть окна — как правило там есть пункт, позволяющий нажать на кнопку ESC и попасть в BIOS (UEFI). Это нам и нужно.

Пример ошибки, переход в настройки BIOS (0xc000000e, Winload.efi, Recovery: Your PC/Device needs to be repaired)
В BIOS нам нужно попробовать включить режим Legacy Boot (или CSM ). В зависимости от версии BIOS меню настроек может сильно отличаться, в качестве примера — я добавил пару фото (👇).
После сохранить настройки и попробовать перезагрузить устройство.

Раздел BOOT — отключаем Secure Boot
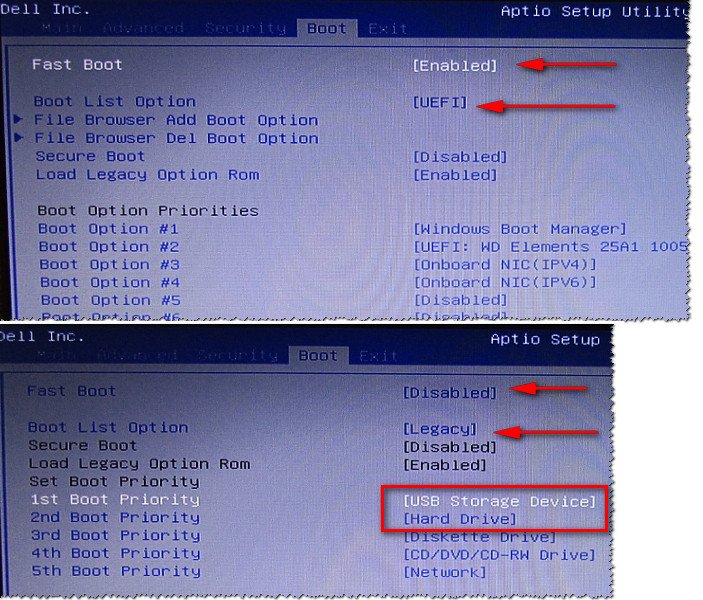
Включен — выключен Secure Boot
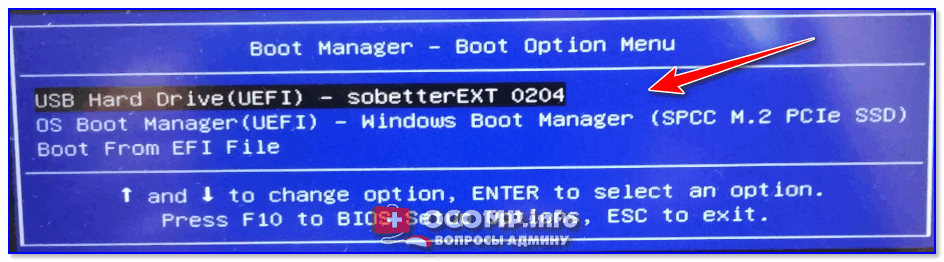
👉 Кстати, еще один важный момент!
В ряде случаев «проблемную» Windows можно загрузить, использовав BOOT-меню и выбрав в нем вручную эту ОС (в моем случае это «OS Boot Manager (UEFI) — Windows Boot Manager (SPCC M.2 PCIe SSD))».
ШАГ 2
Если корректировка настроек BIOS не увенчалась успехом — далее для работы нам понадобиться установочная флешка. Думаю, такая есть у многих (про запас 👌) .
Создание загрузочной USB-флешки Windows 10 — несколько способов
С этой установочной флешки 👉 необходимо загрузиться и дойти до окна, в котором предлагается начать установку Windows — в нижней части окна (👇) нажать на «Восстановление системы» .
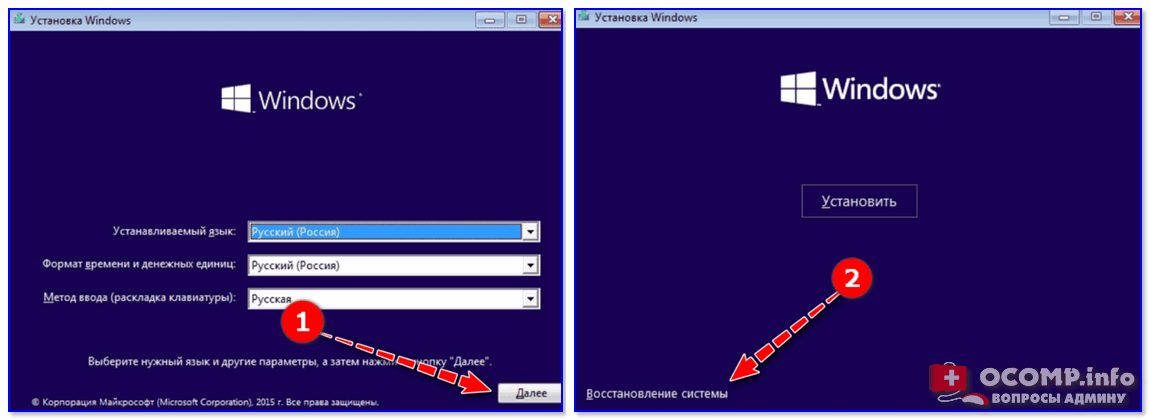
Загрузка с установочной флешки — восстановление системы
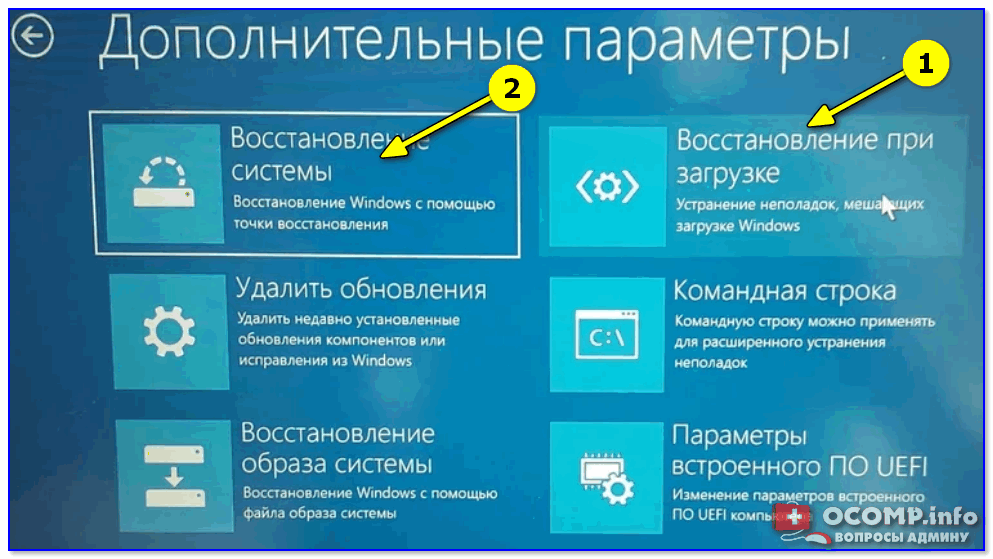
Далее перейти в меню поиска и устранения неисправностей.
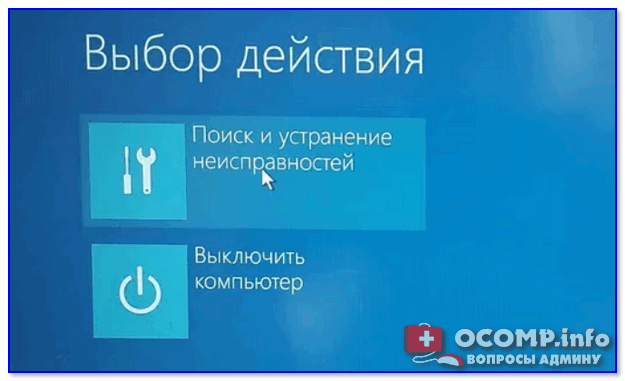
Поиск и устранение неисправностей
В нем есть две ключевых вкладки:
- восстановление при загрузке : рекомендую ее задействовать в первую очередь. В ряде случаев ОС автоматически восстанавливает себя сама;
- восстановление системы : если первое не помогло, попробуйте проверить, вдруг у вас в загашнике есть контрольная точка (бэкап), которая и поможет решить проблему.
ШАГ 3
Если ОС по-прежнему не загружается — стоит попробовать вручную привязать ОС Windows к нужному тому. Делается это не так уж и сложно.
Сначала необходимо загрузиться с установочной флешки (как в ШАГЕ 2 👆) и в меню доп. параметров запустить командную строку .
В ней нужно последовательно ввести ряд команд — я их пометил зеленым цветом (после каждой нажимать Enter 👇):
- DISKPART (запускаем утилиту для работы с дисками);
- LIST VOLUME (даем команду утилите показать все диски в системе);
- SELECT VOLUME=2 (Выбор тома для работы. Здесь нужно указать номер тома «ESP» – можете сориентироваться по его размеру в 99/100 МБ. В моем случае — это том 2);
- ASSIGN LETTER=Z (присваиваем этому тому букву «Z»);
- EXIT (выходим из утилиты DISKPART).
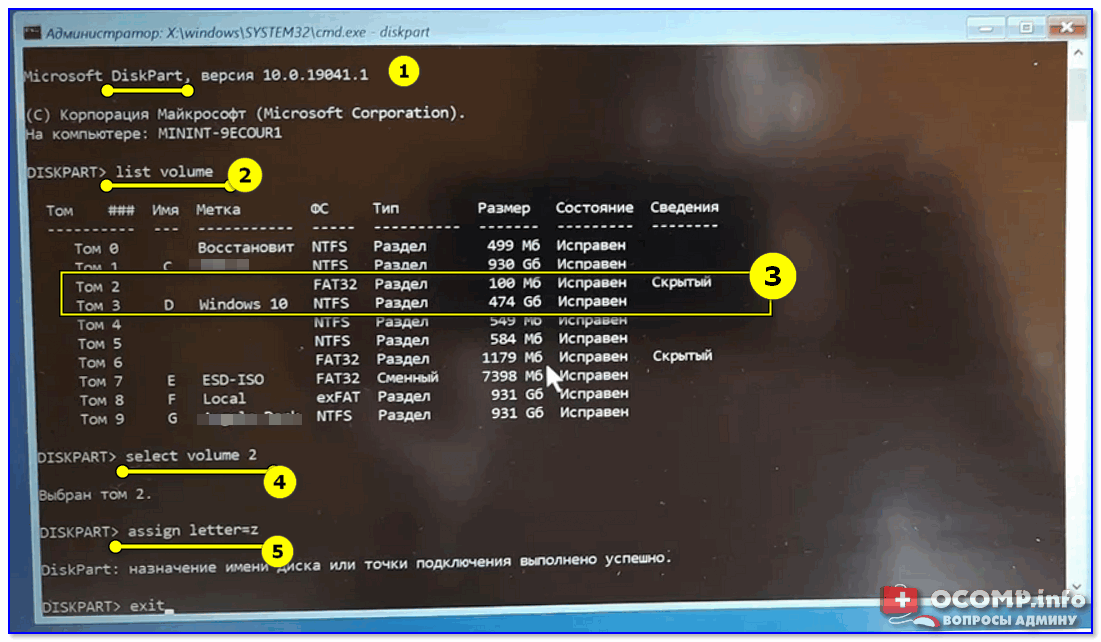
Командная строка — diskpart
После нужно ввести (очень внимательно) следующую команду (и нажать Enter 😉):
bcdboot D:\windows /s Z: /f UEFI
Примечание : вместо «D» нужно указать тот том, на котором у вас установлена Windows (далеко не всегда это диск «C»). Вместо «Z» — букву тома ESP (мы его задали при использовании DISKPART, чуть выше 👆).
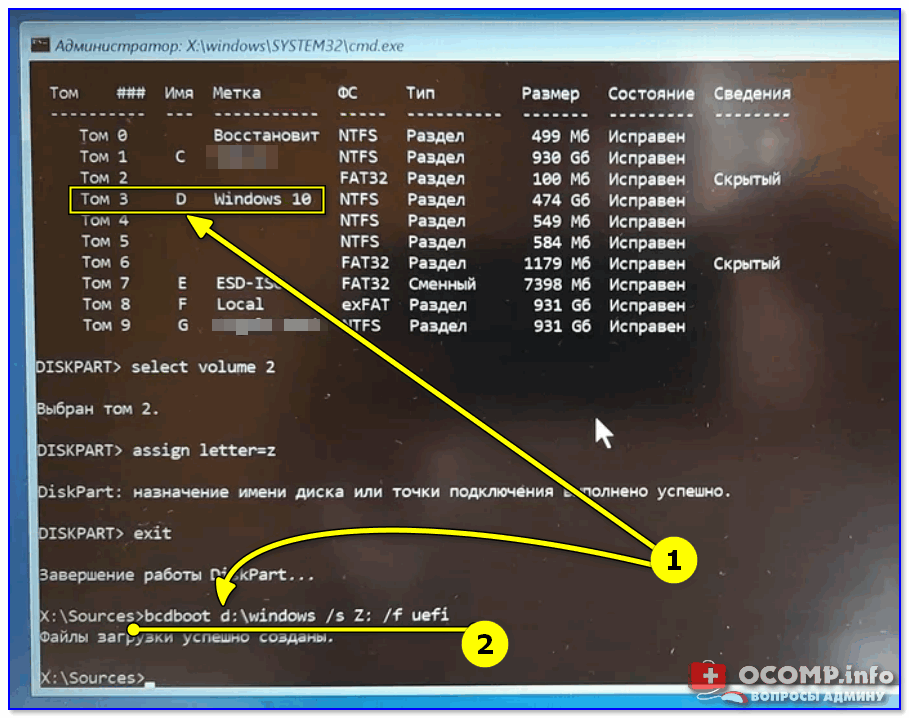
Привязка целевого раздела Windows
Если все прошло успешно — вы должны увидеть сообщение о том, что «Файлы загрузки успешно созданы» . Теперь можно перезагрузить ПК и проверять работу (обычно, такая ручная «привязка» срабатывает в большинстве случаев. ).
Ах да. чуть не забыл. После этой операции у вас на этапе загрузки может начать появляться окно с предложением выбрать какую ОС Windows загружать — как будто их стало 2-3 (👇 выбирайте первую).
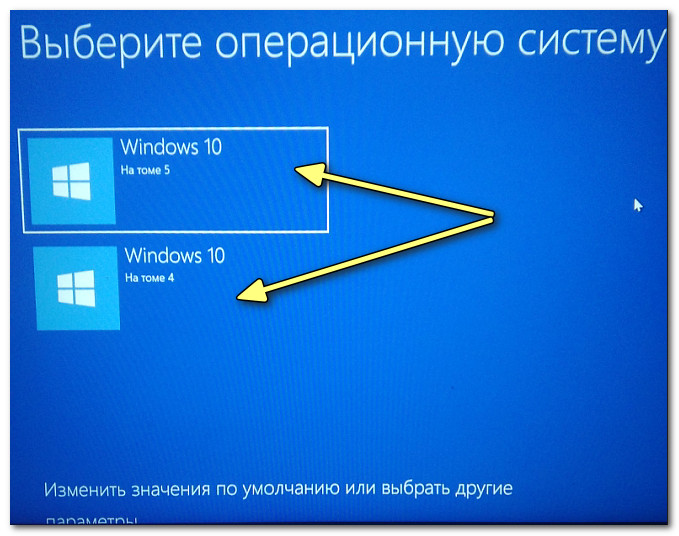
Выбор ОС Windows 10 при загрузке
А чтобы это окно вас не донимало — после загрузки Windows зайдите в проводник и откройте свойства «Моего компьютера», и перейдите в доп. параметры (👇).
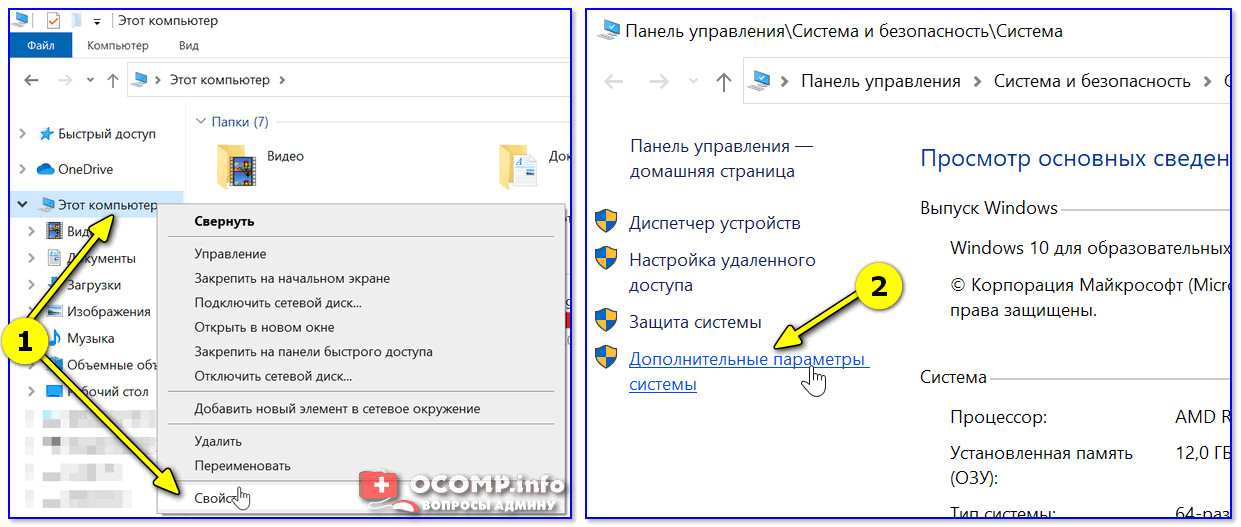
Доп. параметры системы
Далее откройте параметры загрузки и восстановления и измените время отображения списка ОС (лучше всего установить время в 1 сек. В этом случае и меню будет пропадать быстро, и, если что не так — вы всегда сможете до него добраться 👌).
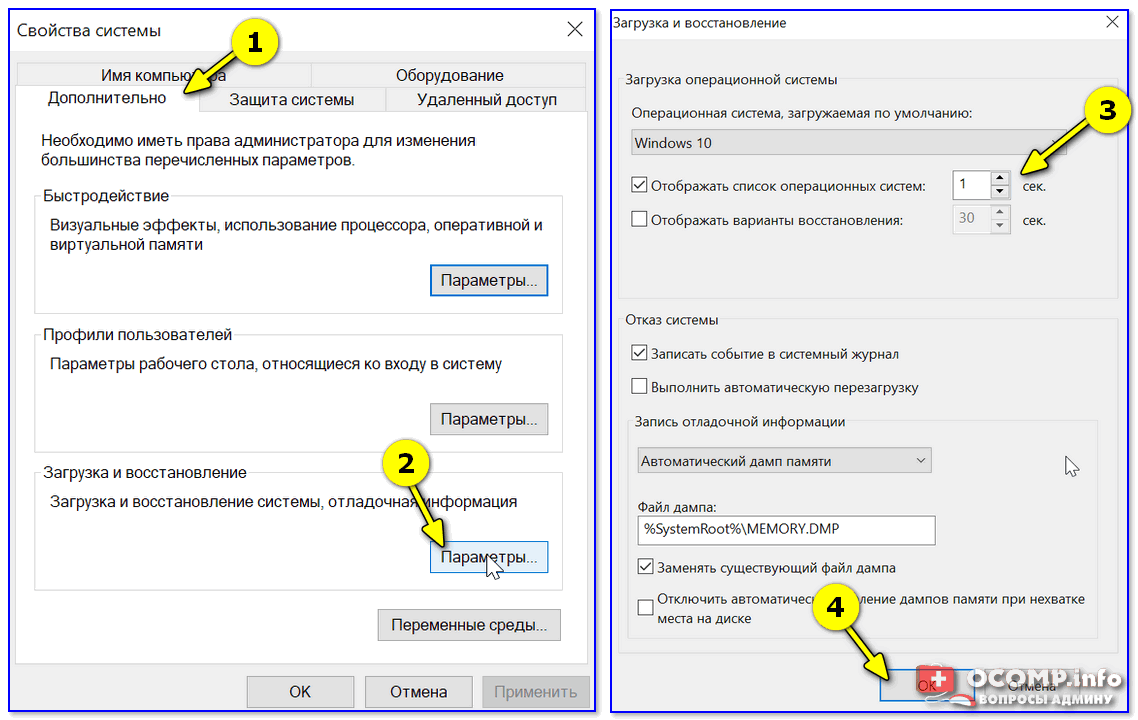
Отображать список ОС 1 сек.!
Если вы решили вопрос как-то иначе — чиркните в комментариях хоть пару слов (заранее благодарю!).
Easily Fixed: Winload.efi is Missing or Contains Errors in Windows 10/8/7
This article tells how to effectively fix “Winload.efi is missing or contains errors” issue step by step in Windows 10/8/7.

By Emily  / Last Updated October 27, 2020
What is Winload.efi file?
As its name suggests, the Winload.efi is an EFI (or Extensible Firmware Interface) file. The executable EFI files apply on the UEFI based on computer systems And execute the tasks of loading the files to the computer bootloader. They contain important data on how the operating system boot process should proceed. Therefore, Winload.efi files are very important for a successful OS boot. If the Winload.efi is missing or corrupted, the Windows cannot boot as normal and stuck into the blue screen along with some error codes like “0xc0000225”, 0xc00000e and 0xc0000001.
What trigger «Winload.efi missing» boot error?
Typically, you will meet the Winload.efi missing problem during Windows startup in the following three situations:
You fail to update Windows that involves an upgrade of vital system files (especially service pack installations) and Winload.efi files;
The hard drive’s system file is damaged due to disk write error, power outages or virus attack, the OS will not be able to locate Winload.efi files;
You clone the OS to another hard drive, or replace the computer motherboard.
How to fix «Winload.efi missing or contains errors» in Windows 10/8/7?
In order to solve this issue and boot Windows 10/8/7 correctly, we have collected the below methods many users have proven effective
Method 1. Enable CSM compatibility mode and disable Secure Boot
If your computer supports both UEFI boot mode (boot from GPT disk), and legacy boot mode (boot from MBR disks), you can try to enable CSM Boot (Compatibility Support Module allows legacy BIOS mode on UEFI systems), and disable secure boot to check if the problem can be fixed.
1. Restart your computer and constantly press F2, F8, Del (the key might be different depending on the PC manufacturer) to enter the UEFI configuration menu. Enable the compatibility (legacy) mode CSM Boot in the UEFI settings (in some versions of UEFI firmware it is called Legacy Boot);
2. Then find the «Secure Boot» option. It usually located in the «Security», «Authentication» or «Boot Sections». Change the «Secure Boot» option from «Enable» to «Disable». Save the changes and reboot your computer.
Method 2. Check system drive for errors
If the first method does not help with your problem, you can run CHKDSK.exe tool to check the system hard drive for errors.
1. Boot your computer from your Windows installation DVD.
2. At the Welcome screen, click «Repair your computer».
3. Select «Troubleshoot» and then «Command Prompt» (for Windows 10/8).
Note: for Windows 7, you need press any key in the «Press any key to boot from CD or DVD» screen, select a language, keyboard layout, click «Next», select the operating system, and choose «Command Prompt» at the subsequent «System Recovery Options» screen.
4. In the elevated Command Prompt window, input «chkdsk c: /f» and press Enter to scan the C drive for errors and fix them if possible.
Method 3. Run System File Checker to check system file integrity
Besides, you can also use SFC (System File Checker) tool to scan your Windows system files for corruption and any other changes. If any protected system files are detected to be covered by wrong files, it will automatically extract the correct file from the system backup and replace the incorrect one.
To run it, you just first access the Command Prompt window (refer to the last method), and then execute the command: «sfc /scannow«.
Or execute command : sfc /scannow /offboot=d:\ /offwindir=d:\windows.

Method 4. Rebuild BCD and MBR
In many cases, the Windows boot failure can be related with damaged MBR (Master Boot Record) and BCD (Boot Configuration Data). Therefore, rebuilding MBR or BCD is also worth trying.
After you have got Command Prompt window open, run the following commands one after another:
bootrec /FixMbr – repair the corrupted or damaged boot sector on the system partition;
bootrec /FixBoot – overwrite a new boot sector on the system partition;
bootrec /ScanOs – scan the disk for the installed OSs;
bootrec /RebuildBcd – rebuild the boot configuration data.
Then close the Command Prompt window with “exit” command and restart your computer to see if it can boot up successfully.
If it does not help, you can run the following commands instead to rebuild the BCD for the MBR.
bcdedit /set
bcdedit /set
bcdedit /set
bcdedit /set
bcdedit /set
bcdedit /set
If you do have the Windows installation DVD, you can try the above methods. If you don’t have one, you can switch to AOMEI Partition Assistant Standard. With it, you can create a bootable USB drive, boot your computer from the USB drive and rebuild MBR in the WinPE mode. Quite easy!
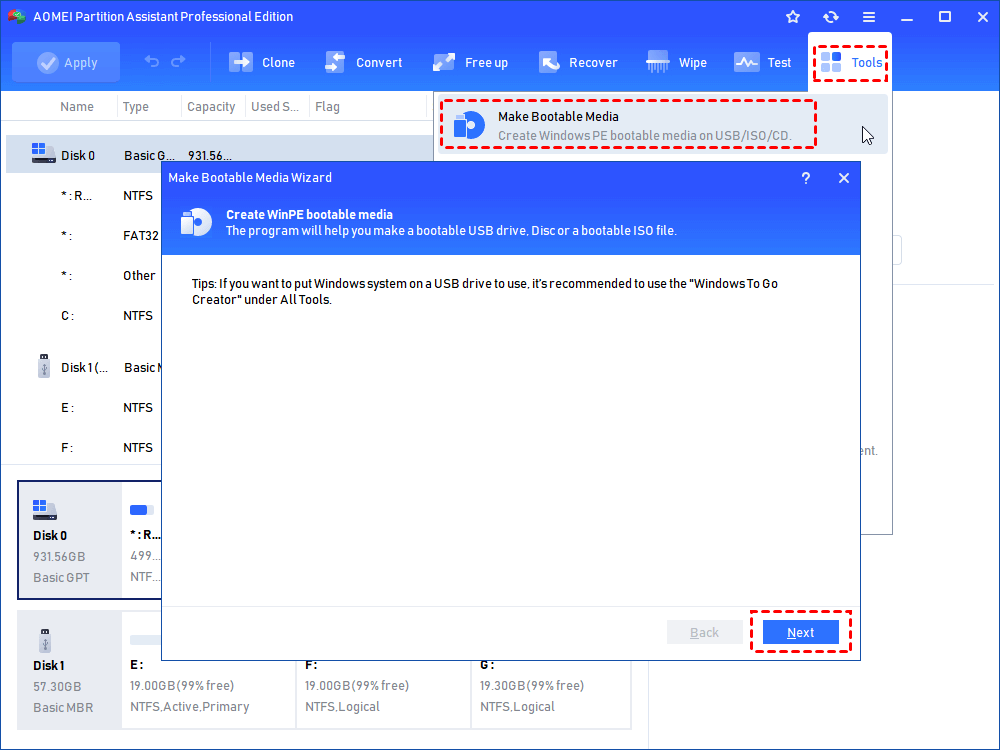
1. Connect an empty USB drive to a working Windows PC. Free download AOMEI Partition Assistant Standard. Install and run it on that computer. Click «Make Bootable Media» on the left side and follow it to create a bootable USB stick.
2. Plug the created bootable USB drive (containing pre-installed AOMEI Partition Assistant Standard) into the computer with a boot problem. Boot the machine from the USB. Once login, you will be in the main interface of AOMEI Partition Assistant.
3. Right click the system disk and select “Rebuild MBR”.
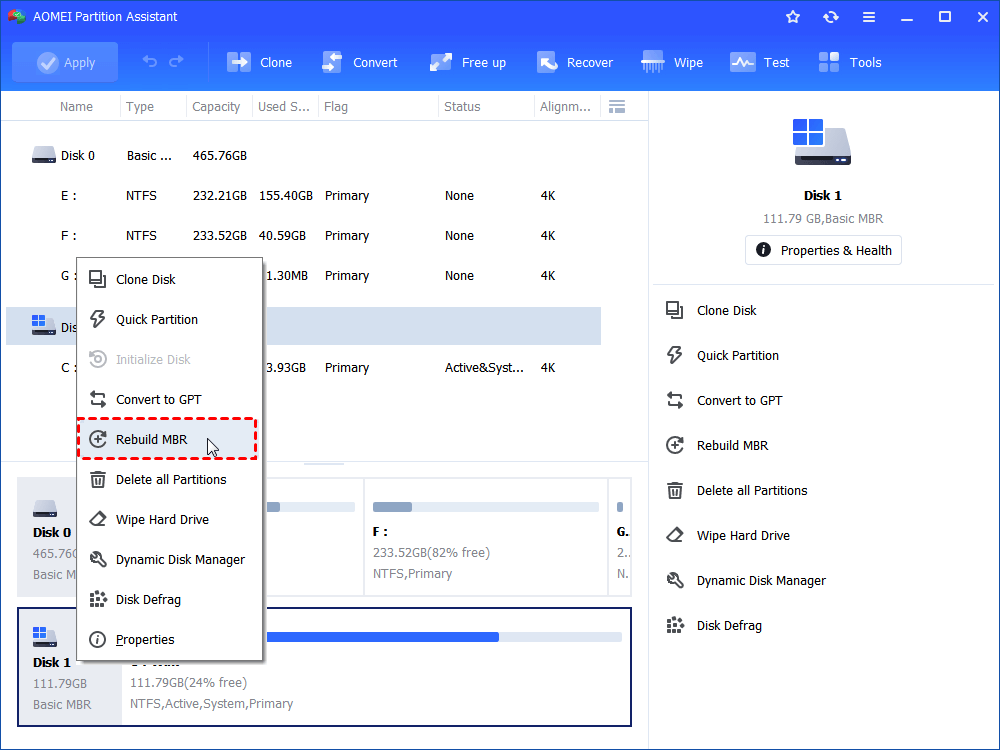
4. Choose an appropriate MBR type according to your current OS, and click “OK”.

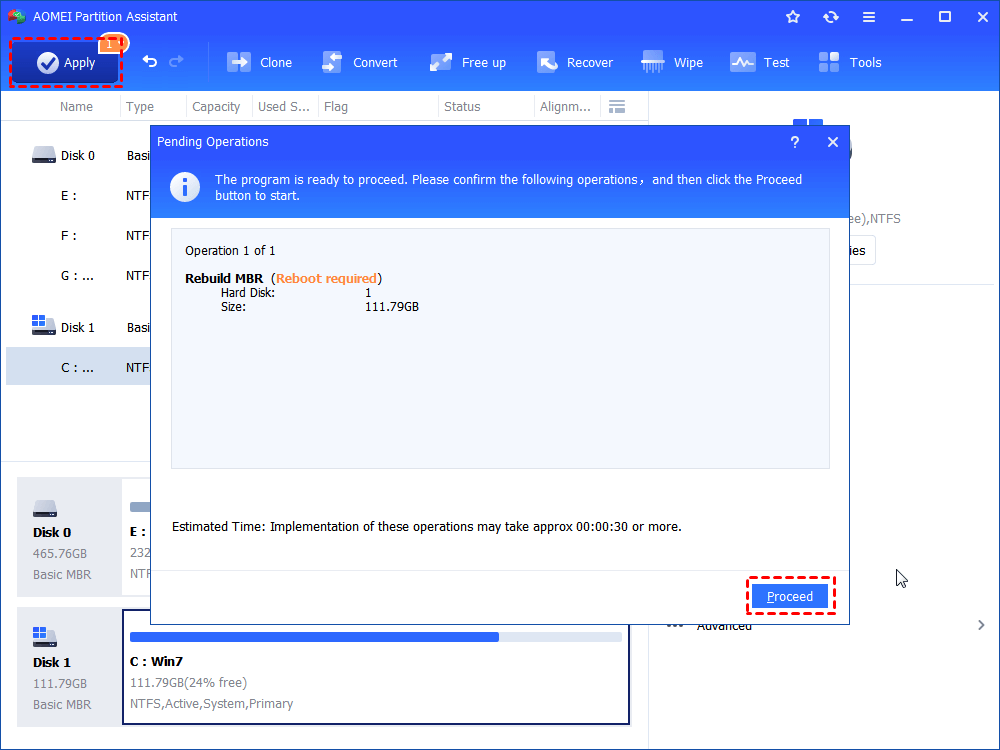
5. Click “Apply” and “Proceed” to commit the pending operation.
Notes:
1. Moreover, you can also right-click the system drive and select “Advanced”> “Check Partition”, then choose the first way to check bad sectors and fix them on the boot drive.
2. If your system partition is deleted by accident and causes boot failure, you can try AOMEI Partition Assistant Professional to recover deleted boot drive with ease.
Method 5. Repair EFI bootloader
At last, you can manually repair EFI bootloader using some commands.
1. Open Command Prompt via Windows installation media.
2. Execute the below commands to assign a drive letter to the EFI volume.
diskpart
list disk
select disk
list volume
Then find a partition labeled ESP or EFI with a size of 100 MB. Remember it.
select volume #: select the ESP or EFI volume
assign letter= k (or another available drive letter)
Now you can type “exit” the diskpart. After that, execute the below command to recreate the bootloader and copy files from the Windows directory:
bcdboot c:\Windows /s k: /f ALL (replace c:\ with the your OS drive letter)
At last, reboot your computer and check if the boot problem is fixed.


