- Использование переменных среды в Терминале на Mac
- Где установить переменные окружения в Mac OS X 2021
- Полный обзор Mac OS X 10.11 El Capitan
- Отображение текущей среды и переменных оболочки в Mac OS X
- Установка переменных среды в командной строке Mac OS X
- Установка Временных переменных среды в OS X
- Bash: Как в macOS добавить новую переменную $PATH?
- Как узнать полный путь к команде?
- С помощью доп.меню
- С помощью терминала
- Как добавить переменную окружения в macOS?
- Добавить переменную в файл .bash_profile
- Environment variables in Mac OS X
- 9 Answers 9
- How to find a full file path on a MacBook
- Before we start
- How to get a file path on a Mac?
- How to copy the file path
- How to find the file path using Terminal
- A shortcut to see unlisted (grayed out) files
- How to find other hidden files on Mac?
Использование переменных среды в Терминале на Mac
Shell использует переменные среды для хранения информации, такой как имя текущего пользователя, имя хоста и пути по умолчанию к любым командам. Переменные среды наследуются всеми командами, которые исполняются в контексте shell, и некоторыми командами, которые зависят от переменных среды.
Вы можете создать переменные среды и использовать их для управления работой команды, не изменяя саму команду. Например, с помощью переменной среды можно сделать так, чтобы команда печатала отладочную информацию в консоль.
Чтобы задать значение для переменной среды, свяжите имя переменной с требуемым значением при помощи соответствующей команды shell. Например, чтобы задать для переменной PATH значение /bin:/sbin:/user/bin:/user/sbin:/system/Library/ , необходимо ввести следующую команду в окне «Терминала».
Чтобы просмотреть все переменные среды, введите:
При запуске приложения из shell приложение наследует значительную часть среды shell, в том числе экспортированные переменные среды. Эта форма наследования может быть полезна для динамической настройки приложения. Например, приложение может проверить наличие (или значение) переменной среды и изменить свою работу соответствующим образом.
Различные shell поддерживают различные семантики для экспорта переменных среды. Cм. man‑страницу предпочитаемой Вами оболочки shell.
Несмотря на то что дочерние процессы shell наследуют среду этой shell, различные shell имеют раздельные контексты исполнения, которые не делятся друг с другом информацией о среде. Переменные, заданные в одном окне Терминала, не передаются в другие окна Терминала.
После закрытия окна Терминала все переменные, которые Вы задали в этом окне, больше не доступны. Если Вы хотите, чтобы значение переменной сохранялось между различными сеансами и во всех окнах Терминала, настройте ее в загрузочном скрипте shell. Об изменении загрузочного скрипта оболочки zsh для сохранения переменных и других настроек между сеансами см. в разделе Invocation на man-странице оболочки zsh.
Источник
Где установить переменные окружения в Mac OS X 2021
Полный обзор Mac OS X 10.11 El Capitan

В командной строке переменные среды определяются для текущей оболочки и становятся наследуемыми любой запущенной командой или процессом. Они могут определять что угодно, от оболочки по умолчанию, PATH, домашнего каталога пользователей, до типа эмуляции терминала, текущего рабочего каталога, в котором находится файл истории, настройки языка и локализации, и далее включать переменные оболочки, которые включают все от настроек до приглашения bash, цветного вывода ls, изменений внешнего вида терминала, псевдонимов и многого другого.
Давайте рассмотрим, как перечислять переменные среды и оболочки, а затем как устанавливать и добавлять новые переменные среды в командной строке Mac OS X.
Отображение текущей среды и переменных оболочки в Mac OS X
Чтобы быстро получить список переменных среды, вы можете использовать следующую команду:
Если вы хотите увидеть полный список переменных оболочки, можно также выполнить команду ‘set’:
Вывод этих команд может быть длинным, поэтому вы можете захотеть передать вывод через команды less или more.
Установка переменных среды в командной строке Mac OS X
Поскольку по умолчанию Mac использует оболочку bash, вы можете установить переменные окружения в пользовательских каталогах .bash_profile, для активной учетной записи пользователя путь к этому файлу находится по адресу:
Если вы изменили свою оболочку или не уверены, какую оболочку вы используете, вы всегда можете проверить, введя команду echo $ SHELL, которая покажет, какая оболочка используется. Мы предполагаем, что вы все еще используете оболочку bash по умолчанию для OS X, поэтому мы добавим новые переменные окружения, изменив .bash_profile с помощью nano — вы можете использовать vi, emacs или другой текстовый редактор, если хотите, но мы рассмотрим нано для простоты.
Начните с открытия .bash_profile в текстовом редакторе nano:
Вы можете добавить переменные окружения и переменные оболочки в новые строки, если в файле .bash_profile уже есть данные, просто обязательно добавьте новые переменные в новую пустую строку, используя при необходимости клавиши со стрелками и клавишу возврата.
Давайте возьмем пример и скажем, что мы собираемся установить переменные окружения JAVA_HOME и JRE_HOME в .bash_profile, добавив следующее в новые строки файла:
export JAVA_HOME=$(/usr/libexec/java_home)
export JRE_HOME=$(/usr/libexec/java_home)
Предполагая, что мы закончили, сохраните изменения, внесенные в .bash_profile, нажав Control + o (это o, как в выдре), затем выйдите из nano, нажав Control + X

Изменения и дополнения, внесенные в переменные среды, потребуют перезапуска оболочки или появления новой оболочки.
Установка Временных переменных среды в OS X
Стоит отметить, что вы также можете установить временные переменные среды в bash, используя саму команду «export», хотя они будут сохраняться только до тех пор, пока текущая оболочка bash остается активной. Например, если вы хотите добавить временный путь к
/ bin /, вы можете использовать следующую команду:
Опять же, команда «export», запускаемая сама по себе и не содержащаяся в .bash_profile, будет только временной настройкой, и переменная среды не будет сохраняться, пока вы не добавите ее в .bash_profile.
Если вы действительно хотите добавить новый PATH для использования, вы почти наверняка должны добавить его в .bash_profile, поместив соответствующую команду экспорта в файл.
Выходя за пределы оболочки bash, если вы изменили стандартную оболочку приложения терминала с bash на tcsh, zsh, sh, ksh, fish или любую другую альтернативную оболочку, вам просто нужно изменить соответствующий профиль или файл rc. для этой конкретной оболочки (.tschrc, .cshrc, .profile и т. д.).
Источник
Bash: Как в macOS добавить новую переменную $PATH?
Сегодня рассказываем вам как добавить новую переменную $PATH в операционной системе macOS (OS X).
Если вам надоело в «Терминале» macOS каждый раз вводить определенные команды через ./команда , тогда необходимо добавить переменную окружения. То есть вам необходимо вам необходимо внести путь полный к команде утилиты в файл .bash_profile .
Как узнать полный путь к команде?
Есть два варианта узнать полный путь, где находиться утилиты с соответствующей командой.
С помощью доп.меню
Сделайте «правый клик» по папке, где находится команда и при появлении контекстного меню нажмите кнопку ALT (OPTION) и «Скопируйте путь до».
С помощью терминала
Перетяните папку с командой в «Терминал» после чего вы сможете скопировать полный путь.
Как добавить переменную окружения в macOS?
Есть также 4 варианта — первый, это открытие файла .bash_profile с помощью Finder и внесение пути, второй и третий и четвертый с помощью терминала:
Добавить переменную в файл .bash_profile
Откройте ваш домашний каталог:
Редактируем .bash_profile :
Добавьте в файл такую запись:
Закройте текстовый файл, все готово!
У вас остались еще дополнительные вопросы? Пишите их в комментариях, о том что у вас получилось или наоборот!
Вот и все! Больше полезных статей и инструкций читайте в разделе Статьи и Хаки IOS и macOS. Оставайтесь вместе с сайтом Android +1, дальше будет еще интересней!
Источник
Environment variables in Mac OS X
Update: The link below does not have a complete answer. Having to set the path or variable in two places (one for GUI and one for shell) is lame.
Coming from a Windows background where it’s very easy to set and modify environment variables (just go to System Properties > Advanced > Environment Variables), it does not seem to be that straight forward on Mac OS 10.5. Most references say I should update /etc/profile or
/.profile. Are those the equivalent of System Variables and User Variables? For example, where should I set my JAVA_HOME variable?
I want to be able to access the variable from the terminal as well as an app like Eclipse. Also, I hope I don’t have to restart/logout to make this take effect.
9 Answers 9
There are several places where you can set environment variables.
/.profile : use this for variables you want to set in all programs launched from the terminal (note that, unlike on Linux, all shells opened in Terminal.app are login shells).
/.bashrc : this is invoked for shells which are not login shells. Use this for aliases and other things which need to be redefined in subshells, not for environment variables that are inherited.
/etc/profile : this is loaded before
/.profile, but is otherwise equivalent. Use it when you want the variable to apply to terminal programs launched by all users on the machine (assuming they use bash).
/.MacOSX/environment.plist : this is read by loginwindow on login. It applies to all applications, including GUI ones, except those launched by Spotlight in 10.5 (not 10.6). It requires you to logout and login again for changes to take effect. This file is no longer supported as of OS X 10.8.
your user’s launchd instance: this applies to all programs launched by the user, GUI and CLI. You can apply changes at any time by using the setenv command in launchctl . In theory, you should be able to put setenv commands in
/.launchd.conf , and launchd would read them automatically when the user logs in, but in practice support for this file was never implemented. Instead, you can use another mechanism to execute a script at login, and have that script call launchctl to set up the launchd environment.
The fundamental things to understand are:
- environment variables are inherited by a process’s children at the time they are forked.
- the root process is a launchd instance, and there is also a separate launchd instance per user session.
- launchd allows you to change its current environment variables using launchctl ; the updated variables are then inherited by all new processes it forks from then on.
Example of setting an environment variable with launchd:
Now, launch your GUI app that uses the variable, and voila!
To work around the fact that
/.launchd.conf does not work, you can put the following script in
Then you can put setenv REPLACE_WITH_VAR REPLACE_WITH_VALUE inside
/.launchd.conf , and it will be executed at each login.
Note that, when piping a command list into launchctl in this fashion, you will not be able to set environment variables with values containing spaces. If you need to do so, you can call launchctl as follows: launchctl setenv MYVARIABLE «QUOTE THE STRING» .
Also, note that other programs that run at login may execute before the launchagent, and thus may not see the environment variables it sets.
Источник
How to find a full file path on a MacBook

Before we start
Having spent some years coding applications for macOS we’ve created a tool that everybody can use. The all-round problem fixer for Mac.

So here’s a tip for you: Download CleanMyMac to quickly solve some of the issues mentioned in this article. But to help you do it all by yourself, we’ve gathered our best ideas and solutions below.
Features described in this article refer to the MacPaw site version of CleanMyMac X.
When you’ve got loads of files — hundreds or even thousands isn’t unusual after a couple of years using the same Mac — it can be difficult to get the correct file path. We attempt to solve this problem in this article for those tired of looking for files and file paths on a Mac.
After trying Spotlight Searches or browsing through files, you might be ready to give up. At times, not knowing the right name can cause software conflicts. But don’t despair. There is always a way to locate a file path.
How to get a file path on a Mac?
To get a basic understanding of where your file is located, just right-click the file.
Look up what’s written under Where:
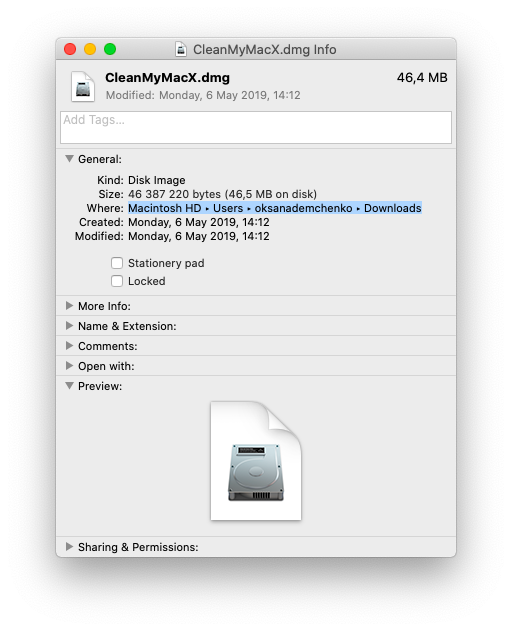
The selected area shows the enclosed folder of your document.
How to copy the file path
Copying any text from the previous window isn’t easy, obviously. But still, you need a complete file address that you can copy and paste anywhere. So you do one extra step:
- Click on Finder
- Click View in the upper bar
- Click Show Path Bar
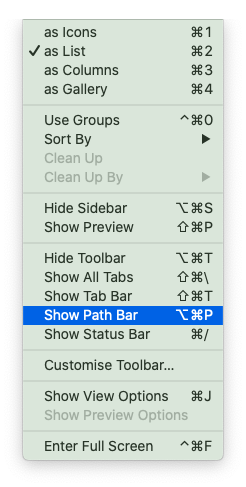
Interestingly, the file path will immediately appear underneath the Finder window.
- Now, Control + Click the file you want the location for
- Hold the Option key
You will see the new command that has appeared in the context menu — Copy …. as Pathname
- Click on the selected command
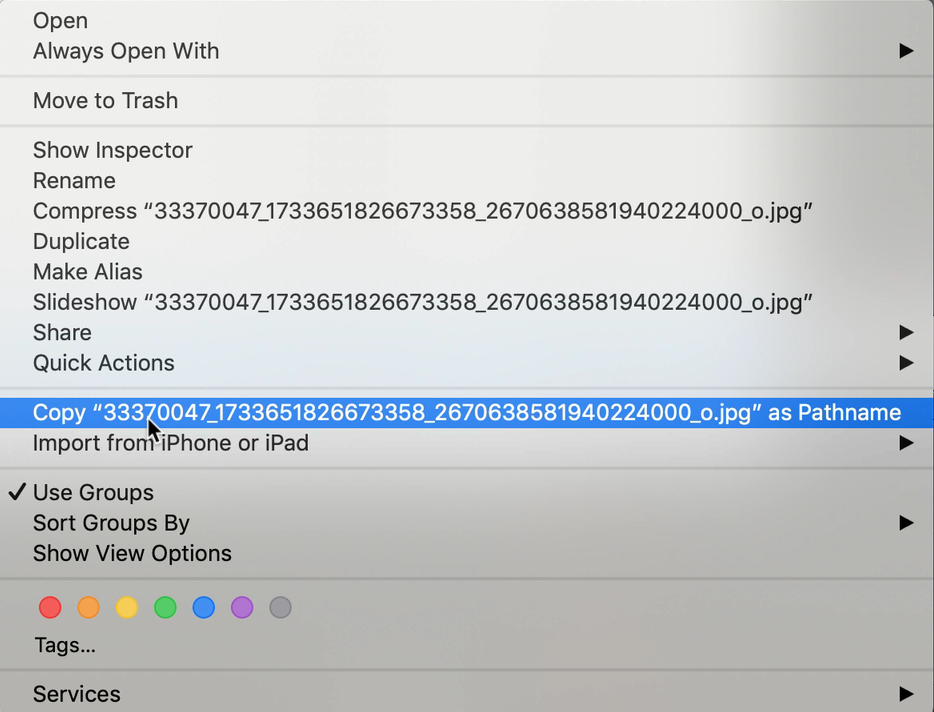
You are now ready to paste. This information is pasted into the Clipboard. Make sure to complete pasting/moving it elsewhere, or this will be lost and you will need to find the folder again.
And that is how to get folder path in Mac. Nice and simple.
How to find the file path using Terminal
Also known as a folder path, or directory path, they aren’t always easy to find. When every other method has failed, turn to Terminal as your solution.
- Go to Applications > Utilities.
- Launch Terminal.
- Make sure you are using it as a Super User (which means being logged in as an Admin), so type in sudo su — then press Return.
- Now you need to have something of an idea of what this file might be called, so once you do, type in the following (the name in the middle is where you’d put a file name): find / -name randomfilename
- Give it time to process the query, which could take several minutes.
- A list of names should appear, some or many of which you can ignore as they will be followed by file-end names, such as “operation not permitted”; so focus on the ones that make the most sense, such as: /Library/Application Support/randomfilename/settings/
- Now copy and paste the full name and drop it into Finder or Spotlight Search.
Alternatively, you can drag and drop the file onto the Terminal window, and it will show the full path. Hopefully, this will bring you to the file you need.
A shortcut to see unlisted (grayed out) files
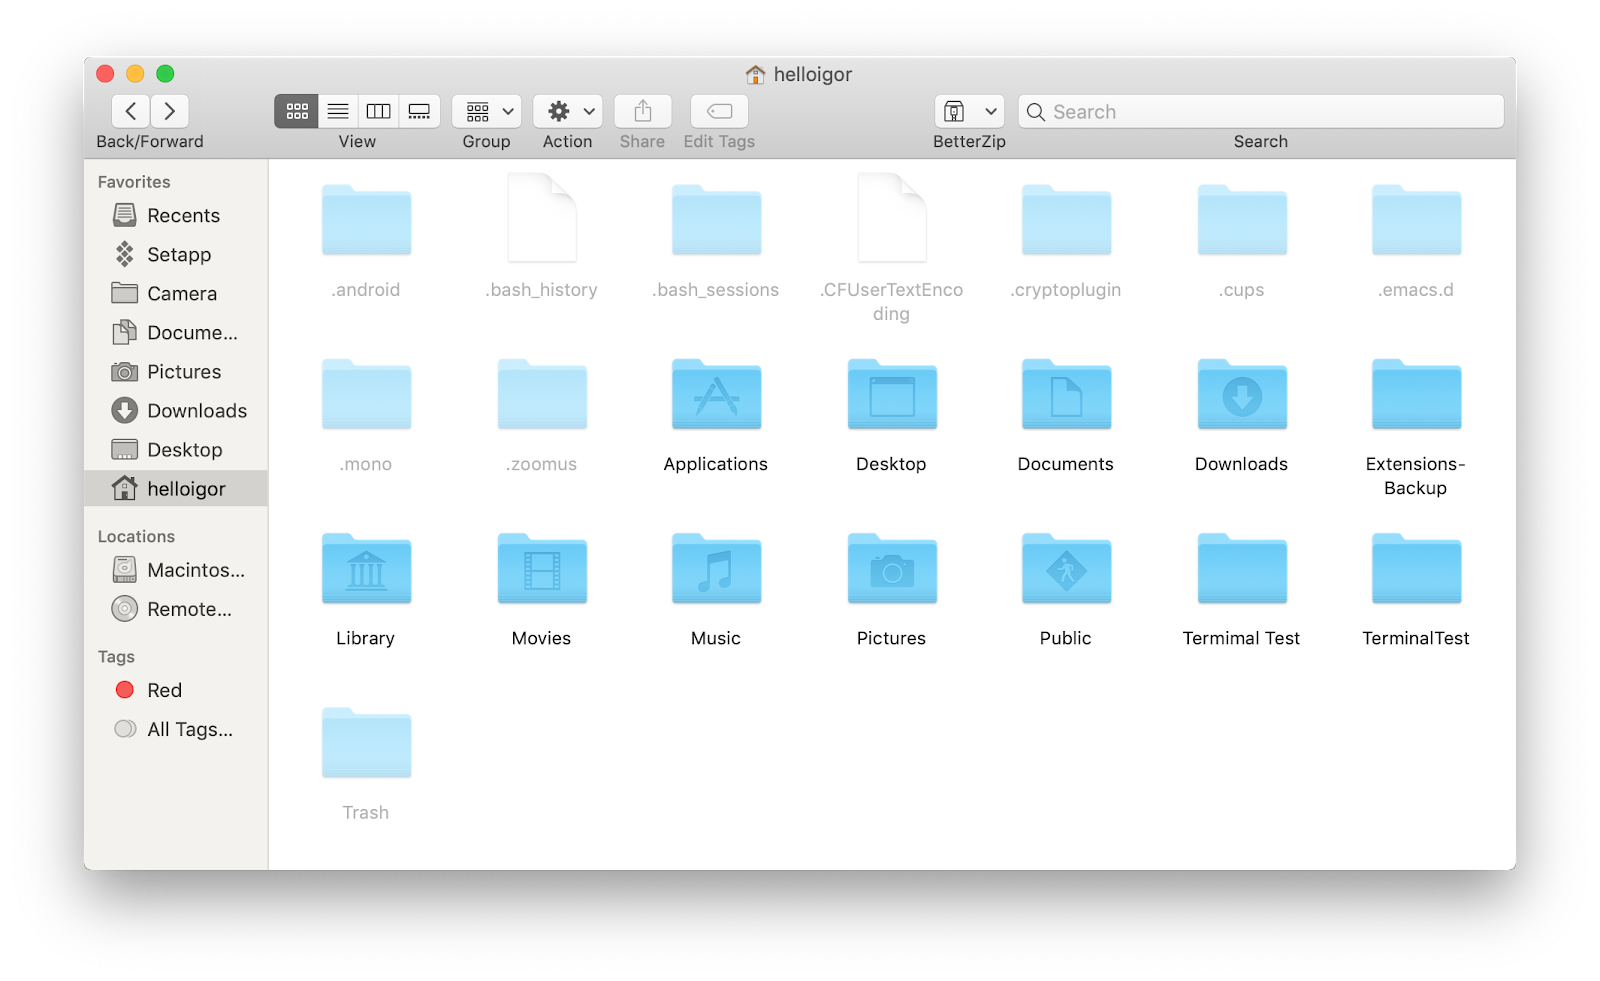
For those who love Apple, which for many is more than a tech company, it’s a representation of a lifestyle, a brand that has many fans, we’ve got a fun fact for you. Did you know there is a shortcut combination to see hidden files?
This shortcut should work for anyone running macOS Mojave, High Sierra, and Sierra, and anything beyond OS 10.12. Here is how you access the shortcut:
- From Finder, go anywhere where you suspect there are hidden files, such as the Macintosh HD root directory, or Home folder
- Next, press down the Command + Shift + Period keys, which should toggle to show hidden files in that folder.
- As you press the shortcut the keys are visible: when you switch it off, they disappear again.
Any hidden files that have been made visible will have greyed out names and icons.
How to find other hidden files on Mac?
It isn’t always easy to know where you’ve put every file on your Mac.
After a couple of years of constant use, a Mac can start to resemble a cluttered old-school file cabinet. Files in places that once make sense, but are now in the wrong place. Files and folders that should be in the right place, but have been put somewhere else. Files that seemingly don’t exist, or are floating around elsewhere.
One solution to this is to download CleanMyMac X. It’s a handy and easy-to-use Mac performance improvement app. It comes with a few tools for finding unlisted, hidden, and large old files that have slipped through the cracks. Here is how you use it:

These blue bubbles represent all your documents in relation to their size. You can dive into each of these folders to reveal their contents — a more visual alternative to Finder.
You can also use the Large & Old files scanner (in the same app). Either or both features will highlight a few gigabytes worth of space you can free up, uncovering files that can easily slip through the cracks and become forgotten. By the way, CleanMyMac X is notarized by Apple, which means this app is malware-free and safe to use on your Mac.
For those with a lot of files, or Mac users badly in need of making more hard drive space, CleanMyMac X is an invaluable tool. We hope you found this article useful about how to locate and copy the file path details when searching for what you need.
Источник


