- Pcsc lite linux mint
- Определение названия модели USB-токена
- Установка дополнительного программного обеспечения
- Проверка работы Рутокен Lite в системе
- Изменение PIN-кода Рутокен Lite
- Определение проблемы с Рутокен Lite в системе
- Проблема «Отсутствие записей об устройстве в конфигурационном файле Info.plist»
- Способ определения
- Решение
- Pcsc lite linux mint
- PC/SC under Unix/Linux/Mac with PCSC-Lite
- Introduction
- PC/SC standard
- CCID standard
- Disclaimer and warning
- CSB6 Family on GNU/Linux
- Download
- Installation
- Installing PCSC-Lite
- Installing CCID driver
- Change Info.plist
- Enabling PCSC-Lite daemon
- Connecting the device
- Validating the installation
- CSB6 Family on Mac OS X
- Configuring CCID driver to support our readers
- Validation
- In case of trouble
Pcsc lite linux mint
Устройства семейства Рутокен Lite используются для безопасного хранения и предъявления персональной информации: ключей шифрования, сертификатов, лицензий, удостоверений и других данных.
Для работы с USB-токеном подключите его к USB-порту компьютера.
Чтобы проверить корректность работы Рутокен Lite в операционных системах GNU/Linux необходимо выполнить действия, указанные в данной инструкции.
Если вы используете для устройства стандартный PIN-код (12345678), то рекомендуется его изменить на более сложный.
Определение названия модели USB-токена
Первым делом подключите USB-токен к компьютеру.
Для определения названия модели USB-токена откройте Терминал и введите команду:
В результате в окне Терминала отобразится название модели USB-токена:

Примечание: В более ранних версиях операционных систем на экране отобразится строка:
Это тоже означает, что название подключенного USB-токена — Рутокен Lite.
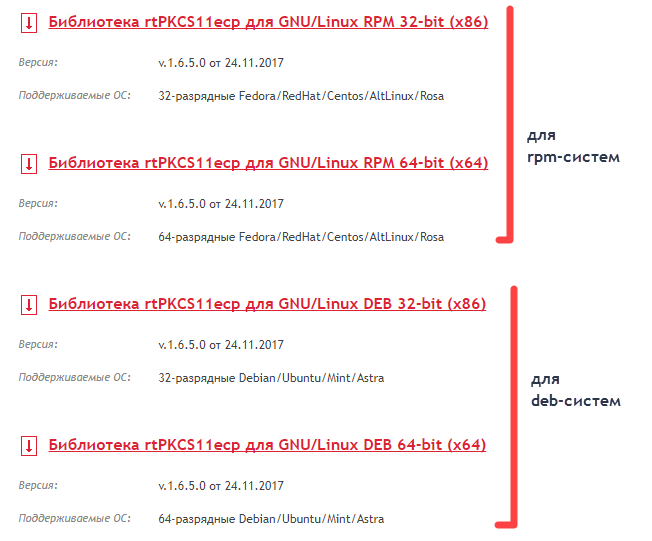
Установка дополнительного программного обеспечения
В deb-based и rpm-based системах используются разные команды. Список систем указан в таблице 1.
Таблица 1. Список операционных систем GNU/Linux
| deb-based | rpm-based |
|---|---|
| Debian, Ubuntu, Linux Mint, Astra Linux | RedHat, CentOS, Fedora, ALT Linux, ROSA Linux, MCBC, ГосЛинукс |
Для выполнения действий данной инструкции необходимо установить следующее программное обеспечение:
В deb-based системах это обычно:
- библиотека libccid не ниже 1.4.2;
- пакеты libpcsclite1 и pcscd;
- pcsc-tools.
В rpm-based системах это обычно:
В ALT Linux это обычно:
Также для всех типов операционных систем необходимо установить библиотеку OpenSC.
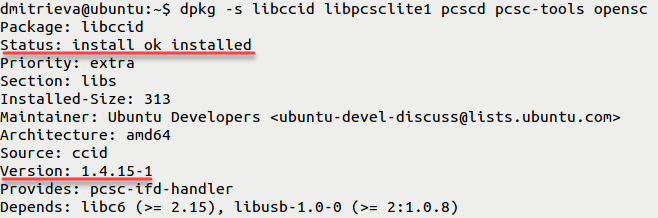
Перед установкой библиотек и пакетов проверьте их наличие в системе. Для этого введите команду:
В deb-based системах:
Если библиотека или пакет уже установлены в системе, то в разделе Status отобразится сообщение «install ok installed».
В разделе Version отобразится версия указанной библиотеки или пакета (версия libccid должна быть выше чем 1.4.2).
В rpm-based системах:
Если библиотека или пакет уже установлены в системе, то на экране отобразятся их названия и номера версий (версия библиотеки ccid должна быть выше чем 1.4.2).

В ALT Linux:
Если у вас нет доступа к команде sudo, то используйте команду su.

Если библиотек и пакетов еще нет на компьютере, то необходимо их установить.
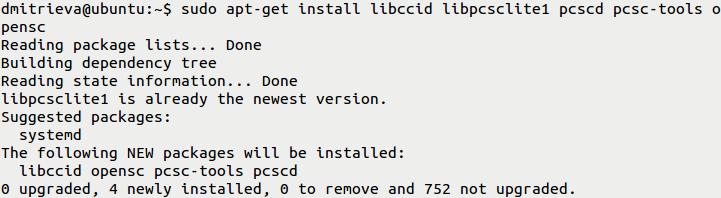
Для установки пакетов и библиотек:
В deb-based системах введите команду:
Если процесс установки завершен успешно, то на экране отобразится сообщение:
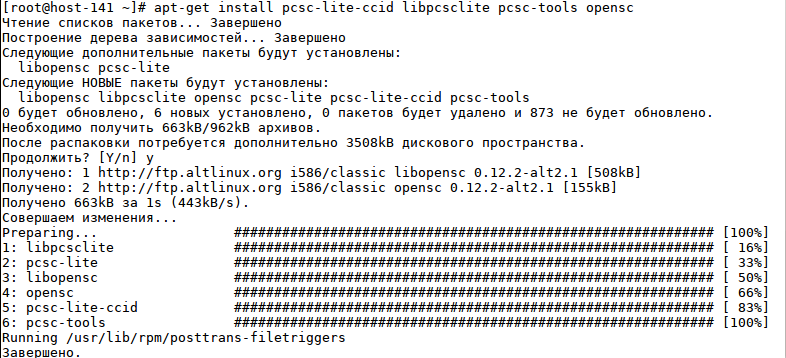
В rpm-based системах (кроме ALT Linux) введите команду:
Если процесс установки завершен успешно, то на экране отобразится сообщение:

В ALT Linux введите команду:
Если у вас нет доступа к команде sudo, то используйте команду su.
Если процесс установки завершен успешно, то на экране отобразится сообщение:
Проверка работы Рутокен Lite в системе
Для проверки работы Рутокен Lite:
- Подключите устройство к компьютеру.
- Введите команду:
Если отобразилось следующее сообщение:
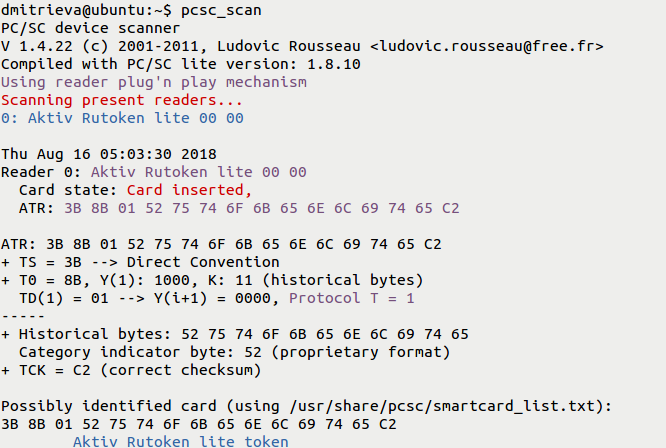
Значит Рутокен Lite работает корректно. В последней строке этого сообщения отображается название устройства (Aktiv Rutoken lite token).

Значит Рутокен Lite не работает. Для решения данной проблемы перейдите в раздел Определение проблемы в работе Рутокен Lite в системе.
Изменение PIN-кода Рутокен Lite
Перед тем, как сменить PIN-код для Рутокен Lite установите библиотеку PKCS#11 и определите путь до библиотеки librtpkcs11ecp.so.
Для того чтобы загрузить библиотеку PKCS#11:
Определите разрядность используемой системы:
Если в результате выполнения команды отобразится строка подобная «i686», то система является 32-разрядной.
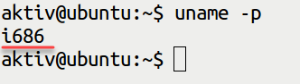
Если в результате выполнения команды отобразится строка подобная «x86_64», то система является 64-разрядной.

https://www.rutoken.ru/support/download/pkcs/
Для того чтобы определить путь до библиотеки librtpkcs11ecp.so введите команду:

Для изменения PIN-кода введите команду:
A — путь до библиотеки librtpkcs11ecp.so
B — текущий PIN-код устройства.
C — новый PIN-код устройства.

В результате PIN-код устройства будет изменен.
Определение проблемы с Рутокен Lite в системе
В данном разделе описана основная проблема, которая может возникнуть c Рутокен Lite в системах GNU/Linux — это отсутствие записей об устройстве в конфигурационном файле Info.plist.
Проблема «Отсутствие записей об устройстве в конфигурационном файле Info.plist»
Способ определения
На экране после ввода команды pcsc_scan отобразилось сообщение:

Это означает, что Рутокен Lite не работает в системе и следует определить проблему.
Для определения проблемы:
Остановите работу утилиты:
Если у вас нет доступа к команде sudo, то используйте команду su.
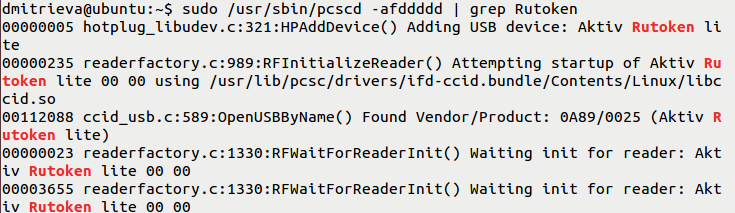
Запустите pcscd вручную в отладочном режиме и осуществите поиск строки «Rutoken».
Откройте в библиотеке libccid конфигурационный файл Info.plist и проверьте наличие в нем записей об устройстве.
Для открытия конфигурационного файла Info.plist введите команду:
Если у вас нет доступа к sudo, то используйте команду su.
В результате откроется конфигурационный файл Info.plist.
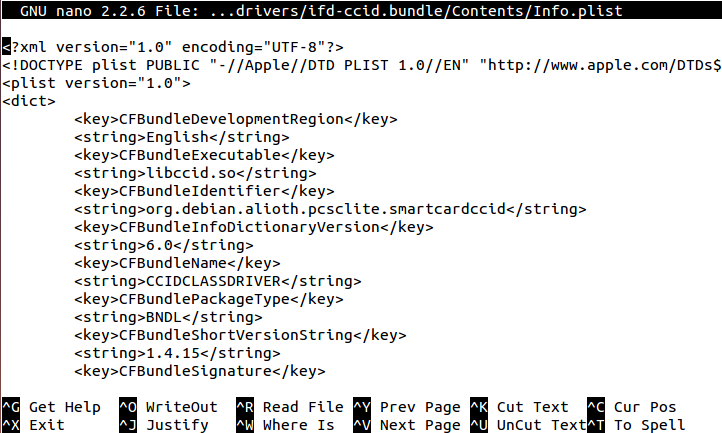
Проверьте наличие строк:
в массиве ifdVendorID строки 0x0A89 ;
в массиве ifdFriendlyName строки Aktiv Rutoken lite .
Решение
Будьте очень внимательны при работе с конфигурационным файлом Info.plist.
Добавьте недостающие строки в конфигурационный файл:
в массиве ifdVendorID строку 0x0A89 ;
в массиве ifdFriendlyName строку Aktiv Rutoken lite .
После этого следует снова проверить работу устройства в системе. Для этого перейдите в раздел Проверка работы Рутокен Lite в системе.
Источник
Pcsc lite linux mint
Для обеспечения работы с электронными ключами Rutoken в ОС семейства Linux необходимо установить:
1. КриптоПро CSP
2. Пакеты из состава дистрибутива КриптоПро CSP : cprocsp-rdr-pcsc, cprocsp-rdr-rutoken
3. Для Rutoken S дополнительно нужен драйвер. Либо с сайта производителя https://www.rutoken.ru/support/download/nix/ , либо из состава дистрибутива КриптоПро CSP — ifd-rutokens
Важно!
Для работы электронных идентификаторов Rutoken должны быть установлены:
В DEB -based системе: библиотека libccid не ниже 1.4.2, пакеты pcscd и libpcsclite1.
В RPM-based системе: пакеты ccid, pcscd и pcsc-lite.
Ниже приведены примеры установки пакетов пользователем, имеющим права администратора ( root ). В противном случае, в начале команды следует поставить « sudo », например:
Устанавливаем драйвер Rutoken для DEB — based и RPM — based систем ( только для RUTOKEN S ):
Устанавливаем КриптоПро CSP для DEB — based и RPM — based систем:
Для обоих систем
Устанавливаем модуль поддержки PCSC-считывателей для DEB — based и RPM — based систем (доп. пакет):
root@ubuntu :# dpkg –i cprocsp-rdr-pcsc
Устанавливаем модуль поддержки Rutoken для DEB — based и RPM — based систем (доп. пакет):
root@ubuntu :# dpkg –i cprocsp-rdr-rutoken
root@ubuntu :# rpm –i cprocsp-rdr-rutoken
После подключения считывателя проверим определяет ли его система:
root@ubuntu :# /opt/cprocsp/bin/amd64/csptest –card –enum
Aktiv Rutoken ECP 00 00
Total: SYS: 0.000 sec USR: 0.000 sec UTC: 0.240 sec
[ ErrorCode : 0 x 00000000]
Просмотр списка настроенных считывателей:
root@ubuntu :# /opt/cprocsp/sbin/amd64/cpconfig -hardware reader -view
Nick name: Aktiv Rutoken ECP 00 00
Connect name:
Reader name: Aktiv Rutoken ECP 00 00
Nick name: FLASH
Connect name:
Reader name: FLASH
Nick name: HDIMAGE
Connect name:
Reader name: HDIMAGE
Для тестирования создадим самоподписанный сертификат с закрытым ключом:
# /opt/cprocsp/bin/amd64$ ./csptestf -keyset -newkeyset -makecert -cont ‘\\.\Aktiv Rutoken ECP 00 00\test’ -keytype exchange
CSP (Type:80) v4.0.9019 KC1 Release Ver:4.0.9963 OS:Linux CPU:AMD64 FastCode:READY:AVX.
AcquireContext: OK. HCRYPTPROV: 34026883
GetProvParam(PP_NAME): Crypto-Pro GOST R 34.10-2012 KC1 CSP
Container name: «test»
Exchange key is not available.
Attempting to create an exchange key.
an exchange key created.
Subject/Issuer: E=test@cryptopro.ru, CN=test
Subject/Issuer: E=test@cryptopro.ru, CN=test
Self signed certificate created: E=test@cryptopro.ru, CN=test
Certificate stored in container.
Keys in container:
PrivKey: Not specified — 24.04.2021 11:33:59 (UTC)
Total: SYS: 0.020 sec USR: 0.140 sec UTC: 10.720 sec
Источник
PC/SC under Unix/Linux/Mac with PCSC-Lite
Products in the SpringCard CSB6 Family (CSB6, Prox’N’Roll PC/SC, EasyFinger and CrazyWriter) are smartcard readers, compliant with both standards PC/SC and CCID .
This makes those products usable on non-Windows operating systems thanks to PCSC-Lite CCID driver.
Introduction
PC/SC standard
PC/SC is the de-facto standard to interface Personal Computers with Smart Cards (and smartcard readers of course). Even if PC/SC has been initialy promoted by Microsoft -and has been implemented for long in Windows-, the standard is not limited to MS’ operating systems.
PCSC-Lite is an open source implementation of PC/SC, part of a global project named MUSCLE (Movement for the Use of Smart Cards in a Linux Environment). Despite its name, the PC/SC stack offered by MUSCLE is not limited to GNU/Linux anymore. Their compatibility list now includes other popular UNIXes, including Apple Mac OS X and Solaris.
CCID standard
The USB CCID specification published by the USB Workgroup aims to normalize USB smartcard readers, in order to have a single driver (supplied once for all with the operating system) for virtually any reader from any manufacturer.
PCSC-Lite project includes an open source CCID driver. This driver has been tested with SpringCard CSB6 on GNU/Linux, and should work on the other operating systems targetted by the project.
Disclaimer and warning
There’s no relationship between SpringCard and the developers involved in the open source PCSC-Lite project.
Apart from this explanation page, SpringCard can’t provide any technical support related to PCSC-Lite middleware nor PCSC-Lite CCID driver.
CSB6 Family on GNU/Linux
In this part we’re going to install PCSC-Lite and CSB6’s drivers on Ubuntu 8.04.1 (Hardy). Some parts of the procedure may vary a little, depending on the GNU/Linux distribution you’re working with.
Do not connect the device to your computer now ! You must download and install the driver before connecting the product.
Download
Go to pcsclite.alioth.debian.org to download both PCSC-Lite and its CCID Driver :
PCSC-Lite : file named pcsc-lite-x.y.z.tar.bz2 , «x.y.z» being the version number,
CCID driver : file named ccid -x.y.z.tar.bz2 , «x.y.z» being the version number.
Installation
Connect as root .
Uncompress both archives.
N.B. : On Ubuntu (and on some other Linuxes), connecting as root is not possible. In this case, one must prefix every command by «sudo», to gain root’s priviledges temporary.
Installing PCSC-Lite
Warning, on some Linux distributions, like Raspbian for example, the system comes with a pre installed lib but in an old version of pcsc-lite (for example an 1.8.3 or 1.8.5 version).
First uninstall the current version then install a new one, for example use the 1.8.11 version). Without an update, you should have some problems to run the daemon.
Before to install pcsc-lite you should also verify that libusb is up to date and if necessary install the dev version.
Open a terminal and go to the directory where you have uncompressed the PCSC-Lite archive. Enter the commands :
./configure
make
make install
Troubleshooting
If the configure step fails with message error: usb .h not found , check that you have the libusb library installed. If needed, please install it, and then give the path to this library to the configuration script: ./configure LIBUSB_CFLAGS=. .
On Ubuntu or Debian, you may alternatively use apt-get to download and install the libusb-dev package :
apt-get install libusb-dev
Installing CCID driver
Open a terminal and go to the directory where you have uncompressed the CCID Driver archive. Enter the commands :
./configure
make
make install
Change Info.plist
With some old Linux distributions, the file called info.plist is not up to date so you may have to change it to work with our readers.
Locate the file called Info.plist, for example with a command like this one :
sudo find / -name Info.plist
You will, for example, find it in /usr/local/lib/pcsc/drivers/ifd- ccid .bundle/Contents/Info.plist
Edit the file to add your product’s IDs.
Enabling PCSC-Lite daemon
PCSC-Lite’s pcscd process must be running in the background.
If you have some problems with the daemon you can launch it this way to see some error messages : pcscd -fd
If you see some error messages related to «permission denied», try to launch make fix-rights from the folder where you have downloaded pcsc-lite (use sudo if necessary).
Starting pcscd manually
Open a terminal and go to the directory where PCSC-Lite has been installed. Typically, this is /usr/local/sbin/pcscd .
In this directory, enter the command ./pcscd .
Configuring pcscd to be launched on startup
It is better to have pcscd automatically started when the computer starts. To do so, you must add pcscd in the list of processes started in rc.local or equivalent startup script.
Connecting the device
Plug the device onto an unused USB connector.
In a terminal , use the command lsusb to verify device’s information.
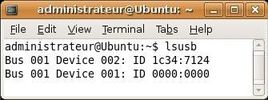
In the above screenshot, we have a CSB6 connected : Vendor (Pro Active and SpringCard), Product (CSB6 Ultimate, PC/SC mode).
Other devices will have different ProductIDs ; all products in the CSB6 PC/SC family have a ProductID in the 0x7100 to 0x71FF range.
Validating the installation
To test the newly installed reader , we’ll use gscriptor, an open source PERL software, able to exchange APDUs with smartcards through the PCSC-Lite stack.
Installing PCSC-Perl
Go to ludovic.rousseau.free.fr/softwares/pcsc-perl and download pcsc-perl-x.y.z.tar.gz , «x.y.z» being the version number.
Uncompress the archive. Install the package as follow :
perl Makefile.PL
make
make install
Go to ludovic.rousseau.free.fr/softwares/pcsc-tools and download pcsc-tools-x.y.z.tar.gz , «x.y.z» being the version number.
Uncompress the archive. Launch the gscriptor program.
Card connect
Select the contactless slot of your CSB6 reader (usually the first reader in the the list),
Put any compliant contactless card on the reader ,
Connect to the card ( Reader -> Connect).
APDU exchange
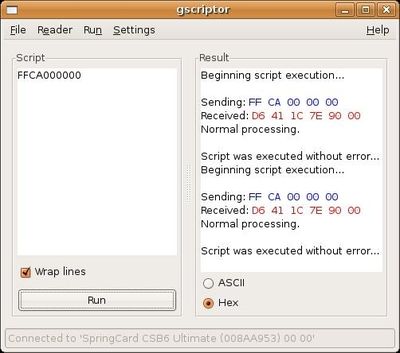
Write the APDU command in the script panel. You may use the command FF CA 00 00 00 (get card serial number) as a test.
Click Run. Observe card’s response in the result panel.
Well, in this test this not actually a response from the card. The command FFCA000000 is interpreted by the reader ( CLA =FF is reserved for the embedded APDU interpreter), so it is the reader that actually answers. The returned data are the serial number of the contactless card . Remember, we’ve put ‘any’ contactless card on the reader , and querying the serial number is more or less the only command that is available for any kind of card.
Troubleshooting
If invoking gscriptor fails with message Can’t locate Chipcard/PCSC.pm , re-install PCSC-Perl and/or verify PERL’s include directories.
Other tools
If you are not using a graphical user interface, you can still use pcsc scan to test your reader with some cards. From the command line, juste type pcsc_scan.
CSB6 Family on Mac OS X
Starting with MacOS X version 10.4, the PCSC-Lite package and the CCID driver are included in the system. We just need to add entries for SpringCard readers into the configuration file of the CCID driver to have them supported.
Configuring CCID driver to support our readers
Open CCID driver’s Info.plist
Open a Terminal window and enter this command :
sudo nano /usr/libexec/SmartCardServices/drivers/ifd- ccid .bundle/Contents/Info.plist
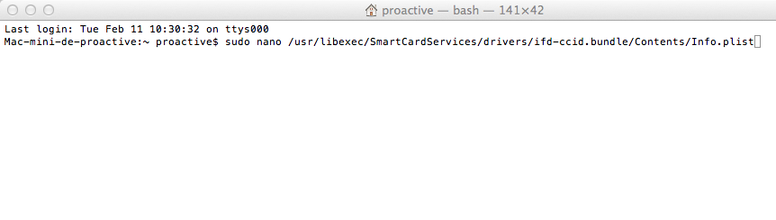
Note : the command may be splited into a few lines if your screen is too narrow. You must enter it at once, with only a single at the end, after Info.plist
Enter your password if prompted to do so.
Note, if you can’t modify (or save) this file :
- Turn off your Mac
- Boot into recovery (when you press power button, you should be already holding cmd R keys, hold them as long as the display is clear white)
- In the recovery system, go in the menubar to Utilities >Terminal
- Terminal window will pop-up. Enter:
- csrutil disable
- Confirm with enter
- Close Terminal , restart the computer through Apple logo in top left corner
- From here on, the SIP is disabled and you can edit your file. It should be noted, that after you are done with your modifications, you should definitely re-enable the SIP. The method is same as above, the only difference is that you will type into Terminal :
- csrutil enable
Add SpringCard’s USB Vendor ID
Scroll down, locate the block beginning by key >ifdVendorID key > ,

Scroll down until you reach the end of the block,
Add 3 occurences of the line 0x1C34 .
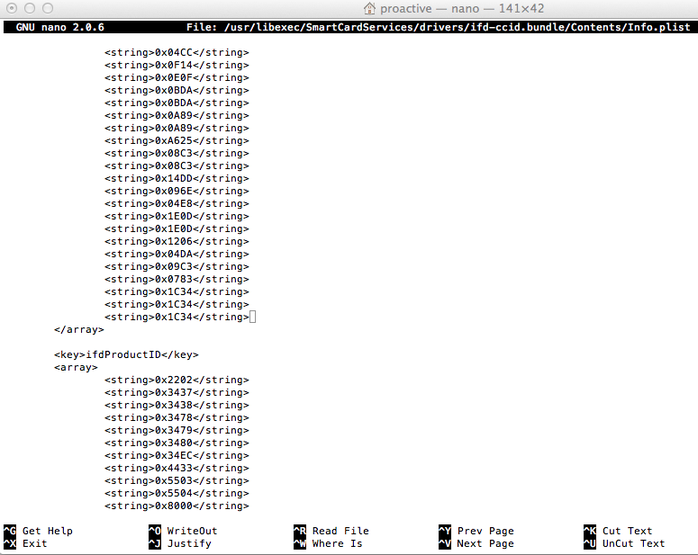
Note : We need to add our Vendor ID 3 times, because we are to support 3 different Product IDs.
Add the Product IDs of SpringCard’s readers
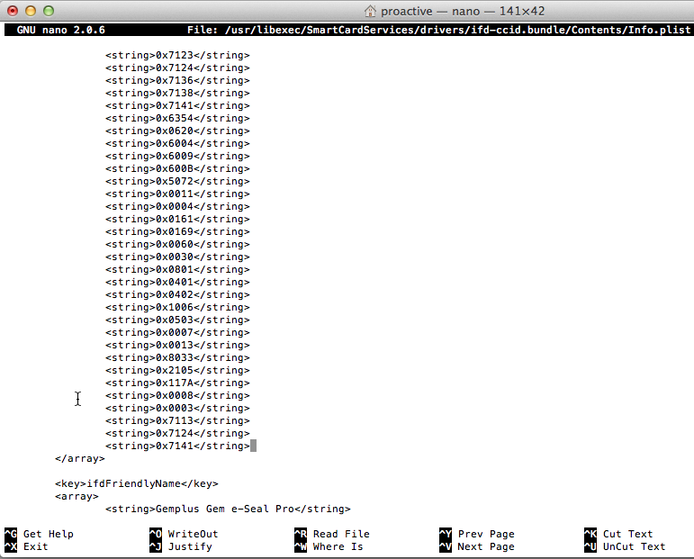
Scroll down, locate the block beginning by key >ifdProductID key > ,

Scroll down until you reach the end of the block,
Add the following lines :
0x7113
0x7124
0x7141
Add the names of SpringCard’s readers
Scroll down, locate the block beginning by key >ifdFriendlyName key > ,
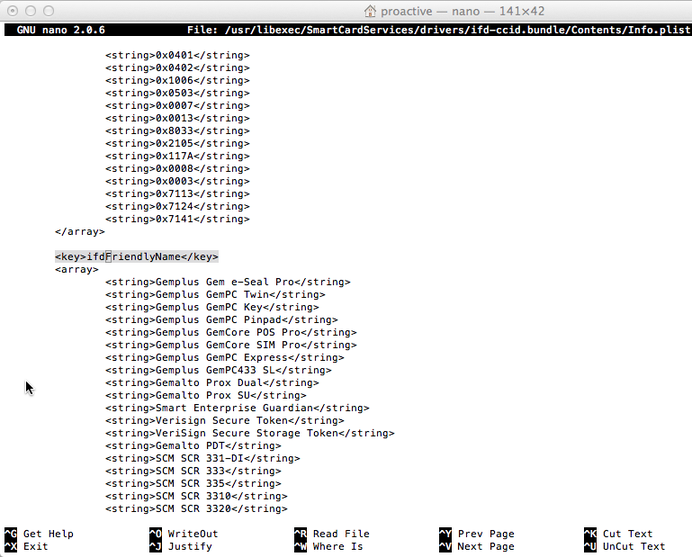
Scroll down until you reach the end of the block,
Add the following lines :
CrazyWriter
CSB6 Ultimate
Prox’N’Roll
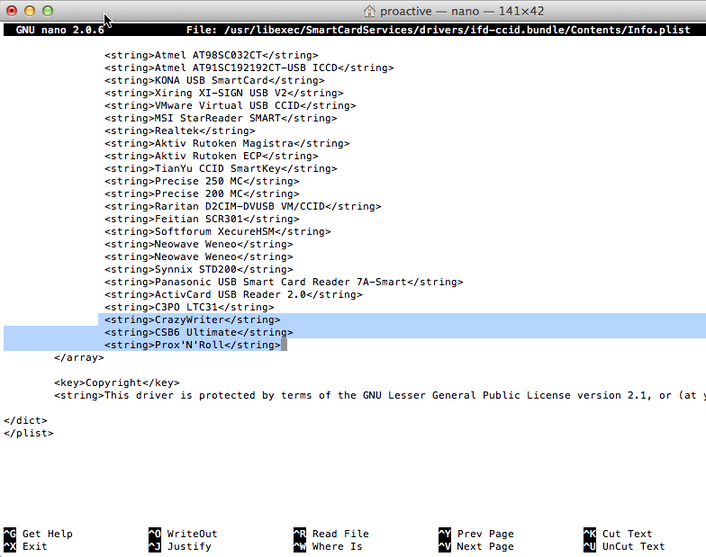
Save and restart
Save the modified file. Exit nano and restart the computer.
Validation
Plug the reader onto a computer’s USB port,
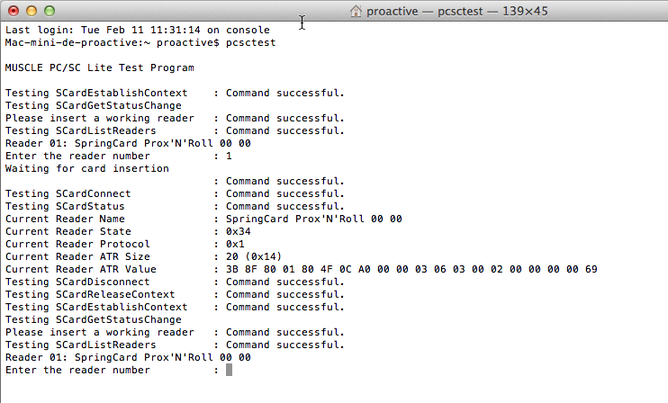
Open a Terminal window and enter the command pcsctest ,
pcsctest displays the list of connected readers (in the following snapshots, only one Prox’N’Roll is connected),
Enter the number of the reader you want to test (in our case, only ‘1’ is allowed).
Put a card on the reader , and check that everything is running as expected.
In case of trouble
If you are experiencing problem(s), you can, in a terminal , launch this command to see if the daemon reports any error message :
sudo /usr/sbin/pcscd — apdu —debug —foreground
For example you could have a syntax error inside your Info.plist file.
You may also check in the activity monitor that you have a process called pcscd (you can use the search on the top right corner). If that’s the case, then the daemon is running.
If you have a problem with OS X 10.8 Mountain Lion, consult this forum (reported here) :
For all on OS X Mountain Lion.
There is an issue with the pcscd where when you boot OS X with your reader connected and card inserted, the daemon will not get launched properly.
Did not delve deeper yet but running pcsctest will say «Service not available».
Manually killing it so it gets relaunched will do the trick or just not connecting your reader while booting.
For all the eid applets out there, the result is the applet getting stuck on a «Please connect your reader » message.
A bugreport has been filed with apple, also hinting that it would be nice for em to update the ccid -driver and pcsc-lite for a change 🙂
As Ludovic states, the ccid -driver for example is 3 years old and by consequence is missing possibly bad support for 97 readers since t hat version 🙂
Источник


