- Конвертирование jpg в pdf в Linux
- Конвертирование jpg в pdf с помощью ImageMagick
- Конвертирование jpg в pdf с помощью Ghostscript
- Convert images to PDF on Linux
- Gscan2pdf
- ImageMagick
- LibreOffice
- Conclusion
- Merging png images into one pdf file [closed]
- 4 Answers 4
- Convert multipage PDF to PNG and back (Linux)
- 2 Answers 2
- How To Convert Multiple Images To PDF In Ubuntu Linux
- 1. The GUI way to convert multiple images to PDF in Ubuntu Linux
- Install gscan2pdf in Ubuntu:
- How to convert multiple images to PDF with gscan2pdf:
- 2. The command line way to convert multiple images to PDF in Ubuntu Linux
- Did it work for you?
Конвертирование jpg в pdf в Linux
Формат jpg несомненно является самым популярным графическим форматом в интернете, однако в некоторых случаях удобнее использовать pdf, так как он может включать как растровую, так и векторную графику. Поэтому качество печати изображений jpg зависит только от их разрешения и степени сжатия, в то время как векторные pdf-файлы можно печатать любого размера. Кроме того, pdf-файлы с текстовым слоем поддерживают поиск по содержимому и могут содержать больше метаданных, чем jpg.
В Linux для конвертирования jpg в pdf вы можете использовать ImageMagic или GhostScript.
Конвертирование jpg в pdf с помощью ImageMagick
Для начала установите ImageMagick.
В пакет ImageMagick входит утилита convert, которая позволяет конвертировать jpg в pdf. Эта команда масштабирует изображение таким образом, чтобы оно соответствовало размеру страницы. Конвертирование осуществляется с помощью команды:
Если вы хотите конвертировать несколько изображений jpg в один pdf-файл (с несколькими страницами), это делается с помощью команды:
Утилита convert также поддерживает различные операции редактирования изображения перед его конвертированием в формат pdf.
С помощью опции «-page» команды convert можно задать размер страницы. Если размер больше, чем размер исходного изображения, оно будет размещено в левом нижнем углу страницы.
Можно также задать размер изображения:
Изменить размер изображения:
Конвертирование jpg в pdf с помощью Ghostscript
Сначала установите ghostscript.
Для конвертирования используется команда gs вида:
Конвертирование нескольких изображений jpg в один файл pdf осуществляется с помощью команды:
Источник
Convert images to PDF on Linux
In this post, we’ll take a look at three different ways on how to convert images to PDF file on Linux.
Gscan2pdf
The first option on our list is to use gscan2pdf app. Gscan2pdf is an open-source app available on all Linux distros and makes converting images to PDF a breeze. We can install it by going to the software centre and searching for gscan2pdf .
After opening the app, click on a folder icon to load images. An error pop-up might show up informing you that you don’t have scanning devices. That’s not a problem, just close it.
Having loaded images, you can customize them if you would like to do so.
The top toolbar includes editing options like:
- Flipping
- Rotating
- Renumbering
- and much more!
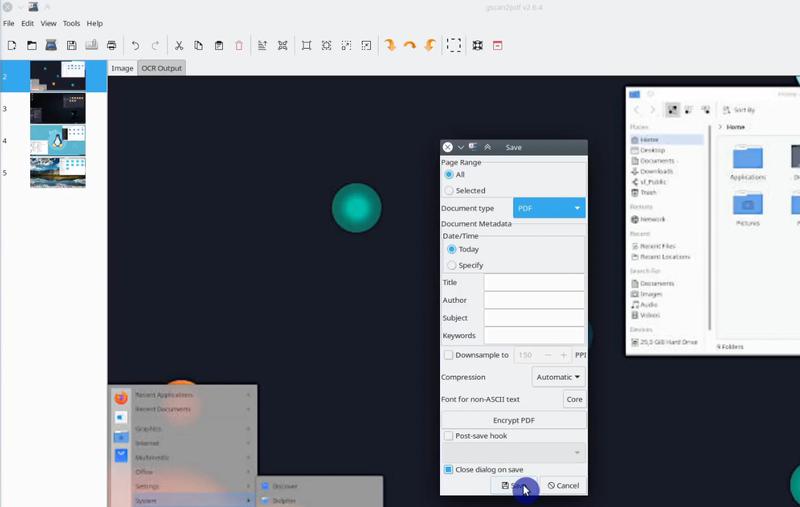
Once we are done with editing, we can convert images into a single PDF:
File → Save → Select Document type to PDF → Save.
ImageMagick
ImageMagick is a CLI tool which allows you to convert images to PDF. As a CLI tool, it’s much faster than Gscan2pdf. On top of that, we can automate the whole process!
We can install it with the following command:
After installing it, convert your images to PDF with the following command:
The command above might yield an “operation not allowed” error. Fortunately, we can easily fix it by executing:
After applying the fix, re-run the conversion command!
LibreOffice
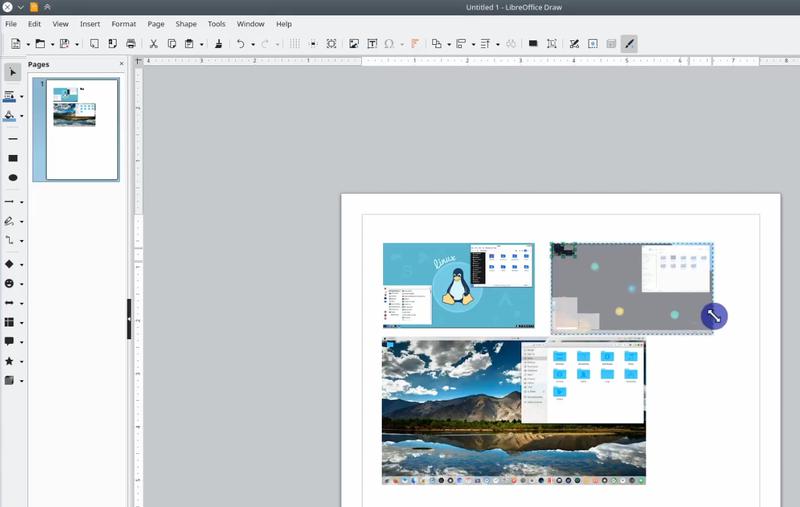
The last option on our list is LibreOffice. LibreOffice Draw provides us with a bit cumbersome, but still possible way to convert images to PDF.
The biggest advantage of this approach is also its biggest disadvantage — the ability to arrange images on a page manually. If you just want to have each image on its page without much tweaking, then you should not use LibreOffice Draw for this.
You can import images in LibreOffice Draw by dragging and dropping them from your file manager and customize them as you wish.
Once we’ve finished with editing, we can export our work as PDF:
File → Export as → Export as PDF → Export
Conclusion
In this post, we’ve explored three different ways to convert images to PDF and discussed the pros and cons of each. What is your approach? Share your thoughts with us in the comments section below. 👇
Источник
Merging png images into one pdf file [closed]
Want to improve this question? Update the question so it’s on-topic for Stack Overflow.
Closed 3 years ago .
How can I merge several .png files into one PDF file in Unix?
4 Answers 4
From looking through the documentation on ImageMagick, it might be as easy as:
If that doesn’t work, PDFjam claims to be able to solve your problem.
If I want to merge some scans to one PDF file, I do this:
This gives you a PDF document with DIN-A4 page size, where every png file is centered on it’s own page. Images that are too big for one DIN-A4 page are resized proportionally to fit on one page. Smaller images are not resized (not made bigger).
You have to name all png files on the command line, but you can also use wildcards to eg merge all png files in the current directory:
The pdfjoin command is part of PDFjam as mentioned in the answer by Jeremiah Willcock. So you will most likely have to install a package named pdfjam or texlive-extra-utils with your distros package manager. PDFjam is able to use png files as input since Version 2.07, released in 2010-11-13.
ImageMagick’s convert tool is my preference.
The convert program is a member of the ImageMagick suite of tools. Use it to convert between image formats as well as resize an image, blur, crop, despeckle, dither, draw on, flip, join, re-sample, and much more.
If you want the image files (and thus, their quality and file size) unaltered, and just put a PDF container around them:
In case you want to have a smaller file size, and you are okay with a loss in quality, you can convert them to the JPEG format first. (ImageMagick also supports changing the PNG compression level, but usually your input files are already using the highest level.)
Use a value between 0 and 100 for the quality option.
Alternatively, you can reach a lower file size (and quality) by resampling the images to a certain resolution.
The value for resample refers to the number of pixels per inches. ImageMagick reads the original density from EXIF part of the input images, falling back to 72 dpi. You can use the density parameter to set a custom resolution for the input images.
You can of course also combine the compress , quality , and resample parameters.
Источник
Convert multipage PDF to PNG and back (Linux)
I have a lot of PDF documents that I want to convert to PNG, edit in Gimp, and then save back to the multipage Acrobat file. I’m filling out forms and adding scanned signature, trying to avoid printing, signing, then scanning back in, with the ability to type the information I need to enter.
I’ve been trying to use Imagemagick to convert to png files, which seems to work fine. I use the command convert -quality 100 -density 300×300 multipage.pdf single%d.png
(I’m not really sure if the quality parameter is right for png).
But I’m having problems with saving back to PDF. Some of the files have the wrong page size, and I’ve tried every command and procedure I can find, but there are always a few odd sizes. The resolution seems to vary so that it looks good at a certain zoom level, but either a few pages are specified at about 2″ wide, or they are 8.5×11 but the others are about 35″ wide. I’ve tried making sure Gimp had the canvass size and resolution correct, and to save the resolution in the file, but that doesn’t seem to matter.
The command I use to save the files is convert -page letter -adjoin single*.png multipage.pdf I’ve tried other parameters, but none seemed to matter.
If anyone has any ideas or alternatives, I’d appreciate it.

2 Answers 2
«I’m not really sure if the quality parameter is right for PNG.»
For PNG output, the -quality setting is very unlike JPEG’s quality setting (which simply is an integer from 0 to 100 ).
For PNG it is composed by two single digits:
The first digit (tens) is (largely) the zlib compression level, and it may go from 0 to 9 .
(However the setting of 0 has a special meaning: when you use it you’ll get Huffman compression, not zlib compression level 0. This is often better. Weird but true.)
The second digit is the PNG data encoding filter type (before it is compressed):
- 0 is none,
- 1 is «sub»,
- 2 is «up»,
- 3 is «average»,
- 4 is «Paeth», and
- 5 is «adaptive».
In practical terms that means:
- For illustrations with solid sequences of color a «none» filter ( -quality 00 ) is typically the most appropriate.
- For photos of natural landscapes an «adaptive» filtering ( -quality 05 ) is generally the best.
«I’m having problems with saving back to PDF. Some of the files have the wrong page size, and I’ve tried every command and procedure I can find [. ] but either a few pages are specified at about 2″ wide, or they are 8.5×11 but the others are about 35″ wide.»
Not having available your PNG files, I created a few simple ones with different dimensions to verify the different commands (as I wasn’t sure myself any more). Indeed, the one you used:
does create all PDF pages in (same) letter size, but it places my sample of (differently sized) PNGs always on the lower left corner of the PDF page. (Should a PNG exceed the PDF page size, it does scale them down to make them fit — but it doesn’t scale up smaller PNGs to fill the available page space.)
The following modification to the command will place the PNGs into the center of each PDF page:
If this is still not good enough for you, you can enforce a (possibly non-proportional!) scaling to almost fill the letter area by adding a -scale ‘590!x770!’ parameter (this will leave a border of 11 pt at each edge of the page):
To leave away the extra border, use -scale ‘612!x792!’ . — Should you want only upward scaling to happen if required while keeping the aspect ratio of the PNG, use -scale ‘590 :
Источник
How To Convert Multiple Images To PDF In Ubuntu Linux
Last updated October 28, 2019 By Abhishek Prakash 72 Comments

You have several documents or images scanned individually and you need to save multiple images to one PDF file. If you Google, you will find many online websites for this purpose. But they are either not free or they will put their watermark on the final PDF file. You don’t want it, do you?
I had this need when I had to apply for a job and they required me to upload a single PDF file consisting of several documents. My problem was that I had documents scanned individually but not in one file. It’s just one of the example where you may need to convert multiple image files in one PDF file.
If you are using Ubuntu then many people would suggest to use the command line tool Image Magic. But if you prefer a GUI tool over command line, gscan2pdf that is the perfect tool for merging multiple images into one PDF file. We shall see both methods in this tutorial.
1. The GUI way to convert multiple images to PDF in Ubuntu Linux
In this tutorial we’ll see how to convert multiple images to PDF with gscan2pdf. Though the tutorial is performed in Ubuntu 14.04, it should be valid for earlier or newer Ubuntu versions as well as other Linux distributions based on Ubuntu such as Linux Mint and elementary OS.
Install gscan2pdf in Ubuntu:
Open terminal (Ctrl+Alt+T) and use the following command to install gscan2pdf:
How to convert multiple images to PDF with gscan2pdf:
Once installed, open gscan2pdf by searching for it in Unity Dash:

Once gscan2pdf is opened, you can select all the required files in it by clicking on the Open Files. By default it is arranged in alphabetical order but you can drag and drop to reorder the images as per your choice. Once done, you can click on the Save icon to save the files to PDF.

When you hit the save button, the next screen might look confusing. Actually it provides you option of putting metadata in the document such as author, date etc similar to a word document. If you just want a PDF file, hit the save button. Since by default the output file is PDF, you don’t need to bother a lot here. Just choose where to save the converted file.

2. The command line way to convert multiple images to PDF in Ubuntu Linux
If you want to go the command line way, you can use ImageMagick. It’s very easy to convert several images into one PDF file this way as well.
Open a terminal and install ImageMagic using the command below:
Once you have it installed, use the ‘convert’ command line tool of ImageMagic. Just provide the paths to individual images and at the end of the command, name the output file. For example, something like this:
That’s it. Nothing more to be done. Cool isn’t it? 🙂
Did it work for you?
I hope this article helped you to merge multiple images into one PDF in Ubuntu Linux. If you are further interested, check this article to know how to edit PDF files in Ubuntu Linux.
Questions, suggestions, a word of thanks is always encouraged.
Like what you read? Please share it with others.
Источник


