- Change permissions for files, folders or disks on Mac
- Assign permissions to users and groups
- Apply permissions to all items in a folder or a disk
- Change an item’s owner
- Add or remove a user or group in the Name column
- How to Set File Permissions on a Mac
- File Permissions Crash Course
- How to Modify Permissions with the Info Window
- How to Modify Permissions with chmod
- Final Thoughts
- Related Articles
- Subscribe to our email newsletter
- Восстанавливаем права доступа под Mac OS X — EL Capitan
- Разрешение доступа к компьютеру Mac приложениям Универсального доступа
Change permissions for files, folders or disks on Mac
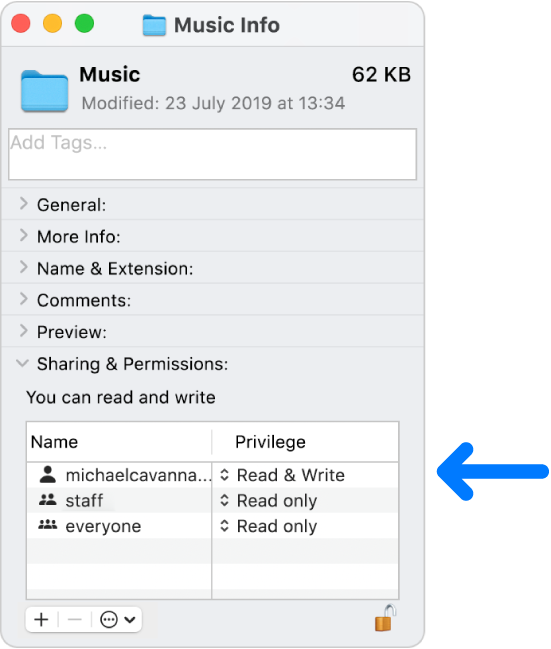
Permission settings determine who can view and alter files on the computer. You change permission settings at the bottom of the Info window for a file, folder or disk in the Finder. For example, you can change permission settings for a folder so that other users who log in to your Mac, or connect to it for file sharing, can view but not change files in a folder.
Assign permissions to users and groups
On your Mac, select a disk, folder or file, then choose File > Get Info.
If the information in Sharing & Permissions isn’t visible, click the arrow  .
.
If the lock at the bottom right is locked  , click it to unlock the Get Info options, then enter an administrator name and password.
Click a user or group in the Name column, then choose a privilege setting from the pop-up menu.
Read & Write: Allows a user to open the item and change it.
Read only: Allows a user to open the item but not change its contents.
Write only (Drop Box): Makes a folder into a drop box. Users can copy items to the drop box, but can’t open it. Only the owner of the drop box can open it.
No Access: Blocks all access to the item.
You can undo any changes to privilege settings for a user or group in the Sharing & Permissions section since opening the Info window. Before closing the Info window, click the Action pop-up menu  , then choose “Revert changes”.
Apply permissions to all items in a folder or a disk
On your Mac, select a folder or disk, then choose File > Get Info.
If the lock at the bottom right is locked , click it to unlock the Get Info options, then enter an administrator name and password.
Click the Action pop-up menu , then choose “Apply to enclosed items”.
Change an item’s owner
On your Mac, select the item, then choose File > Get Info.
If the lock at the bottom right is locked , click it to unlock the Get Info options, then enter an administrator name and password.
If the new owner’s name isn’t listed in the Name column in the Sharing & Permissions section, click the Add button  to add the new owner.
Select the new owner in the Name column, click the Action pop-up menu , then choose “Make __ the owner”.
You can undo any changes to an item’s owner in the Sharing & Permissions section since opening the Info window. Before closing the Info window, click the Action pop-up menu , then choose “Revert changes”.
Add or remove a user or group in the Name column
On your Mac, select an item, then choose File > Get Info.
If the lock at the bottom right is locked , click it to unlock the Get Info options, then enter an administrator name and password.
In the Sharing & Permissions section, do any of the following:
Add a user or group: Click the Add button below the list, select a user or group, then click Select.
Remove a user or group: Select the user or group, then click the Remove button  below the list.
You can undo adding or removing a user or group in the Sharing & Permissions section since opening the Info window. Before closing the Info window, click the Action pop-up menu , then choose “Revert changes”.
Источник
How to Set File Permissions on a Mac
Your Mac uses permissions to restrict access to applications, files, and folders. Utilizing this security control can help protect your data from unauthorized access. Whether you use your Mac in public places or share it with other users, you may want to change the permissions on your documents to ensure the confidentiality and integrity of your data.
Of course, it can be difficult to strike a balance between convenience and security when using permissions. Users who are too restricted won’t be able to perform basic tasks. And if you give users too much power, you risk privilege escalation or worse. Use trial and error to find an adequate level of security that everyone can live with.
File Permissions Crash Course
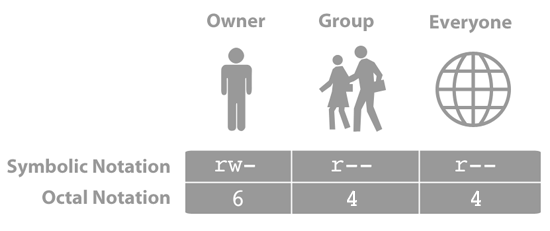
Every file and folder on your Mac has a configurable set of permissions. Permissions control three types of access: reading, writing, and executing. You can mix and match any of the types to grant seven levels of access, as illustrated below. Read, write, and execute permissions overlap to create seven octal permission notations.

You’ll learn how to modify permissions using the Info window in the next section. But to really leverage permissions, you need to learn the Unix-based symbolic and octal permission notations, which are hidden beneath the macOS graphical user interface. All of the available permissions are shown in the table below.
| Permissions | No permission | Execute | Write | Write and execute | Read | Read and execute | Read and write | Read, write and execute |
| Octal Notation | 0 | 1 | 2 | 3 | 4 | 5 | 6 | 7 |
| Symbolic notation | — | —x | -w- | -wx | r— | r-x | rw- | rwx |
The Terminal application allows you to use octal notation to set permissions for the owner, a group, and everyone else. For example, to create a “write only” drop box folder, you could set directory permissions to 622 to give the owner read and write permissions, and the group and everyone else write only permissions. The three groups of notations are shown below.
Your Mac automatically sets permissions to limit a user’s access to system files and other user directories. If that protection isn’t good enough, you can change permissions to prevent other users from doing stuff like editing your “Great American Novel,” reading private financial documents, or opening a specific application.
How to Modify Permissions with the Info Window
The Info window allows you to modify permissions for users, groups, and everyone else. It doesn’t provide the same level of granular control as the chmod command, which you’ll learn about in the next section, but it’s a good way to quickly limit access to a file or folder.
Here’s how to modify permissions with the Info window:
Click a file or folder to select it.
From the File menu, select Get Info. The window shown below appears.

Click the disclosure triangle next to Sharing & Permissions to display permissions for the selected file or folder.
Click the lock and authenticate with an administrator account.
Use the menus next to users and groups to change the permissions.
When you’re finished, close the Info window.
Changes are effective immediately.
How to Modify Permissions with chmod
For total control over permissions, you can use two Unix commands — ls and chmod — to display permissions and modify them. Assume you want to find a folder’s current permissions and then change them to 755. This would give you as the owner read, write and execute permissions, and everyone else read and execute permissions.
Here’s how to find a folder’s current permissions and change them:
Open the Terminal application.
Type ls –l , and then press Return. The symbolic permissions of the files and folders in your home directory are displayed, as shown below.
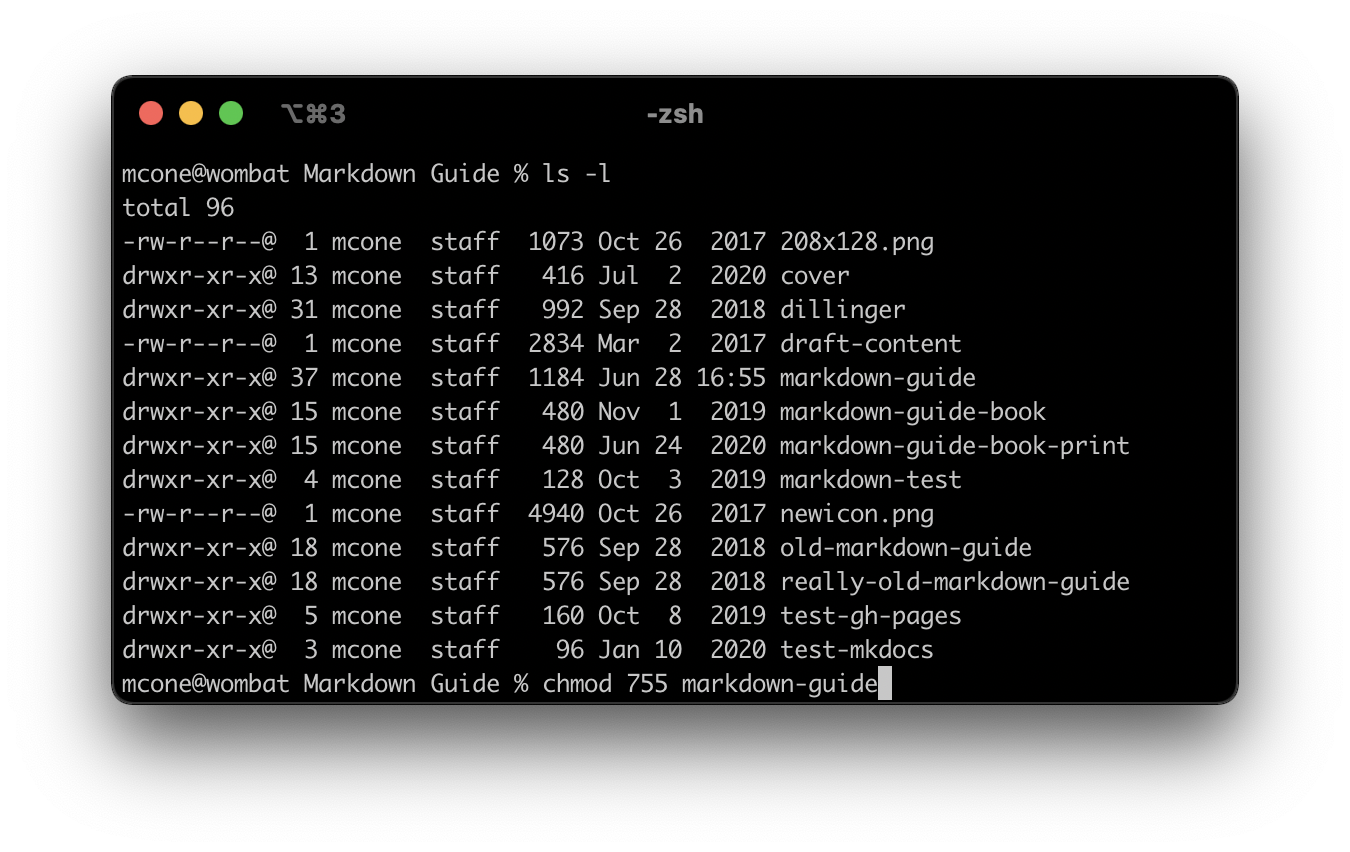
Type chmod 755 foldername , and then press Return. This changes the permissions of the folder to rwxr-xr-x.
When it comes to using the ls and chmod commands, practice makes perfect. Try modifying the permissions on a couple of sample files. If you need more help, use the man command to display the manual pages for these commands (e.g., man ls ).
Final Thoughts
Permissions as a security control are more effective in some environments than others. Schools and offices have a real need for permissions — there are lots of users, and the information stored on the computers can be valuable. In single-user households, where only one person uses a Mac, convenience might outweigh any perceived security threats. It’s all about finding the right balance for your environment.
Related Articles
Subscribe to our email newsletter
Sign up and get Macinstruct’s tutorials delivered to your inbox. No spam, promise!
Источник
Восстанавливаем права доступа под Mac OS X — EL Capitan
При переходе на El Capitan ряд пользователей столкнулся с проблемами прав доступа — неработающее sudo, некорректная timezone, etc…
Корнем зла является урезанный доступ к /private/etc.
Для начала, вам, стоит проверить свой. Откройте Terminal (это можно сделать через Spotlight) и введите ls -la /private.
Вот так «drwxr-xr-x» и должны выглядеть права на etc. Если они выглядят больше похожими на «drwx——», то вам к нам.
Казалось бы — всего-то дел — восстановить права доступа: Spotlight -> DiskUtility -> FirstAid… а где же теперь Repair Permission?
Как оказалось, эта опция больше недоступна через GUI.
Однако как подсказывает нам Google (например — osxdaily.com/2015/11/04/verify-repair-permissions-mac-os-x ), это всё ещё можно сделать через командную строку:
Таким образом, всё что нам нужно чтобы восстановить работоспособность sudo это… работающее sudo! Несколько иронично, не так ли?
Тем не менее — выход есть.
Для того, чтобы починить права необходимо:
1. залогиниться пользователем с правами администратора
2. получить доступ к пользователю root
3. изменить права доступа на папку /private/etc
1. залогиниться пользователем с правами администратора
С первым пунктом я вам ничем не помогу. Если ваша учетная запись уже имеет права администратора — используйте её. Если нет — найдите своего администратора.
2. получить доступ к пользователю root
Для того, чтобы получить доступ к root запустите приложение «Directory Utility». Я бы рекомендовал открывать его через Spotlight.
После запуска программы кликните на замок и введите пароль своего пользователя чтобы «Directory Utility» позволил вам внести изменения.
Зайдите в меню Edit. Если у вас есть пункт «Enable Root User» начните с него. Если же вместо этого пункта вы видите «Disable Root User», то сразу же выбирайте «Change Root Password. »
Введите пароль и повторите его для контроля. Приличные люди не используют для root тот же пароль, что и для своего обычного пользователя.
3. изменить права доступа на папку /private/etc
Запустите Terminal (это, опять таки, можно сделать через Spotlight).
Введите команду su.
При вводе этой команды система запросит у вас пароль. Надо вести пароль root пользователя. Именно тот, который вы установили на втором шаге, а не ваш обычный пароль.
Если вы ввели его верно, то у вас появится приглашение командной строки с решеткой на конце. Что-то вроде:
Итак, мы всего в одном шаге от успеха. Осталось изменить права доступа и проверить результат. Для изменения прав используйте команду «chmod aug+rx /private/etc». Для проверки результата — ls -la /private
Источник
Разрешение доступа к компьютеру Mac приложениям Универсального доступа
Когда приложение стороннего разработчика пытается получить доступ к компьютеру Mac и управлять им через функции универсального доступа, Вы получите предупреждение и должны явно предоставить приложению доступ к компьютеру Mac в настройках «Защита и безопасность».
Если Вы доверяете приложению, можно авторизовать его, нажав в предупреждении «Открыть «Системные настройки»», затем установив флажок для приложения в панели «Конфиденциальность». Если Вы не знаете приложение или не хотите в данный момент предоставлять ему доступ к компьютеру Mac, нажмите «Отказать» в предупреждении.
Соблюдайте осмотрительность и предоставляйте доступ только тем приложениям, которые знаете и которым доверяете. Предоставляя приложениям доступ к компьютеру Mac, Вы также предоставляете им доступ к своим контактам, календарю и другой информации, при этом действуют условия и правила конфиденциальности этих приложений, а не политика конфиденциальности Apple. Внимательно изучите условия использования и политику конфиденциальности приложения, чтобы понимать, как будет использоваться Ваша информация.
Приложения, которым запрещен доступ, перечислены в разделе «Универсальный доступ» панели «Конфиденциальность». Если впоследствии Вы решите предоставить такому приложению доступ к компьютеру Mac, выберите меню Apple

> «Системные настройки», нажмите «Защита и безопасность», нажмите «Конфиденциальность», нажмите «Универсальный доступ», после чего установите флажок рядом с приложением. Чтобы запретить приложению доступ к компьютеру Mac, снимите флажок. Можно также перетянуть приложение в панель, чтобы добавить его самостоятельно, затем установить флажок этого приложения.
Источник


