- Bash permission denied Explanation and Solution
- Bash permission denied
- An Example Scenario
- The Solution
- Conclusion
- Ошибка bash permission denied
- Ошибка bash permission denied
- Выводы
- Ошибка «Permission denied» в Linux
- Изменение прав в терминале
- Изменение прав в файловом менеджере
- В заключение
- Ошибка: Permission denied (доступ запрещен) /публичный ключ/
- Можно ли использовать в Git команду sudo ?
- Проверьте, что вы подключились к нужному серверу
- Всегда использовать пользователя «git»
- Убедитесь, что у вас есть ключ, который используется
- How to resolve permission denied Linux error
- What is permission denied Linux error?
- Example of Permission denied Linux error
- How to resolve Permission denied Error
- Resolving Permission denied error related to script execution:
- Resolving permission denied Linux error while listing or writing to a file
- Resolving permission denied Linux error for specific user
- Download Free book
Bash permission denied Explanation and Solution

Files on an operating system usually have permissions, making the file accessible to a limited range of people. For instance, some files on a computer are accessible only to administrators; other files are only accessible to a particular user.

- Career Karma matches you with top tech bootcamps Get exclusive scholarships and prep courses
If you try to run a file to which you have no access on a Linux computer, you will see a permission denied error. In this guide, we’re going to talk about the cause of this error and how you can solve the error. Let’s begin.
Bash permission denied
The Bash permission denied error happens when you try to run a file which you do not have permission to run. This may happen if a file can only be executed by a particular user or a group of which you are not a member.
- Career Karma matches you with top tech bootcamps Get exclusive scholarships and prep courses
Do you want to learn more about how a coding bootcamp can help you learn to code? Get started by finding the right bootcamp for you along with unlocking additional information about bootcamp cost and reviews.
On a Linux operating system, there are three types of permissions:
You can have permission to read and write a file without having execution privileges. Thus, if you encounter a Bash permission denied be sure to check whether you are allowed to run the file. You can check if you have permissions over a file by using the following command:
This command will give you information about file permissions. We discuss the output of this command in our The Solution section later in the article. Let’s look at an example scenario featuring the permission denied error, with a corresponding solution.
An Example Scenario
We have a file called example.sh. We can see this file by running the ls command. The ls command returns the following:
Career Karma entered my life when I needed it most and quickly helped me match with a bootcamp. Two months after graduating, I found my dream job that aligned with my values and goals in life!
Venus, Software Engineer at Rockbot
Find Your Bootcamp Match
We want to run our example.sh file. To do so, we can use the ./ notation:
This command lets us run the example.sh file which is present in our ./ directory (the directory we are presently viewing). Let’s see what happens when we try to run the file:
Our command returns an error.
The Solution
Our Bash shell is telling us that we do not have permissions to run our file. We can check what permissions we have by running the ls -la command:
We do not have execution privileges over any of our files. If there were an x after the rw in the first entry of the output above, we would know we can execute our file. The three characters after the first one represent read, write, and execute privileges for a user. Our group also does not have write or execute permissions.
To solve this issue, we need to give ourselves execution privileges:
This command gives our user execution (“x”) privileges over the example.sh file.
We can only run this command if we are allowed to change the privileges of the file. If this file was protected (owned by root, for example), then we would not be able to change this file.
The file is owned by the james system user so I can alter the file permissions on my james account. I could also use sudo to alter the file privileges, although this is not necessary because my user account has the necessary access.
Conclusion
The Bash permission denied error indicates you are trying to execute a file which you do not have permission to run. To fix this issue, use the chmod u+x command to give yourself permissions. If you cannot use this command, you may need to contact your system administrator to get access to a file.
Do you want to learn more about Bash? Check out our How to Learn the Command Line guide. This guide comes with top tips on how to learn Bash. You will also find a list of resources to help you accelerate your learning journey.
About us: Career Karma is a platform designed to help job seekers find, research, and connect with job training programs to advance their careers. Learn about the CK publication.
Источник
Ошибка bash permission denied
Многие новички пытаются выполнить запись определенных значений в системные файлы с помощью операторов перенаправления ввода и вывода и получают ошибку bash permission denied. Эта ошибка выводится, даже если вы использовали sudo.
Казалось бы, sudo есть, значит права суперпользователя получены и все должно работать но тут все не так просто. В этой статье мы рассмотрим почему возникает ошибка bash permission denied и как ее обойти.
Ошибка bash permission denied
Допустим, вы выполняете команду:
sudo echo «nameserver 8.8.8.8» >> /etc/resolv.conf
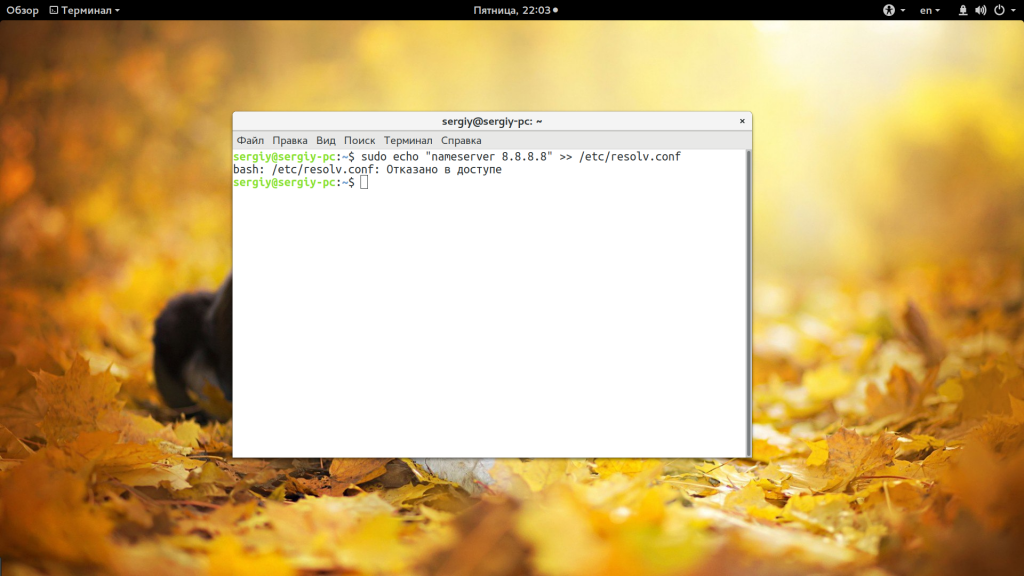
А в результате вместо записи строчки в /etc/resolv.conf получаете ошибку:
bash: /etc/resolv.conf permission denied
В русской локализации это будет отказано в доступе bash linux. Так происходит потому что вы запускаете с правами суперпользователя утилиту echo и она честно выводит вашу строку в стандартный вывод bash с правами суперпользователя. Но bash запущен от обычного пользователя, и когда интерпретатор bash пытается записать полученную строчку в системный файл, естественно, что вы получите ошибку.
Но существует несколько способов обойти это ограничение, вы можете, например, использовать команду tee, которая записывает стандартный вывод в файл или запустить саму оболочку от имени суперпользователя. Рассмотрим сначала вариант с tee:
echo ‘текст’ | sudo tee -a /путь/к/файлу
echo ‘nameserver 8.8.8.8’ | sudo tee -a /etc/resolv.conf

Это очень простое решение, но, кроме того, вы можете запустить оболочку bash с правами суперпользователя, чтобы дать ей доступ на запись:
sudo sh -c ‘echo текст >> /путь/к/файлу’
sudo bash -c ‘echo текст >> /путь/к/файлу’
sudo bash -c ‘echo nameserver 8.8.8.8 >> /etc/resolv.conf

Еще одно решение, призванное, упростить эту команду, добавить такой код в
sudoe() <
[[ «$#» -ne 2 ]] && echo «Usage: sudoe
» && return 1
echo «$1» | sudo tee —append «$2» > /dev/null
>
Дальше для вывода строки в файл выполняйте:
sudoe ‘текст’ >> /путь/к/файлу
sudoe «nameserver 8.8.8.8» > /etc/resolv.conf

Теперь все будет работать, как и ожидалось, и ошибка bash отказано в доступе не появится. Еще можно поменять права на файл, а потом уже выводить в него строку. Но это очень неправильное решение. И даже не потому, что это небезопасно, а больше потому что там намного больше действий.
Выводы
В этой небольшой статье мы разобрали почему возникает ошибка bash permission denied при использовании команды echo для системных файлов, а также несколько путей ее решения. Как видите, все достаточно просто. Надеюсь, эта информация была полезной для вас.
Источник
Ошибка «Permission denied» в Linux
Все операционные системы семейства Linux имеют четко разграниченные права доступа. В своей домашней директории пользователь может делать все, что ему угодно, до тех пор, пока укладывается в отведенные рамки. Попытка выйти за них приводит к появлению ошибки «Permission Denied».
Изменение прав в терминале
Рассмотрим вариант, в котором необходимо прочесть текстовый документ, созданный другим пользователем. Файлы TXT в Linux можно просматривать непосредственно в терминале с помощью команды «cat».
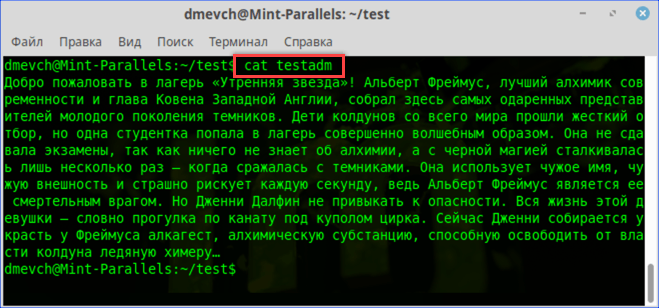
- Заходим в каталог с интересующим нас документом. Набираем команду «cat filename», подставляя вместо «filename» имя нужного файла. На скриншоте показана ошибка «Permission Denied», выглядящая в русской локализации как «Отказано в доступе».

Получаем ошибку «Permission Denied» при попытке просмотреть содержимое файла
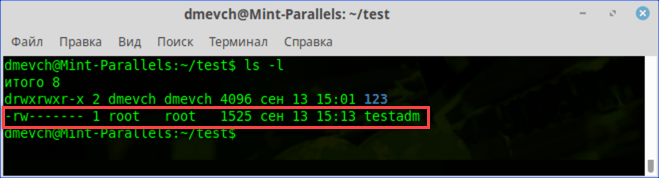
Проверяем права доступа к документу используя команду «ls -l»
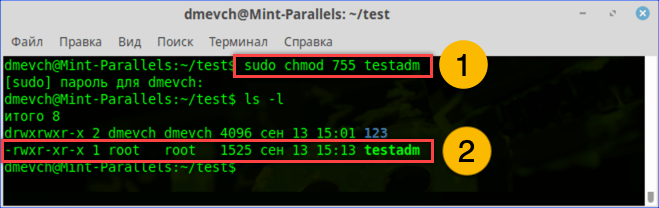
Используем команду «chmod» и административные права для получения доступа
Просматриваем содержимое текстового документа командой «cat»
Изменение прав в файловом менеджере
Разберемся, как выполнить рассмотренную выше операцию в графическом интерфейсе, используя файловый менеджер из дистрибутива.
- Как видно на скриншоте, значок файла изначально имеет дополнительные символы, указывающие на то, что доступ у нему ограничен. При попытке посмотреть содержимое получаем графический вариант ошибки «Permission Denied».
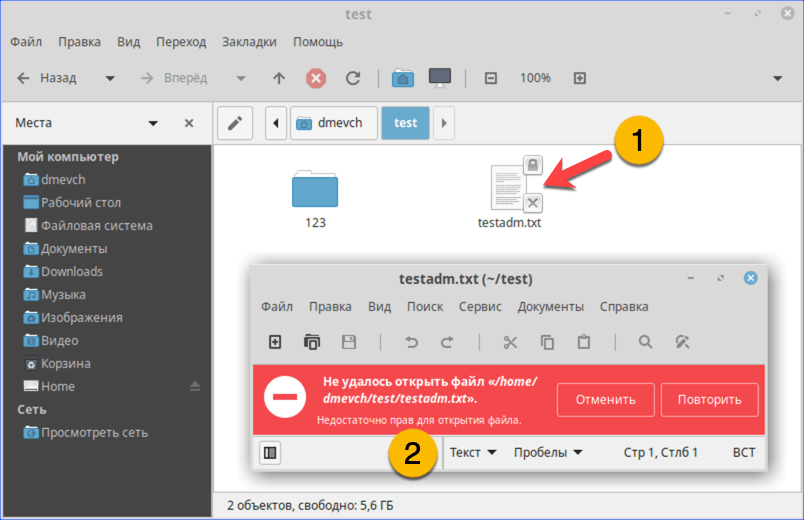
При попытке открыть текстовый документ получаем ошибку «Permission Denied»
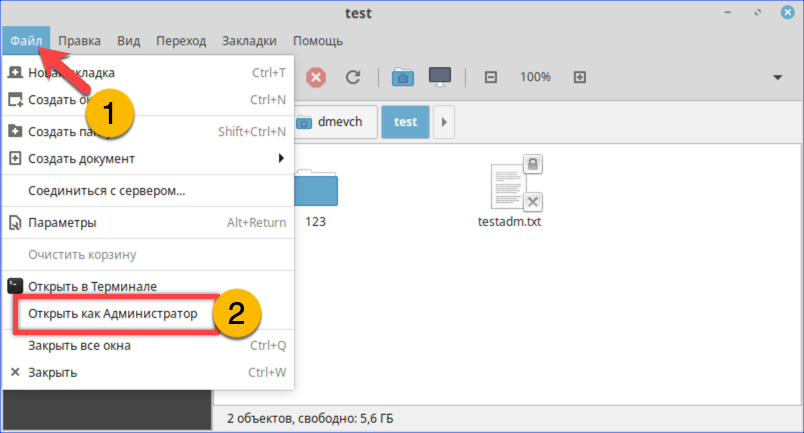
Открываем меню «Файл» и перезапускаем файловый менеджер от имени root
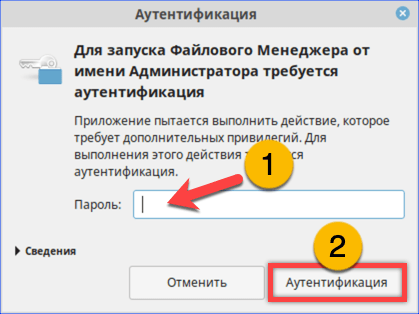
Набираем пароль root в окне аутентификации
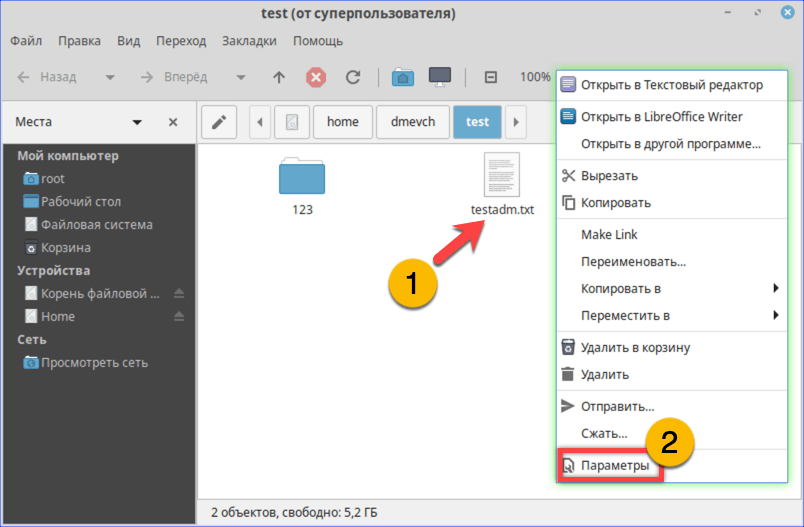
Открываем параметры файла с помощью контекстного меню
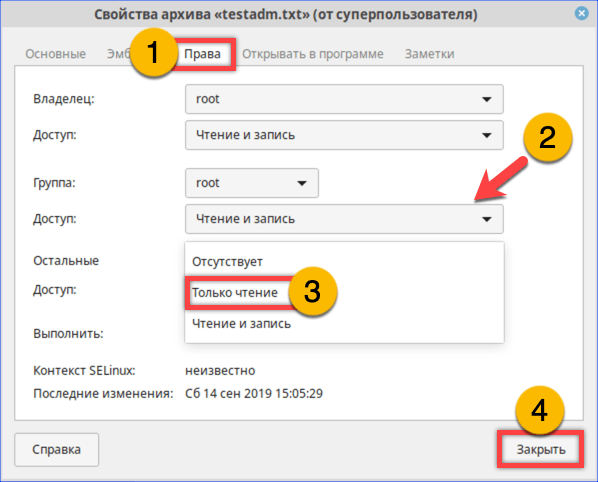
На вкладке «Права» разрешаем доступ для группы root и остальных пользователей
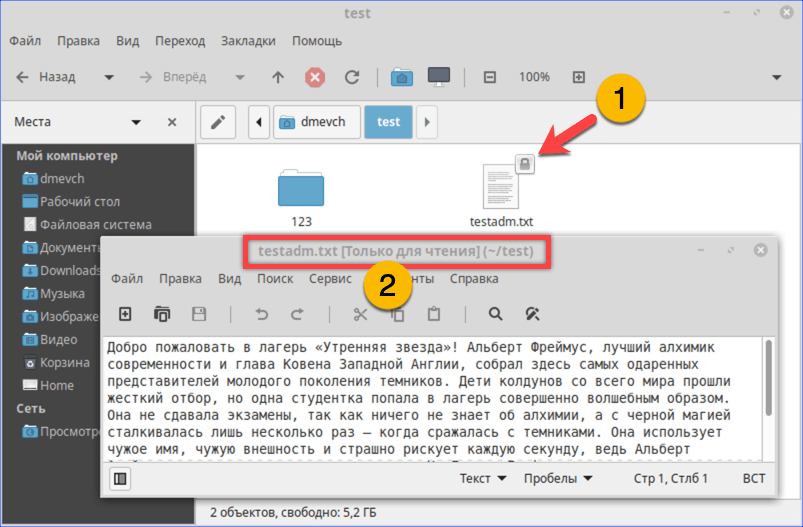
Открываем ранее недоступный файл в режиме чтения и изучаем содержимое
В заключение
Как видим, избавиться от ошибки Permission Denied достаточно просто. Решив изменить правда доступа к системным файлам, лишний раз убедитесь, что полностью уверены в своих действиях и понимаете последствия вносимых изменений.
Источник
Ошибка: Permission denied (доступ запрещен) /публичный ключ/
Ошибка «Permission denied» (доступ запрещён) означает, что сервер отклонил ваше соединение. У этой ошибки может быть несколько причин; наиболее общие из них приведены ниже.
Можно ли использовать в Git команду sudo ?
Вы не должны использовать команду sudo с Git. Если у вас есть веская причина использовать sudo , убедитесь, что вы используете её с каждой командой (возможо, лучше использовать su чтобы получить оболочку с правами суперпользователя (администратора) в этом месте). Если вы сгенерировали SSH-ключ без sudo , а затем пытаетесь использовать команду, подобную sudo git push , вы не должны использовать те же ключи, которые сгенерировали.
Проверьте, что вы подключились к нужному серверу
Будьте внимательны при вводе команд с клавиатуры. В некоторых случаях корпоративная сеть может привести к проблемам разрешения записи DNS.
Так как документ подготовлен в рамках курсов повышения квалификации «Правильный курс» , то и проверка подключения будет описана именно на этом примере.
Напомним, что доступ к репозиторию [email protected] организован по порту 25000, а не по стандартному для SSH порту 22. Поэтому в команде подключения вы должны явно указать номер порта.
Для того, чтобы убедиться в том, что вы подключаетесь к нужному домену, введите следующую команду, добавив в строке номер порта ‘-p 2500’ :
Всегда использовать пользователя «git»
Все соединения длджны выполняться под пользователем «git». Если вы попытаетесь соединиться под вашим псевдонимом в propercourse, соединение не установится:
Вместо этого вы должны проверить соединение, набрав в строке:
Убедитесь, что у вас есть ключ, который используется
Если вы используете Git Bash, включите ssh-agent:
Если вы используете другой командный процессор, такой как, например, Git для Windows, включите ssh-agent:
|
Если вы используете OpenSSH 6.8 или более позднюю:
| Команда ssh-add должна вывести длинную строку из цифр и букв. Если ничего не будет выведено на экран, вы должны сгенерировать новый SSH-ключ и связать его с GitLab.
Получение детализации Вы можете также проверить, что ключ используется при попытках соединения с [email protected] : Источник How to resolve permission denied Linux errorThis article will teach you quickly what is permission denied Linux error. And also what ways you can avoid permission denied error in Linux. What is permission denied Linux error?This error comes when you try to list files or try execute the file inside the directory where you don’t have sufficient permission. Since Linux operating system is very particular about its security aspect. Example of Permission denied Linux errorLet’s say you are a normal user who is trying to list or trying change the directory inside the /root file-system. Since you do not have sufficient permissions system will respond with permission denied error message as below: One way to avoid such error is to switch to root user using su – command. However this solution is not recommended since it will gain unnecessary access to all the root file system. How to resolve Permission denied ErrorResolving Permission denied error related to script execution:Let’s say you have created a shell script for performing any task. but when you try to execute the script you may end with below error due absence of permission denied error. Now to avoid such case you need to add execute permission “x” to the file myshell.sh using chmod command as below: In the last output you can see that there is “x” (execution) permission added after chmod command. So next time when you try to execute the shell script , it will execute without any error. Resolving permission denied Linux error while listing or writing to a fileIn this type of permission denied error you try to list or write the file in which you do not have sufficient permission to do so as below: If you look at the permissions of the “myfolder” directory using ls -l command you will come to know about the permissions. As per the permission given in above output only owner of the directory who is root can have all permission that is read, write and execute. So in such case you need to change the permission of the directory to read using below chmod command: Now this time when normal user manmohan try to list directory he will not get the permission denied error. In case you want to have write permission on this directory you need to specify w flag as well in chmod command as below: Same is applicable to file level permission as well. One more way is to changing the ownership of the directory using chown command. Since in our example we are getting error for user manmohan we will change ownership of the directory “myfolder” using below command. Since manmohan user is now the owner of the directory he can able to do any operation on the directory. In case you want to recursive permission do not forget to add -r while chown command as below: Resolving permission denied Linux error for specific userIn above method of changing the permission using chmod is not suitable as per my opinion. Because when you give permission to others, it will be open for all the users within the system. Which is wrong in terms of security perspective. To resolve this error specific to user you can implement it using access control list or ACL. Follow my article on Access control list ACL for the same. Download Free bookGet your free copy of Linux command line Cheat Sheet. Источник |


