- How to Set File Permissions on a Mac
- File Permissions Crash Course
- How to Modify Permissions with the Info Window
- How to Modify Permissions with chmod
- Final Thoughts
- Related Articles
- Subscribe to our email newsletter
- bzerangue / _verify-repair-permissions-disk.md
- How to Verify & Repair Permissions in OS X El Capitan
- How to Repair Verify Disk Permissions in OS X El Capitan
- How to Repair Disk Permissions in OS X El Capitan from Command Line
- Related
- Enjoy this tip? Subscribe to our newsletter!
- Thank you!
- Related articles:
- 68 Comments
How to Set File Permissions on a Mac
Your Mac uses permissions to restrict access to applications, files, and folders. Utilizing this security control can help protect your data from unauthorized access. Whether you use your Mac in public places or share it with other users, you may want to change the permissions on your documents to ensure the confidentiality and integrity of your data.
Of course, it can be difficult to strike a balance between convenience and security when using permissions. Users who are too restricted won’t be able to perform basic tasks. And if you give users too much power, you risk privilege escalation or worse. Use trial and error to find an adequate level of security that everyone can live with.
File Permissions Crash Course
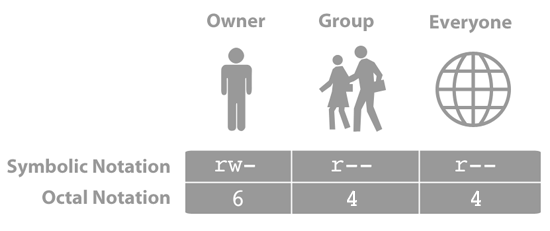
Every file and folder on your Mac has a configurable set of permissions. Permissions control three types of access: reading, writing, and executing. You can mix and match any of the types to grant seven levels of access, as illustrated below. Read, write, and execute permissions overlap to create seven octal permission notations.

You’ll learn how to modify permissions using the Info window in the next section. But to really leverage permissions, you need to learn the Unix-based symbolic and octal permission notations, which are hidden beneath the macOS graphical user interface. All of the available permissions are shown in the table below.
| Permissions | No permission | Execute | Write | Write and execute | Read | Read and execute | Read and write | Read, write and execute |
| Octal Notation | 0 | 1 | 2 | 3 | 4 | 5 | 6 | 7 |
| Symbolic notation | — | —x | -w- | -wx | r— | r-x | rw- | rwx |
The Terminal application allows you to use octal notation to set permissions for the owner, a group, and everyone else. For example, to create a “write only” drop box folder, you could set directory permissions to 622 to give the owner read and write permissions, and the group and everyone else write only permissions. The three groups of notations are shown below.
Your Mac automatically sets permissions to limit a user’s access to system files and other user directories. If that protection isn’t good enough, you can change permissions to prevent other users from doing stuff like editing your “Great American Novel,” reading private financial documents, or opening a specific application.
How to Modify Permissions with the Info Window
The Info window allows you to modify permissions for users, groups, and everyone else. It doesn’t provide the same level of granular control as the chmod command, which you’ll learn about in the next section, but it’s a good way to quickly limit access to a file or folder.
Here’s how to modify permissions with the Info window:
Click a file or folder to select it.
From the File menu, select Get Info. The window shown below appears.

Click the disclosure triangle next to Sharing & Permissions to display permissions for the selected file or folder.
Click the lock and authenticate with an administrator account.
Use the menus next to users and groups to change the permissions.
When you’re finished, close the Info window.
Changes are effective immediately.
How to Modify Permissions with chmod
For total control over permissions, you can use two Unix commands — ls and chmod — to display permissions and modify them. Assume you want to find a folder’s current permissions and then change them to 755. This would give you as the owner read, write and execute permissions, and everyone else read and execute permissions.
Here’s how to find a folder’s current permissions and change them:
Open the Terminal application.
Type ls –l , and then press Return. The symbolic permissions of the files and folders in your home directory are displayed, as shown below.
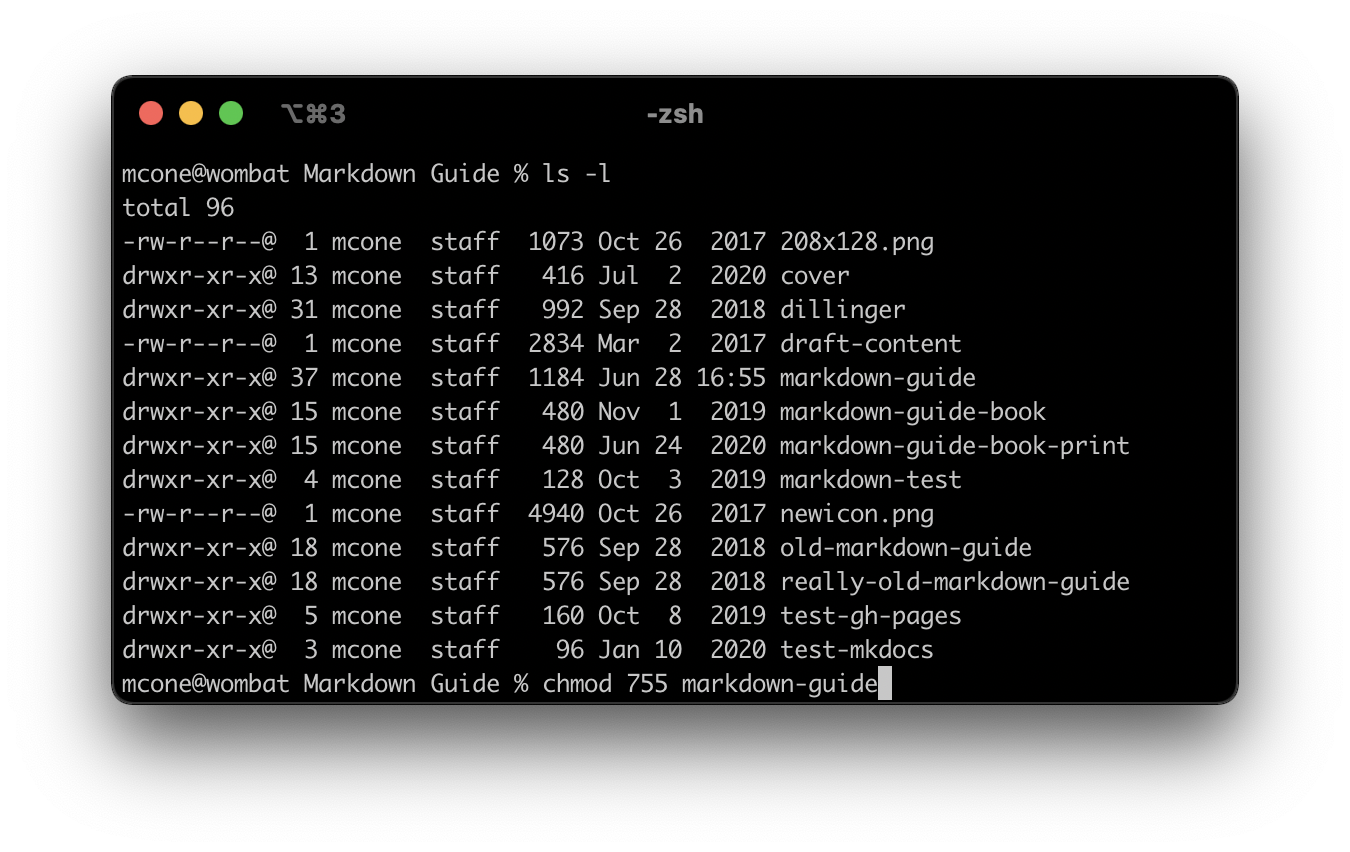
Type chmod 755 foldername , and then press Return. This changes the permissions of the folder to rwxr-xr-x.
When it comes to using the ls and chmod commands, practice makes perfect. Try modifying the permissions on a couple of sample files. If you need more help, use the man command to display the manual pages for these commands (e.g., man ls ).
Final Thoughts
Permissions as a security control are more effective in some environments than others. Schools and offices have a real need for permissions — there are lots of users, and the information stored on the computers can be valuable. In single-user households, where only one person uses a Mac, convenience might outweigh any perceived security threats. It’s all about finding the right balance for your environment.
Related Articles
Subscribe to our email newsletter
Sign up and get Macinstruct’s tutorials delivered to your inbox. No spam, promise!
Источник
bzerangue / _verify-repair-permissions-disk.md
Verify and Repair Disk Permissions via Terminal (Mac OS X)
Verify Permissions
Repair Permissions
Verify and Repair Volume via Terminal (Mac OS X)
Launch Terminal from your Dock, Utilities folder, or via an app launcher like Alfred. Once launched, type or paste in the following command.
diskutil verifyVolume [drive name]
So, for your main hard drive, you could type or paste in something like:
Or, if you have an external drive attached, you can type or paste in the following:
diskutil verifyvolume /Volumes/[drive name]/
So for an external drive named “BackupStuff” you would enter:
diskutil verifyvolume /Volumes/BackupStuff/
If you see no messages, then you can assume that diskutil hasn’t found any errors, and you can move on. If, however, you get an error like “The volume Macintosh HD was found corrupt and needs to be repaired,” then you can repair the drive using diskutil as well.
To repair the drive, you can issue the following command into Terminal:
Or, for that external drive as above:
diskutil repairvolume /Volumes/BackupStuff/
If unable to unmount drive on Mac
You can try booting from OS X recovery by holding CMD + R at the time of startup. Once booted from OS X recovery, select Terminal from the utilities and then at the unix prompt enter:
- diskutil list
- then press return and look for the disk identifier and enter the following command with the disk identifier:
- sudo diskutil unmountDisk /dev/(enter here disk identifier name)
- Press return and enter your admin password if prompted. This should unmount all volumes of the physical drive.
- If still the above method didn’t work, then the last option is to force the entire disk to unmount.
- For that using the terminal application again, enter the following command: sudo diskutil unmount force /dev/(enter here disk identifier name)
- Then press return and enter the admin password if prompted. This will definetely unmount the entire disk and all its related volume.
Mac OS X Software Update via Terminal
To get a list of available software updates, type the following command:
You will see a list of available updates. You can then install all available software updates with the following command:
sudo softwareupdate -iva
The use of sudo is required to get superuser privileges to actually install the updates. You can also install only the recommended updates with:
sudo softwareupdate -irv
Or you can just install specific software updates by specifying the shorthand package name from the previous list, like so:
sudo softwareupdate -i iPhoneConfigurationUtility-3.2
If there are any updates you want to ignore, you can do so with the -–ignore flag, for example:
sudo softwareupdate —ignore iWeb3.0.2-3.0.2
If you want to see all the available command line shortcuts for Software Update, just type:
This is really useful for remotely updating Macs, setting up automated updates via a bash script, or if you just want to geek out.
Control Time Machine from the command line
Time Machine is a great tool for ensuring that your data is safe, and it’s pretty easy to set up and use. But for some users, the basic Time Machine interface isn’t enough. As with most of OS X’s functions, there is a command-line tool that lets you do many things with Time Machine. Here’s how you can use the tmutil command to control and tweak Time Machine from Apple’s command-line tool, Terminal.

Most people won’t need to use this command for their backups because the Time Machine interface will suffice. Who will need it? People who want to manage remote Macs or who want to run scripts containing commands for Time Machine.
The basics of the tmutil command can be found by typing man tmutil in Terminal. (You’ll find the Terminal app in your /Applications/Utilities folder.) The man page tells you what you can do with this command.
For example, to turn Time Machine on or off, you can run these commands:
sudo tmutil enable
sudo tmutil disable
The sudo command is required for many of the commands you issue with tmutil because you need administrative privileges; you’ll have to enter your password after running the above commands.
If you want to run a Time Machine backup right away, on a Mac that either has Time Machine disabled, or, say, just before updating to a new version of OS X, you can run this command:
This is the same as choosing Back Up Now from the Time Machine menu in the menu bar at the top of your screen.
And if you ever want to stop a backup, just run this:
Save disk space on your laptop
Since your laptop isn’t always connected to its backup disk, Time Machine retains «local snapshots,» or files that it will copy to your backup disk the next time it is available. However, these local snapshots take up space, and you may want to turn this feature off if you don’t have much room on your hard disk. You can do so with the following command:
sudo tmutil disablelocal
Running this command will also delete any local snapshots. You can turn local snapshots back on by running:
sudo tmutil enablelocal
If you love delving into the nitty-gritty, and especially if you manage remote Macs, you’ll find this to be a very useful tool.
Exclude files and folders
You can exclude certain files and folders from your Time Machine backups from the Time Machine pane in System Preferences. Naturally, you can also do this from the command line, too. Run this command:
sudo tmutil addexclusion
The part stands for the path to a file or folder. For example, if I want to exclude my Downloads folder from Time Machine backups, I would run the following:
sudo tmutil addexclusion
The tmutil addexclusion command has an interesting property: it’s sticky. When you use this command, the item you exclude remains in the Time Machine exclusion list even if you move it, which is not the case when you exclude items from the Time Machine preference pane. If you use the above command with the -p flag, then it will not be sticky, and will be the same as an exclusion you add from the Time Machine preference pane.
Manage remote backups
If you’re managing a remote Mac, such as a server, you may want to change Time Machine settings for that computer. You can start by finding where Time Machine backups are stored. Run this command:
You’ll see something like this in Terminal:
Name : TM Backup
Mount Point : /Volumes/TM Backup
To change the destination, you can use two commands. First, remove the current destination like this:
In place of , type in the text string returned by the destinationinfo command. Then run this command to set up a new destination disk:
tmutil setdestination _volume_name_
Replace _volume_name_ with the name of the disk or volume you want to use. You can add multiple destinations as well, since Time Machine can rotate its backups on several disks or volumes. See man tmutil for more on setting up multiple backup destinations. (You can now do this without the command line too, see «How to create redundant Time Machine backups.»)
Get Time Machine stats
Time Machine saves a lot of backups: one per hour for the past 24 hours; one a day for the past week; and one a week before that. You can get a list of all the backups on your Time Machine disk with this command:
This will show the full path of each backup.
If you’re curious about how much has changed in your Time Machine backups, there’s a command that will let you find out how much of each backup is new. Run this command to see the delta between each of the Time Machine backups on your backup disk or volume:
tmutil calculatedrift _backup_folder_
Replace _backup_folder_ with the path of the folder containing your backups. This is not the Backups.backupdb folder at the top level of your Time Machine volume, but rather the next folder down; this is generally labeled with your Mac’s name.
For example, when I ran this command on my backups, I saw data like this:
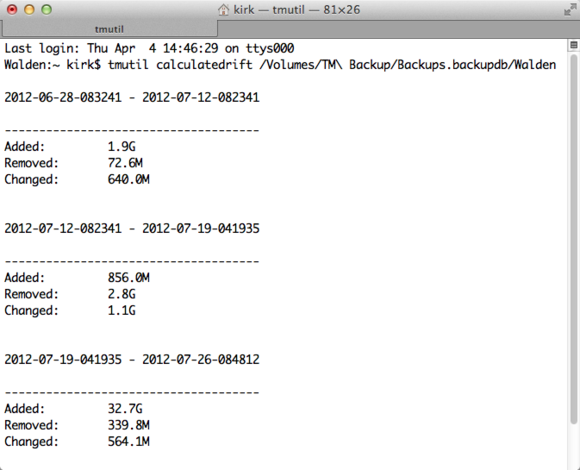
Here’s what I saw when I ran the tmutil calculatedrift backup_folder command on my Mac.
Note that this command takes a long time to run, as your Mac has to calculate a lot of information.
The tmutil command offers many other options, such as the ability to inherit destinations, perform detailed comparisons of backups, restore items and much more. See man tmutil to find out all that you can do.
If you love delving into the nitty-gritty, and especially if you manage remote Macs, you’ll find this to be a very useful tool.
Источник
How to Verify & Repair Permissions in OS X El Capitan

The Disk Utility app has long contained the ability to verify and repair disk permissions on a Mac, but in the latest versions of OS X this ability has been removed. That doesn’t mean you can’t verify permissions and repair permissions in OS X El Capitan 10.11 and later however, you just need to turn to the command line to do so.
To be clear, verifying and repairing disk permissions has long been over assigned as a remedy to all sorts of issues on the Mac, most of which are rarely accurate or legitimate. In this sense, repairing permissions is sort of considered a form of hocuspocus with little benefit to most OS X situations, but nonetheless there are some unique circumstances where you may want to verify and repair disk permissions in OS X anyway, particularly if a files permissions are actually off, meaning the ability for certain users and processes to read and write particular files and folders.
Note this is not the same as verifying and repairing a disk.
How to Repair Verify Disk Permissions in OS X El Capitan
Open the Terminal application (found in /Applications/Utilities/) and use the following syntax to verify a volumes permissions, this will verify the default root volume of a Mac:
sudo /usr/libexec/repair_packages —verify —standard-pkgs /
If you want to verify permissions on a different drive, specify the volume rather than “/”
The command will run and either show permissions that differ, or nothing, depending on what’s found. Not surprisingly, you’ll likely find some variation of permissions that differs, looking something like:
Permissions differ on «usr/libexec/cups/cgi-bin», should be drwxr-xr-x , they are dr-xr-xr-x .
Permissions differ on «usr/libexec/cups/daemon», should be drwxr-xr-x , they are dr-xr-xr-x .
Permissions differ on «usr/libexec/cups/driver», should be drwxr-xr-x , they are dr-xr-xr-x .
Permissions differ on «usr/libexec/cups/monitor», should be drwxr-xr-x , they are dr-xr-xr-x .
How to Repair Disk Permissions in OS X El Capitan from Command Line
Assuming permissions have been found which differ and you’d like to repair them, replace the –verify flag with –repair, and again point the command at the same volume:
sudo /usr/libexec/repair_packages —repair —standard-pkgs —volume /
Repairing permissions may take a while, just like it did from Disk Utility.
If you execute the repair_packages command without sudo and with no specifications or flags, you’ll get a simple help guide instead:
$ /usr/libexec/repair_packages
Usage: repair_packages [ARGUMENTS].
Commands:
—help Print this usage guide.
—list-standard-pkgs Display the package ids in the standard set.
—verify Verify permissions on files in the specified package(s).
—repair Repair permissions on files in the specified package(s).
Options:
—pkg PKGID Verify or repair the package PKGID.
—standard-pkgs Verify or repair the standard set of packages.
—volume PATH Perform all operations on the specified volume.
—output-format # Print progress info using a special output format.
—debug Print debuging information while running.
As suggested, this is not really something that should be run on a regular basis as any part of Mac maintenance routine, and it’s rarely necessary, which is likely why Apple pulled it from the Disk Utility application.
By the way, earlier releases of OS X also have a command line approach to repairing disk permissions, but it’s handled through the Disk Utility command line tool instead.
Related
Enjoy this tip? Subscribe to our newsletter!
Get more of our great Apple tips, tricks, and important news delivered to your inbox with the OSXDaily newsletter.
Thank you!
You have successfully joined our subscriber list.
Related articles:
68 Comments
Thanks a lot for this article! Permissions Repair fixed the problem on my Mini Mac. It is hard to understand why the new OS systems have been made less functional!
Best regards.
Ulisses from Brazil.
How do I stop the permissions correction from “correcting” my Java install?
A while back I stubbed out and symlinked all the OS X Java stuff and set up a proper Java install. Ever since “repair permissions” whacks Java. How do I stop the permissions correction from “correcting” my Java install?
I’m not as technically as most here, or maybe half of the posters because “repair permissions” seems to be a love it or hate it proposition. After recently updating to El Capitan, I get screen after screen asking for my password because the OS needs to repair a permission for this or that. After several days, it is happening less often, but I’m sick of it. I must have done it 50 times right after the upgrade from Mt Lion. Now, when I open an app for the 1st time in El Cap, there is a 50/50 chance I’ll get that annoying message. What is up with this? If SIP means no need to repair permissions, why is it constantly making me enter my pw to repair?
I’m the admin user and I can’t run anything sudo because I get this:
sudo: /etc/sudoers is owned by uid 502, should be 0
sudo: no valid sudoers sources found, quitting
Is there anything that can be done in this situation or should I basically format the computer?
I’m sure this is too late to help the original questioner, but if anybody comes across this question:
1) boot off of an external os x disk, stick, or (maybe) the recovery disk.
2) make sure your boot disk is not the internal disk.
3) sudo:chown the /internal_disk/etc/sudoers to 0 (root) or root:staff, root:wheel, or root:admin.
Which / in the command line to specify a different drive than my Mac Drive? I want to repair permissions on an external drive.
How do you write the code to verify external drives exactly? Kindly provide the line please? Thank you.
I get this error:
sudo: /usr/libexec/repair_packages: command not found
I hate the new Disk Utility. Having more functionality is better. The move to gradually hide and bury more and more of OS X’s functionality is really annoying. What I used to be able to do as a power user now forces me to be a light-weight developer to accomplish. It’s getting to the point of being tougher than Windows to get stuff done.
My only guess is that some lamo security tech got laid off from Microsoft, and then somehow sold his ideas of security to Apple – and then completely demolished the old security paradigm that made Macs so awesome.
So just FYI apple broke the remote login (ssh) feature in El Cap and has not fixed it yet. The fix is to chown the /var/empty path as permissions are not set right for ssh to function (must be root owned)
Sure you could just fix that one path but the cli repair works too. Begs the question why aren’t the dot upgrades fixing this issue if permissions get auto repaired?
After reading some of the comments on here. I must state that if your Mac has an issue its very likely that YOU did something to mess it up.
I have provided tech support to Macs and PCs for over twenty years and its funny how people are always trying to blame the OS.
On the other hand, if your issues are with iCloud: Apple has no doubt messed that one up quite a few times (fact) Use Google to back your photos up instead of iCloud.
If your pictures lost their permission,and they are local copies…its an easy fix. Go to the folder that holds the pictures: change the permissions to give your admin user read and write, then click the gear and choose apply to enclosed. BTW, this works for any type of file.
Thank you so much for this article!
I upgraded to El Capitan and subsequently ran into all sorts of trouble with iTunes and an NFS share. I had resorted to reinstalling both iTunes and El Capitan, neither of which solved my issue.
I was getting the “You do not have enough access privileges for this operation.” message when I launched iTunes. I also could not login to iCloud or the iTunes Store. When I tried to login, I got the “This action could not be completed. Try again.” message. I was able to login at icloud.com so I knew my Apple ID was okay.
The repair_packages command found that the ACL was completely missing for iTunes and also that the permissions for the /Users/Shared folder were incorrect. Running with the –repair option fixed my problem.
Just leaving this note here in case anyone with the same issue searching around.
And now a bit of my experience and the respond to those telling that verify-and-repair-permissions has been delusions, I wish it were. After updating to Safari 6 for Lion (OS X 10.7.5 and Safari 6.1.6 I’m on as for this day) I started experiencing the strange issue, misbehavior, oddity, malfunction, whatever you’re calling it: when in Reader mode I try to call Find function I get search field half(or even by 3/4)-hidden behind the tab ribbon. Strangely it’s possible somehow to type a keyword in the search field but using arrows to jump to the keyword in text results in chaotic jiggering of the yellow marker interestingly as if a normal window (in a non-Reader mode) would shift up to the same distance as the search field did in Reader mode and all these yellow markers would shifted up to the same distance as well. TO support my guess here’s repeating Console message I encounter every time this mess occurs:
“Safari: Unlocking Focus on wrong view (), expected ”
Coincidence or not when verifying permissions I’m often (I mean VERY OFTEN) presented this kind of message related to Safari:
“Permissions differ on “Applications/Safari.app/Contents/Resources/Dutch.lproj/BookmarkTitleChange.nib”, should be drwxr-xr-x , they are -rwxr-xr-x”
Repairing doesn’t help in a long run as Safari 6’s permissions get repeatedly corrupted. And yes, I had reinstalled Lion together with Safari – to no avail, so I’m bound by the necessity to repair permissions which is annoying and is definitely a bug which never got enough attention even among users (perhaps being the reason why it wasn’t fixed during all Safari 6 support cycle).
This is not some minor glitch and I don’t want code hocus posts to fit it.
OS X screwed up and it’s telling me that I do not have permission to open 100,000 of my own photographs on my own computer.
This is serious and there is something seriously wrong with OS-X 10.11.5 that caused it to happen.
Apple needs to make an app that undoes this error then add whatever is needed to Disk Repair to apply that fix.
There are legitimate reasons to verify and repair permissions.
If you use any audio or video app that accesses the Library/Audio/Plug-Ins/ directory, over time and for various reasons permissions will differ and applications WILL CRASH before they get through the verification process.
Those users will need to repair permissions.
About DiskWarrior.. I don’t use it much anymore, but in my IT days it SAVED MY ARSE on more occasions than I can remember. It was the only app back in the day that was reliable enough to work almost 100 percent of the time. And it didn’t BS around.
DiskWarrior should be in the Mac app HOF!
Repairing permissions once or twice a year will help you Mac run smoother and faster and to perform as expected. If you use a Mac as a testing ground and are constantly installing and removing software, then you might even need to repair your permissions quite regularly.
The issue, I believe; is those people who have made the jump from a Windows environment to an OS X environment. They come with a whole load of baggage and tend to think that repairing permissions is akin to defragmenting – which of course its not but Windows migrants come with that mindset – defragment, reorganise, reinstall, empty caches on a regular basis.
Basically, running the same maintenance workflow on a Mac that they did on a Windows PC and completely misunderstanding what they are doing in the process.
So yes, I am pleased that Apple has removed this feature from the GUI but I am glad they have left available via the Terminal. Those of us who need it can still run as and when is necessary and the migrant crowd will still get their permissions repair automatically, during upgrades/updates.
To be honest, I kind of wish Apple would remove all maintenance tools from the GUI and make them Terminal only because so many people run these things without understanding what they are doing with them or what they are for.
I had some problems with updating and even running programs. This fixed that! Thank you
I feel so glad Apple removed this (not)! I had 8 pages of permission repairs.. Who needs to see any of that! It’s all just nonsense, like global climate change.
Exercising the demons from Mac OS X 10.11 with the permission-fix holy water… I hear screaming…
I think the real reason they removed Repair Permissions is that , among all the other things that have been getting screwed up in the operating system, it was getting to the point that instead of there occasionally being a few things that got repaired it has now for a long time been common for there to be an endless list of repairs that takes forever and just keeps coming back every time you run it. It makes the unaccustomed user very nervous. Those who have seen it over and over, we were just getting used to grunting and gritting our teeth.
I bought a new iMac 5K retina display with OS X El Capitan in November 2015.
My problem is that every time I try to open Adobe Photoshop I get stopped by a message titled
CONFIGURATION ERROR
A problem has occurred with the licensing of this product. Restart your computer and re-launch the product.
If this problem still occurs after restarting, contact Customer Support for further assistance, and mention the error code shown at the bottom of this screen
… ERROR 213:5.
From the forums and chat line suggestions, I was told that it is a “permissions” problem.
I attempted to alter permissions (SL store and PCD), but in the Adobe support library application folder there is no SL Store or PCD
I have tried uninstalling and re-installing. After unsuccessfully trying to sort this problem with Adobe chat, the final suggestion was to create another user account and then try to activate it.
I set up new user account but still had same message, Then used safe mode – still same message with photoshop.
So I uninstalled the cd of Photoshop CS5, and opted to subscribe to Adobe creative cloud on a monthly basis.
I got the same error message so could not open Photoshop, had to get money refunded.
I have been using Photoshop for 15 years, to make the prints that I was selling. I have had online chats with Apple and with Adobe, but not yet found anybody who can enable me to open Photoshop. I have put my query to many forums, but am at a total loss what to do next.
There seems to be knowledgeable people here
COULD ANYONE HELP or advise PLEASE.
Because the perception is that repair and verify permissions is not a very beneficial tool for the masses, Apple has done what they do best and attempted to clean up the interface in an effort to approach the ultimate “Easy Button” solution because all other problems you may encounter are taken care of for you when your not looking. Future OS X releases may eventually just have a green Fix button once they simplify it so much.
Besides any serious tech loves the command line and would prefer that to a GUI right
sarcasm? Even if the fix was a placebo, why not leave it if it makes people feel like they did something to help their problem.
ok, so it’s useless.. so what’s my answer then? I ended up on this page because i’m having errors like “illustrator can’t save the preferences file because it’s locked or you don’t have permission to write…”. I haven’t done anything manually, so what should i do instead of repairing permissions when i have problems with.. er… permissions?
A fine example of fixing something that was not broken and reducing ease of use. Sure, you don’t need to fix permissions often but when you do, it’s not the time to be googling “where the hell did Apple put verify and repair”.
Another option is to use the old Disk Utility from Yosemite to repair permissions. It still works on El Capitan.
OOPs. I was wrong. The “Repair Permissions” button is greyed out in the Yosemite version of Disk Utility running on El Capitan.
Back to the command line or Onyx etc.
The comments that Repair Permissions is always unnecessary is not true — as any Digital Performer user can tell you even in Yosemite. Certain builds of Finale required it too. Just one of those things.
I like Onyx and Cocktail but not for the reasons one might think. Neither actually fix anything but they do allow people to so totally screw up their systems that I get to charge for my time to put Humpty Dumpty back together again. DiskWarrior just does nothing except take your money and waste your time.
That is about as clueless reply as I’ve ever seen!
DW does nothing? Really? Are you a Windoze troll?
Unbelievable… unless you like charging people for manually trying, and failing, to put things right!
How about it bringing up dying drives in Preview mode so that data can be recovered with a minimum of time and effort?
I have no idea how many times that has saved customer’s data when file recovery software, of which I have several versions, would have taken a lot more time and cost.
“Diskwarrior does nothing” Obviously you have NO idea what you are talking about. I fear for anyone unfortunate enough to have your inept and incompetent self bumbling through their system then slapping them with a hefty bill for your confused tinkering under the guise of a repair tech. Please leave computers alone and go back to your job writing those irrational and illogical furniture assembly manuals we do love so much.
Источник


