- Резервное копирование данных на iPhone, iPad или iPod touch в iTunes на ПК
- Резервное копирование данных на устройстве
- Восстановление устройства с помощью резервной копии
- Transfer photos and videos from your iPhone, iPad, or iPod touch
- iCloud Photos
- Import to your Mac
- Import to your PC
- How to Import Photos from iPhone to Windows 10
- 1. Photos App to Transfer Pictures from iPhone to Windows 10
- 2. Windows Explorer to Copy iPhone Photos to Windows 10
- 3. Cloud Service to Transfer iPhone Photos to Windows 10
- Steps to Import iPhone Photos to Windows 10 Using OneDrive
- Steps to Move iPhone Photos to Windows 10 Using Dropbox
- Steps to Sync iPhone Photos to Windows 10 Using iCloud
- 4. D-Port to Import Photos from iPhone to Windows 10
- 3 Easy Steps to Back Up iPhone Photos to Windows 10 with D-Port
- Steps to Back Up iPhone Data to Windows 10 Entirely with D-Port
Резервное копирование данных на iPhone, iPad или iPod touch в iTunes на ПК
Резервное копирование означает копирование определенных файлов и настроек с устройства iPhone, iPad или iPod touch на компьютер. Резервное копирование является одним из лучших способов избежать потери информации на устройстве в случае его повреждения или потери. Наличие резервной копии также окажется полезным, если у Вас появится новое устройство и Вы захотите перенести на него предыдущие настройки.
Резервное копирование данных на устройстве
iTunes автоматически сохраняет резервную копию информации на устройстве при его подключении к компьютеру. Кроме того, Вы в любое время можете вручную выполнить резервное копирование устройства. Если Вы пользуетесь iOS 3.0 или новее, iTunes может также шифровать резервные копии для защиты Ваших данных.
Подключите устройство к компьютеру, с которым Вы обычно его синхронизируете.
Для подключения устройства можно использовать кабель USB или USB-C, а также подключение к сети Wi-Fi. Для включения синхронизации по сети Wi-Fi см. Синхронизация контента iTunes на ПК с другими устройствами по сети Wi-Fi.
В приложении iTunes  на ПК нажмите кнопку устройства в левой верхней части окна iTunes.


Нажмите «Создать копию сейчас» (в разделе «Резервные копии»).
Чтобы зашифровать резервные копии, выберите «Зашифровать резервную копию [устройство]», введите пароль, затем нажмите «Задать пароль».
Чтобы просмотреть резервные копии, сохраненные на компьютере, выберите пункт меню «Правка» > «Настройки», затем нажмите «Устройства». Зашифрованные резервные копии отмечены значком замка в списке резервных копий.
Восстановление устройства с помощью резервной копии
Если Вам когда-нибудь потребуется восстановить сохраненную информацию на устройстве, Вы сможете без проблем это сделать.
Подключите устройство к компьютеру, с которым Вы обычно его синхронизируете.
Для подключения устройства можно использовать кабель USB или USB-C, а также подключение к сети Wi-Fi. Для включения синхронизации по сети Wi-Fi см. Синхронизация контента iTunes на ПК с другими устройствами по сети Wi-Fi.
В приложении iTunes на ПК нажмите кнопку устройства в левой верхней части окна iTunes.
Нажмите «Восстановить из копии».
Если резервная копия зашифрована, перед восстановлением файлов и настроек iTunes запрашивает пароль.
Автоматически созданная резервная копия включает текстовые сообщения, заметки, историю звонков, избранные контакты, звуковые настройки, настройки виджетов и др. Кроме того, создаются резервные копии фотографий из альбома «Фотопленка» или «Сохр. фото». Для мультимедийных файлов (таких как песни, видеозаписи и некоторые фотографии) резервная копия не создается, но их можно восстановить, выполнив синхронизацию с iTunes.
См. руководство пользователя Вашего устройства или веб-сайт поддержки Apple.
Важно! Перед отсоединением устройства от компьютера нажмите кнопку «Извлечь»  .
.
Transfer photos and videos from your iPhone, iPad, or iPod touch
Learn how to transfer photos and videos from your iPhone, iPad, or iPod touch to your Mac or PC. You can also make your photos available on all your devices with iCloud Photos.
iCloud Photos
iCloud Photos keeps your photos and videos safe, up to date, and available automatically on all of your Apple devices, on iCloud.com, and even your PC. When you use iCloud Photos, you don’t need to import photos from one iCloud device to another. iCloud Photos always uploads and stores your original, full-resolution photos. You can keep full-resolution originals on each of your devices, or save space with device-optimized versions instead. Either way, you can download your originals whenever you need them. Any organizational changes or edits you make are always kept up to date across all your Apple devices. Learn how to set up and use iCloud Photos.
The photos and videos that you keep in iCloud Photos use your iCloud storage. Before you turn on iCloud Photos, make sure that you have enough space in iCloud to store your entire collection. You can see how much space you need and then upgrade your storage plan if necessary.
Import to your Mac
You can use the Photos app to import photos from your iPhone, iPad, or iPod touch to your Mac.
- Connect your iPhone, iPad, or iPod touch to your Mac with a USB cable.
- Open the Photos app on your computer.
- The Photos app shows an Import screen with all the photos and videos that are on your connected device. If the Import screen doesn’t automatically appear, click the device’s name in the Photos sidebar.
- If asked, unlock your iOS or iPadOS device using your passcode. If you see a prompt on your iOS or iPadOS device asking you to Trust This Computer, tap Trust to continue.
- Choose where you want to import your photos. Next to «Import to,» you can choose an existing album or create a new one.
- Select the photos you want to import and click Import Selected, or click Import All New Photos.

- Wait for the process to finish, then disconnect your device from your Mac.
Import to your PC
You can import photos to your PC by connecting your device to your computer and using the Windows Photos app:
- Make sure that you have the latest version of iTunes on your PC. Importing photos to your PC requires iTunes 12.5.1 or later.
- Connect your iPhone, iPad, or iPod touch to your PC with a USB cable.
- If asked, unlock your iOS or iPadOS device using your passcode.
- If you see a prompt on your iOS or iPadOS device asking you to Trust This Computer, tap Trust or Allow to continue.
If you have iCloud Photos turned on, you need to download the original, full resolution versions of your photos to your iPhone before you import to your PC. Find out how.
When you import videos from your iOS or iPadOS device to your PC, some might be rotated incorrectly in the Windows Photos app. You can add these videos to iTunes to play them in the correct orientation.
If you’re having trouble importing photos from your iOS or iPadOS device to Windows 10, try these steps:
- On your iOS or iPadOS device, open the Settings app. Tap Camera, then tap Formats.
- Tap Most Compatible. From now on, your camera will create photos and videos in JPEG and H.264 formats.
How to Import Photos from iPhone to Windows 10
home_icon Created with Sketch.
Home > Backup iPhone > How to Import Photos from iPhone to Windows 10
![]()
December 12, 2017 (Updated: July 13, 2020)
The introduction of the Windows 10 update has marked the beginning of a new era in computing. This update featured a lot of performance improvements and bug fixes. Numerous features were (re)introduced, among which are the Start Menu, Windows Default Apps, Cortana, multiple desktops and more. However, some users have reported various minor bugs in Windows 10. For example, many iPhone users seem to face a problem when importing photos from their iPhone to their Windows 10 PC. Here in this article we will give you some tips on how to solve this problem.
1. Photos App to Transfer Pictures from iPhone to Windows 10
The default Photos app in Windows 10 can be used to transfer photos easily. You can even do batches transfer of photos from your iPhone. Steps are as follows:
- Connect your iPhone to PC using a USB cable.
- Search “Photos” from the Start menu and open it.
- Click on the Import button at the top right corner of the main screen.
- Select your iPhone from a list of devices to confirm multiple photos transfer.
![]()
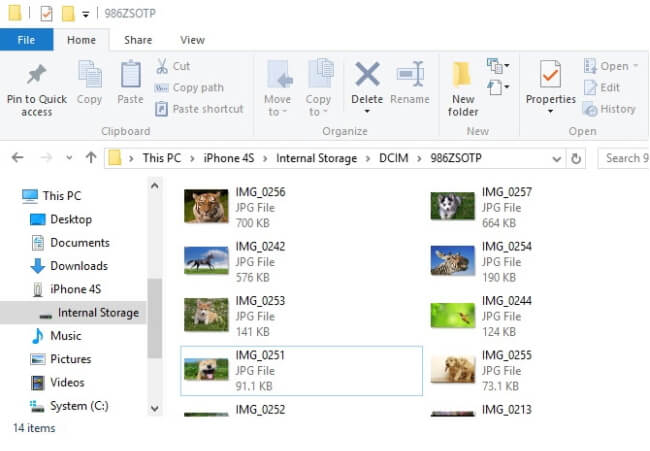
2. Windows Explorer to Copy iPhone Photos to Windows 10
You can also import photos from iPhone to Windows 10 using the Windows explorer.
- Open Windows Explorer and click on This PC in the left sidebar.
- Click on your iPhone’s name and open the DCIM folder in Internal Storage.
- Press Ctrl and select the photos you want to transfer.
- Right-click anywhere and choose Copy in the menu that appears, or just use Ctrl + C.
- Go to your Pictures folder on your hard drive and paste the pictures.
3. Cloud Service to Transfer iPhone Photos to Windows 10
Another way to transfer iPhone photos to Windows 10 is to use cloud storage services such as OneDrive, Dropbox, iCloud. We’ll look at the above-mentioned cloud storage services one by one, and also detail the steps involved in transferring iPhone photos to Windows 10.
The good thing is you don’t even need to use any USB cable to connect to your PC, and your photos are transferred to your PC once you start syncing to your PC. To make it easier to sync for Dropbox and OneDrive, enable camera upload in the settings for the apps on your iPhone.
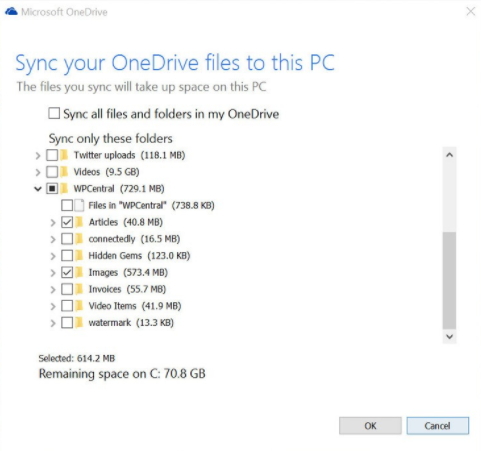
Steps to Import iPhone Photos to Windows 10 Using OneDrive
- Open OneDrive.
- Click on Settings, choose folders for syncing.
- Choose the folders where your photos are located (e.g. DCIM).
- Press OK and make the app sync the folders. Then wait for the process to finish.
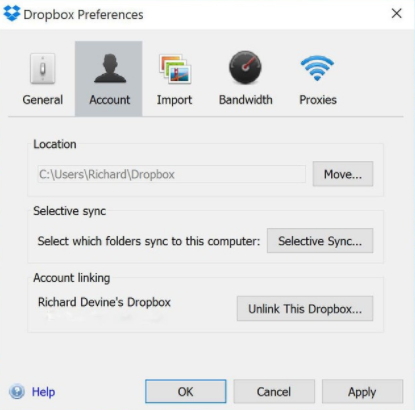
Steps to Move iPhone Photos to Windows 10 Using Dropbox
- Go to Dropbox.com, download and install Dropbox Desktop Sync.
- Click the Dropbox icon on the right part of the taskbar to access settings and select folders for syncing.
- Click Preferences and go to Accounts tab to choose Selective Sync.
- All the folders in your Dropbox will appear, and then select the ones you need to transfer.
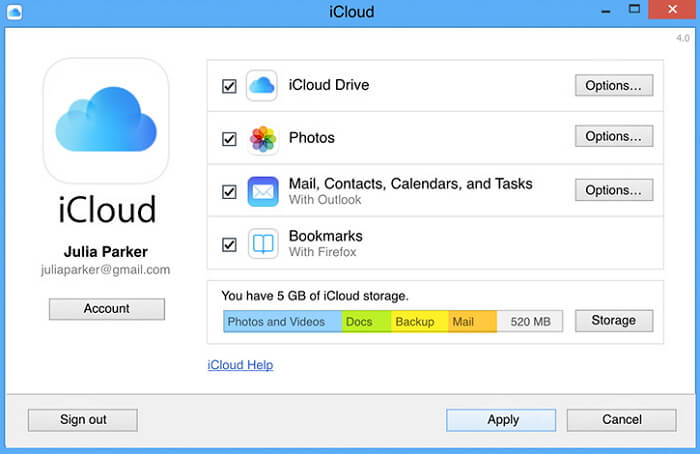
Steps to Sync iPhone Photos to Windows 10 Using iCloud
This is a simple cloud storage service for iPhone users, much like OneDrive is for Windows users.
- Download iCloud for Windows and then install it.
- Log in with your Apple ID and password.
- Go to the box named Photos and tick the Options button.
- Mark My Photo Stream and tick Upload new photos from my PC.
- Hit Done and then Apply to complete.
4. D-Port to Import Photos from iPhone to Windows 10
iMyFone D-Port iOS Data Exporter is a great and easy-to-use software for exporting or extracting your iPhone data from iCloud/ iTunes backups to a Windows PC or Mac. It can transfer over 18 different data types from an iDevice, among which are photos, videos, messages, contacts, notes, WhatsApp data, WeChat data, Kik data, Viber data, voice memos, call history, Safari history & bookmarks and etc. It also supports almost every known iOS device running on iOS 7/8/9/10/11. For instance, it’s fully compatible with iPhone X, iPhone 8/8 Plus, iPhone 7/7 Plus, most models of iPad and iPod Touch devices.
3 Easy Steps to Back Up iPhone Photos to Windows 10 with D-Port
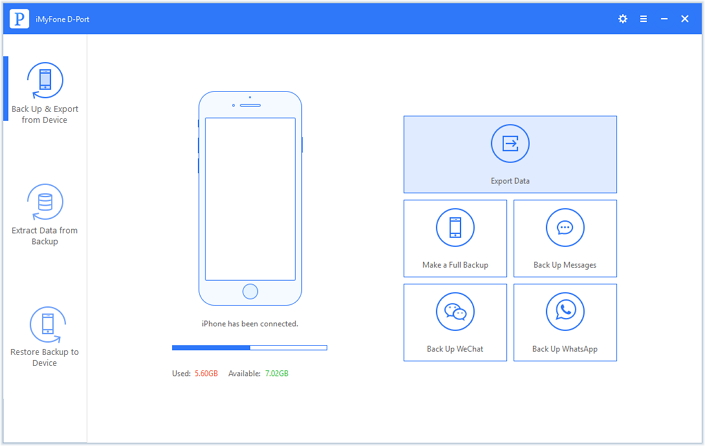
Run iMyFone D-Port Data Exporter and connect your iPhone/iPad to your PC using a USB cable before transfer.
- Select Back Up & Export from Device. You should ensure that the software detects your device before you click on Export Data.
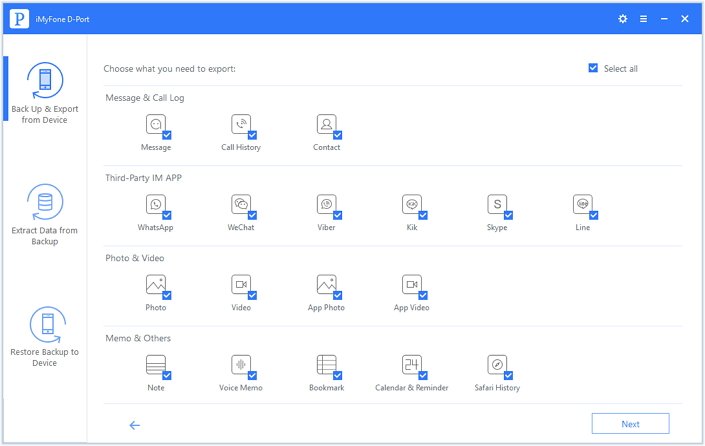
Then the screen will display different file types. You only need to tick the checkbox next to Photo alone (under the Photos and Videos tab) to start scanning.

Steps to Back Up iPhone Data to Windows 10 Entirely with D-Port
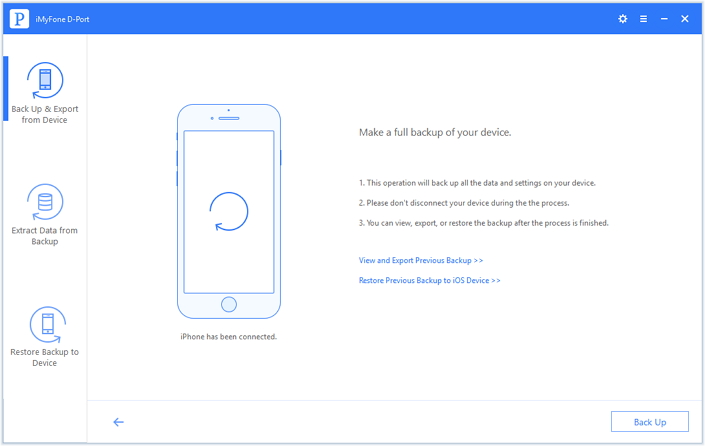
- Connect your iDevice to your PC using a USB cable, then open iMyFone D-Port and select Back Up & Export from Device from the main page.
- Click Make a Full Backup and on the second screen that appears, click the Back Up button to begin. You must not disconnect your device until the process is completed to avoid errors.
- When the backup is done, you’ll be informed with a message that the device has been backed up successfully. Then you can view the imported data anytime you want.
Note: To restore this backup to your iDevice, you need to upgrade D-Port to D-Port Pro.


