- Установка PHP 7.1 в Windows. Командная строка
- Загружаем PHP для Windows
- Устанавливаем PHP 7.1
- Подключаем конфигурационный файл
- Тестируем PHP из командной строки
- Упрощаем обращение к php.exe
- Еще немного о переменных окружения
- PHP: Hypertext Preprocessor
- PHP For Windows
- PECL For Windows
- Which version do I choose?
- Apache
- VC15 & VS16
- TS and NTS
- What is PGO?
- amd64 (x86_64) Builds
- Long and multibyte path
- Archives
- OCI DLLs missing from PHP 8.0.0 pre-release builds
- Windows Defender Warnings
- OpenSSL default config path changed
- PHP 7.4 builds use Visual Studio 2017
- Visual Studio 2019 Builds
- OpenSSL 1.1.1a
- The windows.php.net site uses SSL by default
- AVX builds
- OpenSSL security update
- OpenSSL security update
Установка PHP 7.1 в Windows. Командная строка
В htmlAcademy стартовал первый базовый интенсив по PHP и я работаю на нем наставником. Студентам в рамках интенсива предстоит поднять рабочее окружение и это заметка нацелена упростить эту нелегкую для новичка задачу. Есть разные способы поднятия полноценного LAMP стека, но мы пойдем классическим путем. Настроим все компоненты по отдельности (без применения готовых комбайнов) и начнем с PHP (обязательно будет заметка с рассмотрением готовых сборок LAMP). Поскольку я планирую работать наставникам на интесивах по PHP и дальше, я собираюсь написать подобные инструкции для повторения в других ОС (Linux, macOS). Как говорится, лучше один раз попотеть, но потом всем станет проще. Итак, приступаем.
Загружаем PHP для Windows
Заходим на официальный сайт и загружаем актуальную версию PHP. На момент написания заметки это – 7.1.4. На странице доступно несколько вариантов дистрибутивов. У меня Windows 7 x64, соответственно я выбираю zip архив с VC14 x64 Thread Safe.
Обратите внимание, для загрузки доступна два варианта дистрибутива: Thread-Safe (TS) и Non-Thread-Safe (NTS). Выбор зависит от того как вы планируете применять интерпретатор. TS рекомендуется использовать для одного процесса веб-служб (например, настраивая через модуль mod_php для Apache). NTS рекомендуется для применения IIS (Internet Information Service) и альтернативных FastCGI веб-сервером (например, Apache с модулем FastCGI) и командной строки.
Устанавливаем PHP 7.1
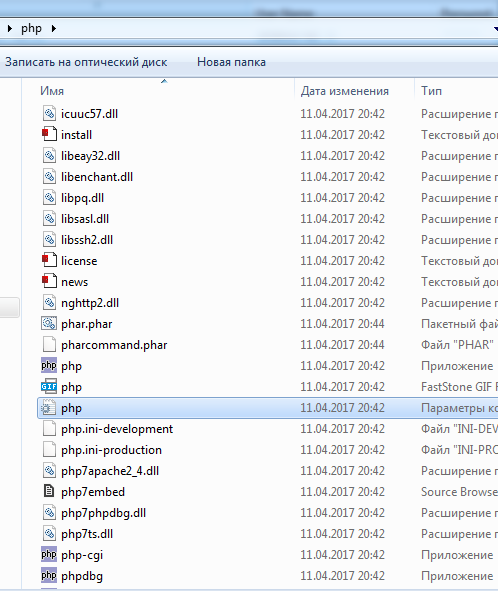
Начнем готовить PHP для комфортной работе из командной строки. В предыдущем шаге вы загрузили архив с дистрибутивом PHP. В отличие от большинства программ, PHP поставляется в простом архиве, а не как инсталляционный пакет. Поэтому вам придется самостоятельно извлечь файлы в любую удобную для вас директорию. Я предпочитаю хранить подобные вещи в корне системного диска. Создайте в корне диска «C:» (или любом другом месте) директорию «php» и извлеките в нее содержимое загруженного архива.
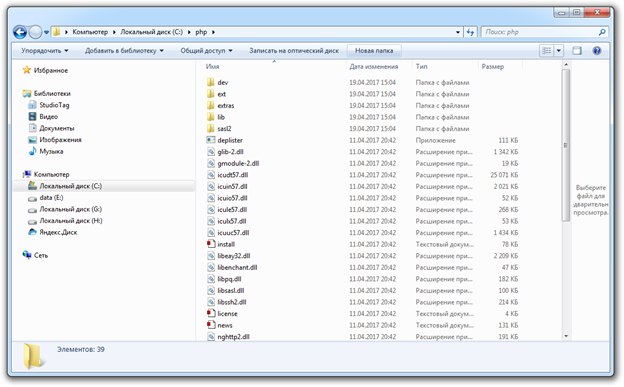
В директории появится множество файлов, но нас больше всего интересуют:
- go-pear.bat – сценарий для установки PEAR. Подробности о PEAR можно почитать в официальной документации.
- php.exe – позволяет выполнять PHP сценарии из консоли;
- php-win.exe — позволяет выполнять PHP сценарии без применения консоли;
- php-cgi.exe – необходим для выполнения PHP кода в режиме FastCGI;
- php7apache2_4.dll – модуль интеграции с веб-сервером Apache 2.4.X;
- phpdbg.exe – отладчик;
- php.ini-development – пример конфигурационного файла PHP для окружения разработчика (development)
- php.ini-production – пример конфигурационного файла PHP для рабочего окружения (production)
Подключаем конфигурационный файл
Распакованный дистрибутив у нас есть, подключим для него конфигурационный файл. Мы собираемся ставить эксперименты, поэтому в качестве образца возьмем php.ini-development. Сделайте копию этого файла в директорию php (C:\php) с именем php.ini. ВАЖНО! Делайте именно копию, не простое переименование. За время разработки вам может потребоваться изменять конфигурационный файл и есть все шансы совершить ошибку, которую трудно будет обнаружить.
В таких случаях нет ничего лучше, чем вернуться к эталонным настройкам. В нашем случае будет достаточно повторить копирование файла php.ini-development в php.ini. Итак, по окончанию телодвижений в директории с php должен появиться файлик php.ini. В дальнейших заметках мы обязательно поговорим о его содержимом более детально.
Тестируем PHP из командной строки
На этом шаге, так называемая «установка» завершена. Откройте консоль (cmd.exe, ярлык доступен в меню «Стандартные») и введите команду:
Результат будет примерно таким:
Результат подтверждает, что PHP работает. Попробуйте для примера создать новый файл-сценарий (я создал файл “test.php” прямо в корне диска “C:”) и поместить в него текст:
Теперь попробуйте выполнить этот файл и посмотрите результат:
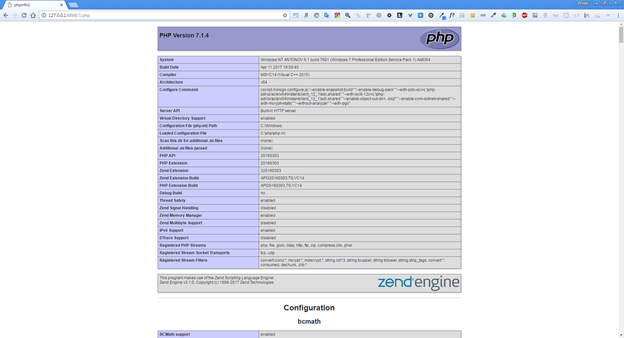
Функция phpinfo() выводит информацию по конфигурации PHP в удобном виде. Об этой функции мы еще поговорим.
Упрощаем обращение к php.exe
PHP готов к работе, но согласитесь, каждый раз вбивать в консоле путь к php интерпретатору довольно неудобно. Чтобы упростить себе жизнь, внесем небольшие изменения в переменные среды. Запустим в панели управления аплет «Система» (или просто нажмем горячую клавишу «Windows + Pause Break». Затем нажмем на кнопку «Изменить параметры». В появившемся окне «Свойства системы», перейдем на закладку «Дополнительно». Найдите и нажмите на ней кнопку «Переменные среды».
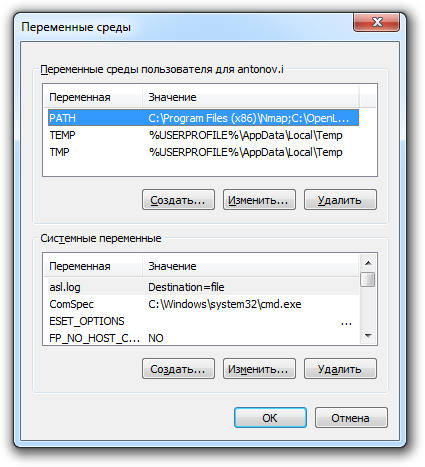
Находим в списке переменную «PATH» и нажимаем кнопку «Изменить», появится окно редактирования переменной. В поле «Значение переменной» нам необходимо дописать путь к директории с PHP. Перейдите в самый конец строки и через точку с запятой укажите путь к директории с PHP: C:\php;
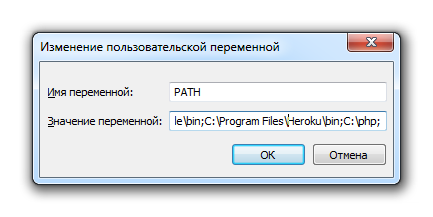
Все, нажимайте «Ok». Теперь перезагрузите систему (увы, придется). После перезагрузки Windows, обращаться к PHP можно будет просто: php.Например, чтобы вывести название версии достаточно написать:
А чтобы интерпретировать файл test.php, расположенный в корне диска «C:»:
Или вовсе запустить встроенный веб-сервер:
Для тестирования откройте web-браузер попробуйте обратиться на http://127.0.0.1:8888/test.php. Обратите внимание, после параметра –t мы указываем путь к директории, которая станет корневой директорией веб-сервера. Все сценарии, расположенные в этой папке будут доступны для запроса с клиента. У меня на диске «C:» есть один файлик 1.php и именно его я и запрашиваю.
Можно пойти немного дальше и ассоциировать расширение .php с интерпретатором, т.е. сделать все файлы с расширением php исполняемым по умолчанию. Для этого вводим в консоле несколько команд:
Еще немного о переменных окружения
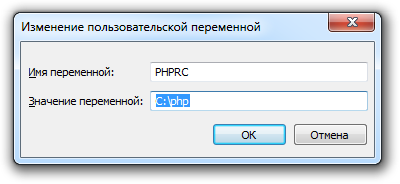
Теперь давайте поговорим о том как PHP будет искать файл настроек конфигурации (вспоминаем, о php.ini). В документации приведена полная цепочка поиска. Во избежание лишних сложностей, рекомендую сразу добавить в переменные окружения новую – «PHPRC» и в качестве значения указать путь к директории с конфигурационным файлом. У меня конфиг располагается в тоже же директории, что и основные файлы php, следовательно в качестве значения переменной указываю –
«C:\php». После внесения изменения потребуется перезагрузка.
На этом у меня все. Первый часть мануала для новичков готова.
PHP: Hypertext Preprocessor
Are you seeing a warning from Windows Defender? Check out this info.
PHP For Windows
This site is dedicated to supporting PHP on Microsoft Windows. It also supports ports of PHP extensions or features as well as providing special builds for the various Windows architectures.
If you like to build your own PHP binaries, instructions can be found on the Wiki.
PECL For Windows
PECL extensions for Windows is being worked on. Windows DLL can be downloaded right from the PECL website.
The PECL extension release and snapshot build directories are browsable directly.
Which version do I choose?
If you are using PHP as FastCGI with IIS you should use the Non-Thread Safe (NTS) versions of PHP.
Apache
Please use the Apache builds provided by Apache Lounge. They provide VC15 and VS16 builds of Apache for x86 and x64. We use their binaries to build the Apache SAPIs.
With Apache, using the apache2handler SAPI, you have to use the Thread Safe (TS) versions of PHP.
VC15 & VS16
More recent versions of PHP are built with VC15 or VS16 (Visual Studio 2017 or 2019 compiler respectively) and include improvements in performance and stability.
— The VC15 and VS16 builds require to have the Visual C++ Redistributable for Visual Studio 2015-2019 x64 or x86 installed
TS and NTS
TS refers to multithread capable builds. NTS refers to single thread only builds. Use case for TS binaries involves interaction with a multithreaded SAPI and PHP loaded as a module into a web server. For NTS binaries the widespread use case is interaction with a web server through the FastCGI protocol, utilizing no multithreading (but also for example CLI).
What is PGO?
Profile Guided Optimization is an optimization feature available in Microsoft’s Visual C++ compiler that allows you to optimize an output file based on profiling data collected during test runs of the application or module.
Links:
amd64 (x86_64) Builds
PHP 7 provides full 64-bit support. The x64 builds of PHP 7 support native 64-bit integers, LFS, 64-bit memory_limit and much more.
x64 builds are recommended (almost all Windows installations support x64).
Long and multibyte path
PHP 7.1+ supports long and UTF-8 paths. See the manual for details.
Archives
Past releases are available from our archives, older versions not found there can be found at the Museum.
OCI DLLs missing from PHP 8.0.0 pre-release builds
Due to a build system error which only has been noticed recently, so far the PHP 8.0.0 pre-release builds didn’t contain php_oci8_12c.dll and php_pdo_oci.dll in the ext/ folder. You can now separately download these files and copy them in your existing PHP-8.0.0beta1 installation (the DLLs are not suitable for the alpha releases). Make sure that you use the appropriate package (x64 vs. x86, and non thread-safe vs. thread-safe).
Windows Defender Warnings
A few days ago, we have noticed that Windows Defender reports some files in the PHP source and test packages as severe threat, claiming they would constitute a backdoor (e.g. Backdoor:PHP/Dirtelti.MTF). These files are auxiliary test files containing eval statements. Are these files backdoors? That depends on the context, i.e. in this case whether they are accessible via the Web. If they are, because they have been uploaded to the webroot of a publicly available Webserver, for instance, they may pose a serious threat. On the other hand, if they are just used on a local machine for development and testing purpuses, they are not malicious in any way.
So, if you experience such Windows Defender warnings, examine the reported files, make sure they don’t pose any threat, and then unblock them.
Happy PHPing on Windows!
OpenSSL default config path changed
As of PHP 7.4.0, the OpenSSL default config path changes from c:\usr\local\ssl\openssl.cnf to C:\Program Files\Common Files\SSL\openssl.conf for x64 builds, and C:\Program Files (x86)\Common Files\SSL\openssl.conf for x86 builds. These paths match the defaults of OpenSSL 1.1, and are more inline with the Windows folder structure than the old settings. Note that this path is still configurable via the environment variable OPENSSL_CONF. See also the installation section in the PHP manual.
PHP 7.4 builds use Visual Studio 2017
We used Visual Studio 2019 to build the early releases of PHP 7.4 (up to and including 7.4.0beta2). And although Visual Studio 2019 is generally an improvement over Visual Studio 2017, due to compatibility issues we have decided to switch back to Visual Studio 2017 for our PHP 7.4 builds, and we are planning to stick with this for the complete lifetime of PHP 7.4.
Note that it is still possible to use Apache VS16 builds from Apachelounge in combination with PHP 7.4, since VS 2019 is forward compatible with VS 2017.
Our master snapshots are still built with Visual Studio 2019, and we are planning to stick with Visual Studio 2019 for PHP 8.0.
Visual Studio 2019 Builds
All binary packages we were offering contained «vc#» (for instance, «vc14») in the filename to designate the Visual Studio version which has been used to build them. This number («#») has tradionally been the major number of the respective platform toolset. The preview releases of Visual Studio 2017 shipped with platform toolset 15.00, so we used «vc15» to mark the files. The first GA release of Visual Studio 2017, however, shipped with platform toolset 14.10 (to signal the backward compatibility), but the internal Visual Studio version number stayed 15.00. To avoid confusion with already distributed packages, we stuck with the «vc15» marker. For our Visual Studio 2019 builds (PHP 7.4 and master) we finally changed from «vc#» to «vs#» (note the «s»), where the number now designates the major internal Visual Studio version number. We are planning to stick with this new naming scheme for the foreseeable future.
OpenSSL 1.1.1a
The recent release candidates 7.2.14RC1 and 7.3.1RC1 use the latest OpenSSL 1.1.1 release branch. Please help testing these release candidates with the regard to the OpenSSL compatibility and report bugs. This concerns the OpenSSL extension itself as well as the extensions depending on OpenSSL like cURL.
The windows.php.net site uses SSL by default
Thanks to «Let’s Encrypt», the site now uses SSL by default. All the non SSL links are transparently redirected to the SSL locations.
WinXP users might experience connection issues. It is a high time to switch away from WinXP to some more recent OS version.
AVX builds
In addition to the usual regular snapshots, the current master builds deliver binaries with AVX (Advanced Vector Extensions) support. AVX is an instruction set available in many modern CPUs. The internal PHP implementation uses these specific CPU instructions to improve performance.
Processors, manufactured after 2011, most likely support AVX. The exact information about the hardware can be retrieved by using the Coreinfo tool.
Help us to test these new flavours, any feedback appreciated!
OpenSSL security update
The OpenSSL Security Advisory [19 Mar 2015] announces the availability of the OpenSSL 0.9.8zf and 1.0.1m which fix twelve security vulnerabilities. The latest PHP releases 5.4.39, 5.5.23 and 5.6.7 already contain the updated OpenSSL library. All PHP users are strongly encouraged to upgrade to the corresponding patch versions.
Alternatively, the updated OpenSSL dependency DLLs can be downloaded separately as replacement for the older PHP and Apache versions.
OpenSSL security update
The OpenSSL Security Advisory [07 Apr 2014] announces the availability of the OpenSSL 1.0.1g which fixes CVE-2014-0160. In this regard the latest PHP release 5.5.11 was rebuilt with the OpenSSL 1.0.1g. All PHP users are strongly encouraged to upgrade to PHP 5.5.11. If you already have downloaded this version before 10-Apr-2014, please redownload. The existing private keys should be regenerated as soon as possible.
Alternatively, the updated OpenSSL dependency DLLs can be downloaded separately as replacement for the older PHP versions. Though be aware that this issue affects only OpenSSL 1.0.x and the DLL packages are only applicable to PHP 5.5 and upper.
PHP 5.4 and lower is not affected by this issue.


