- Подключение GD2 к PHP
- Задача: Добавить в PHP поддержку/модуль GD2
- Подключение GD2 к PHP под Windows
- Подключение GD2 к PHP под FreeBSD
- PHP уже инсталлирован из портов
- PHP собран вручную
- Установка поддержки JPEG
- Надо установить поддержку zlib
- Собираем PHP
- Тестирование
- Пройденные ошибки
- Решение
- Установка PHP 5.3.10
- DLL DOWNLOADER
- Download Php_gd2.dll for Windows 10, 8.1, 8, 7, Vista and XP
- Php_gd2.dll Explanation link
- Table of Contents
- Operating Systems Compatible with the Php_gd2.dll Library link
- Other Versions of the Php_gd2.dll Library link
- Steps to Download the Php_gd2.dll Library link
- How to Fix Php_gd2.dll Errors? link
- Method 1: Fixing the DLL Error by Copying the Php_gd2.dll Library to the Windows System Directory link
- Method 2: Copying The Php_gd2.dll Library Into The Program Installation Directory link
- Method 3: Uninstalling and Reinstalling the Program that Gives You the Php_gd2.dll Error link
- Method 4: Fixing the Php_gd2.dll Error Using the Windows System File Checker link
- Method 5: Getting Rid of Php_gd2.dll Errors by Updating the Windows Operating System link
- Windows Update Guides link
- The Most Seen Php_gd2.dll Errors link
- Dynamic Link Libraries Similar to the Php_gd2.dll Library link
- Incoming Feedback for the Php_gd2.dll Library link
Подключение GD2 к PHP
© 2007, Guzei.com, Игорь Гузей
Это не точная и окончательная инструкция к действию использующая правильные термины и оптимальные варианты. Это скорее лог текущей проблемы.
Задача: Добавить в PHP поддержку/модуль GD2
Как обычно начинаем тренироваться на локальном компьютере, а он, конечно, работает под виндами. Точнее Windows XP SP2. Далее подключим GD2 в PHP, настроенном через порты или собранным вручную под FreeBSD.
Подключение GD2 к PHP под Windows
Находим в дистрибутиве:
\php-4.3.9-Win32.zip\php-4.3.9-Win32\extensions\
библиотеку php_gd2.dll, т.е. версию 2.
и копируем php_gd2.dll в c:\windows
в файле c:\windows\php.ini находим строку extension=php_gd2.dll и убираем комментарий.
Перегружаем Апач. Всё.
Если наивным образом сначала убрать в php.ini комментарий и думать, что этого достаточно, то после перезагрузки Апача появится диагностика:
«Unable to load dynamic library ‘./php_gd.dll’ — Не найден указанный модуль.»
Подключение GD2 к PHP под FreeBSD
PHP уже инсталлирован из портов
Точнее не только PHP, но вообще всё (php, MySQL, Apache, . ) было настроено с помощью портов.
PHP собран вручную
В этом случае требуется предварительная работа по подготовке JPEG и ZLIB
Установка поддержки JPEG
JPEG из порта
JPEG из дистрибутива
Надо установить поддержку zlib
Из порта
Собираем PHP
Далее собираем новый Apache как обычно и заменяем им старый. JPEG, PNG, GIF работают.
Тестирование
Пройденные ошибки
При установке библиотеки JPEG после «make» была сделана команда «make install» с расчётом, что новые файлы лягут в /usr/local и потом автоматически будут там найдены
Но почему-то JPEG не подключился. Не было никакой отрицательной диагностики и нет результата.
По глупости я тыкался как слепой котёнок пытаясь поставить то так, то этак. То через всё встроенное, то через скаченное, то из портов. Всё это безобразие сопровождалось лишними инсталляциями от чего произошли накладки из-за которых в момент инсталляции PHP были ошибки: при этом вроде директория для GD указывается, но диагностика ссылается на встроенную директорию.
Попытка подготовить все модули отдельно и точно указать на них:
Решение
После того, как были удалены все следы инсталляций GD, а потом всё сделано как написано вначале — всё получилось.
Установка PHP 5.3.10
Статья описывает процесс установки и первоначальной настройки на локальном компьютере, работающим под операционной системой Windows XP, прекрасно зарекомендовавшей себя связки программ, используемых при создании, как крупных, так и средних веб-проектов: Apache, MySQL, PHP и phpMyAdmin.
Сайт разработчика: http://www.php.net/
Дистрибутив (VC9 x86 Thread Safe, Zip архив): http://windows.php.net/download/
Прямая ссылка: php-5.3.10-Win32-VC9-x86.zip
Заодно скачайте сразу и документацию на русском языке в формате .chm, она вам понадобится при изучении и работе: php_enhanced_ru.chm
Распакуйте архив в желаемый каталог (изначально предлагается «C:\php»). Откройте конфигурационный файл содержащий рекомендуемые настройки — «php.ini-development» (находящийся в корне дистрибутива), переименуйте его в php.ini и произведите следующие изменения.
Редакция php.ini:
- Найдите строку:
post_max_size = 8M
Увеличьте до 16 Мбайт максимальный размер данных принимаемых методом POST, изменив ее на:
post_max_size = 16M - Найдите строку:
;include_path = «.;c:\php\includes»
Раскомментируйте ее, убрав перед строкой символ точки с запятой.
(Внимание исключение! Обратные косые черты при указании пути):
include_path = «.;c:\php\includes»
Создайте пустой каталог «C:\php\includes», для хранения подключаемых классов. - Найдите строку:
extension_dir = «./»
Установите значением данной директивы путь к папке с расширениями:
extension_dir = «C:/php/ext» - Найдите строку:
;upload_tmp_dir =
Раскомментируйте ее и укажите в значении следующий путь:
upload_tmp_dir = «C:/php/upload»
Создайте пустую папку «C:\php\upload», для хранения временных файлов загружаемых через HTTP. - Найдите строку:
upload_max_filesize = 2M
Увеличьте максимально допустимый размер загружаемых файлов до 16 Мбайт:
upload_max_filesize = 16M - Подключите, расскомментировав, данные библиотеки расширений:
extension=php_bz2.dll
extension=php_curl.dll
extension=php_gd2.dll
extension=php_mbstring.dll
extension=php_mysql.dll
extension=php_mysqli.dll - Найдите строку:
;date.timezone =
Раскомментируйте и установите значением часовой пояс вашего местоположения (список часовых поясов можно найти в документации):
date.timezone = «Europe/Moscow» - Найдите строку:
;session.save_path = «/tmp»
Раскомментируйте и установите значением данной директивы такой путь:
session.save_path = «C:/php/tmp»
Создайте пустую папку «C:\php\tmp» для хранения временных файлов сессий.
Сохраните изменения и закройте файл php.ini.
Далее необходимо добавить каталог с установленным PHP интерпретатором в PATH операционной системы. Для чего пройдите по пути «Start» («Пуск») -> «Control Panel» («Панель управления») -> «System» («Система»), откройте вкладку «Advanced» («Дополнительно»), нажмите кнопку «Environment Variables» («Переменные среды»), в разделе «System Variables» («Системные переменные») сделайте двойной щелчок на строке «Path», добавьте в поле «Variable Value» («Значение переменной»), к тому что там уже существует, путь к каталогу с установленным PHP, например, «C:\php» (без кавычек). Обратите внимание на то что символ точки с запятой разделяет пути. Чтобы внесенные изменения вступили в силу, перезагрузите операционную систему.
Пример строки Path:
%SystemRoot%\system32;%SystemRoot%;%SystemRoot%\System32\Wbem;C:\php;C:\Program Files\MySQL\MySQL Server 5.5\bin
Установка и настройка PHP интерпретатора – завершена.
Описание подключаемых библиотек:
php_bz2.dll – С помощью данного расширения PHP сможет создавать и распаковывать архивы в формате bzip2.
php_curl.dll – Очень важная и нужная библиотека, позволяющая соединяться и работать с серверами, с помощью огромного количества интернет-протоколов.
php_gd2.dll – Ещё одна незаменимая библиотека, позволяющая работать с графикой. Вы думали на PHP можно только HTML странички генерировать? А вот и нет! С помощью PHP можно почти всё, в том числе и рисовать.
php_mbstring.dll – Библиотека содержит функции для работы с много-байтными кодировками, к которым относятся кодировки восточных языков (японский, китайский, корейский), Юникод (UTF-8) и другие.
php_mysql.dll – Имя библиотеки говорит само за себя — она необходима для работы с сервером MySQL.
php_mysqli.dll – Данная библиотека является расширением предыдущей и содержит дополнительные функции PHP для работы с сервером MySQL версии 4.1.3 и выше.
Данных библиотек должно хватить для полноценной работы PHP. Со временем, если появится такая необходимость, вы сможете подключить дополнительные библиотеки, но не стоит подключать их все сразу с мыслью, что кашу маслом не испортишь, в данном случае излишнее количество подключенных библиотек может заметно замедлить работу PHP.
DLL DOWNLOADER
Download DLL and other System-Files for Windows

Download Php_gd2.dll for Windows 10, 8.1, 8, 7, Vista and XP
Php_gd2.dll Explanation link
The Php_gd2.dll library is a system file including functions needed by many programs, games, and system tools. This dynamic link library is produced by the The PHP Group.
The Php_gd2.dll library is 1.38 MB. The download links are current and no negative feedback has been received by users. It has been downloaded 3219 times since release and it has received 1.5 out of 5 stars.
Table of Contents
Operating Systems Compatible with the Php_gd2.dll Library link
Other Versions of the Php_gd2.dll Library link
The newest version of the Php_gd2.dll library is the 5.4.3.0 version. There have been 2 versions released before this version. All versions of the Dynamic link library have been listed below from most recent to oldest.
Steps to Download the Php_gd2.dll Library link
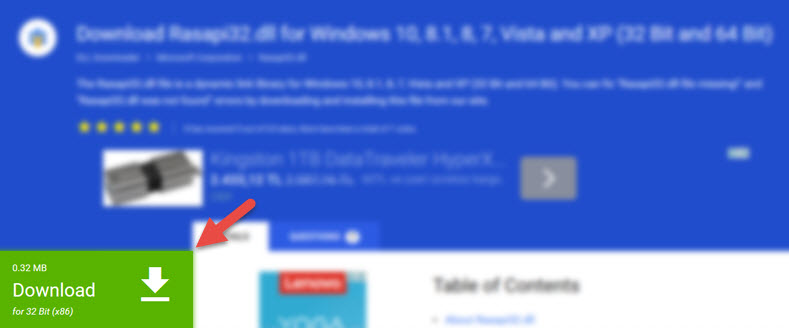
- First, click the «Download» button with the green background (The button marked in the picture).
 Step 1:Download the Php_gd2.dll library
 - After clicking the «Download» button at the top of the page, the «Downloading» page will open up and the download process will begin. Definitely do not close this page until the download begins. Our site will connect you to the closest DLL Downloader.com download server in order to offer you the fastest downloading performance. Connecting you to the server can take a few seconds.
 Step 1:Download the Php_gd2.dll library
How to Fix Php_gd2.dll Errors? link
ATTENTION! Before continuing on to install the Php_gd2.dll library, you need to download the library. If you have not downloaded it yet, download it before continuing on to the installation steps. If you are having a problem while downloading the library, you can browse the download guide a few lines above.
Method 1: Fixing the DLL Error by Copying the Php_gd2.dll Library to the Windows System Directory link
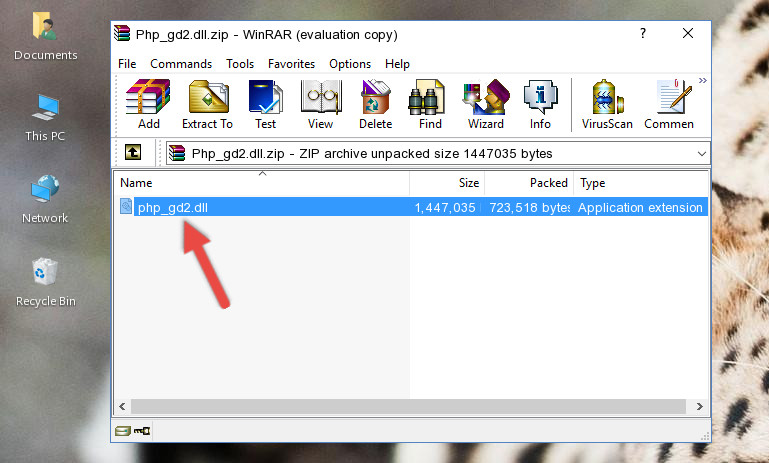
- The file you downloaded is a compressed file with the extension «.zip«. This file cannot be installed. To be able to install it, first you need to extract the dynamic link library from within it. So, first double-click the file with the «.zip» extension and open the file.
- You will see the library named «Php_gd2.dll» in the window that opens. This is the library you need to install. Click on the dynamic link library with the left button of the mouse. By doing this, you select the library. Step 2:Choosing the Php_gd2.dll library
- Click on the «Extract To» button, which is marked in the picture. In order to do this, you will need the Winrar program. If you don’t have the program, it can be found doing a quick search on the Internet and you can download it (The Winrar program is free).
- After clicking the «Extract to» button, a window where you can choose the location you want will open. Choose the «Desktop» location in this window and extract the dynamic link library to the desktop by clicking the «Ok» button. Step 3:Extracting the Php_gd2.dll library to the desktop
- Copy the «Php_gd2.dll» library file you extracted.
- Paste the dynamic link library you copied into the «C:\Windows\System32» directory. Step 4:Pasting the Php_gd2.dll library into the Windows/System32 directory
- If your system is 64 Bit, copy the «Php_gd2.dll» library and paste it into «C:\Windows\sysWOW64» directory.
 Step 2:Choosing the Php_gd2.dll library
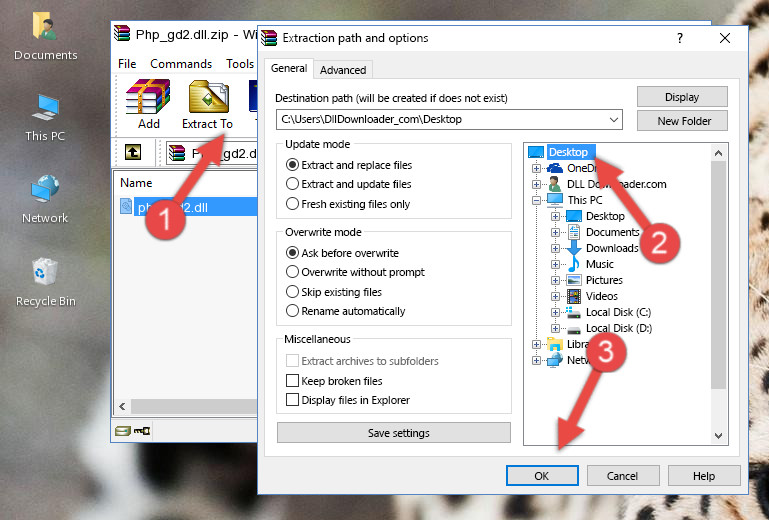 Step 3:Extracting the Php_gd2.dll library to the desktop
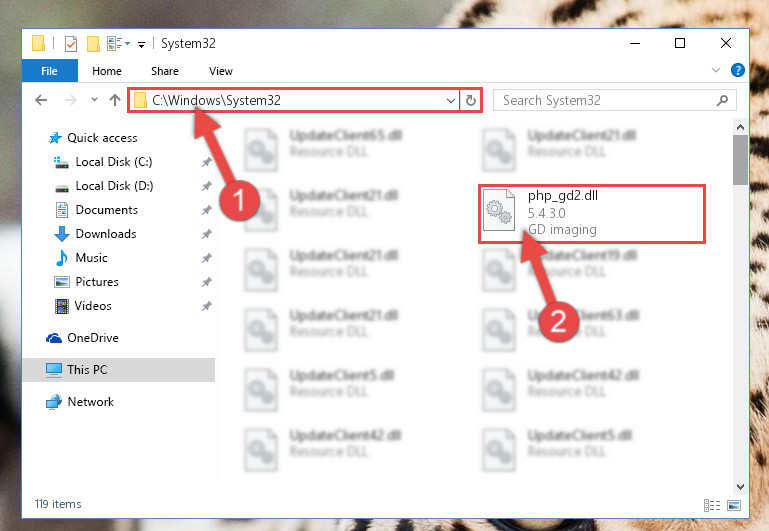 Step 4:Pasting the Php_gd2.dll library into the Windows/System32 directory
NOTE! On 64 Bit systems, you must copy the dynamic link library to both the «sysWOW64» and «System32» directories. In other words, both directories need the «Php_gd2.dll» library.
NOTE! We ran the Command Prompt using Windows 10. If you are using Windows 8.1, Windows 8, Windows 7, Windows Vista or Windows XP, you can use the same method to run the Command Prompt as administrator.
- Open the Start Menu and before clicking anywhere, type «cmd» on your keyboard. This process will enable you to run a search through the Start Menu. We also typed in «cmd» to bring up the Command Prompt.
- Right-click the «Command Prompt» search result that comes up and click the Run as administrator» option.
 Step 6:Running the Command Prompt as administrator
%windir%\System32\regsvr32.exe /u Php_gd2.dll
%windir%\SysWoW64\regsvr32.exe /u Php_gd2.dll
%windir%\System32\regsvr32.exe /i Php_gd2.dll
%windir%\SysWoW64\regsvr32.exe /i Php_gd2.dll
Method 2: Copying The Php_gd2.dll Library Into The Program Installation Directory link
- First, you must find the installation directory of the program (the program giving the dll error) you are going to install the dynamic link library to. In order to find this directory, «Right-Click > Properties» on the program’s shortcut. Step 1:Opening the program’s shortcut properties window
- Open the program installation directory by clicking the Open File Location button in the «Properties» window that comes up. Step 2:Finding the program’s installation directory
- Copy the Php_gd2.dll library.
- Paste the dynamic link library you copied into the program’s installation directory that we just opened. Step 3:Pasting the Php_gd2.dll library into the program’s installation directory
- When the dynamic link library is moved to the program installation directory, it means that the process is completed. Check to see if the issue was fixed by running the program giving the error message again. If you are still receiving the error message, you can complete the 3rd Method as an alternative.
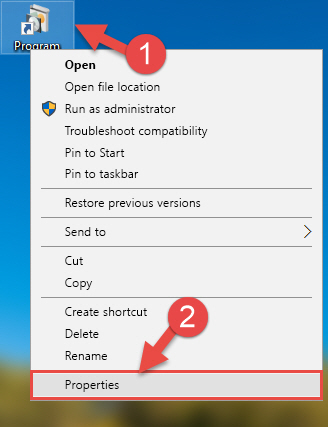 Step 1:Opening the program’s shortcut properties window
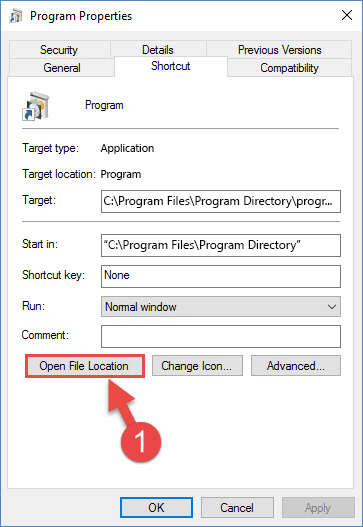 Step 2:Finding the program’s installation directory
 Step 3:Pasting the Php_gd2.dll library into the program’s installation directory
Method 3: Uninstalling and Reinstalling the Program that Gives You the Php_gd2.dll Error link
- Open the Run window by pressing the «Windows» + «R» keys on your keyboard at the same time. Type in the command below into the Run window and push Enter to run it. This command will open the «Programs and Features» window.
Method 4: Fixing the Php_gd2.dll Error Using the Windows System File Checker link
- In order to complete this step, you must run the Command Prompt as administrator. In order to do this, all you have to do is follow the steps below.
NOTE! We ran the Command Prompt using Windows 10. If you are using Windows 8.1, Windows 8, Windows 7, Windows Vista or Windows XP, you can use the same method to run the Command Prompt as administrator.
- Open the Start Menu and before clicking anywhere, type «cmd» on your keyboard. This process will enable you to run a search through the Start Menu. We also typed in «cmd» to bring up the Command Prompt.
- Right-click the «Command Prompt» search result that comes up and click the Run as administrator» option.
Step 1:Running the Command Prompt as administrator
Method 5: Getting Rid of Php_gd2.dll Errors by Updating the Windows Operating System link
Some programs need updated dynamic link libraries. When your operating system is not updated, it cannot fulfill this need. In some situations, updating your operating system can solve the dll errors you are experiencing.
In order to check the update status of your operating system and, if available, to install the latest update packs, we need to begin this process manually.
Depending on which Windows version you use, manual update processes are different. Because of this, we have prepared a special article for each Windows version. You can get our articles relating to the manual update of the Windows version you use from the links below.
Windows Update Guides link
The Most Seen Php_gd2.dll Errors link
The Php_gd2.dll library being damaged or for any reason being deleted can cause programs or Windows system tools (Windows Media Player, Paint, etc.) that use this library to produce an error. Below you can find a list of errors that can be received when the Php_gd2.dll library is missing.
If you have come across one of these errors, you can download the Php_gd2.dll library by clicking on the «Download» button on the top-left of this page. We explained to you how to use the library you’ll download in the above sections of this writing. You can see the suggestions we gave on how to solve your problem by scrolling up on the page.
- «Php_gd2.dll not found.» error
- «The file Php_gd2.dll is missing.» error
- «Php_gd2.dll access violation.» error
- «Cannot register Php_gd2.dll.» error
- «Cannot find Php_gd2.dll.» error
- «This application failed to start because Php_gd2.dll was not found. Re-installing the application may fix this problem.» error
Dynamic Link Libraries Similar to the Php_gd2.dll Library link
Incoming Feedback for the Php_gd2.dll Library link
The graph below has been put together according to the feedback given by our users. By looking at this graph, you can see the usefulness of the Php_gd2.dll library. If you also want to give your opinion, you can give feedback by using the stars in the upper section of this page.


