- Виртуализация: physical windows to virtual box
- How to Access Physical Disk in VirtualBox- Windows 10
- Summary
- How to Access Entire Physical Disk from VirtualBox
- How to Access Specific Partitions of Physical Disk from VirtualBox
- You Can Read Next
- VMware Vs VirtualBox – Detailed Comparison
- Best Free Virtual Machine Software in 2021 – Start Your New Career
- VDI to VHD/VHDX – Convert VirtualBox VMs to Hyper-V
- Pre-installed Windows 98 SE VirtualBox Image – Download and Use
- Convert VirtualBox VDI to Parallels Disk Format in macOS
- Install VirtualBox Extension Pack on Windows 10/8.1 Host
- 16 thoughts on “How to Access Physical Disk in VirtualBox- Windows 10”
- Use VirtualBox to boot a physical drive/partition [duplicate]
- 3 Answers 3
- VirtualBox P2V (Physical to Virtual) in Windows 10 – 2 Methods
- Two Tools for VirtualBox P2V in Windows 10 Host
- 1) Disk2vhd
- 2) VMware vCenter Converter
- P2V with Disk2vhd in VirtualBox
- Physical to Virtual in VirtualBox by VMware vCenter Converter
Виртуализация: physical windows to virtual box
Сегодня на рабочем компьютере вышла из строя материнская плата. Пока плату будут ремонтировать решил свою рабочую физическую windows-систему перенести на виртуальную машину, чтобы не терять время на инсталляцию и настройку софта который облегчает администрирование. Оказалось что перенос windows с физической машины на виртуальную — достаточно простая задача.
Я пошел следующим путем. Скачал с Windows Sysinternals маленькую утилиту Disk2vhd — technet.microsoft.com/en-us/sysinternals/ee656415.aspx . Утилита не требует установки. С ее помощью можно из жесткого диска сделать виртуальный жесткий диск, то есть перегнать его в образ в формате vhd (Virtual Hard Disk — Microsoft’s Virtual Machine disk format).

Если на физической машине\винчестере у вас несколько логических дисков, а время поджимает, можете сделать образ только с системного диска.
Дальше нам понадобится установленный virtualbox, который можно скачать тут: virtualbox.org/wiki/Downloads .
Устанавливаем и создаем виртуальную машину с той ОС, чей образ Вы сделали.

На этапе создания виртуального жесткого диска, говорим что он у нас уже есть и указываем на файл созданного образа

После этого можете пробовать запускать виртуальную машину, но у меня на этом этапе она не запустилась и пришлось сделать еще пару кликов в свойствах виртуальной машины.

- На вкладке материнской платы ставим галочку напротив «Enable IO APIC»
- На вкладке процессора убеждаемся что не установлена галочка напротив «PAE/NX features.»
Если физический диск на физической машине был сконфигурирован как SATA-устройство, вам может понадобиться подключить его образ как SATA-устройство и в виртуальной машине.
Делается это на вкладке «Storage».
Удаляем текущий контроллер:

И создаем SATA-контроллер:

Подключаем к контролеру образ жесткого диска (у вас он конечно будет в vhd/vhdx-формате):

Хочу отметить что столкнулся с таким нюансом: изначально на хостовой машине с 8 ГБ ОЗУ я создал виртуальную машину с 2 ГБ ОЗУ, после успешного запуска решил увеличить до объем ОЗУ на виртуальной машине до 4 ГБ, но она перестала запускаться, выдавая ошибки. Свободного времени было немного, потому я не записал текст ошибки и не стал разбираться в сути проблемы, просто снова установил в виртуальной машине 2 ГБ ОЗУ.
Если выскакивает ошибка 0x0000007B мне помогло для виртуализиванной машины с windows xp указать носитель IDE с типом ICH6, чипсет ICH9. При этом винчестер на физической машине был воткнут в SATA.
How to Access Physical Disk in VirtualBox- Windows 10
VirtualBox has a shared folder feature that allows accessing the host computer physical hard drive partition and folders from the virtual machine. Once the VirtualBox guest additions installed properly, by doing additional steps, this can be enabled easily. But in some cases, if you want to attach a physical drive partition to a virtual machine from its settings, then you need to follow the steps to accomplish.
This step by steps method explains how you can access the physical disk in VirtualBox. Unfortunately, this cannot be done easily as how we do VMware workstation. Few commands and hard drive mapping involved in this process to access the physical disk partition in VirtualBox. This access method is called ‘Raw Disk’ access. Read more about what is Raw Disk
Summary
Before starting the procedure, let me explain how it’s going to work.
As I said earlier, it’s not easy as giving access to physical disk in VMware workstation. We have to create a configuration VMDK file for the host’s entire physical disk or partition. Then add this VMDK in Virtual Media Manager. Then allocate the disk to any Virtual Machine in VirtualBox.
Ok, now let’s start the steps.
How to Access Entire Physical Disk from VirtualBox
1) Open Command prompt in Host computer then go to the installation folder of the VirtualBox program, in most cases, it will be under this location.
2) Type: (This command is to access entire physical disk as Raw Disk)
VBoxManage internalcommands createrawvmdk -filename c: \Users \sunuser \.Virtualbox \VDI \mydrive.vmdk -rawdisk \ \ . \PhysicalDrive0
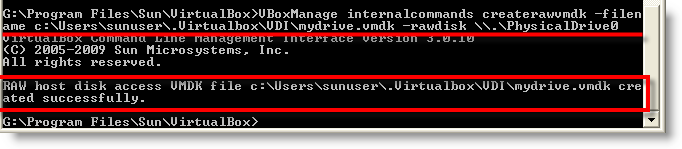
c: \Users \sunuser \.Virtualbox \VDI \mydrive.vmdk : Location and ‘ mydrive.vmdk’ is the configuration VMDK file of your entire physical drive.
Do not think that the new VMDK file will take huge size as your physical disk size. It’s just a 1KB size file. After you added this file to Virtual Media Manager, then you will get the full size of the physical disk.
\ \. \PhysicalDrive0 : is the physical drive of the host computer. 0,1, 2 numbers can be seen from Disk management in Windows OS under Computer Management. You insert the number as required physical disk number normally starts with 0.

3) You can confirm that the command worked correctly by visiting the location of the VMDK file created.
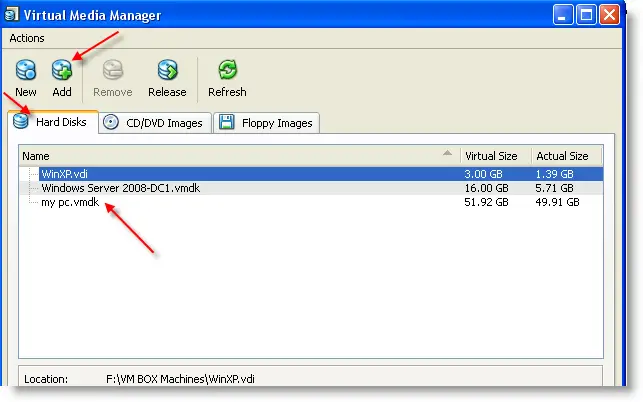
4) Now, Open VirtualBox, and go to Virtual Media Manager.
5) Add the newly created ‘mydrive.vmdk’ under the hard disk. Click here to read more about how to add VMDK file in VirtualBox
6) Add the newly added hard disk to the virtual machines in VirtualBox and start accessing them from the Virtual Machine Guest Operating system. Since this access has the write permission, ensure that any overwriting access from guest VM will not create any issues on the host OS.
How to Access Specific Partitions of Physical Disk from VirtualBox
To access specific partitions of host physical disk from VirtualBox, run the same command with additional switches,
VBoxManage internalcommands createrawvmdk -filename c: \Users \sunuser \.Virtualbox \VDI \ mydrive.vmdk -rawdisk \ \. \ PhysicalDrive0 -partitions 1,3
-partitions 1,3 : The partition numbers of PhysicalDrive 0. It will allow you to access the first and third partitions of the physical drive in this example.
This command also will create a VMDK file and you can access the drives as explained in the first method.
Remeber, by using these methods you can attach a physical disk partition and boot the OS if it has a bootable OS.
Dinesh
Dinesh is the founder of Sysprobs and written more than 400 articles. Enthusiast in Microsoft and cloud technologies with more than 15 years of IT experience.
You Can Read Next
![]()
VMware Vs VirtualBox – Detailed Comparison
![]()
Best Free Virtual Machine Software in 2021 – Start Your New Career
![]()
VDI to VHD/VHDX – Convert VirtualBox VMs to Hyper-V
![]()
Pre-installed Windows 98 SE VirtualBox Image – Download and Use
Convert VirtualBox VDI to Parallels Disk Format in macOS
![]()
Install VirtualBox Extension Pack on Windows 10/8.1 Host
16 thoughts on “How to Access Physical Disk in VirtualBox- Windows 10”
help with this one. im using windows 7, running Ubuntu 9.10 inside virtualbox 3.1. when i type the command it shows invalid parameter -users.
please help. desperately want to use my Ubuntu OS and access all my files from the host.
Hi, it’s not – users (parameter). It’s the location of vmdk configuration file. I used Vista as my host, so I created in that location. Windows 7 also must be the same. Try and let me know.
This works great, but the only problem is Windows 7 rearranges the order of the physical disks in disk manager every time I reboot. Annoying.
Hi – Are you positive that you use Vista (or 7) as a host and XP as a guest, XP being on a physical partition ?
I can’t have this to run with my Win7 and XP (BSOD with UNMOUNTABLE_BOOT_VOLUME). The VB logs says that the physical XP partition cannot be written
The vdmk was created w/o problem, my VB runs “elevated”, the XP partition is not “mounted” etc … I’ve even tried installing a Kubuntu host instead of the Win7, and using the _exact_ same XP partition in the Kubuntu host, and this run fine. I’m used to use XP and Kubuntu on physical partition w/o problems for years …
Hi Philippe,
I have Windows 7 and XP as Host and having same Operating systems as guest too. The above steps I tested on Windows vista host but not Windows XP physical partition. To be honest, I’m scared to mount system physical partition inside VirtualBox. But I did later. I mounted Windows XP physical partition in Sun VirtualBox and started same physical computer in VirtualBox. Guess what? Once I restart Host Windows XP later, it says some boot sector or loader corrupted. I struggled to get my host OS back.
So from that point, I don’t boot or mount physical Host OS in VB. It’s little risky. (I’m not sure; I understand your point correctly).
Anyway, Thanks for your comment.
One should install some kernel-mode hack to workaround this.
Use VirtualBox to boot a physical drive/partition [duplicate]
I have two partitions on my hard drive, one for Windows and one for linux. I would like to use VirtualBox in Linux to boot the Windows partition as a virtual machine. How can I acheive this?
3 Answers 3
There’s actually a really easy solution to achieve this. The following process will create a virtual disk ( .vmdk ) that will boot to a designated drive/partition. You essentially «fake» boot directly to the drive so the created virtual drive isn’t very big in size and it doesn’t get any bigger.
However, a downfall to the following suggestion would be that it boots virtually. Meaning, you can run any programs or files that are on it but once in the Virtual Machine, settings/program changes can’t be made on the physical drive. If you wanted to add programs, updates, etc. you would have to normally boot to the drive, make desired changes, then boot from the VirtualBox. I don’t know if this is a deal breaker for you but here’s the goods.
Part of this example is for doing it in Windows because I don’t know the Linux directory structure and path variables by heart but the VirtualBox command will be the same, regardless of Host OS. Same process just supplement the OS commands accordingly
1: WindowsKey + R > Type diskmgmt.msc Make note of the disk number of the drive you’re trying to virtualize. Linux alternative for figuring this out would be running one of the following utilities > fdisk , lsblk , gparted
2: Open a CommandPromptTerminal with Admin/Sudo privileges > type cd %programfiles%\oracle\virtualbox . I don’t know what the default directory path for VirtualBox is in Linux distros but simply find it and cd to it.
3: Run the following VirtualBox command: VBoxManage internalcommands createrawvmdk -filename «%USERPROFILE%»\.VirtualBox\CUSTOMNAMEOFVHD.vmdk -rawdisk \\.\PhysicalDrive#
Replace «CUSTOMNAMEOFVHD» to whatever you would like. You can also change the entire path of that file to something else. It’s simply telling VBoxManage where to put the created .vhd
Change the last character # do the disk drive number recorded in step 1.
VirtualBox P2V (Physical to Virtual) in Windows 10 – 2 Methods
This guide explains how to do VirtualBox P2V in Windows host OS. By this method, you can convert a physical computer that can be local or network (remote computer) to the virtual environment. It’s not a straight forward method since there are no tools available for P2V (Physical to Virtual) in VirtualBox. But still, it’s possible with few free tools. You can use these tools to convert most of the Windows Operating Systems from Windows 7 to 10 and Server versions Windows 2008 to latest Windows 2019 server.
Before starting the procedures, let me tell you how it’s going to work.
We can use two tools for this purpose. You need to select the correct tool which matches your scenario.
Two Tools for VirtualBox P2V in Windows 10 Host
1) Disk2vhd
It is a free tool from Microsoft to convert a local physical computer to a virtual format. This tool should be running on the local computer to convert its physical disks to virtual disk format VHD. If you need to convert a remote or networked computer, you need to run it from that particular computer. Compared to the 2nd tool, it should be executed from the local computer only. The output virtual disk format is VHD which is used by Microsoft Hyper-V. But, the Oracle VirtualBox will read this file format easily.
2) VMware vCenter Converter
This tool is from VMware to convert physical or virtual computers and servers to their VMware virtualization software such as Workstations and ESXi (or vSphere). The output will in VMDK virtual disk format, but still, our friendly VirtualBox will read this disk format. The advantage of vCenter converter over Disk2vhd is it can convert computer (or server) in the network. If you have administrative credentials of a remote computer, it will work perfectly over the network for P2V.
Both tools will give the virtual hard disks of the physical computer. We need to create a new virtual machine on VirtualBox with the proper hardware and Operating System settings then attach this converted hard disks to make it work.
P2V with Disk2vhd in VirtualBox
As mentioned earlier, we need to execute this tool from the physical computer that needs to be converted. Since the steps are already mentioned in several guides earlier, you can refer below links.
- To know how to convert a physical computer to VirtualBox virtual platform and fix the possible errors, read this guide.
- How to use Disk2vhd to convert a physical server to Hyper-V
Physical to Virtual in VirtualBox by VMware vCenter Converter
2) Convert your physical computer to virtual using free VMware vCentre converter as mentioned here. Make sure that you select correct physical partitions, processors and memory size for the new virtual machine. Don’t split the virtual disks during the conversion.
3) Once successfully created, locate the VMX and VMDK files. Don’t bother about VMX files.
4) Now add the newly created vmdk file to VirtualBox media manager as shown below.
5) Read more about adding and accessing vmdk disk files in VirtualBox here. This article explains how you can access a vmdk disk file as a partition inside a virtual machine.
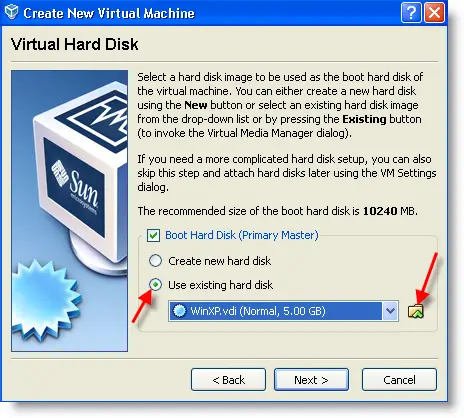
6) After successfully added vmdk disk file, create a new virtual machine in VirtualBox. Select the correct guest OS, processor type and memory size. In the virtual hard disk option, select ‘Use existing Hard Disk’ and browse the disk you added by vmdk file in VirtualBox media manager. So your new virtual machine will boot from vmdk disk which we converted from physical to virtual.
7) That’s it. Boot the virtual machine now. It will be booting and working fine. Sometimes it may install additional required drivers for VirtualBox hardware platform. Let it complete and install the VB guest additions to get better display performance with additional features.
8) You must see your physical computer on VirtualBox as a virtual machine now. This is the easiest method to convert Physical to Virtual in VirtualBox with free tools.
9) If you are still interested in running a pure VirtualBox machine with VDI disk files, you can convert your newly created VMDK files to VDI format with a free tool as mentioned here. After created the VDI file, add it to media manager and boot a virtual machine from vdi files.
Hope you understood the fundamentals and steps to P2V Windows client or server computers to VirtualBox.


