- Как извлечь изображения Windows: интересное (Windows: spotlight) в Windows 10
- Скрипт №1 для извлечения изображений Windows: интересное (Windows: spotlight)
- Скрипт №2 для извлечения изображений Windows: интересное (Windows: spotlight)
- Windows Spotlight lock screen picture won’t change
- How to Save Windows 10 Spotlight Lock Screen Pictures
- Find Windows Spotlight Lock Screen Pictures
- How to save Windows Spotlight images for your wallpaper or phone
- Comments (23)
Как извлечь изображения Windows: интересное (Windows: spotlight) в Windows 10

В данной статье показаны действия, с помощью которых можно извлечь изображения Windows: интересное (Windows: spotlight) в операционной системе Windows 10.
Функция Windows: интересное (Windows: spotlight) предназначена для автоматической смены изображений на экране блокировки. Фоновые изображения находятся на серверах Microsoft, и загружаются они на компьютер когда функция Windows: интересное (Windows: spotlight) включена в параметрах системы.
Далее в статье представлены два скрипта, с помощью которых можно извлечь изображения Windows: spotlight всего в пару кликов мыши.
По умолчанию изображения сохраняются в папку Assetst в профиле пользователя по следующему пути:
Скрипт №1 для извлечения изображений Windows: интересное (Windows: spotlight)
Данный скрипт создаёт папку «Spotlight Images» на рабочем столе и извлекает в неё все изображения Windows: spotlight.
Скачайте архив со скриптом spotlight_images.zip.
Распакуйте архив в любом месте и запустите двойным кликом файл spotlight_images.vbs

Через несколько секунд на рабочем столе появится папка Spotlight Images , а в ней изображения Windows: spotlight из профиля пользователя.
Скрипт автоматически извлекает и даёт расширение *.jpg всем файлам из каталога Assets, некоторые из них и есть изображения «Windows: интересное» (Windows spotlight), которые загружаются с серверов майкрософт, но большинство из них не является фоновыми изображениями экрана блокировки.

Ниже представлен листинг файла сценария spotlight_images.vbs
Const ssfDESKTOPDIRECTORY = &h10
Dim FolderName
FolderName = «Spotlight Images»
Set oShell = CreateObject(«Shell.Application»)
strDesktop = oShell.NameSpace(ssfDESKTOPDIRECTORY).Self.Path
Dim oFSO, strAppData, objShell
Set objShell = CreateObject(«WScript.Shell»)
Set oFSO = CreateObject(«Scripting.FileSystemObject»)
strAppData=objShell.ExpandEnvironmentStrings(«%LOCALAPPDATA%\\Packages\\
Microsoft.Windows.ContentDeliveryManager_cw5n1h2txyewy\\LocalState\\Assets»)
oFSO.CopyFolder strAppData , strDesktop & «\\» & FolderName, True
Set objShell = Nothing
Set oFSO = Nothing
\’ Extension ————————
sVBSPath = strDesktop & «\\» & FolderName
with createobject(«wscript.shell»)
.currentdirectory = sVBSPath
.run «%comspec% /c ren *. *.jpg», 0, true
end with
Set objShell = CreateObject(«Wscript.Shell»)
strPath = «explorer.exe /e,» & strDesktop & «\\» & FolderName
objShell.Run strPath
Скрипт №2 для извлечения изображений Windows: интересное (Windows: spotlight)
Данный скрипт предложил пользователь VBS Expert. Скрипт также позволяет извлечь изображения «Windows: spotlight».
При использовании данного скрипта можно согласиться на то, что все файлы изображений скопируются на рабочий стол, или также можно перетащить на файл скрипта «SavePics.vbs» любую папку в которую вы пожелаете скопировать изображения.
При повторном запуске скрипта, существующие файлы изображений будут перезаписаны.
Windows Spotlight lock screen picture won’t change
I have an HP laptop running Windows 10, and usually when my laptop is locked, the picture changes every now and then on my lock screen and I really enjoyed that. But recently for the past month or two, it’s been stuck on the same picture and it stopped changing to new pictures. I checked my settings and I still have «Windows Spotlight» set as my lock screen but still nothing happens. It just stopped working and changing pictures for some reason.
If anyone can help, please do!
Just follow these steps of Windows Central:
How to fix Windows Spotlight Lock screen errors Is Windows Spotlight broken or stuck on the same image? If so, this guide details the steps to fix the issue.

Windows Spotlight is a feature included with Windows 10 that uses Bing to automatically download and set new background images on the Lock screen, to keep your experience fresh every time you sign in.
The only caveat with Windows Spotlight is that sometimes it will stop working, or you’ll notice that it gets stuck on the same image. Unfortunately, Windows 10 doesn’t include an option to reset this feature. However, it’s possible to fix the Windows Spotlight settings with this simple workaround.
In this Windows 10 guide, we show you the steps to fix Windows Spotlight on your computer and keep getting fresh images from Bing on your Lock screen.
If the Windows Spotlight feature is stuck on the same image, or it’s not working at all, you can use the following steps to fix the issue:
- Open Settings.
- Click on Personalization.
- Click on Lock screen.
Under «Background,» make sure Windows Spotlight is NOT selected and change the option to Picture or Slideshow.

Type the following path and click OK.
Select all the files (Ctrl + A) and hit the Delete key to clear all old images (if applicable).

Type the following path to where the Windows Spotlight settings are stored and click OK.
Right-click settings.dat and roaming.lock individually, then click Rename and name them settings.dat.bak and roaming.lock.bak.

Under «Background,» make sure to enable Windows Spotlight.

Once you complete these steps, you can lock your PC (Windows key + L), and the Lock screen should show new Bing images.
If everything worked as expected, remember to go back to the Settings folders where Windows Spotlight stores the settings and delete the settings.dat.bak and roaming.lock.bak files.
Alternative method to fix Windows Spotlight
If the steps mentioned above didn’t fix Windows Spotlight, you can try to reset the settings using the following steps:
- Open Settings.
- Click on Personalization.
- Click on Lock screen.
Under «Background,» make sure to enable Windows Spotlight. (If you don’t enable the feature, you’re likely to get an error while running the PowerShell command.)
Enter the following command and press Enter to reset the Windows Spotlight:
Get-AppxPackage -allusers *ContentDeliveryManager* | foreach

After completing these steps, you should be able to lock your PC (Windows key + L), and the Lock screen should show new Bing images.
How to Save Windows 10 Spotlight Lock Screen Pictures

Windows 10 includes a limited collection of desktop backgrounds to choose. And, the Windows Spotlight feature, previously limited to Windows 10 Home, became available in the Pro edition via the November Update.
It provides a travel log of stunning background images taken from around the world on your Lock Screen. Many of these are desktop worthy, too. Here’s how you can find and collect those pictures.

Find Windows Spotlight Lock Screen Pictures
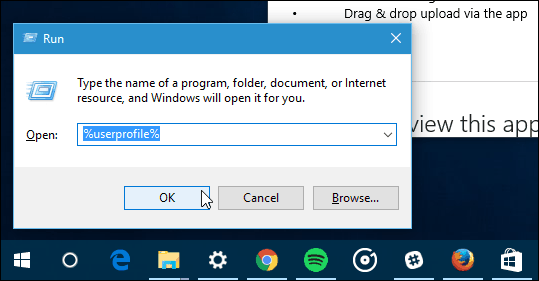
Windows Spotlight Images are not stored in the most obvious of places. First, open your user folder, press Windows key + R then type: %userprofile% and hit Enter.
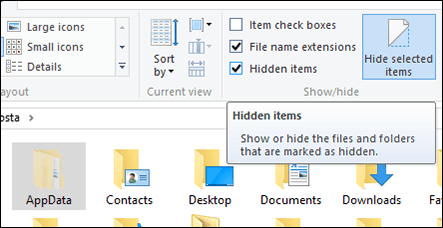
When File Explorer opens up, you’ll need to turn on Show hidden files and folders. Click the View tab then check the box: Hidden items within the Show/Hide group.
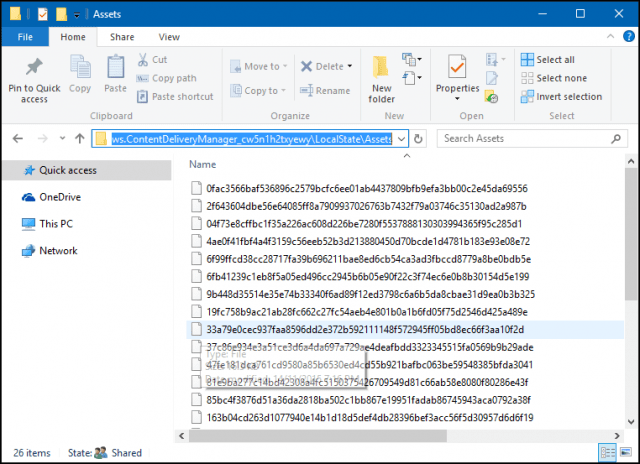
The AppData folder will now appear in your User folder. Open it then navigate to Local > Packages > Microsoft.Windows.ContentDeliveryManager_cw5n1h2txyewy > LocalState > Assets.
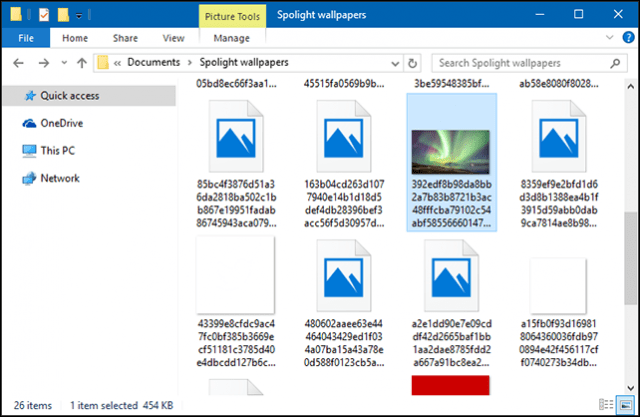
The images will appear as blank files, select all of them Control + A then copy with Control + C. Create a new folder in your Documents folder or on the Desktop then paste the files with Control + V.
Open the folder containing the blank Files, click File menu > Open Command Prompt > Open Command Prompt as administrator.

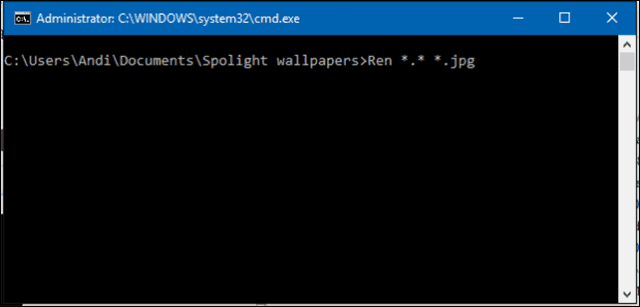
Type the following command: Ren *.* *.jpg then hit Enter. This batch command will convert the blank files to JPEG images and make them visible.
Your mileage might vary, though. I don’t know if it’s because I am using a limited data plan, why I don’t have many of these Spotlight images stored. Some of the files will be asset images, used as resources for app icons; you can delete what you don’t need.
You can periodically check the folder for new images. If you want an easier way to obtain new wallpapers for your desktop, check out our article on how to download and install Windows Themes.
How to save Windows Spotlight images for your wallpaper or phone
Windows Spotlight is a feature in Windows 10 that rotates beautiful images on your lock screen. Have you ever turned on your computer and seen an image you really liked? Did you wonder how to save that image so you could use it for your desktop background?
Fortunately, it is very easy to retrieve these images. In this article I’ll show you how.
Instructions:
1. Right-click the Start button and click Run.
2. Copy and paste the following directory, then click OK.
%localappdata%\Packages\Microsoft.Windows.ContentDeliveryManager_cw5n1h2txyewy\LocalState\Assets
3. The directory where Windows downloads and stores the images will open. So that we can work with the them, select all the files in this folder and copy them to a new folder on your desktop.
4. You’ll notice these files don’t have an extension to them. We need to add the .jpg extension to these files so that they will open in a photo viewer. To do this quickly, we can use the command line.
In the new folder that you copied the files to, hold the Shift key on your keyboard, right-click in an empty space, and select Open command window here. Alternatively, you can open any command prompt window and then cd to the folder.
Note: Some newer builds of Windows 10 have replaced the command line option with Windows PowerShell. This isn’t a problem — when the PowerShell window opens, just type cmd to enter the command line processor.
5. Inside the command prompt window, type Ren *.* *.jpg and press Enter. This command will rename all files without an extension to ones with the extension .jpg.
5. You’ll notice that the command changes the files to the .jpg format. You can see a thumbnail view of the pictures by going to the View tab and selecting Large icons.
That’s all there is to it!
Was this article helpful?
Sorry this didn’t help.
Great! Thanks for your feedback.
How satisfied are you with this article?
Thanks for your feedback, it helps us improve the site.
How satisfied are you with this article?
Thanks for your feedback.
Comments (23)
* Please try a lower page number.
* Please enter only numbers.
* Please try a lower page number.
* Please enter only numbers.
This was somewhat helpful. But after following the above instructions, some of the pictures cannot be opened. How do I resolve that?
I would like to request that you identify where on our earth each picture was taken, so that we can visit some of them. Beautiful. Thank you.
17 people found this comment helpful
Was this comment helpful?
Sorry this didn’t help.
Great! Thanks for your feedback.
How satisfied are you with this comment?
Thanks for your feedback, it helps us improve the site.
How satisfied are you with this comment?
Thanks for your feedback.
10 people found this comment helpful
Was this comment helpful?
Sorry this didn’t help.
Great! Thanks for your feedback.
How satisfied are you with this comment?
Thanks for your feedback, it helps us improve the site.
How satisfied are you with this comment?
Thanks for your feedback.
pressing shift + right click didn’t work for me.
I get a somewhat different window to open. and can’t manage to make files into .jpeg
This is what I get:
and then, as I type Ren *.* *.jpg like you’ve said, it doesn’t work.
this is what I get:
117 people found this comment helpful
Was this comment helpful?
Sorry this didn’t help.
Great! Thanks for your feedback.
How satisfied are you with this comment?
Thanks for your feedback, it helps us improve the site.
How satisfied are you with this comment?
Thanks for your feedback.
Marina Hi. This is a forum article and whilst comments are invited it is not the correct place to request help. There is another approach to this and I’ll be happy to help but you need to ask a question by clicking the Ask link at top right of page. Ric.
For general info — the picture files contained in this folder include other image files — only the larger files are spotlight images (two of each in landscape and portrait modes) and they change on a daily basis so there will only be a small number in the folder at any one time. — R.
Was this comment helpful?
Sorry this didn’t help.
Great! Thanks for your feedback.
How satisfied are you with this comment?
Thanks for your feedback, it helps us improve the site.
How satisfied are you with this comment?
Thanks for your feedback.
EXACTLY! Marina P!
This is what I get now too. don’t know how to fix either. 🙁
1 person found this comment helpful
Was this comment helpful?
Sorry this didn’t help.
Great! Thanks for your feedback.
How satisfied are you with this comment?
Thanks for your feedback, it helps us improve the site.
How satisfied are you with this comment?
Thanks for your feedback.
11 people found this comment helpful
Was this comment helpful?
Sorry this didn’t help.
Great! Thanks for your feedback.
How satisfied are you with this comment?
Thanks for your feedback, it helps us improve the site.
How satisfied are you with this comment?
Thanks for your feedback.
The PowerShell module takes in different command strings than the command prompt does. My dad is a programmer and helped me figure out how to do this same command with PowerShell and it is as follows:
Dir | rename-item -newname
alternatively, you can change the part inside the quotation marks with any file extension type you prefer, such as: .jpg, .jpeg, etc.
52 people found this comment helpful
Was this comment helpful?
Sorry this didn’t help.
Great! Thanks for your feedback.
How satisfied are you with this comment?
Thanks for your feedback, it helps us improve the site.
How satisfied are you with this comment?
Thanks for your feedback.
It’s obnoxious, but you can manually change each file name. Just right click, Rename, and put .jpg at the end of each.
Here’s what worked for me:
4. Windows Spotlight «scrambles» the files, so we need to change them back to the .jpg file type. Here’s how:
— Press the Windows key on your keyboard (usually between CTRL and ALT on the left) + R to bring up the Run box. Type «cmd» (without the quotes) to bring up the Command Prompt window. In the command prompt window, type the following command and press ENTER: cd\pathname of the folder you copied the files to, then type the following command and press ENTER: Ren *.* *.jpg
For instance, I copied the files to a new folder in Pictures, called «Spotlights», so my pathname would be C:\Users\MyProfileName\Pictures\Spotlights
If you have «Display the full path in the title bar» checked as a Folder Option, you can highlight the pathname and Copy it, then Paste it in the Command Prompt window step above.
Once I got the pictures copied to the new folder, I went through and deleted all the non-wallpaper pictures, usually anything Comment
5 people found this comment helpful
Was this comment helpful?
Sorry this didn’t help.
Great! Thanks for your feedback.
How satisfied are you with this comment?
Thanks for your feedback, it helps us improve the site.


