- Как закрепить окно или программу поверх всех окон в Windows 10, 8.1 или Windows 7
- Как сделать программу или окно всегда поверх всех окон с помощью AutoHotKey
- DeskPins — простая бесплатная программа для закрепления окна поверх других окон
- PinWin
- 3 Ways to Keep a Window Always on Top on Windows 10
- 1. Use a Keyboard Shortcut with an Always on Top AutoHotkey Script
- 2. Use Your Mouse with DeskPins
- 3. Use a System Tray Menu with TurboTop
- Bring the Always-on-Top Feature to All Windows
- Pin an app window in Windows 10 with Parallels Toolbox one-click tool Window on Top
Как закрепить окно или программу поверх всех окон в Windows 10, 8.1 или Windows 7
 Если вам потребовалось закрепить какое-то окно поверх всех других окон в Windows, а в настройках программы, которой принадлежит это окно такого параметра нет, к сожалению, системных средств для этого действия также нет. Но вы можете поместить окно «всегда сверху» с помощью нескольких бесплатных утилит.
В этой статье несколько способов закрепить окно программы поверх всех окон Windows 10, 8.1 или Windows 7 с помощью бесплатных программ, которые позволят выполнять это сочетанием клавиш, с помощью меню в области уведомлений и другими методами.
Как сделать программу или окно всегда поверх всех окон с помощью AutoHotKey
AutoHotKey — популярная программа, позволяющая создать скрипты для собственных горячих клавиш в различных программах или в Windows в целом. С помощью неё можно создать и сочетание клавиш, которое будет включать режим «Всегда сверху» для активного окна:
- Скачайте и установите AuthoHotKey с официального сайта — https://www.autohotkey.com/
- В любой папке или на рабочем столе с помощью в контекстном меню выберите Создать — AutoHotKey Script.

- Задайте любое имя скрипту, а затем нажмите по нему правой кнопкой мыши и выберите пункт «Edit» (редактировать).
- С новой строке в скрипте введитеи сохраните файл скрипта.
- Запустите скрипт (просто двойным кликом) и теперь, когда вы в активном окне нажмете Ctrl+Shift+Пробел, оно будет отображаться поверх других окон до следующего нажатия этой же комбинации клавиш.
- Если вы захотите прекратить использование сочетания клавиш, можно закрыть Autohotkey в области уведомлений Windows или поставить исполнение скрипта на паузу в меню.


Разумеется, вы можете задать свою комбинацию: в моем примере используется ^ (Ctrl), + (Shift) и SPACE (пробел).
Вместо SPACE можно задать какую-либо букву, можно задействовать клавишу «Win» (код для неё — #). Например, если я захочу использовать сочетание Ctrl+Win+A, мне потребуется ввести ^#A:: в начале скрипта. Подробности вы можете найти в документации к AutoHotKey на официальном сайте.
DeskPins — простая бесплатная программа для закрепления окна поверх других окон
DeskPins — не самая новая, но очень простая бесплатная утилита, позволяющая легко закрепить любое окно Windows 10, 8.1 или Windows 7 так, чтобы оно всегда располагалось поверх других окон. Достаточно просто загрузить программу с официального сайта https://efotinis.neocities.org/deskpins/, запустить её, нажать по значку программы в области уведомлений (указатель мыши превратится в кнопку), затем нажать по окну, которое нужно закрепить.

В дальнейшем, если это окно больше не нужно располагать поверх других, поднесите указатель мыши к кнопке в заголовке окна и нажмите по ней для открепления.
PinWin
PinWin — еще одна бесплатная программа для помещения выбранных окон поверх остальных, даже когда они неактивны. После установки и запуска программы ее значок отобразится в области уведомлений Windows, и там можно будет выбрать окно, которое нужно закрепить поверх других окон из списка, либо указав на него (пункт «Select Window From Screen»).

Там же можно открепить все окна (Unpin All Windows). Официальный сайт программы — https://sourceforge.net/projects/pinwin/
На самом деле, программ подобного рода множество, как правило они бесплатны и не занимают много места. Два похожих инструмента со слегка иной реализацией закрепления поверх всех окон — OnTopper и TurboTop.
Дополнительно, если вам требуется закрепить окно какой-то конкретной программы поверх других окон, не исключено, что такая настройка присутствует в параметрах самой этой программы: например, вы найдете такую настройку в диспетчере задач Windows, медиа плеере VLC, для видео в браузере Google Chrome можно использовать расширение Floating Video, для браузера Firefox есть дополнение «Always on Top», во многих других программах также можно отыскать соответствующие возможности.
А вдруг и это будет интересно:
Почему бы не подписаться?
Рассылка новых, иногда интересных и полезных, материалов сайта remontka.pro. Никакой рекламы и бесплатная компьютерная помощь подписчикам от автора. Другие способы подписки (ВК, Одноклассники, Телеграм, Facebook, Twitter, Youtube, Яндекс.Дзен)
06.03.2020 в 14:22
Программ много, но как-то ни одна из них не работает на W10 1909. Печально : (
А хуже всего то, что Microsoft все сама не догадается реализовать такую простую, но нужную фичу, которая в Linux в почти любом DE есть давно.
07.03.2020 в 09:23
Я все указанные программы именно на 1909 и запускал когда статью писал (W10 1909 Pro x64), все исправно работают.
Быть может, окно у вас какое-то особенное?
06.03.2020 в 20:46
Inqsoft Window Scanner?
07.03.2020 в 09:03
Не сталкивался. Сейчас посмотрел, с 2004 не обновлялась, но если продолжает работать на 10-ке и т.п., то почему нет?
07.03.2020 в 22:36
Actual Title Buttons всем в помощь.
15.03.2020 в 12:20
Перепробовал кучу вариантов, в том числе, и те, что перечислены в статье, в итоге остановился на AlwaysOnTopMaker. Остальные не устроили либо неуместными кнопками, которые они добавляют в интерфейс и отсутствием шорткатов. Программа не обновлялась с 2002, занимает менее 1Мб памяти, не имеет интерфейса, но свою задачу выполняет на отлично: Ctrl+Alt+T — закрепить/открепить, Ctrl+Alt+Q — закрыть приложение. Добавил программу в атозагрузку и проблем не знаю.
3 Ways to Keep a Window Always on Top on Windows 10


When you are working in Windows with limited screen space, it’s useful to have certain windows stay on top of others. Some programs in Windows automatically incorporate this “always on top” feature, but most programs don’t, and Windows doesn’t include this feature either.
Today we’ll cover three ways to easily add the “always on top” feature to every single program in Windows.
1. Use a Keyboard Shortcut with an Always on Top AutoHotkey Script
AutoHotkey is a free program that allows you to create scripts to perform multiple actions with a single keyboard shortcut. It runs in the background and sits in the system tray.
We’re going to use AutoHotkey to create a script that will keep a selected window on top of all others when you press Ctrl + Spacebar when that window is active. We’ll show you the script and explain how it works. But we’ll also provide a downloadable AutoHotkey script file you can use.
Download and install AutoHotkey and then run it.
Download the AlwaysOnTop.ahk script file, extract the .zip file, and put the script in a folder on your hard drive that won’t be moved or deleted.
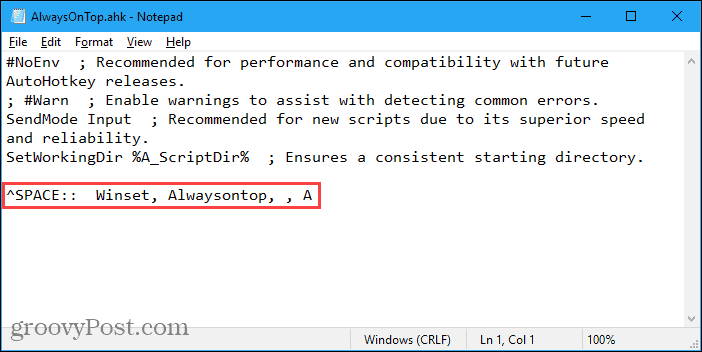
The script contains some comments and then the following command:
This command sets the currently active window to always be on top when you press Ctrl + Spacebar. If you’d rather use a different key combination, you can change the first part of the command, “^SPACE“. The “^” character represents the Ctrl key. You’ll find the symbols to use for other hotkeys in the Hotkey Modifier Symbols section on this AutoHotkey help page.
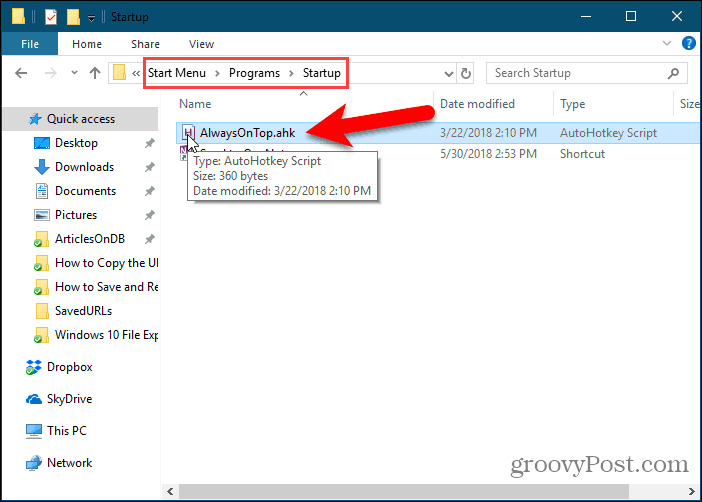
You can put the script in the Windows startup folder (%AppData%\Microsoft\Windows\Start Menu\Programs\Startup), so it starts automatically when Windows starts.
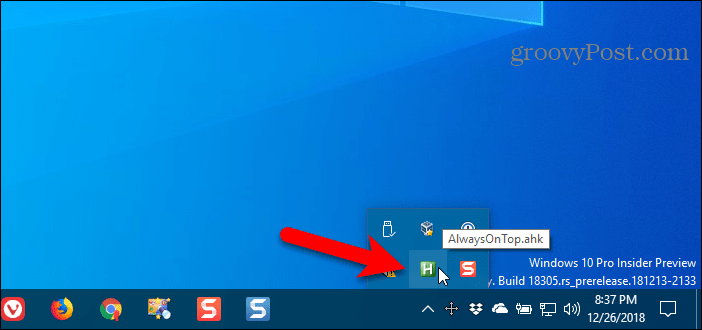
The AutoHotkey script stays in the system tray.
To make the active window always on top, press Ctrl + Spacebar (or the keyboard shortcut you assigned). Press the keyboard shortcut again to disable “always on top” for the active window.
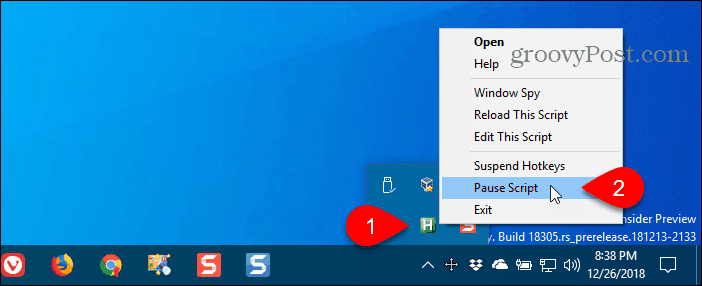
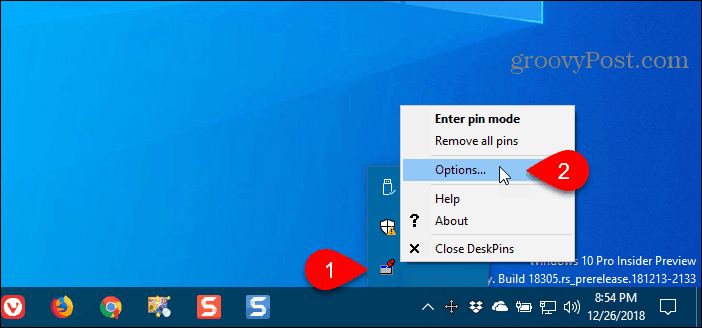
For script options, right-click on the AutoHotkey icon in the system tray.
2. Use Your Mouse with DeskPins
DeskPins provides pins you can grab and use to keep any window on top of all other windows. The program sits in the system tray and uses minimal resources.
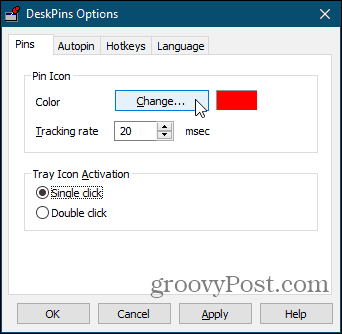
Download and install DeskPins. Run the program, right-click the icon in the system tray, and select Options to change the Pins, Autopin, and Hotkeys settings.
On the Pins tab, you can change the color of the pins. The Tracking rate controls how often each pin checks the pinned window’s position and state. Lower values make the pins more responsive. You can enter any number from 10 to 1000 msec (milliseonds).
If you have an older computer, you may want to increase the Tracking rate number to avoid slowing down your computer.
You can also choose Single click or Double click under Tray Icon Activation to indicate how you get pins from the DeskPins system tray icon. The default is Single click.
You can have DeskPins automatically pin certain types of windows using rules on the Autopin tab.
Check the Enable box and then click Add to add a new rule. Use the check boxes next to the rules to enable and disable individual rules.
Click Help to access the DeskPins help file for more information about automatically pinning windows.

DeskPins provides default shortcuts for entering pin mode and toggling the active window pin. You can change these shortcuts on the Hotkeys tab.

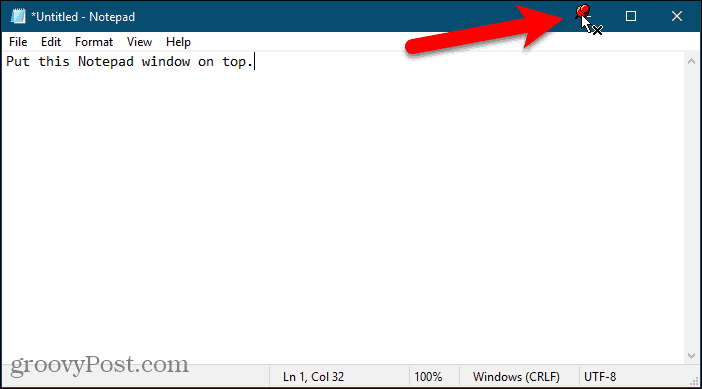
To pin a window on top, click (or double-click, depending on the setting) the DeskPins icon in the system tray.
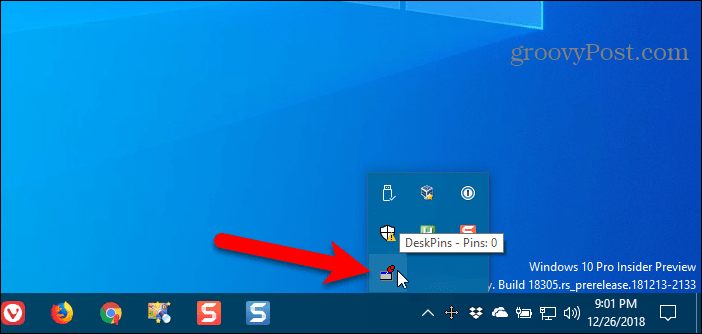
Then, click the title bar on the window you want to keep always on top.
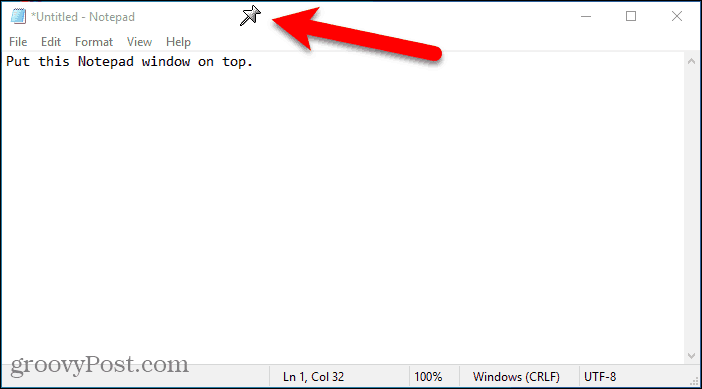
A pin displays on the title bar of the chosen window in the color you specified, or in the default color red.
Click the pin again to disable always on top for the window.
3. Use a System Tray Menu with TurboTop
TurboTop also sits in your system tray like DeskPins. But it operates differently.
Download and install TurboTop. Then, run the program.
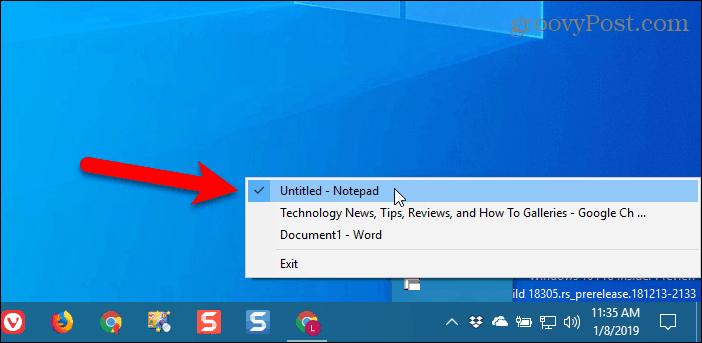
To keep a window always on top, click the TurboTop icon in the system tray. A list of all open windows displays. Select the title of the window you want.
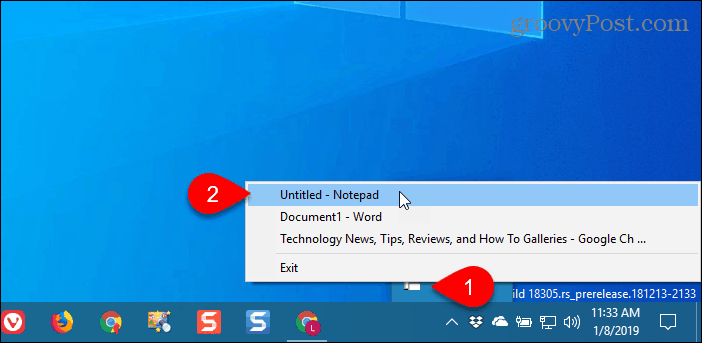
Any windows you choose to be always on top are indicated with a check mark on the TurboTop menu.
To stop keeping a window always on top, click the TurboTop icon in the system tray and select that window again, so there’s no check mark next to the window name on the menu.
Bring the Always-on-Top Feature to All Windows
Whether you like using keyboard shortcuts or prefer using the mouse, there’s an easy solution for keeping windows always on top. If you’ve found other options for keeping windows always on top, let us know in the comments.
Pin an app window in Windows 10 with Parallels Toolbox one-click tool Window on Top
When working between multiple programs or windows in Windows 10, you might want to pin a window on top and be able to continue working with other programs.
Some programs in Windows 10 have built-in intelligence to accomplish this. However, not all programs are created equal and most do not have this functionality.
It’s quite easy to force your desired window to float on top regardless of the program’s individual ability with the Parallels® Toolbox tool Window on Top.
Window on Top is a simple one-click solution to get around the pesky Windows 10 programs that don’t have a pin or float functionality. If you need a window to always be on top of other programs, start this tool and select the window you want. It will always be displayed above other windows for immediate access.
This tool is a better solution than remembering multiple keyboard commands or buying an individual third-party app to accomplish this.
Parallels Toolbox is a helpful suite of one-click tools that is here to help manage your productivity. Our engineers designed this all-in-one suite for creative individuals, students, small-business owners, chronic multitaskers, IT managers and everyone in between to ensure everyone can use their PC to its maximum potential.
Parallels Toolbox is our all-in-one solution with over 30 tools for macOS and Windows 10. With just one click, you can save space on your hard drive, create high-quality content, quickly optimize your computer for a presentation and so much more. Our economical suite of tools replaces the need for multiple applications and programs. Try a free 7-day trial of Parallels Toolbox for macOS or Windows 10 from the links below!


