PSJailbreak — свободу Playstation!
![]() Взлом PS4, Важно!
Взлом PS4, Важно!
Как и «завещали» fail0verflow — «мы вам для взлома PS4 не понадобимся — это и так слишком просто». Собственно так оно и произошло — сегодня в сети появилась подробная инструкция по запуску ядра Linux со всеми необходимыми для этого файлами.
Требования:
- Playstation 4 с прошивкой 1.76
- Charles Proxy
- USB флэшка с FAT 32
- Initramfs.cpio.gz и bzImage
- PS4 Playground
Загрузки:
Charles Proxy — Скачать
Initramfs.cpio.gz и bzImage — Скачать
Теория:
Поясню в общих чертах что мы будем делать. Если ваша PS4 с прошивкой 1.76 ни разу не выходила в интернет то вы не сможете запустить браузер не войдя в PSN, а в PSN нельзя войти не обновив прошивку. Замкнутый круг. Но есть способ запустить браузер не заходя в PSN — если из меню настроек вызвать справочник, то откроется браузер по определённому адресу. При помощи прокси Charles мы перехватываем этот адрес и подставляем вместо него наш PS4 Playground использующий уязвимость браузера который и запускает ядро Linux-а с USB флэшки
Готовим ПК:
1. Ставим Charles proxy.
2. На предварительно отформатированную в FAT32 USB флэшку копируем из архива 2 файла — Initramfs.cpio.gz и bzImage. Файлы должны быть в корне флэшки.
Готовим PS4:
1. Запускаем Charles на ПК
2. На PS4 идём в настройки сети и выбираем «Использовать proxy сервер»
3. В графе «адрес» прописываем IP адрес вашего компьютера где установлен Charles, в графе «порт» — 8888
Настраиваем PS4 Playground:
1. На PS4 в меню Настройки выбираем самый первый пункт — «Руководство»
2. Консоль откроет страницу по адресу http://manuals.playstation.net/document/ru/ps4/
3. На ПК в Charles ищем этот запрос в окне «Structure», на пункте PS4 нажимаем правой кнопкой и выбираем «Map Local»
4. В открывшемся окне выбираем папку «PS4-playground-gh-pages» распакованную из архива. В папке должны быть файлы index.html, browser.html и другие

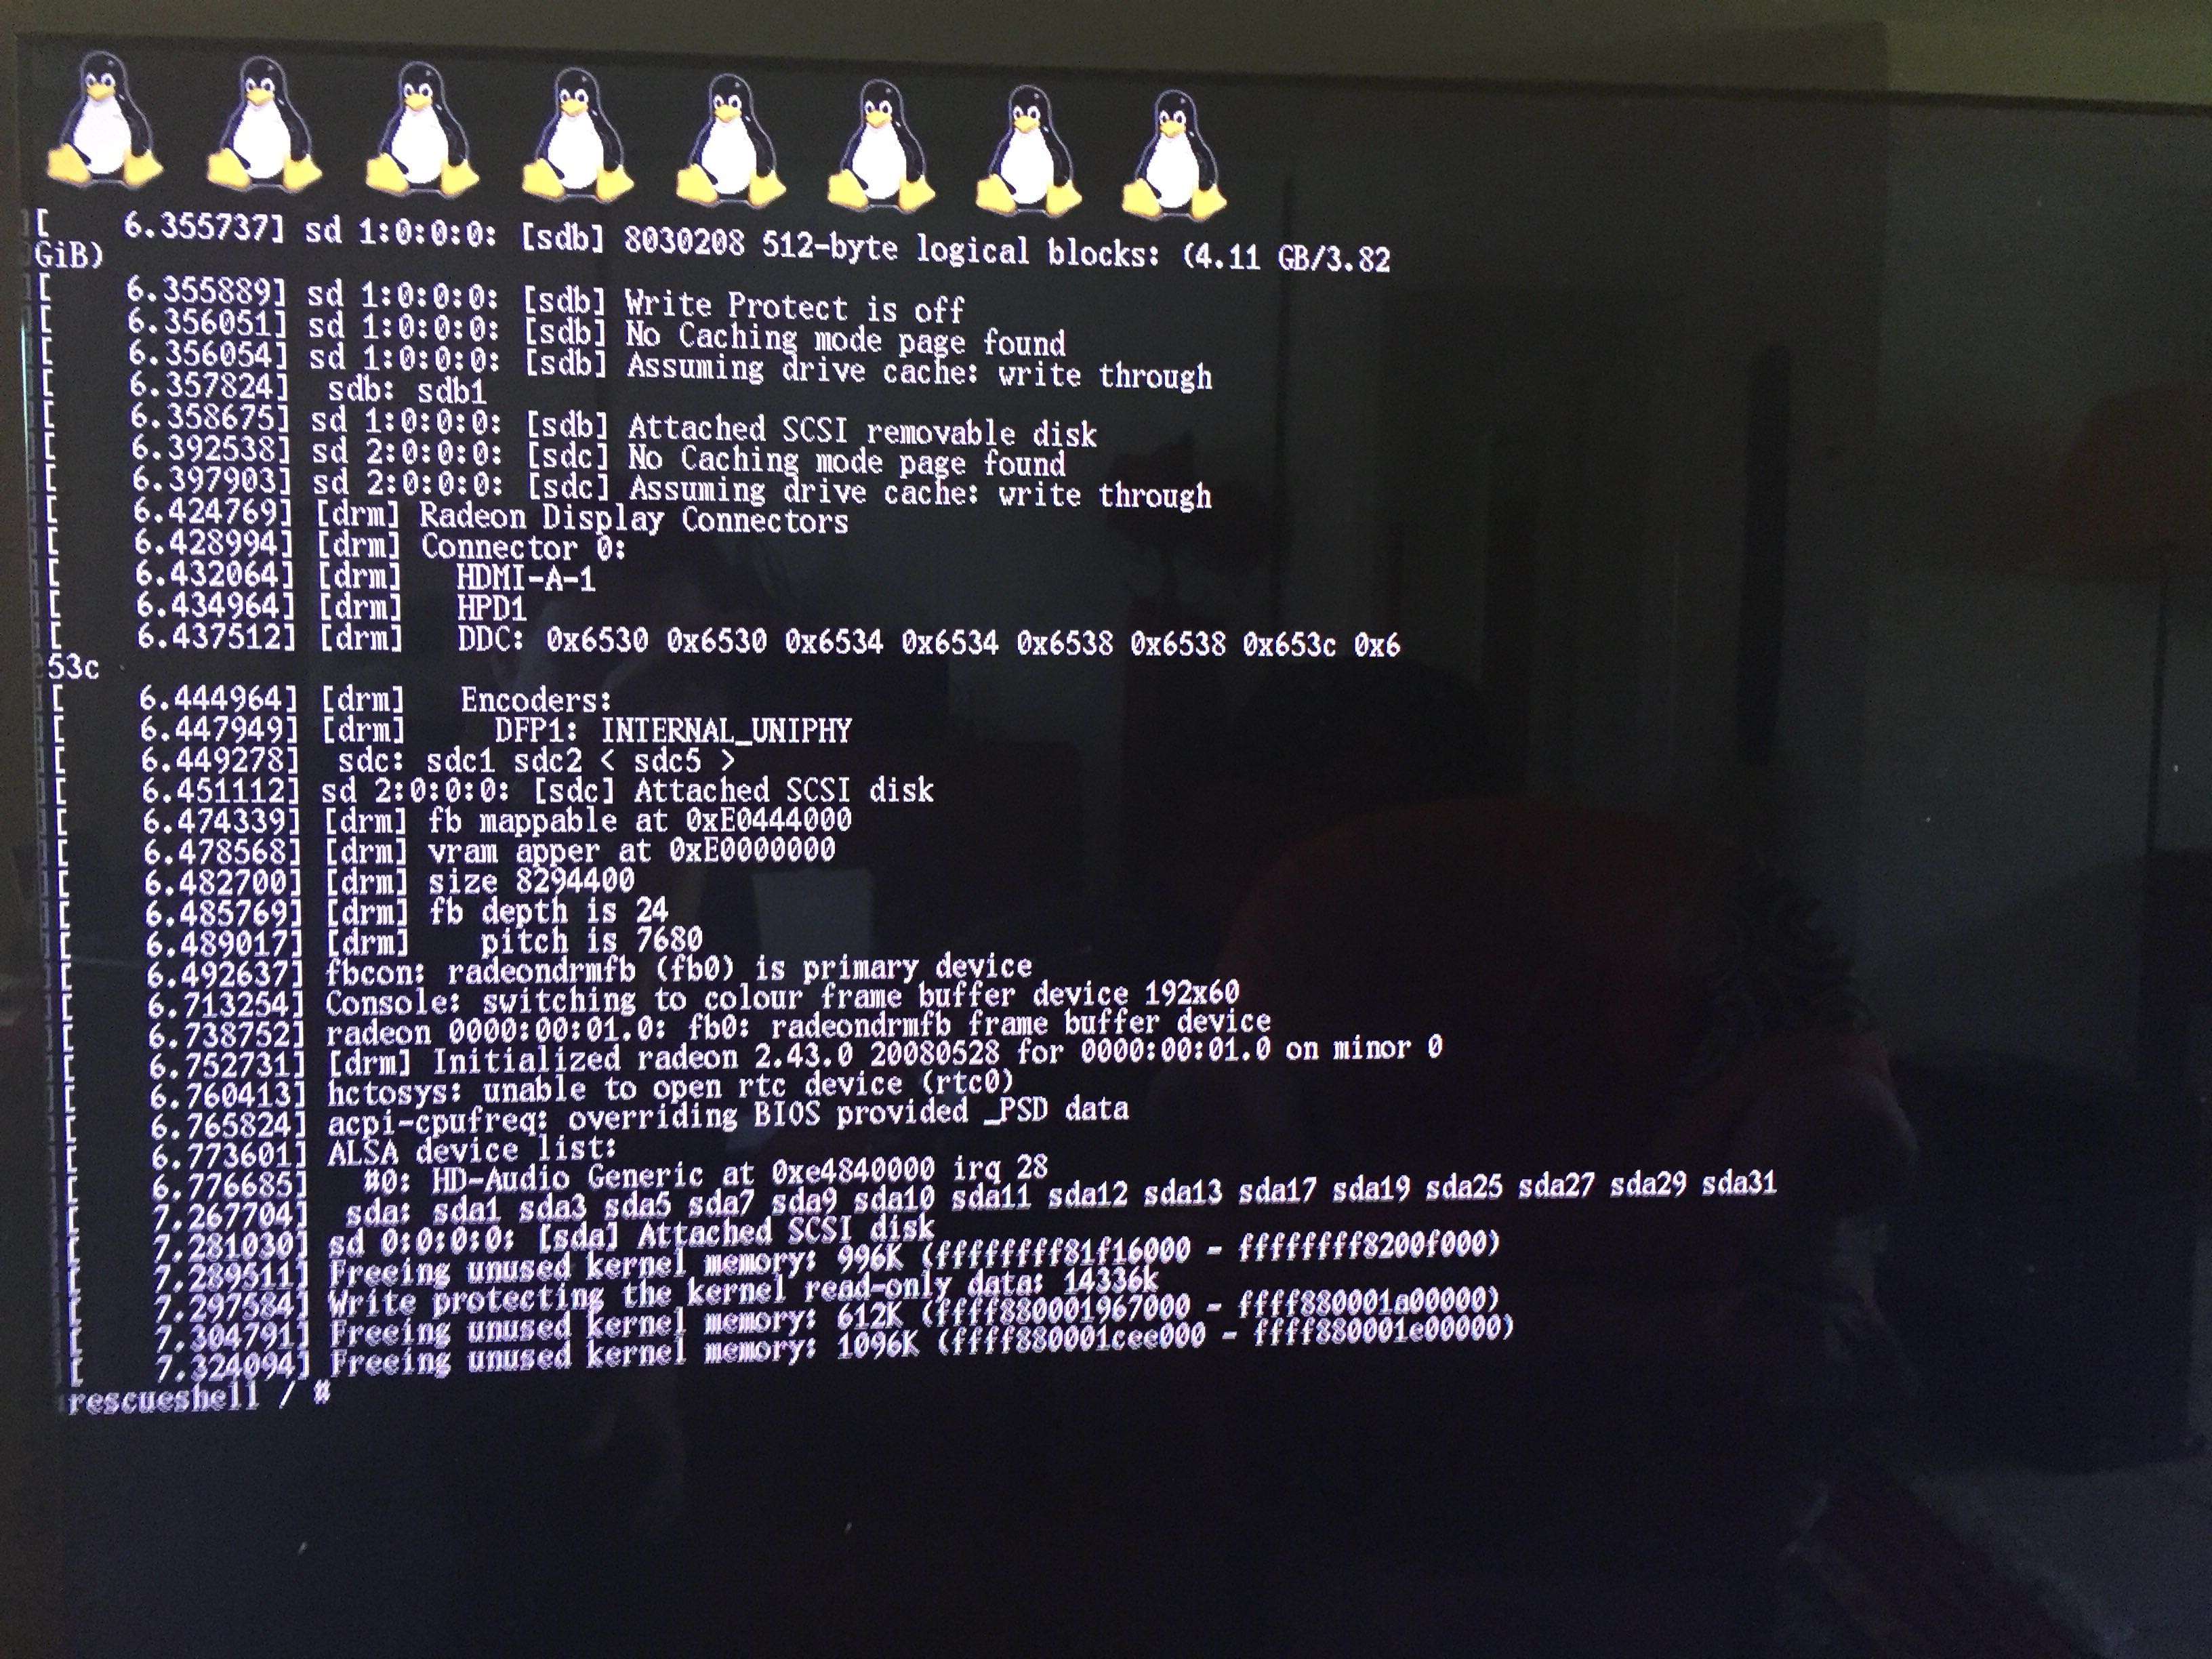
Запускаем Linux:
1. Закрываем и снова открываем «Руководство» — вместо него должен открыться наш PS4 Playground:


Примечания:
1. Пока что это всего-навсего практически голое ядро Linux, но я уверен что в ближайшее время в сети появятся дистрибутивы со всеми необходимыми драйверами, графическим интерфейсом и прочими плюшками.
2. В качестве прокси не обязательно использовать Charles — подойдёт любая программа которая умеет перехватывать и подменять запросы — например SKFU proxy.
3. За основу взята инструкция от Senaxx с сайта playstationscenefiles.com
P.S. Да, это не фэйк. Проверено на моей личной PS4 — всё работает
PS4 с прошивкой 1.76.
Usb флешь накопитель или USB Hdd, с достаточным объёмом для установки Ubuntu.
Прежде всего вам нужно установить Ubuntu на ваш USB HDD:
Скачать Ubuntu Iso releases.ubuntu.com
Скопируйте образ ISO в USB с помощью таких инструментов как unetbootin (Win/mac/linux) https://unetbootin.github.io/, так же вы можете записать образ на DVD болванку.
Теперь вам нужно запустить ядро Linux на PS4
После чего выньте флешку с файлами bZimage & initramfs.cpio.gz, она больше не понадобится, все находится в оперативной памяти, подключите свой подготовленный USB Hdd с Ubuntu ( /dev/sdXX).
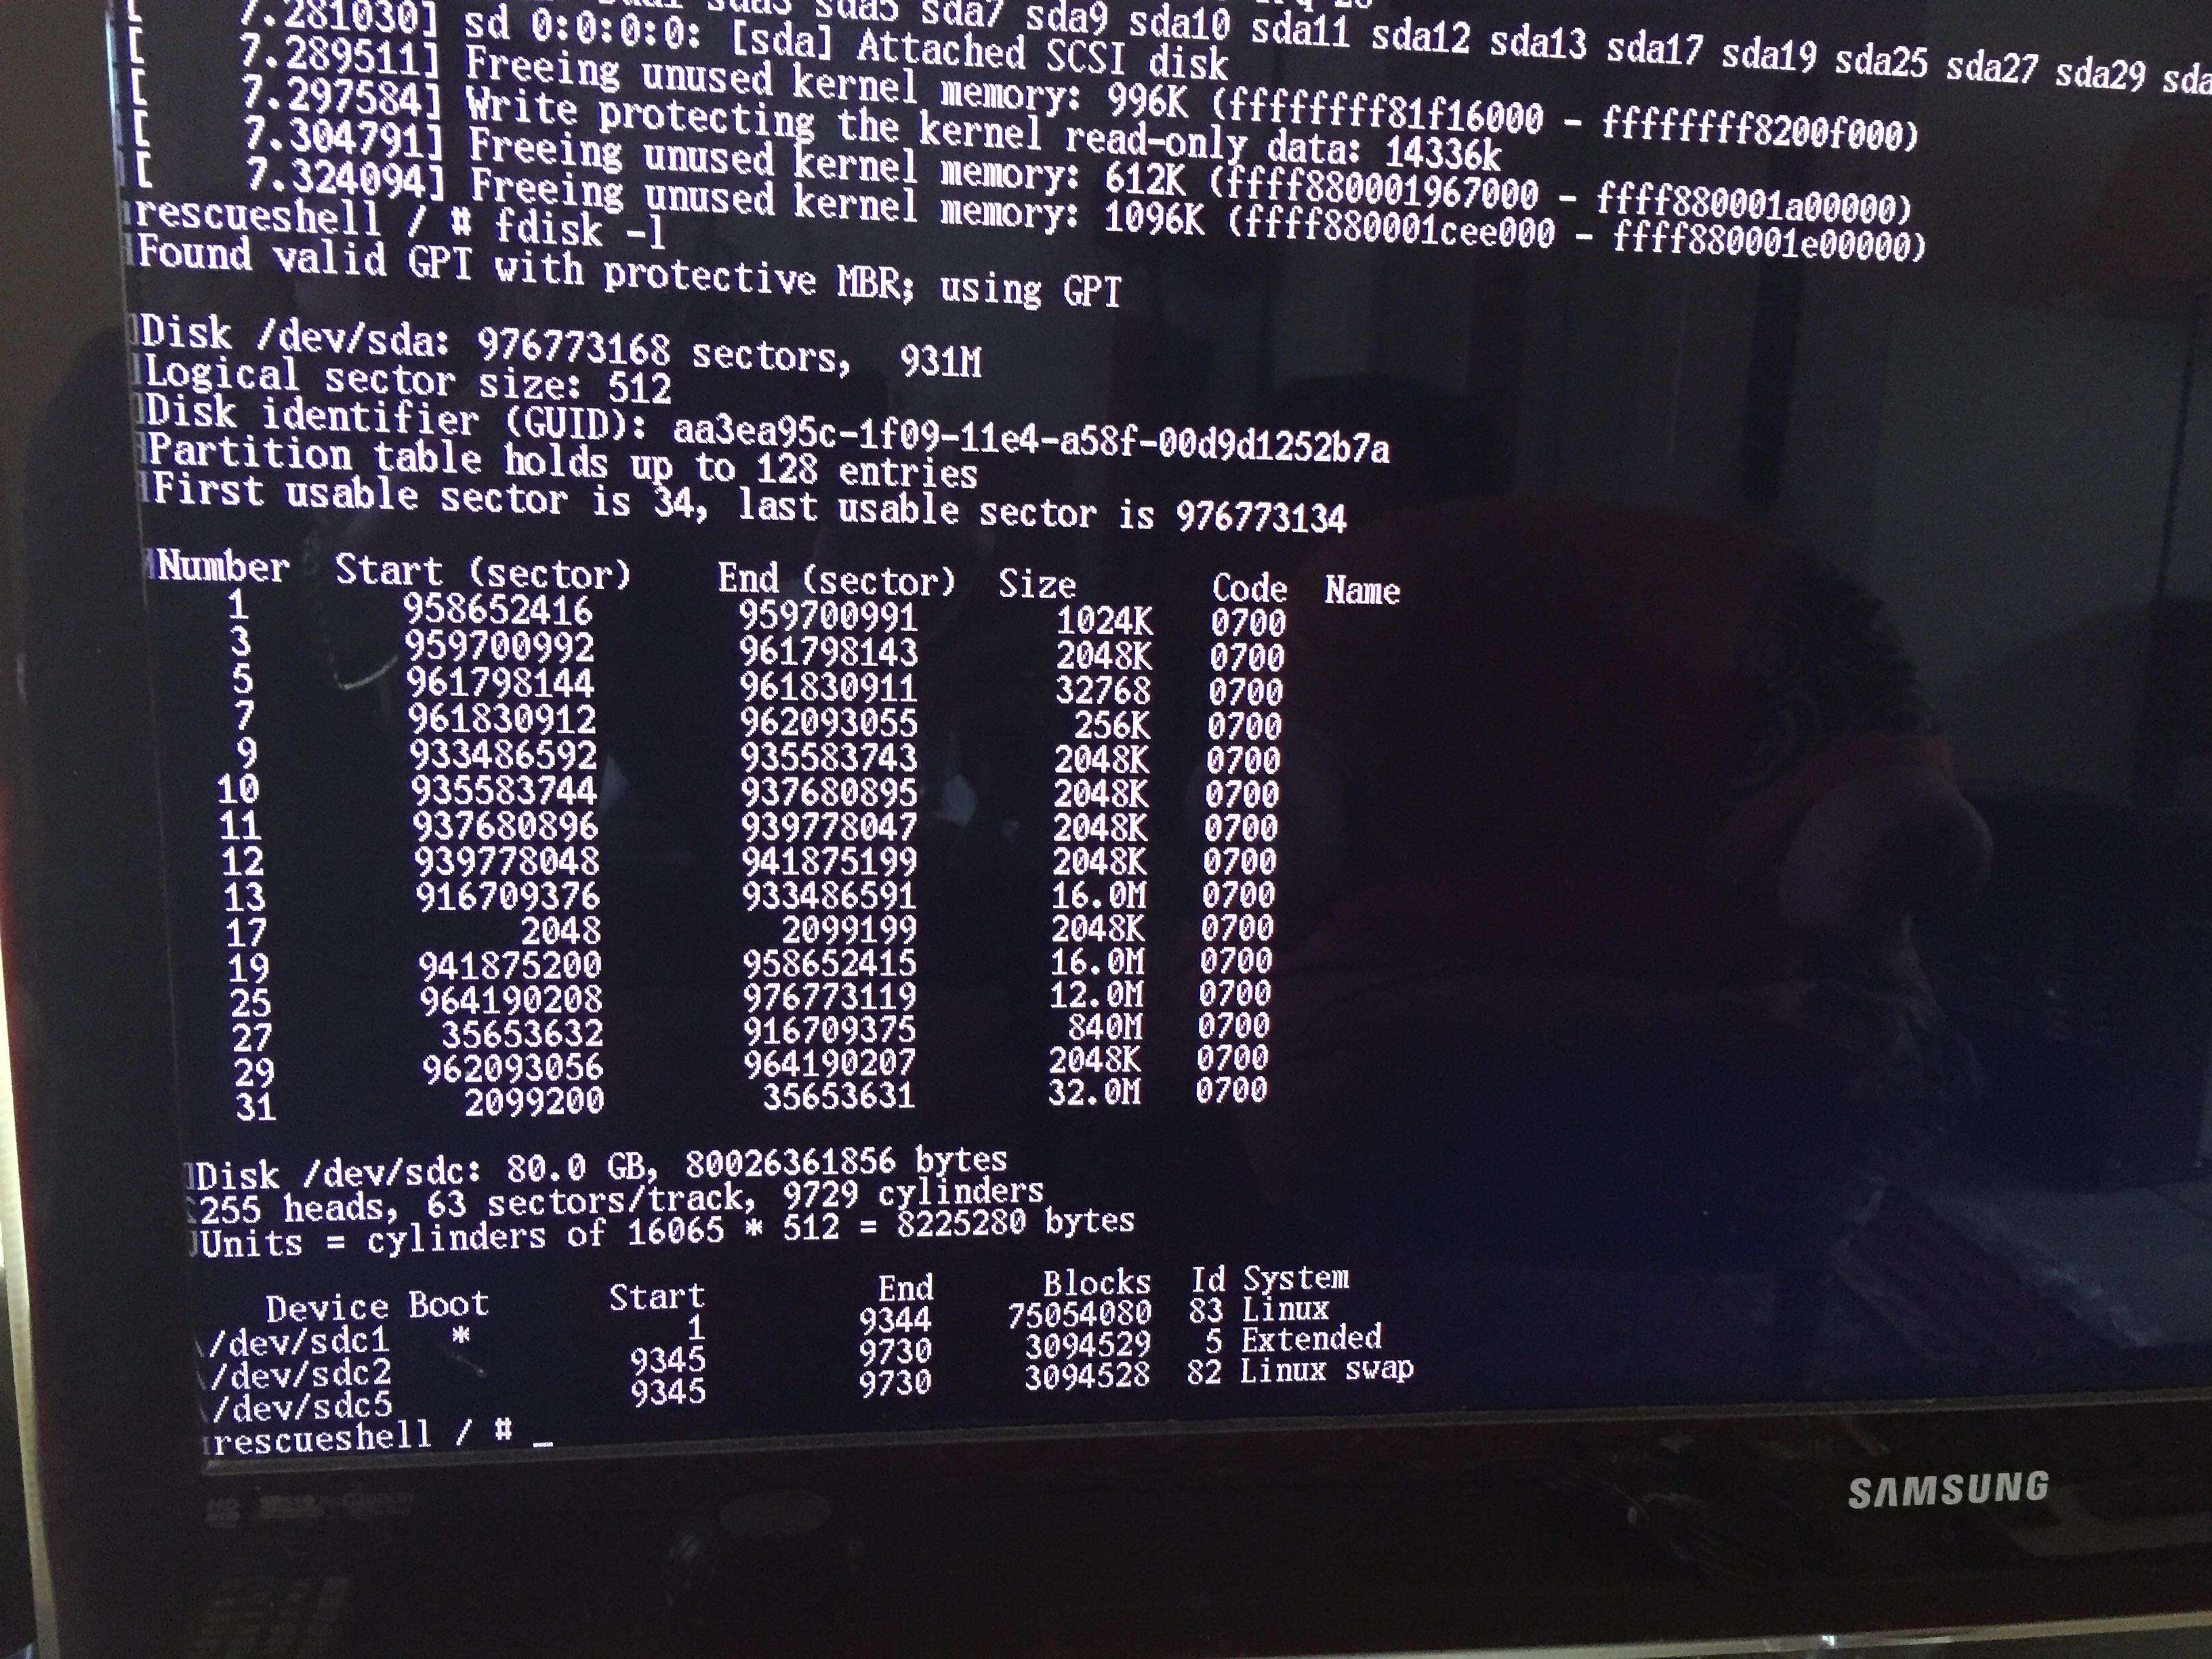
Ваш загрузочный раздел Ubuntu находится в каталоге /dev/sdc1
Монтируйте /dev/sdc1 newroot/
exec switch_root /newroot/ /newroot/sbin/init
Если не получится с первого раза, снова введите команду.
Подождите несколько секунд, и вы должны увидеть ход загрузки Ubuntu, и наконец рабочий стол.
Источник
Installing PS4 Gentoo Linux on PlayStation 4 Guide by Mircoho
After the recent PS4 Gentoo Kernel Sources 5.3.7 with Baikal Chip Patches, here is a guide by me (@mircohoooo) covering how to install Gentoo Linux on PlayStation 4 and turn your PS4 into an emulation station! 
## How to Install Gentoo and Turn Your PS4 into an Emulation Station
If Your System Firmware is 5.05, you already know that you have the luck to use a Kernel Exploit which gives you the ability to run a Linux Distribution.
The principle is the same as Fedora for firmware 1.76, you need to copy the image file to a USB stick or hard drive. You can use the tools RUFUS (GUI) in Windows, Etcher for MacOSx or DD under Linux.
After installation, you can enlarge the Linux partition with Gparted in Gentoo, for example if you have installed it on an SSD or HDD on the USB 3.0 port.
My Models:
- CUH-1006A and CUH-7016B
greez mircoho
have fun

Small video about Gentoo: (gentoo.mp4)
## Prerequisites
- A dedicated 12GB+ Usb Stick better a HDD / SSD for more Speed
- PS4Gentoo image (3.09 GB): Mega (ps4gentoo01-2020.img.gz) / G-DRIVE (ps4gentoo01-2020.img.gz) (Update: 17.01.2020)
- Rufus for Windows: (rufus-3.8.exe)
- Etcher for Mac OSX: (balenaEtcher-Setup.exe)
- PS4 Exploit Host (PS4Gentoo.Github.io) (thanks @Leeful for this nice design)
## How under Windows
- Download Gentoo and Rufus
- Open Rufus
- Select the image of Gentoo and your target USB / HDD / SDD Device
- Then click on Start Once done
- Plug your prepared USB / HDD or SSD drive into the USB port of your PS4
- Open this (PS4Gentoo.Github.io) on your PS4 Webbrowser
- Inject the linux load from USB payload 5.05 and Wait .
- Autoboot doesnt work? replug the USB / HDD / SSD Drive and send this command «` resume-boot «`
- If you have a freeze or nothing that happens on the screen trying again some Models have random crashes .
- RESIZE the linux partition after installation VIDEOsimplescreenrecorder-2020-01-17_14.31.15.mp4
- Others? (PS4Gentoo.Github.io/issues)
## Info
- Partition:1 FAT32 (initramfs/bzImage)
- Partition:2 ext4 (ps4gentoo)
- Username: ps4
- Password: ps4
- Username: root
- Password: ps4 (change the password!!)
- change portage mirror in /etc/portage/make.conf with root
- Gentoo source mirrors
- VirtualManger KVM you need to run libvirtd with root before you can use
## What works / what doesn’t?
CUH10XX & CUH11XX
- Ethernet : works
- Wi-Fi : works
- Bluetooth : works
- Internal HDD: works
- Audio : works
- GPU : works
- GPU acceleration : works (via mesa), with Vulkan
- Power button : works
- BD Drive : works
- USB : works
- Power management / Suspend : suspend doesn’t work shutdown and reboot : works
CUH12XX & CUH2XXX
- Ethernet : works
- Wi-Fi : works
- Bluetooth : works
- Internal HDD: works (only Baikal)
- Audio : works
- GPU : Works but Blackscreen problem with some Monitors / TVs
- GPU acceleration : works (via mesa), with Vulkan
- Power button : works
- BD Drive : works
- USB : works for some Model
- Power management / Suspend : suspend doesn’t work, shutdown and reboot : works
CUH70XX PS4 Pro
- Ethernet : works
- Wi-Fi : works
- Bluetooth : works
- Internal HDD: WIP
- Audio : works
- GPU : works but Blackscreen problem with some Monitors / TVs
- GPU acceleration : works (via mesa), with Vulkan
- Power button : works
- USB : WIP
- BD Drive : works
- Power management / Suspend : suspend doesn’t work, shutdown and reboot : works
## Changelog
- System updates, u.v.m.
- Emulationstation configuration for easy use!
## Installed Apps
- Internet: Brave, Chrome (Browser), Telegram, Discord (Messenger), Filezilla (Ftp-Client)
- Game & Emulation: Emulationstation (Front End -> Retroarch (AllinOne Emulator), Steam (Steam), Lutris (Play Games on Linux), Chiaki (PS4rViewer), ScumVM, pcsx, pcsx2, pcsx3 (PS1-3 Emulator), Dolphin (Gamecube Emulator)
- Multimedia & Graphics: Kodi, Vlc, MakeMKV, Gimp, Gwenview, MuPDF, Spectacle, Simplescreenrecorder
- System: Geany, Gkrellm, Ark, krfb, AntimicroX, Gparted, Spectacle, Ksysguard, Kinfocenter
### Bugs
- Blackscreen problem for some Screens (Kernel)
- USB Host Controller doesnt work 100% for PS4 Pro! (Kernel)
### ☎ for more Support Join us
- Telegram (ps4linux4homebrews)
- Twitter (mircoho)
### Gentoo-Sources
- Linux Kernel
- Linux Loader
- Linux Video Driver for Gentoo (thanks marcan)
### Thanks To ❤❤
- ❤ Masterzorag & EEEply ❤
- qwertyoruiopz, flatz, Specter, xVortex, Stooged, OpenOrbis, 5u770n, KiiWii, LightningMods, RetroGamer74, CelesteBlue, AlAzif, c0d3m4st4, EdiTzZ, Zecoxao, Zer0xFF
- eeply, valentino, rancido, astromatik, fabien, cedasill, shim and Team in telegram group
PS4 Jailbreak How To Install Gentoo Linux via seanp2500
Источник
Turn Your PS4 Into An Awesome Gaming PC With Linux

Thousands of retro and PC games at your fingertips.
My original Wii, that “OG” Nintendo DS, my original PSP and my prior Xbox 360 were all given the same “homebrew” treatment in the past, so why not the PS4 I no longer use? The upside to the PS4 is that it has the guts of a PC compared to the custom chipsets of the past. Now, the adventure begins….
Note: for this guide I will be using the original 2013 CUH100C1 PS4 model on firmware 7.00, and I will be connected to the internet via a wired Ethernet cable. Your model may differ, but the guide should work the same. For PS4 Pro owners, follow the videos of this youtuber to stay up to date on jailbreaks.
New Beginnings
The first thing I did upon finding my old ps4, was get into settings and check out the firmware version. You can view this by going to Settings -> System -> System Information.
At the time of my writing this, only systems running 7.02 or earlier firmware are jailbreak-able. More jailbreaks seem to be in the works. Luckily, having not touched my machine in over a year or so, it is still on 7.00.
Next, we’ll want to head to our PC of choice, with a flash drive or external hard drive of 128gb minimum at the ready. I recommend 128gb minimum if you wish to install PC games from Steam on there going forward (64gb drives work just as well).
My daily driver is a Thinkpad P51 running Fedora Linux, but your operating system doesn’t really matter for this part. Go grab the PS4 Gentoo image (linked is the January 2020 update by Marcan) and then download Etcher. Etcher has had the highest success rate amongst those I’ve talked to over on Telegram and in YouTube comments thus far, so it’s a safe and easy choice.
Next, take that Gentoo Image and extract it with 7Zip or gunzip until you have just the file ending in the extension .img. Now, open Etcher, select your flash drive and then your .img file and flash away!
Once Etcher has completed flashing the image to the drive, close it. Now, eject the drive from your machine, and insert it into a free USB port on your PS4.
I also recommend having a USB 2.0 or 3.0 hub such as this cheapo one, so that you can have a mouse and keyboard plugged into one port with your drive plugged into the other. My PS4 only had two ports on the front.
Some Prep Work Before Exploit
Before we jump into the fun Linux-booting times, it is recommended to change some video settings for your PS4 so that the screen won’t turn black during boot-time. Head over to Settings, and go to Sound and Screen, then Video Output Settings. Then set Resolution to 1080p instead of Automatic or prior settings. Next, turn off HDR from the same menu. Then, back out to the Settings screen again and head to System and disable HDCP! You should be good to go from there.
Now, with the drive inserted, open your built-in Web Browser on the PS4. Close any pages currently loaded and open a new one. Navigate to the Hakku Raifu Exploit Host at this address. Going forward, I’ll be referring to this as HL to keep things simple. Once you’ve reached the page, you should find a menu such as the below image…

Once you are at this menu, select the available exploits for your firmware version. Since my firmware version is closest to 7.02, I’ll select that option. Note that if you don’t want to keep getting nagged by the PS4 trying to update, run the Disable-Updates exploit until it successfully finishes- there will be a pop-up letting you know when it does.
Booting Linux
For the Linux options in the 7.02 Exploit HL menu, I’ll select the Linux-3GBVRAM option, since I’ve had issues using the 1GBVRAM loader in the past. Note that newer consoles might not have issues using the 1GBVRAM exploit, however my console is apparently only able to load the Linux-3GBVRAM option. The good news here is that the GPU part of my PS4’s processor will gain more memory, allowing for smoother gameplay in Steam games and retro roms you load.

Note that you may need to leave the webpage open and let it re-run a few times, as it is common to get “not enough system memory” errors when running it. My suggestion here is to hit the Options button, go to Settings and “Clear Website Data” as well as “Delete Cookies” every other time you get an out of memory error. Deleting browsing history from the main Options menu can help as well. Eventually, you’ll see the above page and that slide-in notification will let you know the exploit has taken off.
Now, if you have retained that patience, we wait!
Eventually the screen will go black and your monitor or TV may complain of the lack of an input. This is totally normal! Just wait for a minute or two. Eventually you’ll be greeted by a screen with penguins at the top and various information scrolling vertically. After that, you should load into a screen that looks like the following…

Hello, Gentoo!
Once you’ve got to this step, congratulations! You’ve successfully booted to the Linux image on the drive you’ve plugged in! Steam, Retroarch and various other programs have already been installed to this by Marcan, so we just need to login to Steam and we’re good to go!
If you want to know about the retro gaming side of things, Modded Warfare covers that in detail, but for this article, I’m mainly interested in some PC gaming on the PS4, so that’s what I’ll go over next.
Move your mouse down to the hidden dock at the bottom of the screen and click the PlayStation icon on the far left.
Type in “Gparted” in this menu and click the only result. If it asks for a password, the default password for this should be “ps4”. Click the drop down menu in the top right of this program and select your flash drive or hard drive you are booting from- in my case I’m booting from a 256gb flash drive, so I will choose that, as seen below.

After choosing the ext4 partition, you will want to extend it to fill the rest of the drive, so you have space to install games or download roms etc.

Make sure to drag the arrow to the end of the right side in the menu that follows.
After that, let’s open up Steam!
Gaming
Click the PlayStation icon in the bottom dock again and search “steam”.
Steam should come up, though it may need to update after getting clicked. Let it update, and then sign into your Steam account if you have one! I’ve been playing PC games via this marketplace for a few years, so I have a solid library I’ll get to testing soon.

As shown in the screenshot above, I recommend enabling the Proton compatibility layer before you start installing PC games. To do this, click Steam in the top left of the client, then Settings -> Steam Play -> Enable Steam Play For All Other Titles. You will likely have to restart Steam after clicking OK. That’s fine.
Источник


