- Работаем с Wi-Fi сетями из терминала в Linux. Просто и удобно!
- MNorin.com
- Блог про Linux, Bash и другие информационные технологии
- Настройка WiFi из командной строки
- Установка необходимых пакетов
- Проверка беспроводного контроллера
- Настройка WiFi из командной строки
- Изменение конфигурационных файлов
- Connect to Wi-Fi From Terminal on Ubuntu 18.04/20.04 with WPA Supplicant
- Step 1: Find The Name of Your Wireless Interface And Wireless Network
- Step 2: Connect to Wi-Fi Network With WPA_Supplicant
- Connecting to Hidden Wireless Network
- Step 3: Auto-Connect At Boot Time
- How to Obtain a Static IP Address
- Using a Hostname to Access Services on Ubuntu
- Unblock Wifi on Raspberry Pi
- Multiple Wi-Fi Networks
- Wi-Fi Security
- Wrapping Up
Работаем с Wi-Fi сетями из терминала в Linux. Просто и удобно!

Доброго времени суток всем юзерам! 🙂 Я думаю ни для кого не секрет, что при работе с ОС Linux, часто приходится работать в терминале. Терминал вещь очень хорошая если умело работать с ним и сегодня попробуем поработать с сетями Wi-Fi из под терминала 🙂
Итак, что нам нужно? Руки, голова, Wi-Fi-сети и конечно ваш любимый дистрибутив Linux 🙂
Для начала нам нужно определить, какие интерфейсы в компьютере работают с Wi-Fi сетями:
после чего вы увидите что то похожее на это:

Как мы видим по скриншоту выше, интерфейс называется wlan0.
Теперь давайте убедимся, что интерфейс wlan0 поднят и работает:
После того, как интерфейс поднят и работает, давайте просканируем сети Wi-Fi командой:
sudo iw dev wlan0 scan | less
должно выйти похожее на это:

Конечно названия сети (SSID) будет отличаться от той, что на скриншоте. Тут мы можем получить достаточную информацию о сетях Wi-Fi, такую как:
- Название (SSID);
- Тип безопасности (WEP, WPA/WPA2);
- Уровень сигнала и тд.
К примеру, если сеть не имеет пароля и соответственно открыта, то для подключения к ней используйте команду:
sudo iw dev wlan0 connect [SSID]
Если же сеть имеет тип безопасности WEP, то для подключения вводим команду (нужно знать пароль от сети):
sudo iw dev wlan0 connect [SSID] key 0:[Пароль от сети]
Для работы с зашифрованными сетями я рекомендую другой принцип работы, о нем ниже.
В данном случае нам понадобится утилита wpa_supplicant, она установлена не во всех дистрибутивах по-умолчанию. К примеру в openSUSE и Ubuntu она есть + есть к ней и GUI. GUI не установлен, ну и не надо 🙂
Устанавливаем эту утилиту, если ее у вас еще нету в системе и редактируем файл конфига wpa_supplicant:
sudo vi /etc/wpa_supplicant/wpa_supplicant.conf
Рекомендую добавлять это в конец файла, а также закоментируйте другие настройки в файле, которые вы не используете.
После того как файл отредактирован, сохраняем его и перезапускаем его командой в терминале:
sudo wpa_supplicant -i wlan0 -c /etc/wpa_supplicant/wpa_supplicant.conf
Теперь как вы подключены к желаемой сети, вам нужно получить IP-адрес, для этого выполняем команду:
Если вы все правильно сделали, то вы уже online + получили IP-адрес через DHCP, для проверки введите команду:
Будет что то похожее на:
Вот и все 🙂 Конечно, все тоже самое можно проделать и при помощи NetworkManager к примеру, но терминал есть терминал 🙂
Источник
MNorin.com
Блог про Linux, Bash и другие информационные технологии
Настройка WiFi из командной строки
Если вы пользуетесь какой-либо операционной системой на базе ядра linux, то скорее всего уже видели графические приложения для подключения к беспроводными сетям. Но если графического приложения еще нет, и для установки его требуется наличие сети, а для получения доступа к Интернету необходимо подключиться к беспроводной точке, то выход тогда только один — настройка WiFi из командной строки. Или еще пример — настроить сервер по ssh, чтобы он мог работать с беспроводным контроллером.
Установка необходимых пакетов
В первую очередь необходимо проверить, установлены ли пакет wpasupplicant и wireless-tools. Эти пакеты позволят вам подключаться к беспроводным сетям с WPA и WPA2 аутентификацией. В Debian и Ubuntu это делается командами
Если пакеты не установлены, то, возможно, поднять беспроводную сеть не получится, если у вас нет другого носителя. Пакеты устанавливаются следующей командой:
Кроме того, может понадобиться поставить микрокод (firmware) для устройства, установив соответствующий производителю пакет. Микрокод также называют прошивкой, но это не совсем правильно. Микрокод загружается в устройство перед началом работы с ним, а прошивка в устройстве находится постоянно. Для Intel это может быть, например, пакет firmware-iwlwifi из репозитория non-free. Микрокод часто лежит именно в этой ветке репозиториев. Либо это может быть пакет firmware-realtek, либо firmware-linux-free.
Проверка беспроводного контроллера
Перед тем, как пытаться подключаться, нужно убедиться, что система видит WiFi-контроллер и правильно его распознает, для просмотра списка устройств можно использовать команду lspci, в ее выводе должна быть строчка наподобие этой:
А в списке интерфейсов должен присутствовать соответствующий сетевой интерфейс, обычно это wlan0. Просмотреть список можно командой
Настройка WiFi из командной строки
Если устройство в системе найдено, можно переходить к настройке сети. Для начала просмотрим список доступных локальных сетей:
На экран будет выведен список доступных сетей в виде записей такого вида:
Из этой информации нам понадобится поле «ESSID», представляющее название точки доступа, в данном случае «wireless-net», а также строчки «IEEE 802.11i/WPA2 Version 1» и «Authentication Suites (1) : PSK». Эти два значения дают нам понимание того, что используется WPA2-PSK аутентификация.
Создаем файл /etc/wpa_supplicant/wpa_supplicant.conf:
И затем даем команду
После этого, если адрес не получен автоматически, вызываем DHCP-клиент:
После получения адреса Интернет может быть недоступен. Необходимо командой route проверить таблицы роутинга. Если шлюз по умолчанию отсутствует, то надо добавить его командой
Если адрес указан верно, то вы сможете получить доступ к Интернету. Но обычно DHCP-клиент получает шлюз по умолчанию автоматически
Изменение конфигурационных файлов
Теперь нам необходимо задать в конфигурационных файлах параметры беспроводной сети — название и ключ.
Записываем в файл /etc/network/interfaces следующее:
Источник
Connect to Wi-Fi From Terminal on Ubuntu 18.04/20.04 with WPA Supplicant
In this tutorial, we are going to learn how to connect to Wi-Fi network from the command line on Ubuntu 18.04/20.04 server and desktop using wpa_supplicant. In a modern home wireless network, communications are protected with WPA-PSK (pre-shared key) as opposed to WPA-Enterprise, which is designed for enterprise networks. WPA-PSK is also known as WPA-Personal. wpa_supplicant is an implementation of the WPA supplicant component. A supplicant in wireless LAN is client software installed on end-user’s computer that needs to be authenticated in order to join a network.
Step 1: Find The Name of Your Wireless Interface And Wireless Network
Run iwconfig command to find the name of your wireless interface.
wlan0 used to be a common name for wireless network interface on Linux systems without Systemd. Because Ubuntu uses Systemd, you are going to find that your wireless network interface is named something like wlp4s0 . You can also see that it’s not associated with any access point right now.
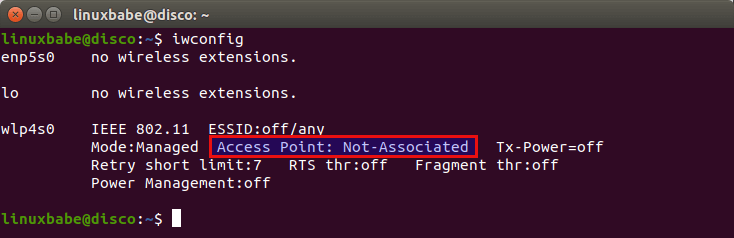
If your wireless interface isn’t shown, perhaps you need to bring it up with the following command.
Then find your wireless network name by scanning nearby networks with the command below. Replace wlp4s0 with your own wireless interface name. ESSID is the network name identifier.

Step 2: Connect to Wi-Fi Network With WPA_Supplicant
Now install wpa_supplicant on Ubuntu 18.04/20.04 from the default software repository.
We need to create a file named wpa_supplicant.conf using the wpa_passphrase utility. wpa_supplicant.conf is the configuration file describing all networks that the user wants the computer to connect to. Run the following command to create this file. Replace ESSID and Wi-Fi passphrase with your own.

Note that in the above screenshot, I wrapped my ESSID with double-quotes, because my ESSID contains whitespace.
The output of wpa_passphrase command will be piped to tee , and then written to the /etc/wpa_supplicant.conf file. Now use the following command to connect your wireless card to wireless access point.
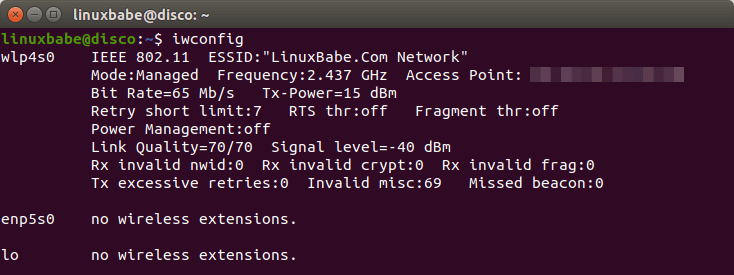
The following output indicates your wireless card is successfully connected to an access point.
Note that if you are using Ubuntu desktop edition, then you need to stop Network Manager with the following command, otherwise it will cause a connection problem when using wpa_supplicant.
And disable NetworkManager auto-start at boot time by executing the following command.
By default, wpa_supplicant runs in the foreground. If the connection is completed, then open up another terminal window and run
You can see that the wireless interface is now associated with an access point.
You can press CTRL+C to stop the current wpa_supplicant process and run it in the background by adding the -B flag.
Although we’re authenticated and connected to a wireless network, we don’t have an IP address yet. To obtain a private IP address from DHCP server, use the following command:
Now your wireless interface has a private IP address, which can be shown with:

Now you can access the Internet. To release the private IP address, run
Connecting to Hidden Wireless Network
If your wireless router doesn’t broadcast ESSID, then you need to add the following line in /etc/wpa_supplicant.conf file.
Step 3: Auto-Connect At Boot Time
To automatically connect to wireless network at boot time, we need to edit the wpa_supplicant.service file. It’s a good idea to copy the file from /lib/systemd/system/ directory to /etc/systemd/system/ directory, then edit the file content, because we don’t want a newer version of wpa_supplicant to override our modifications.
Edit the file with a command-line text editor, such as Nano.
Find the following line.
Change it to the following. Here we added the configuration file and the wireless interface name to the ExecStart command.
It’s recommended to always try to restart wpa_supplicant when failure is detected. Add the following right below the ExecStart line.
If you can find the following line in this file, comment it out (Add the # character at the beginning of the line).
Save and close the file. (To save a file in Nano text editor, press Ctrl+O , then press Enter to confirm. To exit, press Ctrl+X .) Then reload systemd.
Enable wpa_supplicant service to start at boot time.
We also need to start dhclient at boot time to obtain a private IP address from DHCP server. This can be achieved by creating a systemd service unit for dhclient .
Put the following text into the file.
Save and close the file. Then enable this service.
How to Obtain a Static IP Address
If you want to obtain a static IP address, then you need to disable dhclient.service .
We need to use netplan to configure static IP address on Ubuntu 18.04/20.04. Create a configuration file under /etc/netplan/ .
Add the following lines to this file. Replace 192.168.0.102 with your preferred IP address. Please be careful about the indentation. An extra space would make the configuration invalid.
Save and close the file. Then apply the configurations.
You can also turn on the —debug option if it doesn’t work as expected.
If there are other .yaml files under /etc/netplan/ directory, then netplan will automatically merge configurations from different files. netplan uses systemd-networkd as the backend network renderer. It’s recommended to configure the wpa_supplicant.service runs before systemd-networkd.service , so the system will first associate with a Wi-Fi access point, then obtain a private IP address.
Find the following line.
Save and close the file.
Another way to obtain a static IP address is by logging into your router’s management interface and assigning a static IP to the MAC address of your wireless card, if your router supports this feature.
Using a Hostname to Access Services on Ubuntu
Actually, you don’t have to obtain a static IP address for your Ubuntu box. Ubuntu can use mDNS (Multicast DNS) to announce its hostname to the local network and clients can access services on your Ubuntu box with that hostname. This hostname can always be resolved to the IP address of your Ubuntu box, even if the IP address changes.
In order to use mDNS, you need to install avahi-daemon, which is an open-source implementation of mDNS/DNS-SD.
Start the service.
Enable auto-start at boot time.
Avahi-daemon listens on UDP 5353, so you need to open this port in the firewall. If you use UFW, then run the following command.
Then you should set a unique hostname for your Ubuntu box with the hostnamectl command. Replace ubuntubox with your preferred hostname, which should not be already taken by other devices in the local network.
Now restart avahi-daemon.
If you check the status with
you can see the mDNS hostname, which ends with the .local domain.

On the client computer, you also need to install an mDNS/DNS-SD software.
- Linux users should install avahi-daemon .
- Windows users need to enable the Bonjour service by either installing the Bonjour print service or installing iTunes.
- On macOS, Bonjour is pre-installed.
Now you can access services by using the ubuntubox.local hostname, eliminating the need to check and type IP address.
Unblock Wifi on Raspberry Pi
The Ubuntu ARM OS for Raspberry Pi blocks wireless interface by default. You need to unblock it with:
To unblock it at boot time, create a systemd service unit.
Add the following lines to it.
Save and close the file. Enable auto-start at boot time.
I found that the unblock-wifi.service should run after the wpa_supplicant.service starts, otherwise it can’t unblock wifi. Note that if you have installed a desktop environment, there’s probably a network manager running that can interfere with the connection. You need to disable it. For example, I use the lightweight LXQT desktop environment on Raspberry Pi ( sudo apt install lubuntu-desktop ) and need to disable connman.service and NetworkManager.service.
Multiple Wi-Fi Networks
The /etc/wpa_supplicant.conf configuration file can include multiple Wi-Fi networks. wpa_supplicant will automatically select the best network based on the order of network blocks in the configuration file, network security level, and signal strength.
To add a second Wi-Fi network, run
Note that you need to use the -a option with the tee command, which will append, instead of deleting the original content, the new Wifi-network to the file.
Wi-Fi Security
Do not use WPA2 TKIP or WPA2 TKIP+AES as the encryption method in your Wi-Fi router. TKIP is not considered secure anymore. You can use WPA2-AES as the encryption method.
Wrapping Up
I hope this tutorial helped you connect Ubuntu 18.04/20.04 to Wi-Fi network from the command line with WPA Supplicant. As always, if you found this post useful, then subscribe to our free newsletter to get more tips and tricks 🙂
Источник


