- How to Install Postman on Linux Desktop
- Supported Platforms
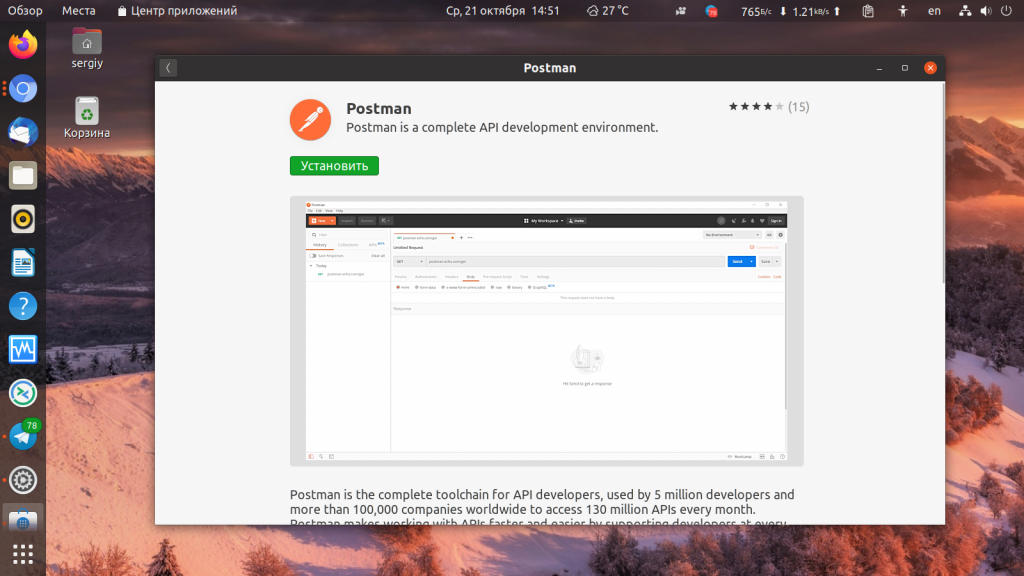
- Installing Postman on Linux Desktop
- Install Postman in Debian and Ubuntu
- Install Postman in Linux Mint
- Install Postman in Fedora Linux
- Removing Postman on Linux Desktop
- If You Appreciate What We Do Here On TecMint, You Should Consider:
- Как пользоваться Postman
- Установка Postman
- Как пользоваться Postman
- 1. Интерфейс
- 2. Выполнение запроса
- 2. Передача параметров
- 3. Передача параметров формы
- 4. Передача заголовков
- 5. Передача файла
- 6. Авторизация Basic Auth
- 7. История запросов
- 8. Коллекции запросов
- Выводы
- Installing and updating
How to Install Postman on Linux Desktop
Postman is the most popular collaboration platform for API (Application Programming Interface) development, which is used by 10 million developers and 500,000 companies all over the world. The Postman API platform offers features that simplify API development and offers a wide range of tools that enable teams to share and collaborate on APIs.
Postman is available as a native app for all major operating systems, including Linux (32-bit / 64-bit), macOS, and Windows (32-bit / 64-bit) and on the web at go.postman.co/build.
This article guides you in different ways of installing the Postman desktop application on Ubuntu, Debian, Linux Mint and Fedora distributions.
Supported Platforms
Postman supports the following distributions:
- Ubuntu 12.04 and newer
- Debian 8 and newer
- Linux Mint 18 and newer
- Fedora 30 and newer
Installing Postman on Linux Desktop
To install the latest version of the Postman desktop app, you need to install it via the Snap using the following commands.
Install Postman in Debian and Ubuntu
Install Postman in Linux Mint
Install Postman in Fedora Linux
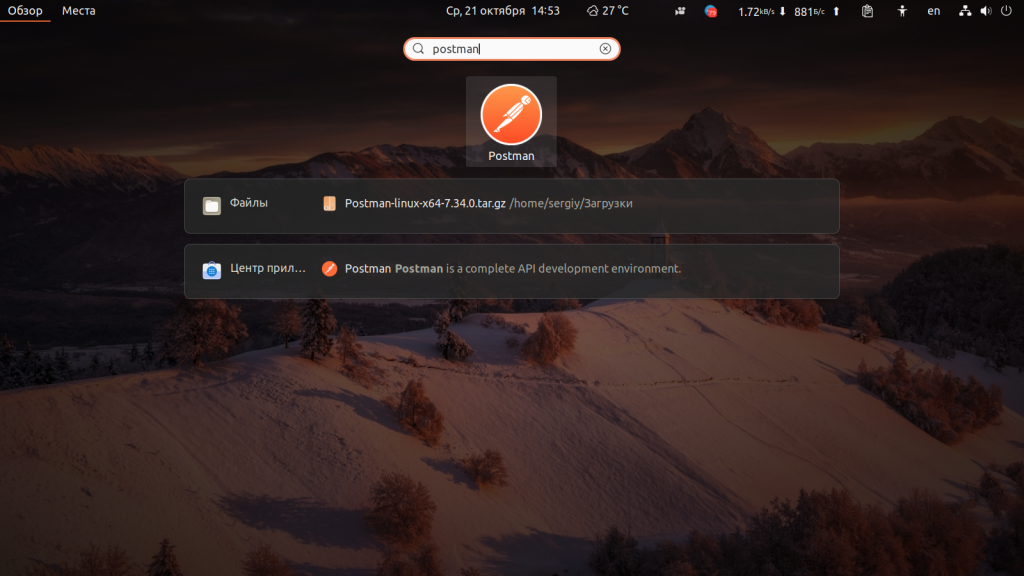
You can also manually install the latest version of the Postman desktop app by downloading it from a web browser to quickly start using it.
![]() Download Postman Desktop App
Download Postman Desktop App
Then move into the Downloads directory, extract the archive file, move it into /opt/apps directory, create a symlink called /usr/local/bin/postman to access the Postman command, and run postman as follows:
![]() Postman Desktop App
Postman Desktop App
To start the app from a launcher icon, you need to create a .desktop file (a shortcut that is used to launch an application in Linux) for Postman desktop app and save it in the following location.
Then copy and paste the following configurations in it (ensure that the file paths are correct depending on where you extracted the files):
Save the file and close it.
If the file paths are correct, when you try to search for the postman in the system menu, its icon should appear.
![]() Postman Desktop Launcher
Postman Desktop Launcher
Removing Postman on Linux Desktop
You can remove the Postman desktop client from your system as follows. If you installed the Postman snap, you can remove it as shown.
If you installed it using the manual method, you can remove it by running the following commands:
For more information, got to the Postman website. Use the feedback form below to share any queries.
If You Appreciate What We Do Here On TecMint, You Should Consider:
TecMint is the fastest growing and most trusted community site for any kind of Linux Articles, Guides and Books on the web. Millions of people visit TecMint! to search or browse the thousands of published articles available FREELY to all.
If you like what you are reading, please consider buying us a coffee ( or 2 ) as a token of appreciation.

We are thankful for your never ending support.
Источник
Как пользоваться Postman
Postman — это очень популярная среди разработчиков программа для тестирования работы различных API или просто отправки POST и GET запросов на сервер. Она имеет графический интерфейс и поэтому намного удобнее консольной утилиты curl. Вы можете очень просто настраивать передаваемые Cookie, HTTP заголовки, а также параметры форм.
Всё это позволяет удобно проверить работу любого API, и даже обычного веб-сайта. В этой статье мы рассмотрим как пользоваться Postman для тестирования HTTP запросов.
Установка Postman
Загрузить Postman для Windows можно на официальном сайте программы. Кроме версии для Windows, здесь есть портативные версии для Linux и MacOS.

После загрузки будет необходимо запустить загруженную программу. В Linux также можно установить программу из центра приложений Ubuntu:
Или с помощью универсального менеджера пакетов snap. Для этого выполните:
sudo snap install postman
После завершения установки postman в Linux можно запускать программу из главного меню.
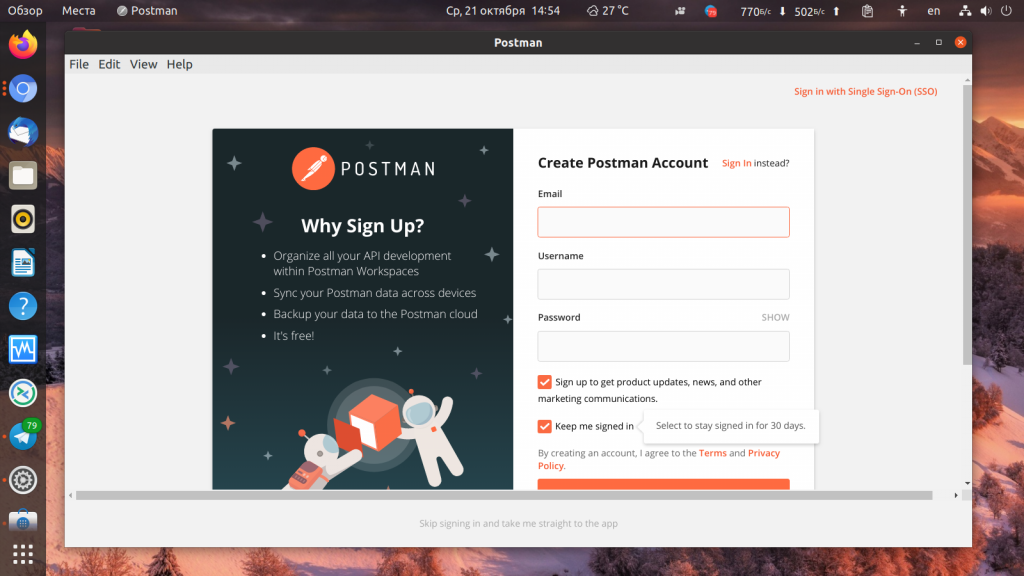
После первого запуска программа предлагает создать бесплатный аккаунт. Он необходим для синхронизации результатов вашей работы между устройствами. Создайте аккаунт или войдите в уже существующий нажав кнопку Sign In. Для создания аккаунта надо ввести адрес электронной почты, ваш ник, пароль и нажать оранжевую кнопку Create Free Account:
После входа в аккаунт вы попадёте в главное окно программы. Дальше давайте рассмотрим использование Postman, это будет так сказать инструкция для чайников, поэтому если вы уже пользовались программой и всё в ней знаете, то вам будет не интересно.
Как пользоваться Postman
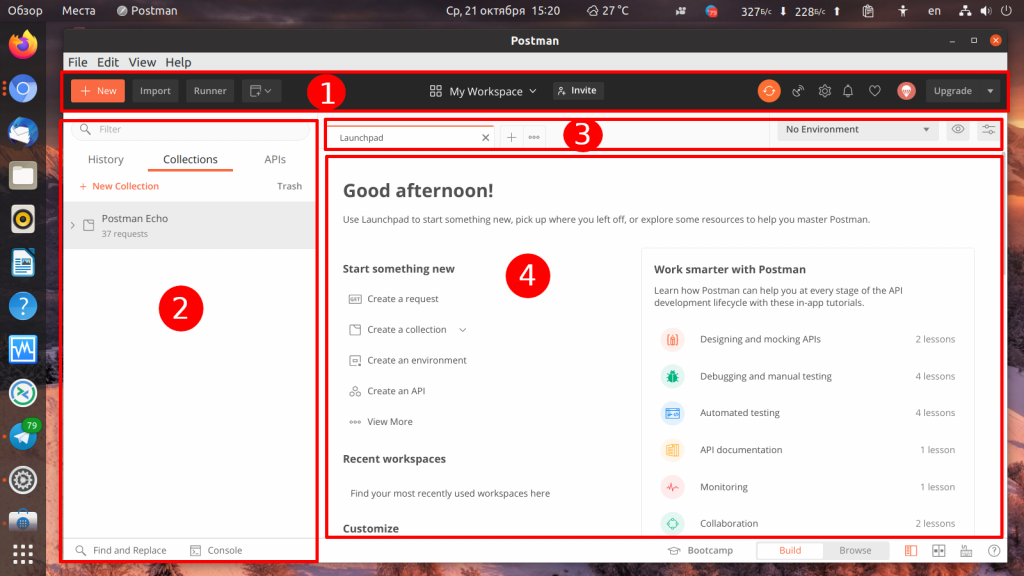
1. Интерфейс
Давайте сначала разберемся с интерфейсом Postman. Главное окно можно условно разделить на несколько частей:
- Верхняя панель — здесь находятся основные элементы настроек программы;
- Боковая панель — тут находится список запросов выполненных ранее и сохранённые в виде коллекций запросы;
- Панель вкладок — позволяет переключаться между вкладками запросов;
- Рабочая область — здесь размещены основные настройки запроса и возвращённые им данные.
Предлагаю пока не трогать сложные настройки, а разобраться с обычной отправкой запросов.
2. Выполнение запроса
Для того чтобы выполнить простой запрос не сохраняя его в коллекцию найдите на панели вкладок кнопку со значком + и кликните по ней. Откроется новая вкладка, где вы можете выбрать тип запроса GET или POST, а также прописать URL, которую надо открыть. Например, можно получить главную страницу losst.ru. Для отправки запроса нажмите кнопку Send:
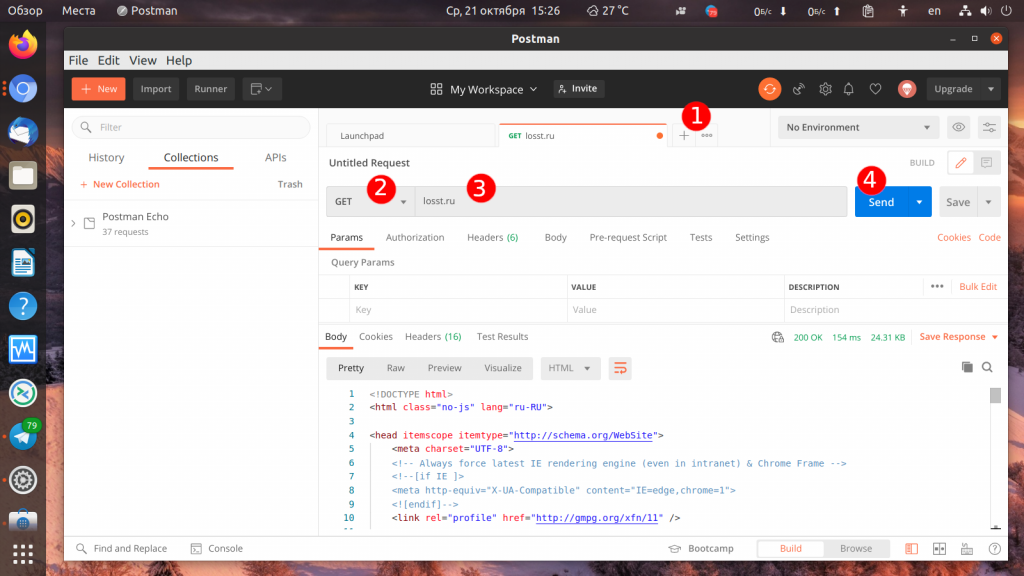
В нижней части страницы сразу же отобразится HTML код страницы. Здесь есть несколько вкладок:
- Body — всё, что было возвращено сервером в теле запроса;
- Cookie — записанные сервером;
- Headers — заголовки возвращённые сервером.
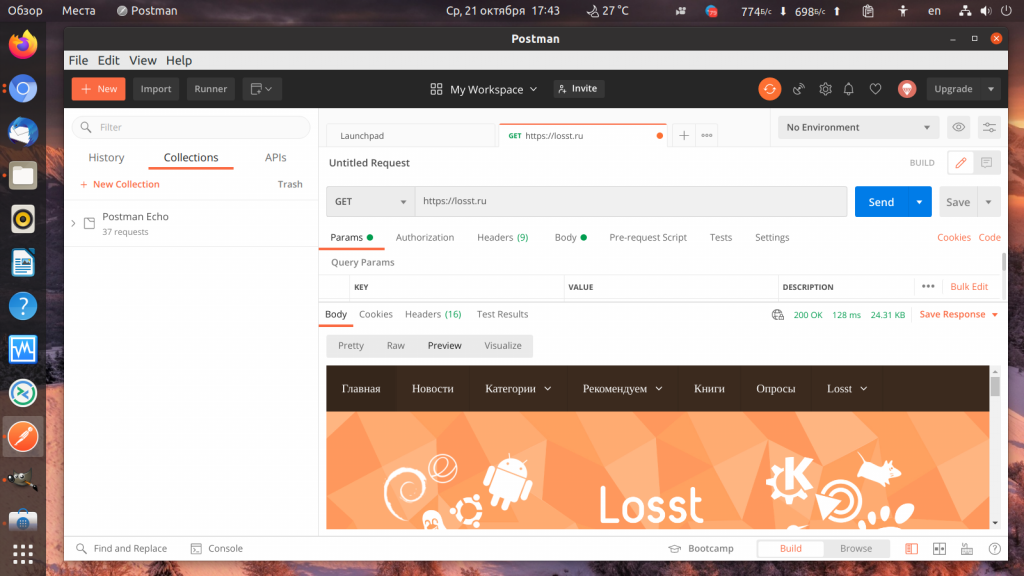
Кроме того, на вкладке Body можно выбрать несколько вариантов отображения. Вкладка Pretty полезна для JSON данных, они будут отформатированы в удобном для чтения формате, вкладка Raw выводит данные как есть, а на вкладке Preview можно посмотреть как выглядит открытый сайт:
Это самый простой вариант, но давайте попробуем работать с API.
2. Передача параметров
Программа Postman предоставляет свой API сервис, который можно использовать для тестирования клиентов API. Это postman-echo.com. Например, если отправить запрос по адресу https://postman-echo.com/git и передать туда несколько параметров, вы получите в ответ переданные параметры, а также заголовки в формате JSON.
Выберите тип запроса GET, в поле URL вставьте https://postman-echo.com/get. Затем откройте вкладку Params и здесь в разделе Query Params под надписью Key напишите название параметра, например foo, затем, напротив него под надписью Value напишите значение параметра, например, bar. Таких параметров можно добавить столько, сколько вам нужно. После нажатия кнопки Send запрос отправится и вы получите результат внизу страницы:

Чтобы в следующем запросе эти параметры нам не мешали, снимите с них галочки. Это сообщит программе, что передавать их не нужно.
3. Передача параметров формы
Если вы хотите отправить POST запрос, передать параметры таким же образом не получится потому что в POST параметры передаются не в URL, а в теле запроса. Выберите тип запроса POST, URL — https://postman-echo.com/post. Затем перейдите на вкладку Body и поставьте переключатель в положение form-data. Теперь аналогично предыдущему пункту добавьте параметры и нажмите кнопку Send:
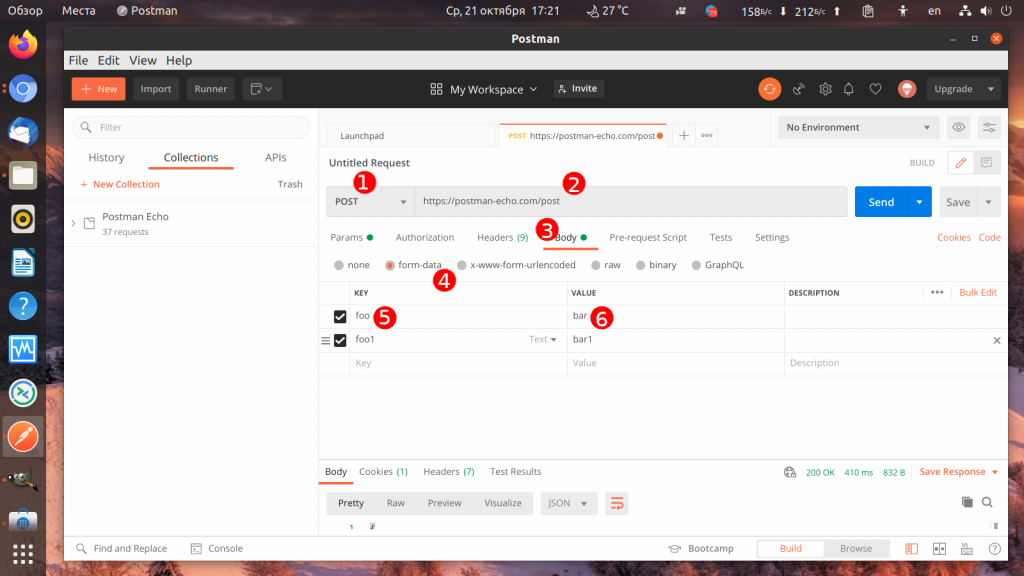
В ответ вы получите те же параметры.
4. Передача заголовков
Иногда API требуют передавать токены авторизации с помощью HTTP заголовков. Так делает, например, форумный движок на PHP — Xenforo. Чтобы передать в заголовках какую-либо информацию на сервер перейдите на вкладку Headers и добавьте здесь имя заголовка и его значение. Здесь URL та же, метод тот же. Например, X-Header-Foo со значением bar:

После отправки запроса вы увидите его в разделе Headers внизу окна, значит он был передан на сервер.
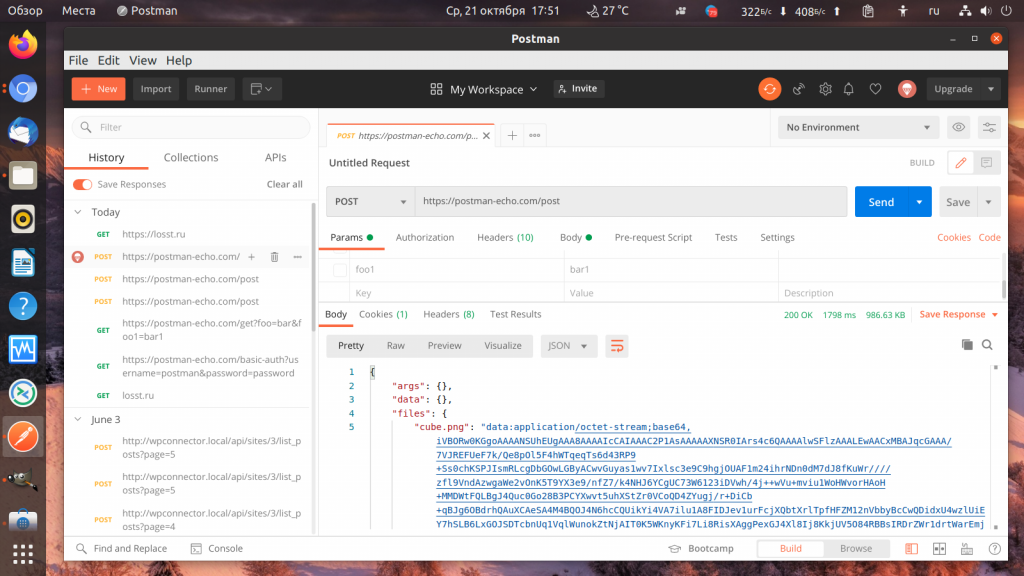
5. Передача файла
До этого мы передавали только текстовые данные, но ничего не мешает передать файл в Postman. Для этого вернитесь на вкладку Body, в раздел form-data. Здесь сделайте нужный параметр неактивным и выберите тип параметра вместо Text — File:

Затем нажмите Select file, там, где должно быть значение параметра и выберите файл. После отправки его на сервер, вы найдёте полученный файл в секции files:
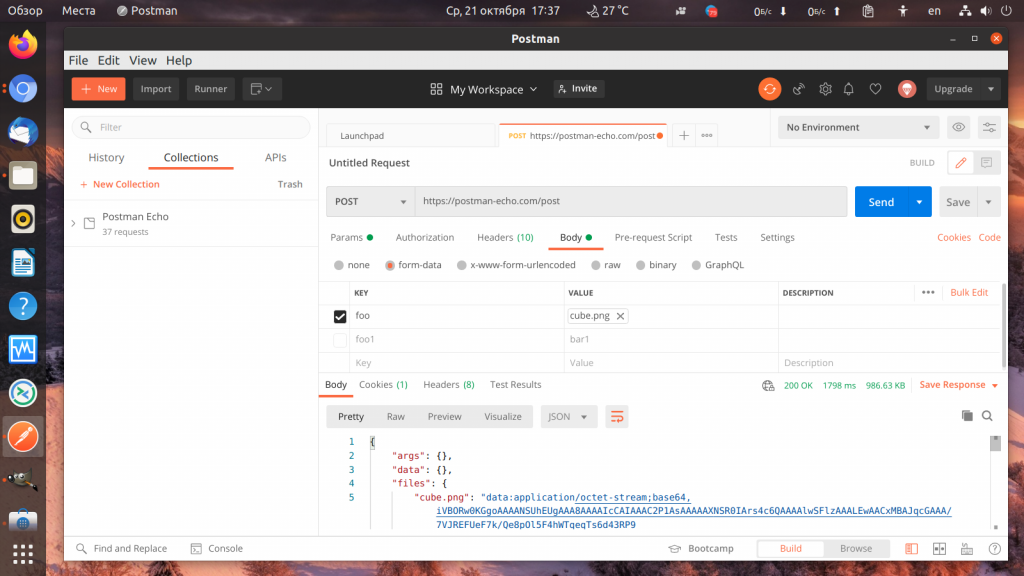
Теперь вы знаете как отправить файл Postman, как видите, всё просто.
6. Авторизация Basic Auth
Иногда для защиты тех или иных URL на сервере используется авторизация Basic Auth. Программа Postman тоже умеет её проходить. Для примера будем использовать API URL https://postman-echo.com/basic-auth. Здесь, для того чтобы пройти авторизацию на передать имя пользователя postman, а пароль password.
В рабочей области откройте вкладку Authorization, в разделе Type выберите Basic Auth и заполните имя пользователя и пароль:
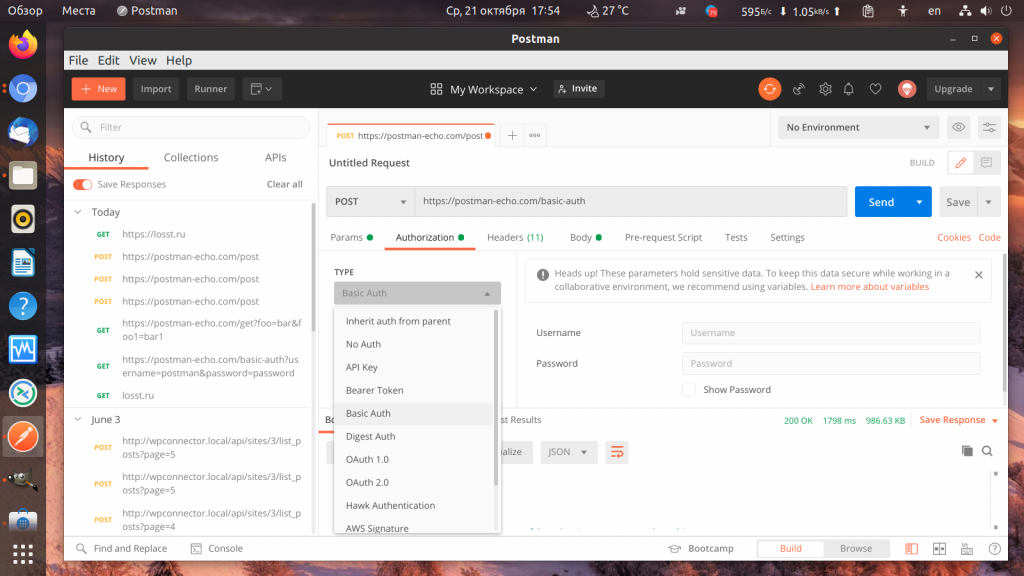
Если всё прошло успешно, то тестовый сервер вернёт вам ответ authenticated: true:

7. История запросов
История ранее выполненных запросов — это довольно удобный инструмент, который позволяет не набирать одни и те же данные, если вам надо повторить ранее выполненный запрос. Чтобы посмотреть историю на боковой панели откройте вкладку History. Здесь отображаются все запросы под датам. Вы можете открыть любой из них и посмотреть что вернул сервер, а также выполнить его снова:
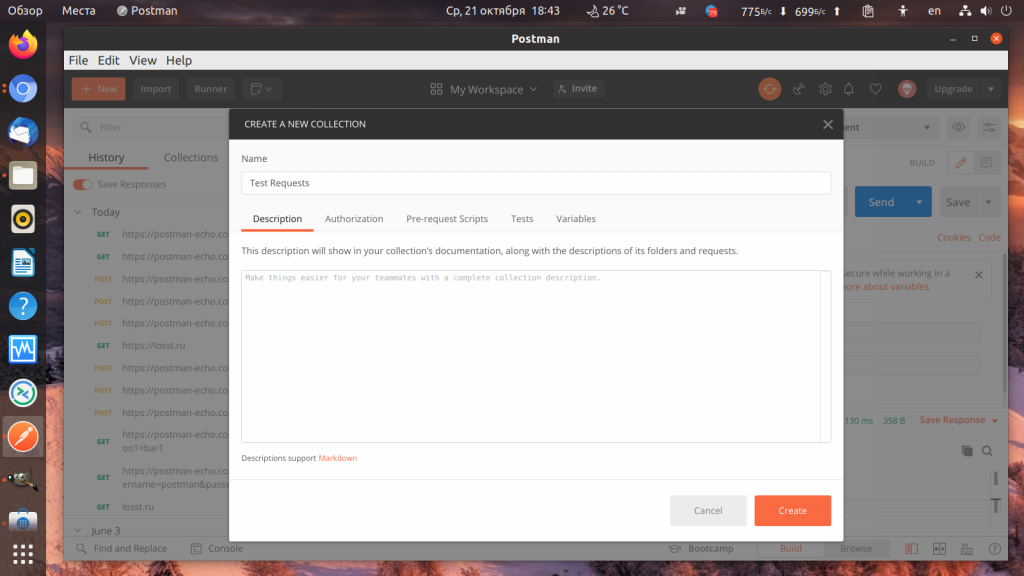
8. Коллекции запросов
Если вам нужно часто повторять одни и те же запросы с определёнными параметрами, вы можете создать отдельную коллекцию запросов. Для того чтобы создать коллекцию нажмите кнопку New на верхней панели, затем выберите Collection и в открывшемся окне введите имя коллекции, например, Test Requests:
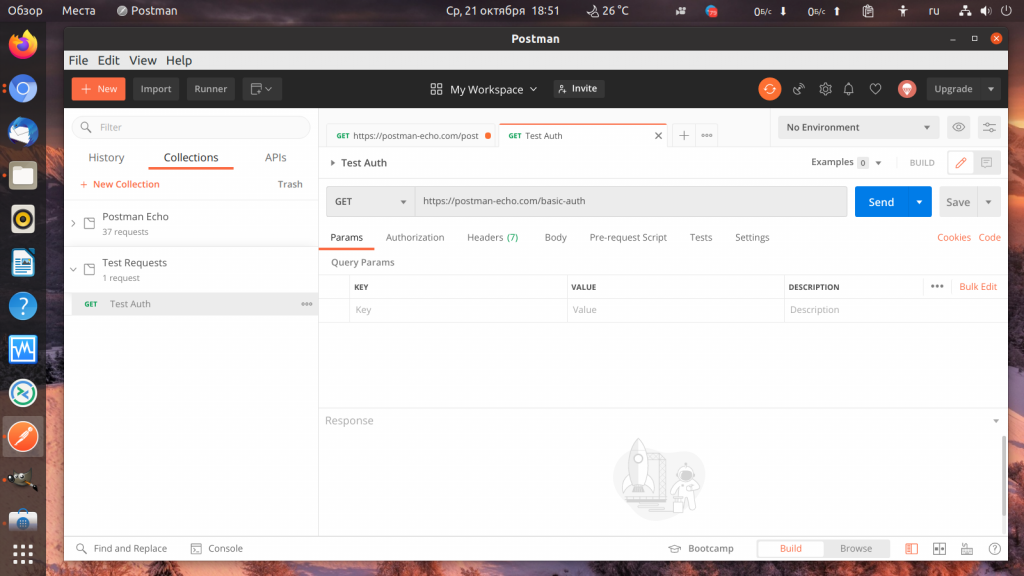
Чтобы добавить в коллекцию запрос, нажмите ту же кнопку New и кликните по ссылке Request. В открывшемся окне надо ввести имя запроса, а чуть ниже выбрать коллекцию к которой следует его добавить. После этого нажмите кнопку Create и можете заполнять данные запроса и смотреть ответ как это описано выше. Когда всё будет настроено кликните по кнопке Save, которая находится рядом с Send чтобы сохранить этот запрос.
После этого вы сможете найти свой запрос открыв на боковой панели вкладку Collections:
Благодаря использованию аккаунта все ваши запросы будут синхронизированы между устройствами, на которых вы используете программу.
Выводы
Теперь вы знаете как пользоваться Postman для проверки работоспособности вашего API. Конечно, мы рассмотрели далеко не все возможности и функции программы, но этого вам будет достаточно чтобы начать её полноценно использовать и отправлять различные запросы. А какие программы используете вы для таких целей? Напишите в комментариях!
Источник
Installing and updating
Postman is available on the web at go.postman.co/home and as a native desktop app for Mac, Windows (32-bit / 64-bit), and Linux (64-bit) operating systems.
To get the latest version of the Postman desktop app, visit the download page and select Download for your platform.
- Installing Postman on the desktop
- Mac
- Windows
- Linux
- Using Postman on the web
- Browser requirements
- Installing the Postman desktop agent
- Web limitations
- Updating Postman
- Chrome app (deprecated)
- Migrating to the native app
- Using Postman behind a firewall
- Troubleshooting your Postman installation
- Next steps
Note that the Postman team only tests, fixes bugs, and provides support for the app on Mac, Windows, Linux, and the web.
Installing Postman on Mac
Download and unzip the app using the built-in Archive Utility app. Double-click Postman. When prompted, move the file to your Applications folder—this will ensure that future updates can be installed correctly.
The minimum OS version supported is macOS 10.11 (El Capitan).
You may encounter a «Library not loaded» error if you attempt to unzip and install Postman using a third-party app—using the default Archive Utility for Mac should resolve this.
Installing Postman on Windows
Download the app. Double-click the exe file to install it.
Postman supports Windows 7 and above. Both ia32 (x86) and x64 (amd64) installers are available for Windows. Windows for ARM devices is possible by using the ia32 binary.
Installing Postman on Linux
You can install Postman on Linux by manually downloading it, using the Snap store link, or with the command snap install postman .
To install manually, download and unzip the app, for example into the opt directory. You will need sudo privileges.
To start the app from a launcher icon, create a desktop file, naming it Postman.desktop and saving it in the following location:
Enter the following content in the file—replacing opt if you extracted the file somewhere else—and save it:
Postman supports the following distributions:
- Ubuntu 14.04 and newer
- Fedora 24
- Debian 8 and newer
The support of certain Linux distributions depends on if they are supported by Electron. Refer to Electron’s documentation.
It is recommended you install Snap as it includes all the libraries that the app needs and they are bundled with the app itself.
Avoid starting Postman using the sudo command, as it will create permission issues on the files created by Postman.
Make sure you have read/write permission for the
/.config folder where Postman stores information.
If you are an Ubuntu 18 user, you will also need to install the libgconf-2-4 package with the command apt-get install libgconf-2-4
Using Postman on the web
You can use Postman in your web browser to carry out your API development and testing tasks in conjunction with the Postman Agent. To access Postman on the web, visit go.postman.co/home.
Postman’s web application is optimized for the following browsers:
- Chrome (78 and higher)
- Firefox (76 and higher)
- Edge (79 and higher)
- Safari (13.1.1 and higher)
Installing the Postman desktop agent
If you are using the Postman web client, you will need to also download the Postman desktop agent. You will be prompted to download and install the agent so that you can make requests from the web. You can also download the agent directly from the Downloads page.
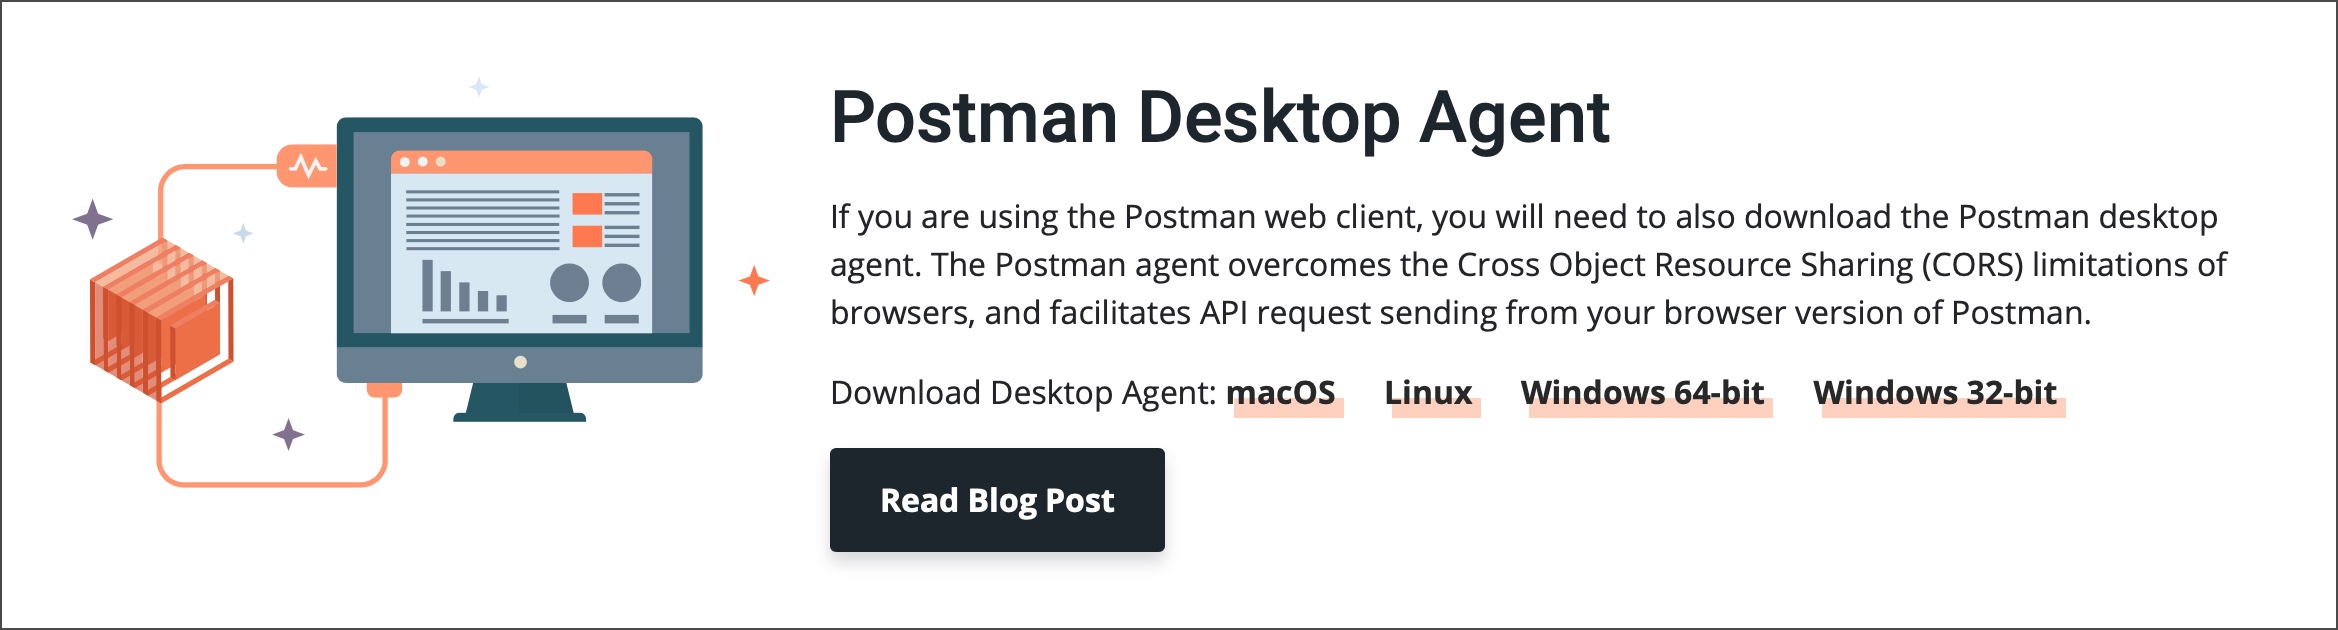
The Postman agent overcomes the Cross Object Resource Sharing (CORS) limitations of browsers, and facilitates API request sending from your browser version of Postman. Once you have the agent installed you will be able to use it with web requests.
You can either enable Auto-select option or manually select the agent (Cloud, Desktop, or Browser) you would like to use for your requests.

Once you enable the option for Auto-select, Postman will automatically select the best agent for your requests.
You can select the Cloud Agent if you want to send HTTP requests via Postman’s secure cloud servers. While using the locally running Postman, it is recommended you use the Desktop Agent. Using the Browser Agent for your web requests has some limitations.
If you try to send a request and it isn’t successful because the agent is not selected, you will see a link in the response area which you can select to switch to the agent and try your request again. Read more about the agent.
Postman on the web is under active development, but there are a few features you can currently only access in the desktop app and not in your web browser:
- Live preview: You will not see all of your request headers update live as you enter your request configurations as you do in the desktop Postman app—you will only see Authorization headers update as you edit.
- Saving responses to file
- Certificates and Proxy: These will take the browser defined value and cannot be overridden by Postman.
- Postman Interceptor
The native Postman apps will notify you when a major update is available. For other updates you will see a dot on the settings icon. If the indicator is red instead of orange, it indicates a failed update.

Select the update option to download or install the latest update. You will see a notification when the download is complete, prompting you to restart the Postman app to apply the updates. If you’re not ready to update yet, choose Later to auto-update the next time you launch the app.
You can configure your preferences to enable automatic download for major updates in Settings > Update. Postman automatically downloads minor updates and bug fixes.

Postman Chrome app (deprecated)
The Postman Chrome app is deprecated—if you’re using the Chrome app, you can retain your data when you switch to the native app either by syncing with a Postman account you’re signed into, or by exporting from Chrome and importing into the native app.
The native app is built on Electron, and overcomes a number of restrictions of the Chrome platform.
- The native apps let you work with cookies directly.
- Unlike the Chrome app, no separate extension for the Interceptor is needed.
- The native apps come with a built-in proxy that you can use to capture network traffic.
- The native apps are not restricted by the Chrome standards for the menu bar. You can check for updates, create Postman Windows and tabs, and edit preferences.
- The native apps let you send headers like Origin and User-Agent . These are restricted in the Chrome app.
- The «don’t follow redirects» option exists in the native apps to prevent requests that return a 300-series response from being automatically redirected—doing this in the Chrome app requires the Interceptor extension.
- The native app has a built-in console, which allows you to view the network request details for API calls.
Migrating to the native app
To switch from the Chrome app to native, download Postman and sign in to your account. Start the native app, and your history and collections will be automatically synced.
Alternatively, if you don’t want to sign in to your Postman account, you can bulk export your Postman data from the Chrome app, and then bulk import into the new native app at Settings > Data.

Note that importing will overwrite your existing data. For more on bulk import, see Importing Postman data.
Using Postman behind a firewall
Postman’s infrastructure runs on Amazon’s AWS platform. If you are operating behind a network firewall, you will need to allow the following domains to make WebSocket connections for Postman:
By default, WebSocket connections use the same ports as HTTP (80) and HTTPS (443).
Postman does not have a fixed IP range that can be provided. If necessary, please refer to the current AWS IP ranges and allow the broad range provided.
Troubleshooting your Postman installation
If you encounter any issues installing and running Postman, check out the following tips. If these do not help, please refer to the installation posts on the community forum and create a new post if your issue is not already covered.
Update failed error
If you see an Update Failed notification in Postman, you can use the DevTools to investigate.

Open the DevTools using View > Developer > Show DevTools (Current View). Some known errors are as follows:
- Error message: Cannot update while running on a read-only volume
- This error means that the app user does not have write permission in the directory where Postman is installed. To resolve the problem, move Postman to a directory where the user has write permissions, for example the /Application directory for Mac, and to the home directory for Linux.

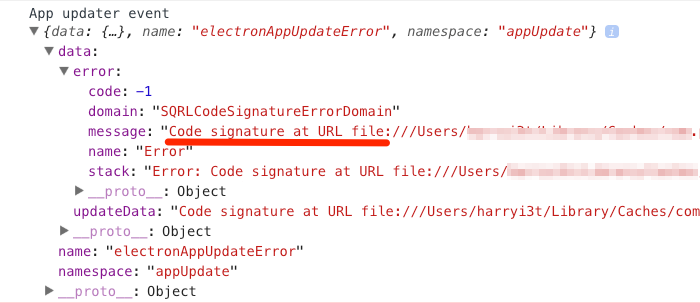
- Error message: Code signature at URL file:///. did not pass validation: code object is not signed at all
- This error means that there are multiple updates running at the same time. This can happen when the app is opened before the previous update could finish. To resolve the problem, quit and reopen the app.
Update button not available
If you are using Postman for Linux, and installed the app with the Ubuntu Software Center or Snap Store, you may not see a Check for updates button. This is because the updates are handled by the store, which should automatically update Postman on a regular cadence.
If you’re having trouble with installation or updates, reach out for Postman support. If your installation is working as expected, send your first request!
Источник


