- Отключаем обновления Windows 10 в один клик и разбираемся зачем это нужно
- реклама
- реклама
- реклама
- реклама
- How to Disable or Block automatic Windows Update in Windows 10
- Turn off Windows Updates in Windows 10
- 1] Disable Windows Update & Windows Update Medic Services
- 2] Change WU settings using the Group Policy Editor
- 3] Set your network connection to ‘Metered’
- 4] Tools that help you block automatic Windows 10 Updates
- How To Turn Off Windows Update In Windows 10
- www.makeuseof.com
- Follow MUO
- 7 Ways to Stop Windows Update in Windows 10
- Tip: Upgrade to Windows 10 Pro if Possible
- 1. Prevent Updates With a Metered Connection
- 2. Pause Updates for a Limited Time
- 3. Get Notified Before Updates Are Downloaded
- 4. Delay Windows Updates Until They’re Safe
- How to Defer Feature Updates for Up to 365 Days
- How to Defer Quality Updates for Up to 30 Days
- 5. Block Updates During Active Hours
- 6. Schedule the Installation of Downloaded Updates
- 7. Completely Disable Windows Updates
- Handling Driver Updates in Windows 10
- How to Manage App Updates in Windows 10
- Pause Windows Update Only When Necessary
- Subscribe To Our Newsletter
- One More Step…!
Отключаем обновления Windows 10 в один клик и разбираемся зачем это нужно
В интернете полно гайдов, как отключить обновления в Windows 10. Однако, большинство из них неактуальны и предлагают совершить кучу действий. Залезть в редактор групповой политики, использовать планировщик заданий, диспетчер служб и так далее. Этим пусть занимаются другие. Сегодня я вам покажу, как в 2020 году полностью отрубить все автообновления одним кликом мышки. Справится даже самый неопытный пользователь!
реклама
Сразу к делу. Скачиваем утилиту Windows Update Blocker. Запускаем ее, ставим флажок «отключить обновления» и жмем «Применить». Вот и всё.
Эта программа приостанавливает обновления на неопределенный срок. При желании, можно дополнительно поставить галочку «защитить параметры службы». Она служит для того, чтобы какая-нибудь залетное приложение или служба не смогли заново активировать Windows Update.
реклама
Теперь давайте поговорим о том, зачем вообще это нужно. Лично я всегда отключаю автоматические обновления, предпочитаю делать это вручную — раз в несколько месяцев.
Одно дело, когда ты школьник или энтузиаст с кучей свободного времени. Лично у меня нет ни желания, ни свободных минут, чтобы убирать ошибки после еженедельного апдейта. А в худшем случае, даже переустанавливать систему. Несмотря на то, что с релиза «десятки» прошло уже 5 лет, программисты Microsoft до сих пор не научились нормально тестировать свои «обновы».
Приведу примеры фейлов «мелкомягких» только за последние пару недель: раз, два. И так с каждым крупным обновлением: ты буквально играешь в русскую рулетку. Становиться бесплатным тестировщиком в руках жадных капиталистов — это не про меня. Лучше подождать месяцок, пока устранят все баги. И только потом накатывать апдейт.
реклама
Отключил Windows Update я после того, когда в результате очередной обновы у меня отвалился принтер. Пришлось потратить кучу времени, чтобы реанимировать старого трудягу, который живет в моем доме уже второй десяток лет. С тех пор принцип «работает — не трогай» служит для меня главным правилом при работе с ПК.
Также советую отключать автообновления неопытным пользователям. Сделал так на компьютере родителей.
Была б моя воля — полностью отказался бы от апдейтов. Windows в текущем виде меня полностью устраивает. Однако, некоторые современные игрушки требуют определенной версии «винды».
реклама
Из последнего могу вспомнить Horizon: Zero Dawn. Она просит как минимум Build 1809. Деваться некуда — приходиться обновляться.
Поделитесь в комментариях своим опытом. Сталкивались ли с проблемами при обновлении Windows 10? Отключаете автообновления или же устанавливаете всё подряд?
How to Disable or Block automatic Windows Update in Windows 10
There is no option to stop or turn off Windows Updates using the Control Panel or Settings app in Windows 10, as it used to be with earlier versions of Windows. But there is a workaround to disable or turn off Windows Update in Windows 10, that we’ll talk about in this post.
First, let us take a look at why people may want to turn off Windows updates.
With Windows 8.1 and earlier versions, we had Windows Update giving us options to:
- Install updates automatically (Recommended)
- Download Updates but choose when to install them
- Check for updates but let me choose whether to download and install them
- Never check for updates (Not Recommended)
These options provided a way to defer updates until we had enough time to download and install them or to have them downloaded automatically and then install them at a time we wish. These options are not present in Windows 10 Update & Security Settings.
Now in Settings app > Update and Security > Windows Update > Advanced Options, you will see the following settings:
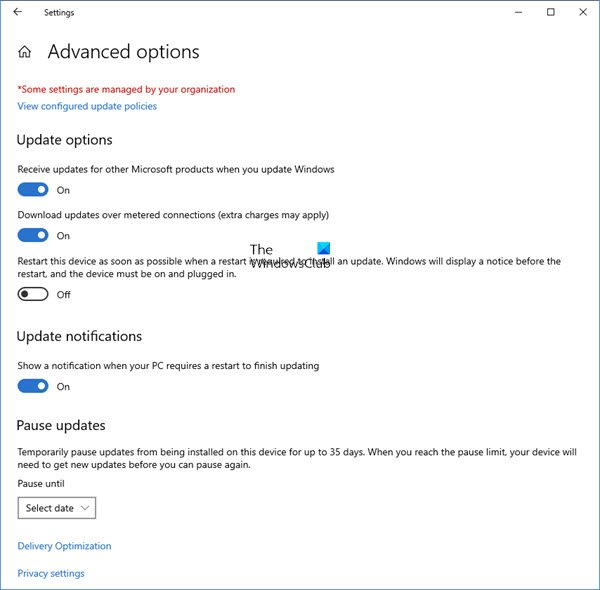
Microsoft has explained that it will provide updates in two distinct methods for its two distinct types of clients.
The Home users now have the option to pause Windows Updates. Earlier they did not have this option. Windows 10 will also let you defer restart, but that is not enough because a download in the background might slow down your browsing in some cases.
The other ring of users are Enterprise users who will have the option to delay updates so that they can hold it to the time when they are free. Microsoft said it would push updates to such users less frequently so that they are faced with minimum downtime. These are the corporates and real-time users such as hospitals and ATMs etc.
Coming back to Home users and Professional users, there is not even the option to delay the updates. They will be downloaded as soon as they are available. The availability of Windows Updates for normal users means that the updates have already been tested by Windows Insiders. If you are a Windows Insider, running Windows 10 Home or Pro, you will be in priority to receive updates. After a few days of you testing the updates and if it doesn’t pose any problems, it will be released to the normal ring of users.
Thus, you are stuck. Windows 10 will keep on downloading updates as soon as they are available and will occupy your computer resources, when you may not want it too. Some of us will want to keep the automatic downloads to be stopped so that we can install the updates manually when free – when we are not working on something urgent. That is to say; some users would want the liberty and option to download and install updates when they want and not when Microsoft provides it.
Since there is no option to turn off Windows updates from Control Panel or PC Settings, here is a workaround.
Turn off Windows Updates in Windows 10
To stop automatic Windows Updates in Windows 10, you will have to:
- Disable Windows Update & Windows Update Medic Services
- Change WU settings using the Group Policy Editor
- Set your network connection to ‘Metered’
- Use a free tool that lets you disable automatic updates.
Now let us see each of these suggestions in detail.
1] Disable Windows Update & Windows Update Medic Services
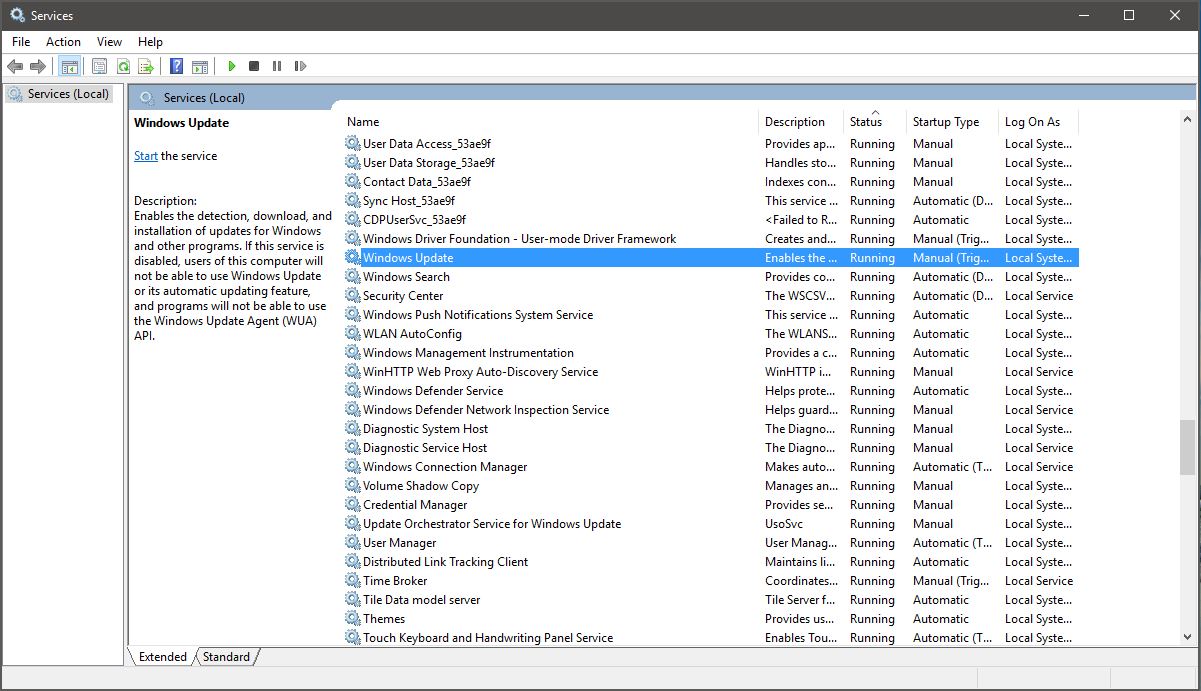
You can disable the Windows Update Service via Windows Services Manager. In the Services window, scroll down to Windows Update and turn off the Service. To turn it off, right-click on the process, click on Properties and select Disabled. That will take care of Windows Updates not being installed on your machine.
But since Windows is a Service now onwards, you have to keep your computer updated. To be able to install the next set of features or a newer build, you will require the earlier updates to be installed. That’s why if you use the above workaround, you will have to go to the Windows Services Manager and turn it on once in a while to download and update your copy of Windows.
You need to also disable the Windows Update Medic Service or WaaSMedicSVC. The Windows Update Medic Service is a new Windows Service introduced in recent versions of Windows 10. This Service has been introduced to repair Windows Update components from damage so that the computer can continue to receive updates. We recommend you try this method first.
After you turn on the Windows Update Service, when you open Windows Update in PC Settings, you will see a message that updates were not installed because the computer was stopped. You will have to click on Retry so that all the available updates are downloaded and installed. This may take two or three “Check for Updates” tries. You will have to keep on clicking “Check for updates” until it says your computer is up to date. Then you can go back and turn off the Windows Update service until next time you feel you are free enough to spend time updating your copy of Windows 10.
2] Change WU settings using the Group Policy Editor
If your version of Windows 10 has Group Policy, you can also change some settings using the Group Policy Editor. Run gpedit and navigate to the following policy setting:
Computer Configuration > Administrative Templates > Windows Components > Windows Update.
On the right side, double-click on Configure Automatic Updates and change its settings to suit your requirements.
Once you configure the settings, you will see the result in the Settings app as follows:
We do not recommend that you disable automatic Windows Update in Windows 10. If your computer is fine with downloads in the background and doesn’t affect your work, it is not advisable to do it. But if you face slowdown of computer due to updates downloading and installing in the background, the above tip to turn off Windows updates in Windows 10 will be of some help.
3] Set your network connection to ‘Metered’
Setting your network connection to ‘Metered’, can also stop Windows 10 from automatically downloading the Updates. You can do it as follows – Settings app > Network & Internet > WiFi > Advanced options. Move the slider to On position for Set as metered connection. See how to set Metered Connection in Windows 10.
4] Tools that help you block automatic Windows 10 Updates
Here is a list of some free Windows Update Blocker tools to Stop Automatic Windows 10 Updates. You might want to take a look at them as they allow you to control Widows 10 Updates with a click.
- Windows Update Blocker
- StopUpdates10
- Wu10Man
- Kill-Update
- WuMgr
- Win Update Stop
- Win Updates Disabler
- WAU Manager.
Incidentally, Microsoft has released a tool called Show or Hide Updates that allows users to hide or block specific unwanted Windows Updates in Windows 10. Using it, you can stop Windows 10 from downloading specific updates.
Date: November 4, 2019 Tags: Windows Updates
How To Turn Off Windows Update In Windows 10
Windows 10 is a service, which means automatic updates are turned on by default and your PC always has the latest and best features. With automatic updating, you don’t have to search for updates online or worry that critical fixes or device drivers for Windows might be missing from your PC. Windows Update automatically installs important updates as they become available. But some users will not want automatic updates as it might take up system and network resources when they are doing critical work.
In Windows 8.1 and before, Microsoft allowed users to turn off auto updates completely. Unfortunately in Windows 10, Microsoft does not offer any option for general consumers to turn off automatic updates. But there is a workaround to turn off automatic updates in Windows 10. Follow the steps below,
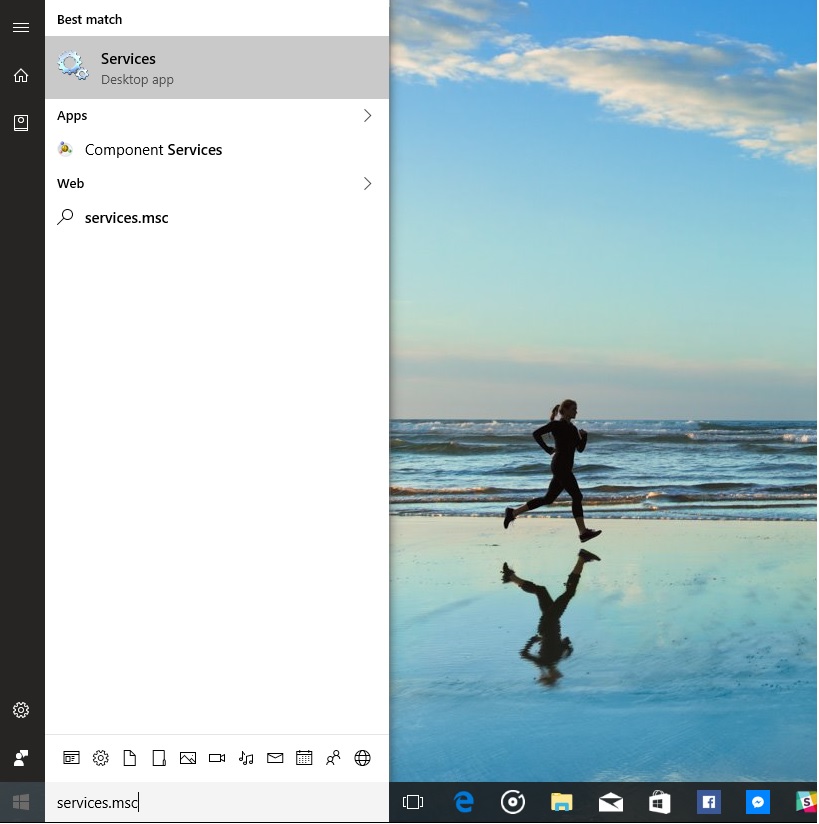
1) Search for services.msc in Cortana/Search box and open it.
2) Find Windows Update in the services list.
3) Double click Windows Update services. In the Windows Update Properties Window, select ‘Disabled’ in the Startup type list box.
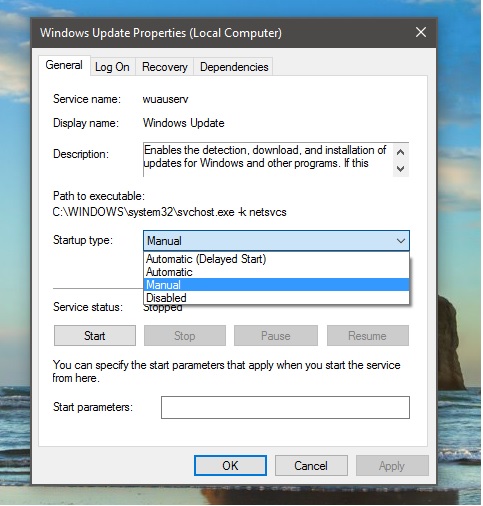
4) Click Apply and Ok.
From now on Windows 10 Update process itself will not start in your PC which means you will never get new updates from Microsoft. We recommend using this workaround only when you really want to disable Windows 10 automatic updates. If you want to revert back your changes, follow the same steps again, instead of ‘Disabled’, select ‘Automatic’ in the Windows Update Properties window and apply it.
If your PC is connected to a network where updates are managed by Group Policy, you might not be able to make changes to settings related to Windows Update. For more info, contact your organization’s support person. If you are an Admin, you can make configurations related to Windows Update by following the below steps.
1) Open Group Policy Editor by typing “Edit group policy” in Cortana or Search box.
2) In the Group Policy Editor, go to Computer Configuration > Administrative Templates > Windows Components > Windows Update.
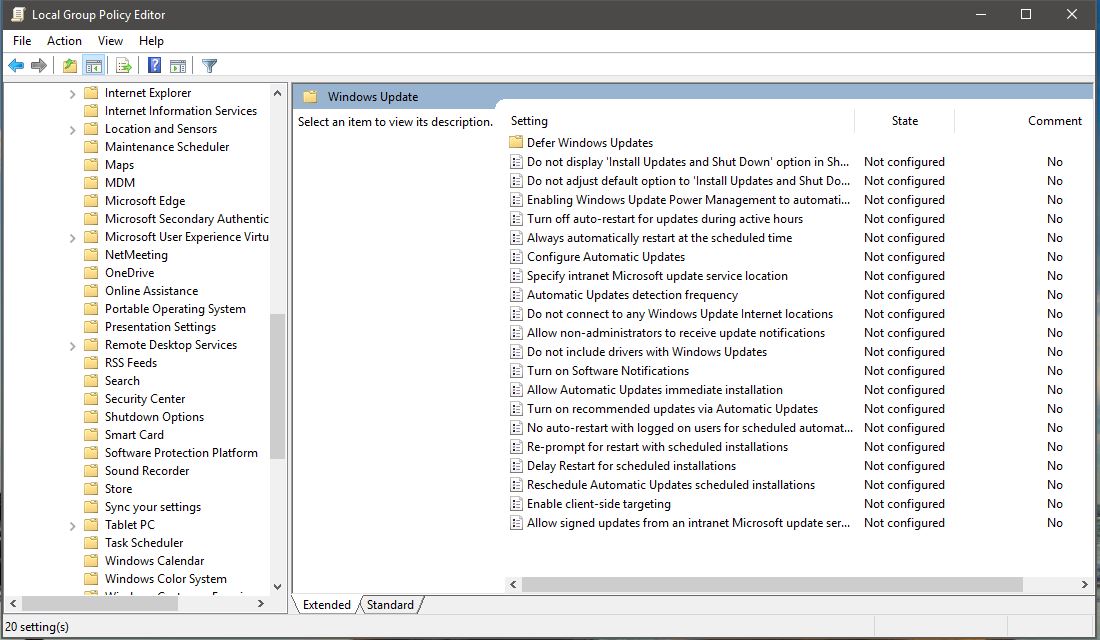
3) Click the Setting you need to change and configure it according to your needs.
Hope this helps!
Some links in the article may not be viewable as you are using an AdBlocker. Please add us to your whitelist to enable the website to function properly.
www.makeuseof.com
Follow MUO
7 Ways to Stop Windows Update in Windows 10
Windows Update keeps your system patched and safe. You shouldn’t stop Windows Update forever, but we’ll show you how to temporarily pause it.
Is there ever a good time for Windows Update to run? It’s necessary to keep your system patched and install security updates. But you might not want to waste time and internet bandwidth on minor quality patches or undesired feature updates.
Learning how to manage Windows Update will put you in control of your updates. Here we have compiled the various settings and tweaks that can help you keep interruptions—and surprising changes caused by Windows Update—at bay.
Tip: Upgrade to Windows 10 Pro if Possible
Some of the tips below are not available to Windows 10 Home users. If at all possible, we recommend upgrading to Windows 10 Pro because it offers additional features in regards to controlling Windows Update.
Unfortunately, Windows 10 Pro is not a free upgrade. You can buy the upgrade, or apply a valid Windows 7 or 8 Pro product key to your current Windows 10 Home installation, if applicable. See our guide to generic Windows 10 product keys for more info on possible upgrade paths.
Now, let’s look at how to pause Windows 10 updates using several methods.
1. Prevent Updates With a Metered Connection
On a metered connection, which is any connection that has a data limit, Windows won’t download updates in most cases.
This «metered connection» option is the easiest way to consistently block most updates. It’s available on all Windows 10 editions, including Windows 10 Home.
To mark your internet connection as metered, head to Settings > Network & Internet. On the Status tab, select Properties under the network name you’re currently connected to.
Then, under Metered connection, turn Set as metered connection on. You can also choose to Set a data limit, though this isn’t necessary if you’re not on an actual metered connection.
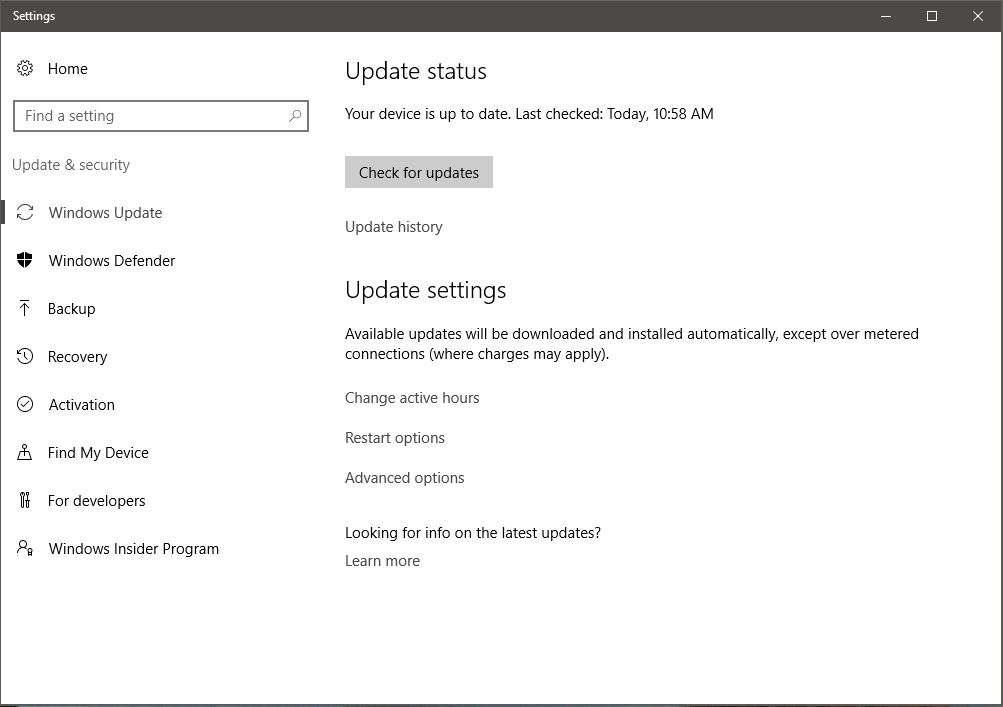
When you do want to install updates, you can always go to Settings > Update & Security > Windows Update to Check for updates, which will manually start the download and installation.
On that page, you can also click Advanced options and enable the option to Download updates over metered connections, which will effectively disable the metered method of limiting updates.
See our guide to setting your Windows 10 connection as metered for full information. Just keep in mind that you can only apply the setting while you’re connected to the respective network.
2. Pause Updates for a Limited Time
If you need to block your computer from installing all updates for a time, you can use the option to pause updates for up to a few weeks. This is a built-in option available in all Windows 10 editions, as long as you’re on a modern version.
To pause Windows Update, go to Settings > Update & Security > Windows Update. You can click Pause updates for 7 days to block updates for a week; it’s also possible to extend this time by clicking again later.
If you want to pause for a longer amount of time, click Advanced options instead. Under Pause updates, use the dropdown box to choose a date up to 35 days from today. Updates won’t install until this day hits—and at that time, you’ll have to install all available updates before you can pause again.
When updates are paused, on the main Windows Update page, you can click Resume updates to get back to normal.
3. Get Notified Before Updates Are Downloaded
You can make Windows 10 notify you when updates are available, then manually trigger the download. This helps anyone with limited bandwidth or a spotty internet connection. Unfortunately, this trick only works if you have access to the Group Policy Editor, which excludes Home users (under usual circumstances).
To open the Group Policy Editor, press the Start button to open the search bar, then type Group Policy and open the Edit Group Policy result. With the editor open, head to Computer Configuration > Administrative Templates > Windows Components > Windows Update and open Configure Automatic Updates.
Set the option to Enabled, then under Configure automatic updating, choose 2 — Notify for download and auto install. For another option, try 4 — Auto download and schedule the install, which lets you use the options below to choose when updates install automatically.
With option #2 selected, next time updates are available, you’ll see a notification that You need some updates. Selecting the message will take you to Windows Update, where you have to click the Download button to initiate the update process.
Note that enabling this setting will disable some options under Windows Update in the Settings app. This is because turning on the Group Policy tweak mentioned tells Windows that Some settings are managed by your organization and thus restricts them.
4. Delay Windows Updates Until They’re Safe
The following options are great if you want to temporarily opt out of quality or feature updates for Windows. Delaying updates can buy you time and make sure bugs won’t affect you, since major Windows 10 releases tend to have issues at launch.
After the grace period has passed, the deferred updates will be deployed automatically. By this time, however, Microsoft should have fixed any issues that popped up during the initial rollout.
The options to defer upgrades used to sit in the Settings app. Nowadays, though, they’re in the Group Policy Editor. As such, this option is not available to users of Windows 10 Home.
How to Defer Feature Updates for Up to 365 Days
In the Group Policy Editor (opened the same way as explained above), go to Computer Configuration > Administrative Templates > Windows Components > Windows Update > Windows Update for Business.
Here, open the setting Select when Preview Builds and Feature Updates are received. Set this policy to Enabled, then you’ll need to choose your Windows readiness level. The normal setting is Semi-Annual Channel, but you can set it to something faster if you want preview updates or similar.
After this, enter the number of days (up to 365) that you want to defer preview builds or feature updates. Additionally, you can set a start date for the deferral, if you want. Remember that feature updates are the major Windows 10 updates that launch roughly twice per year.
How to Defer Quality Updates for Up to 30 Days
As opposed to major feature updates, quality updates are smaller Windows 10 patches that arrive more frequently. To adjust this, go to Computer Configuration > Administrative Templates > Windows Components > Windows Update > Windows Update for Business and open the setting Select when Quality Updates are received.
Whish this setting Enabled, you can defer receiving quality updates for up to 30 days. You can also Pause Quality Updates starting on a date of your choice, if you prefer.
5. Block Updates During Active Hours
The latest editions of Windows 10 let you set active hours, which are the times you’re regularly using your computer. During this period, Windows Update won’t restart your device to install updates. The option is available under Settings > Windows Update > Change active hours.
You can enable the slider to Automatically adjust active hours based on your activity, if you prefer. Windows will also recommend times based on when you typically use your PC.
Otherwise, click Change to tweak the times when you’re normally active. This is limited to a range of 18 hours, so you can’t keep it on 24/7.
6. Schedule the Installation of Downloaded Updates
Once Windows Update has downloaded new updates that require a reboot, it’s a matter of time until you have to restart. When you have updates pending, you can schedule a restart instead of letting Windows decide when to do it.
To do this, go to the Windows Update page in Settings, as mentioned before. Next to the Restart now button, select Schedule the restart. Set the option to schedule the restart to On, then you choose a time and date that works for you. Windows will use this instead of restarting on its own.
For best results, we recommend that you also enable the Show a notification when your PC requires a restart slider under Windows Update > Advanced options. With this, you’ll get more notifications about restarting so you can delay a restart that Windows prompts on its own.
Without this, you could find Windows caught in a long update cycle when you return from a break.
7. Completely Disable Windows Updates
As a last resort, here’s the one method that will fully turn off updates, either completely or until you reboot your computer. It’s available in all editions of Windows 10.
Go to Start, type Services, and open the matching result. Find the Windows Update service in the list and double-click it.
Below Service status, click Stop to shut down Windows Update until you reboot. Under Startup type, you can select Disabled to prevent it the service from starting when you boot Windows. This will prevent Windows Update from running until you turn the service back on manually.
If you do this, remember to turn updates back on as soon as possible to protect your computer with security patches.
Handling Driver Updates in Windows 10
In Windows 10, Windows Update also handles driver updates. In the latest versions, you’ll see them under a separate section of the Windows Update page, which you have to click View all optional updates to see. Expand Driver updates to review the list of possible drivers that may fix problems.
Otherwise, Windows should only automatically install new drivers when needed. If you need to manage them manually, see our guide to updating your drivers in Windows 10. Microsoft’s Show or Hide Updates Troubleshooter tool, which used to let you block driver updates in Windows Update, is no longer available as of this writing.
How to Manage App Updates in Windows 10
We’ve focused on how to manage Windows Update for system updates here. If you’re interested in a similar level of control over your apps, have a look at our full tutorial for turning off automatic app updates in Windows 10.
Keep in mind that the same caveats apply here. Turning off app updates can be useful in cases where the latest version is buggy or has other issues. But regular updates help keep the software on your machine safe, so you shouldn’t neglect them for too long.
Pause Windows Update Only When Necessary
Now you know how to pause updates in Windows 10 whenever needed. Most of the time, automatic updates are great, since they keep your device secure without any input. However, if you need to keep your PC from restarting or fear problems in the latest version, blocking updates for a short time can help.
Just make sure you install updates before long, as leaving your PC unpatched is a security risk.
Updating your computer’s software is important, but how do you check for all those updates? We’ll show you how to update everything in Windows.

While completing a PhD, Tina started writing about consumer technology in 2006 and never stopped. Now also an editor and SEO, you can find her on Twitter or hiking a nearby trail.
Subscribe To Our Newsletter
Join our newsletter for tech tips, reviews, free ebooks, and exclusive deals!
One More Step…!
Please confirm your email address in the email we just sent you.


