- How to Restore Missing Power Plan Options on Windows 10
- What Causes Power Options to go Missing?
- Solution 1: Restore Them Manually
- Command Prompt:
- Download the Files Yourself:
- Solution 2: Use the Following Registry Hack
- Solution 3: A Useful Workaround
- Solution 4: Check for the New Battery Slider
- The Ultimate Guide To Windows 10 Power Options
- Access Windows 10 power options
- Hard disk
- Internet Explorer
- Desktop background
- Wireless Adaptor
- Sleep
- Sleep after
- Hibernate after
- Allow hybrid sleep
- Allow wake timers
- PCI Express
- Processor power management
- Minimum/Maximum processor state
- System cooling policy
- Display
- Multimedia
- When sharing media
- Video playback quality bias
- When playing video
- Conclusion
How to Restore Missing Power Plan Options on Windows 10
On Windows 10, Power Options allows you to customize your Power Usage – as per requirements. Technically, a power plan is a set of hardware and system settings that defines how power is used and preserved by your computer. There are three built-in power plans: Balanced, Power Saver and High Performance. They can be customised for your system, or you can create new plans based on them.
What Causes Power Options to go Missing?
Many users have reported variations of missing power plans, such as only balance power plan is available and the high performance power plan is missing. This could be due to a system corruption or a Windows Update recently installed which may have modified the registry or tweaked the power options.
We have gathered some working solutions so make sure you try them out. Good luck!
Solution 1: Restore Them Manually
If a Windows Update or something else you did has removed the power plans from your computer, you can get to them by running commands which will recreate them and have them available on your computer the same way as they were before. There are two ways you can do this and it depends on what you prefer.
Command Prompt:
You can restore the missing power plan settings simply by running several commands in Command Prompt.
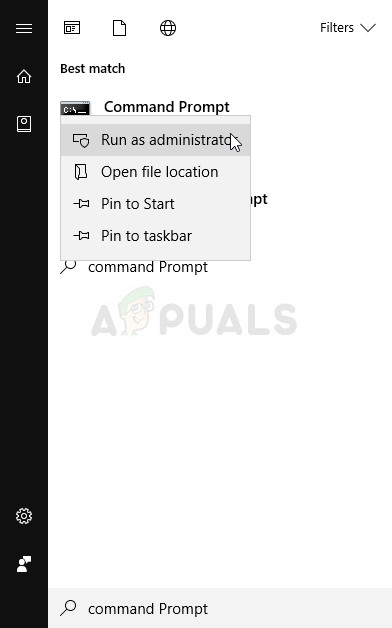
- Search for “Command Prompt” either right in the Start menu or by tapping the search button right next to it. Right-click on the first result which will appear at the top and select the “Run as administrator” option.
- Type in the following set of commands one after another and make sure you click Enter after typing each one and wait for the process to finish and display a “process successful” message:
Note: The last command can only work on Windows 10 versions after the 17101 build as it’s related to restoring the Ultimate Performance Power Plan available for the newest Windows 10 builds for workstations.
- Restart your computer and check to see if the power plans are back where they belong.
Download the Files Yourself:
You can download the required files easily from a guide made by TenForums and it contains the “.pow” files which are used to represent a power plan.
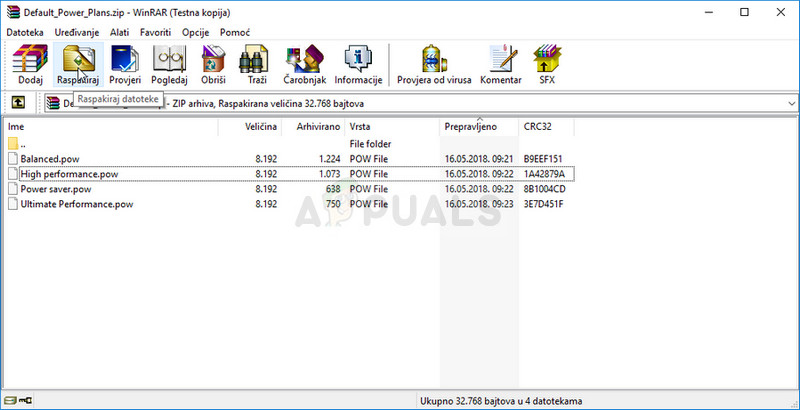
- Click on this link in order to download the “.zip” file containing the power plans. Locate the file in your Downloads folder, right-click on it, and choose the Extract to option. Extract the files to any location but it’s best to keep it simple because of the following steps.
- Search for “Command Prompt” either right in the Start menu or by tapping the search button right next to it. Right-click on the first result which will appear at the top and select the “Run as administrator” option.
- Use the following command in order to install the required power plan:
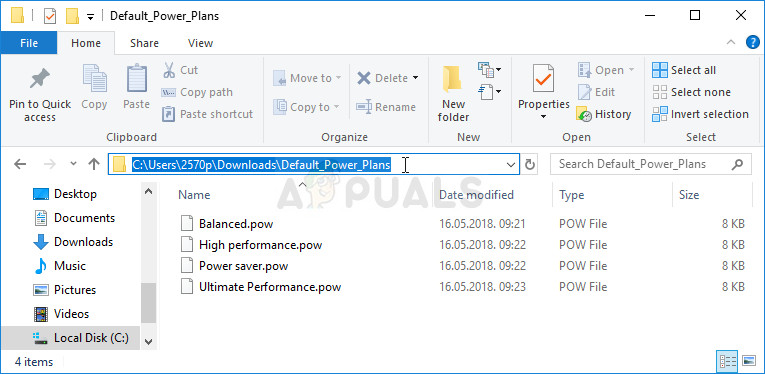
- In this scenario, instead of “Full path of .pow file”, you will have to paste the correct path to the file, in the folder you have extracted the files to. Let’s say you want to install the “Power saver” plan which is also named that way in the folder.
- Navigate to the folder where the files are located, click the address navigation bar at the top and copy the address after it has been selected. Head back to Command Prompt and paste the address. If the files were, let’s say, in the Downloads folder within their own folder called Default_Power_Plans, the command should look like:
- Make sure you repeat the same process for all power plans you want to install and check to see if they have returned in Control Panel.
Solution 2: Use the Following Registry Hack
If a Windows Update has indeed hidden these options, it’s possible that Windows it trying to replace this feature or push it into the history by replacing it with other features. If you still wich to use this exact option, you can turn it on using the following registry hack.
Since you will have to edit a registry key, we recommend you check out this article we have made for you to safely backup your registry to prevent unwanted side effects which shouldn’t occur if you just follow the steps carefully.
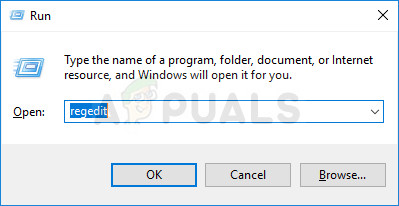
- Open the Registry Editor window by typing “regedit” in either the search bar, the Start menu, or the Run dialog box which can be accessed with the Windows Key + R key combination. Navigate to the following key in your registry by navigating at the left pane:
- Click on this key and try to locate an entry called CsEnabled at the right side of the window. If such option exists, right-click on it, and choose the Modify option from the context menu.
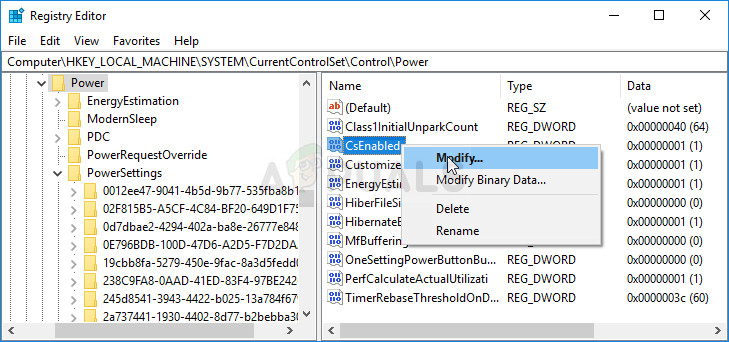
- In the Edit window, under the Value data section change the value from 1 to 0, and apply the changes you have made. Confirm any security dialogs which may appear during this process.
- You can now manually restart your computer by clicking Start menu >> Power button >> Restart and check to see if the problem is gone.
Note: If this didn’t work out for you, you can try adding an option to show these power plans individually for every power plan your computer knows about.
- Navigate to the following key in your registry by navigating at the left pane:
- You will be able to see plenty of weirdly named keys inside the PowerSettings key. Navigate to each one of these keys, right-click the right blank side of the, screen, and choose New >> DWORD (32bit) Value.
- Name each one of these values “Attributes” by right-clicking and choosing the Rename option. After that, right-click the newly created attributed value and choose the Modify option.

- Set the value to 2 under value data, keep the base in hexadecimal and click OK. Repeat the same process for each key in PowerSettings.
- Check to see if the problem is gone now.
Solution 3: A Useful Workaround
This workaround can be used quite easily if you want to add the power option which is missing quite easily. Since a new build of Windows usually only leaves the Balanced power plan intact, you can add it (or any other default plan) easily by creating a new plan which is exactly the same as this one.
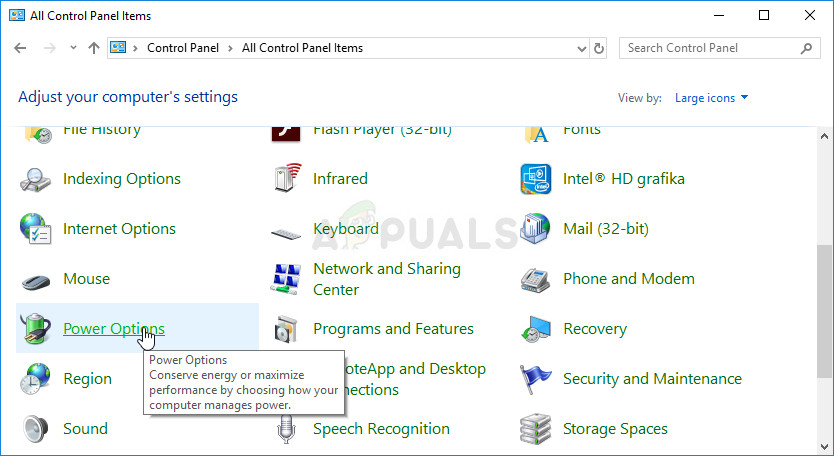
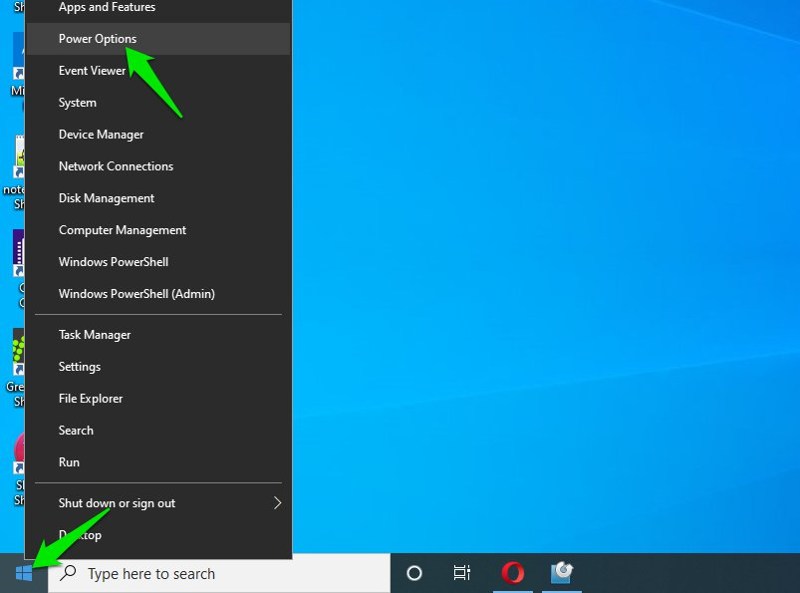
- Right-click on the battery icon located in the system tray or the lower right part of your screen, next to time and date, and click on Power Options.
- If you have removed this from the system tray, click on the Start menu and search for Control Panel. Change the View by option to Large icons and click on the Power Options button.
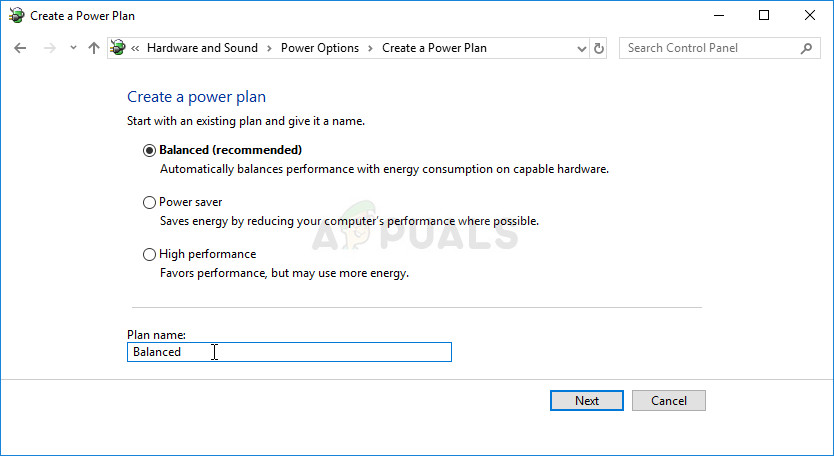
- At the left side of the window you should see several options displayed one under the other so click the Create a power plan option. You should see the Create a power plan window and a list of choices. Set the radio button to the power plan you wish to bring back.
- Under the Plan name, you can even name it the same way as it was originally named before clicking the Next button at the lower right part of the window.
- You will some additional settings, such as Turn off the display, Put the computer to sleep and Adjust plan brightness. You can set them up now or later, before clicking Create.
- You will now have access to this power plan so make sure you select it when necessary.
Solution 4: Check for the New Battery Slider
From the latest build of Windows, it appears that the power options have now started to change for users who didn’t perform the steps above and everyone will get to see the new slider you can use to either set everything to high performance or to save battery life.
Also, these settings will now be managed through the Settings tool and not via Control Panel.
The Ultimate Guide To Windows 10 Power Options
![]()
Windows offers 3 preset power profiles that you can switch based on whether you want better performance or power saving.
However, I personally never let Windows decide which power profile I want, and I fully customize the power options every time I reset or reinstall Windows.
Because I find Windows preset power profile values to be rather flawed, for example, in the performance profile, Windows forces CPU power to always stay at max power, which isn’t necessary at all (more on it later).
Thankfully, Windows power profiles can be fully customized according to your need, but you need a little help in understanding each option to optimize it. And today, I will explain each power option available in Windows 10, so you may choose the right setting based on whether you want better performance or want to save power (or both).
Access Windows 10 power options
Before you actually edit the power options, you need to know where the power options reside in Windows 10.
Here’s how to access them:
Right-click on the start menu and select Power Options from the list.
This will open the Power & sleep page; click on the Additional power settings link in the right panel.

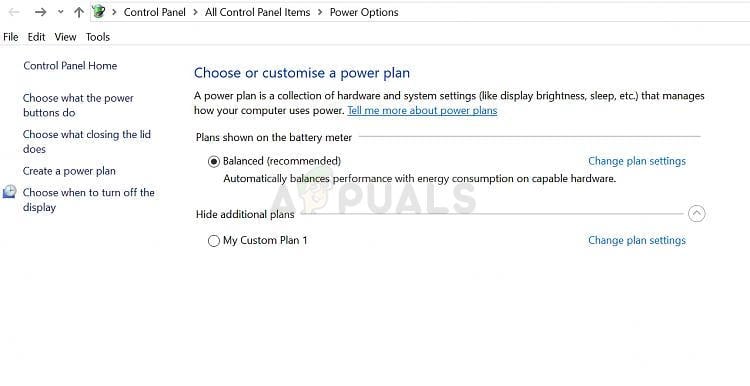
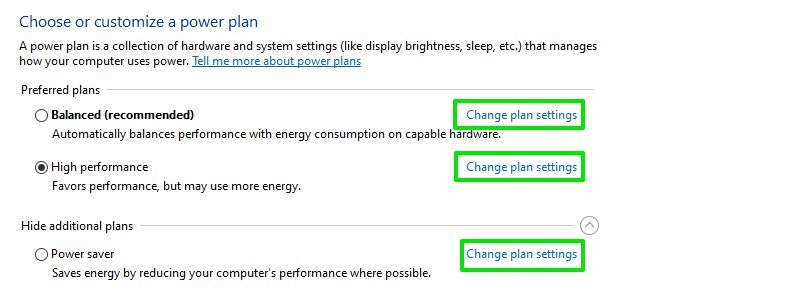
You will now see three power plans here, Balanced, High Performance, and Power saver.
It doesn’t matter which plan you choose here as all have the same options that you will customize anyway. However, you should pick the power plan name that best suits your intentions for clarity reasons, like whether you want to tweak for better performance or to save power.
Click on Change plan settings next to your preferred power plan.
Here click on Change advanced power settings link, and you’ll be ready to edit the power options explained below.

Note: If you are using a laptop, then each power setting will have a separate option when plugged in or on battery power. So make sure you adjust the settings considering these scenarios.
Hard disk
First, I should mention that this option only affects PCs running on a hard drive (HDD); PCs with SSD (solid-state drive) will not affect whatsoever. A hard drive continuously spins to read and write data, which of course, consumes power. This power setting will stop the hard drive from spinning after a specified idle time to save power.
Once the hard drive turns off, it will take a second or two to start on again when you try to access data in it, i.e., you will notice a tiny delay if you let it turn off. By default, it’s set to 20min of no reading and writing on the hard drive before it stops spinning. You can increase and decrease the time as you find right, and if you want to disable it, decrease the value to 0, and the Never option will become available to select.
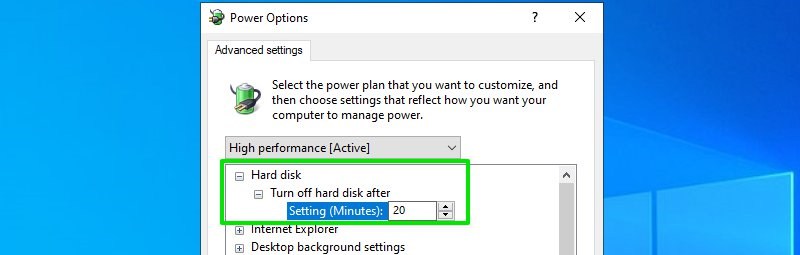
My recommendation: keep this option enabled, and the default 20min timer is perfect too. Usually, the hard drive stays in use as long as you are doing something on the PC, so it will not interrupt your work. And a tiny one-time delay when you access your PC after a long idle time shouldn’t hamper your experience.
In return, you not only save power but also stop unnecessary wear and tear on the hard drive, and we all know hard drives have a limited lifespan.
Internet Explorer
I am not sure why Microsoft is still keeping this option here when Edge is the default browser on Windows 10, but now that it is here, I should explain it anyway. This option only affects users who are still using Internet Explorer; other users can skip it. It basically allows you to manage how Internet Explorer manages Javascript in the browser.
It will use all your CPU’s cores to manage JavaScripts on web pages on maximum performance mode, which results in better performance but with some drain on power. Although on power-saving mode, it will slow down the performance of JavaScript to save power.

My recommendation: Honestly, this option solely depends on what you want; there is no in-between. Do you want to save power? Select Maximum Power Savings. Do you want to have the best performance while browsing? Select Maximum Performance.
Desktop background
Using this option, you can enable/disable the slideshow feature that automatically switches your desktop wallpaper every few seconds. Again, this option is only worth tweaking if you actually use slideshow wallpaper. Constantly changing wallpaper consumes PC resources even when Idle, and depending on Wallpaper quality, the effect on PC power can be substantial. You can select Paused to disable this feature or Available to enable it.
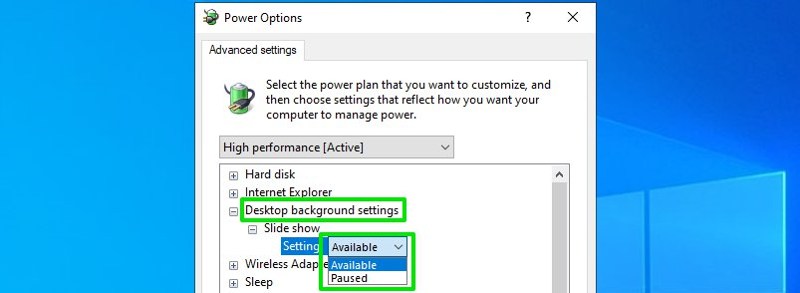
My recommendation: If you are on battery power and know that you won’t get access to a power source soon, you should definitely pause this option. This feature has no performance advantage, so it’s just an unnecessary power drain for a more lively desktop. I am sure you won’t prioritize a lively desktop over the battery to run out on you anytime.
Wireless Adaptor
This option allows you to decide whether you want the network adaptor always to stay awake, keep receiving the network packets, or go in the sleep state when the WLAN 802.11 power save mode enabled network goes in the sleep state.
There is a big problem with this option, though, if the network from which you are receiving signal doesn’t support the 802.11 power save protocol, you will start seeing drops in network connection and bad performance when you will put it on the power-saving setting.
The easy solution is to keep it at Maximum Performance state and have no worries about network problems. Although if you want to save power, then it’s worth searching whether your Wifi modem supports the 802.11 power save protocol or not (Google should help here). If it does, then you can use one of the 3 power-saving options to save power.
Start from low power save and see if any network issues arise or not and then move to maximum power-saving mode. If you are not using the internet at all, you should put it on Maximum Power Saving mode.

For reference, you can save anywhere between 2% to 9% battery power on Maximum Power Saving mode, according to Microsoft.
My recommendation is that it’s quite a hassle to maintain this option as its performance depends on the network you are connected to. This becomes worse if you frequently change networks and won’t check each network’s details. I’ll say keep it at Maximum Performance if you don’t want network issues. However, I have already told you what you need to know if you want to use your wireless adaptor’s power-saving mode.
Sleep
You will find multiple options under this section to manage how automatic sleep and hibernate state works for your PC. PC uses quite a lot of power even when idle, so it’s necessary to put it on sleep or hibernate if you leave and can’t shut it down due to important work on the PC. These options will make sure your PC goes to sleep or hibernate when left idle for whatever reason.
Below is an explanation of each option:

Sleep after
Here you can select the idle time, after which the PC will automatically go into the sleep state. There are multiple sleep states with varying power, but to keep it simple, in sleep state, the PC powers off all the hardware and uses minimum power to keep data in the RAM running so you could quickly continue where you left off.
In the sleep state, the PC hardly uses 10-15 watts of power. Here’s a great answer on Super User that explains sleep power consumption very well. It would help if you made your PC automatically sleep after 10-20min idle time using this option.
One problem you may face is that some programs may be unable to stop your PC from sleeping even when they are working or downloading something. Therefore, any work like installation or downloading may be interrupted if you leave your PC, and it goes to sleep. Although most apps today are programmed to stop Windows from going into sleep mode while they are running.
Note: If you lose power while your PC is in sleep state, all the apps running on the PC will stop, and unsaved data will be lost.
Hibernate after
Similar to sleep, this option lets you decide after how long idle time should your PC go into hibernate mode. Hibernate mode puts the PC in an even lower power consumption state than sleep, and there is also no risk of data loss in case of power failure.
In hibernate, Windows moves data in the RAM to the hard disk and turns off power to even the RAM. This helps save even more power and won’t risk your data. Although it will take more time for the PC to turn on than sleep, all the data in the hard drive moves back to RAM.
It would be best if you automatically hibernated at least twice as much time after automatic sleep triggers. Hibernate is most useful when you move away for an extended period of time, so saving power becomes more important than slow start-up time compared to sleep.
Allow hybrid sleep
A combination of hibernation mode and sleep mode, hybrid sleep lets you put your PC on sleep without the risk of losing data in case of power failure. If your PC is at risk of losing power, then you should enable this option to make sure you don’t lose data if a power failure occurs. In hybrid sleep, Windows puts the PC to sleep and also copies RAM data to the hard drive to restore in case of power loss. The only downside to this is that your PC will take a little longer to go into regular sleep mode. You can turn this feature on/off based on your need; usually, it’s not required on laptops.
Allow wake timers
When enabled, this will allow events like an alarm or scheduled tasks in the Task scheduler to wake your PC up from sleep state. If you have such important tasks on the PC, you should enable this option to complete. Of course, this means your PC will turn on while you are away and won’t go back to sleep until the task is complete.
USB selective suspend lets the system suspend power to individual USB ports if it notices it’s idle, which helps save power. This doesn’t affect mouse or keyboard much as they are constantly in use, but things like fingerprint scanner will be affected as they are one-time-use devices.
Usually, there is no downside to enabling this option, but it can mess with some USB devices.
For example, I once had trouble with this option when it kept disabling my internet USB dongle because Windows, though it’s an idle device for some reason.

My recommendation: Keep this option enabled as it’s good for power saving, and very rarely, it can affect your experience negatively. Although if you notice a USB device is having problems running, this is the first option you should disable.
PCI Express
The hardware components in your PC like graphics card, sound card, and network card, etc. keep a constant link using PCI Express. To keep that constant link between devices, the PCI Express shares dummy data even when the devices aren’t sharing actual data, which of course, consumes power. This power option helps you control whether you want to keep a constant link or disable the link when the PC is idle.
Using one of the power saving options will lead to a tiny delay when your PC stays idle for too long, and you start using it. The maximum power saving option will save more power but will add higher latency while creating the link. Similarly, the moderate power saving option will save a little less power in exchange for less latency. If you don’t want any latency at all, then you can turn this power option off, and the link will stay constant.
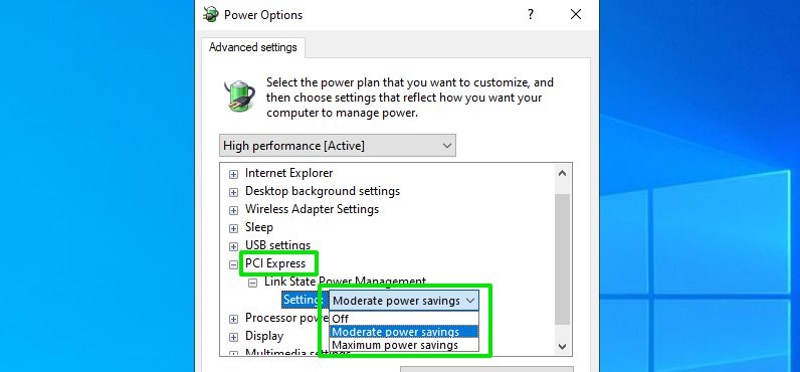
My recommendation: You should use one of the power saving options here as you find right as the latency only occurs when you access the PC after a long idle time. This option will not interfere in your active use of the PC. Although I have not personally experienced this, I have heard people complain about having trouble recovering from the sleep state when using power-saving. If that happens to you, turn off this option.
Processor power management
Here you can adjust the speed of your CPU to save power and manage how PC cooling policy works. Below is an explanation of the options here.
Minimum/Maximum processor state
These are two options to customize the CPU bus speed multipliers, which basically means the speed of the CPU in GHz. The maximum processor state should always stay at 100% as your PC only uses 100% power when it actually needs it, throttling it would only affect performance unnecessarily. The minimum processor state is the important option here, which configures the constant speed of the CPU.
If you put the minimum processor speed to 100%, then the processor will always run at max power. Similarly, if you will put the minimum to 0%, it will run at the minimum base multiplier, usually half of the CPU core speed. The CPU can adjust core speed in the blink of an eye when needed, so keeping processor speed to 100% is unnecessary and will consume extra power. You should keep the minimum processor speed to 5-10% even when you prefer performance over power saving.

To see the changes in action, open up the task manager (Ctrl+Shift+Esc), and move to the Performance tab. Here you will see the CPU speed change under the CPU section when you will change the minimum processor speed.
System cooling policy
A compassionate power option that requires extra care, especially if you are on a laptop. This option lets you decide how your PC will cool down with two options to select; Active and Passive. To keep it simple, the system will run at max performance in an active cooling policy, and the fan will run fast to cool down the PC when needed. The PC performance will only slow down when even the fan can’t keep the PC cool. In Passive cooling policy, Windows will first slow down the performance to cool down the PC. If that doesn’t work, then it will run the fan fast to cool the PC.

As you may have guessed, the Active cooling policy will consume a lot more power; but it will keep your PC at maximum performance while keeping it cool. And the Passive cooling policy will slow your PC performance to keep it cool, so it’s not ideal to use the PC for any heavy tasks.
My recommendation: If you don’t use the PC for any heavy application or games, then keep the cooling policy to Passive; it will save a lot of power from both the fan and less power consuming performance state. If you will use the PC for heavy tasks, then using the Active cooling policy becomes mandatory. Keep in mind that using the Active cooling policy while on battery will substantially affect battery timing, so choose wisely between running heavy applications or saving battery power.
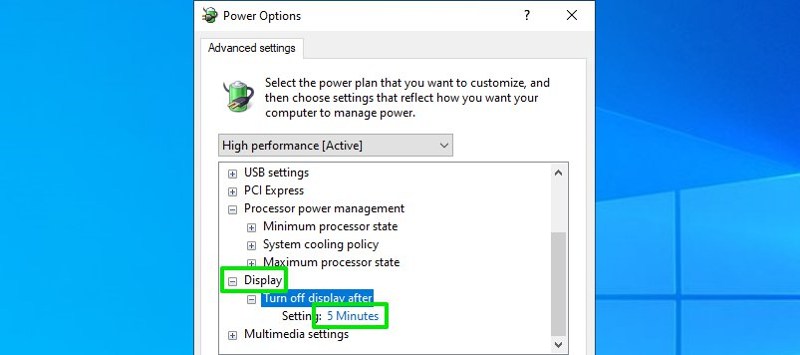
Display
It’s a simple option to decide after how long your PC display should turn off when left idle. PC display consumes a lot of power, so you should be using this option to save power when you may have to leave your PC.
Don’t worry; the display will not turn off if you are watching a video. You should set this timer to at least half the Sleep option’s timer as the display turns off in the sleep state anyway. For example, if your PC is set to go to sleep after 10min of idle time, set the display off timer to 5min or less.
Multimedia
These settings are only used when your computer is sharing media with another device. They will not affect the performance of media running on your PC. If you are not sharing media with any device, you don’t even need to adjust these options. Here’s a quick explanation of each option:

When sharing media
Use this option to decide whether your PC should be allowed to go to sleep while sharing media. In most cases, you should select Prevent idling to sleep as you wouldn’t want your media source to turn off while the media is playing on another device. However, if you want the PC to go to sleep after running the media files required, then you may allow it to sleep. This also means that your PC’s sleep timer must be higher than the duration of the media you will be playing.
Video playback quality bias
Here decide whether the PC should focus be biased towards saving power or playback quality of the video. I personally haven’t tested this option, but I guess that the quality of playback wouldn’t be hindered too much to be noticeable. Nevertheless, it would help if you chose here based on your priority, i.e., you want to save power or prefer better quality.
When playing video
An option very similar to the above. You decide whether you want to save power while sharing media or have better video quality. There is also an option to select a balance between both power-saving and video quality. You should select the right option based on your priority.
Conclusion
I am sure you have noticed I have recommended many customizations completely different from what Windows has set by default. The difference is there because Windows has set the settings based on the users’ intention, so it’s not always optimal. Although I am sure after going through the above guide, you are in a good place to decide which option is best for your needs.
Next, find out how to optimize Windows for a better experience.


