- Появилось «Power saving mode» на мониторе, а изображения нет. Что делать?
- Что нужно проверить, если на экране появилось «Power saving mode»
- How to Turn off Power Saving Mode
- Plus, how to turn on power saving mode
- How to Turn off Power Saver in Windows 10
- How to Turn on Power Saver in Windows 10
- How do I disable power save mode for win10 ?
Появилось «Power saving mode» на мониторе, а изображения нет. Что делать?

Столкнулись с одной проблемой: перенесли компьютер из одной спальни в другую и теперь при включении на мониторе появляется сообщение «Power saving mode» и всё. Изображение никакое больше не отображается, через несколько секунд экран становится просто черным (компьютер, судя по кулерам, продолжает работать).
Подскажите, что можно сделать?
Эта надпись (Power saving mode) означает, что монитор переходит в энергосберегающий режим (прим.: обычно, он включается автоматически при простое компьютера).
Происходит подобное из-за того, что на монитор не подается видеосигнал (и в этом не всегда виновата видеокарта).
В этой заметке попробую подсказать вам, на что нужно обратить внимание в первую очередь, чтобы решить этот вопрос. 👇
Что нужно проверить, если на экране появилось «Power saving mode»
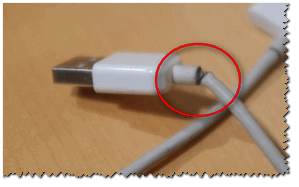
Целы ли кабели, не «разбиты» ли разъемы
Наиболее часто монитор уходит в энергосберегающий режим из-за того, что к нему просто-напросто не подключен видеокабель (либо не очень плотно вставлен в разъем — попробуйте просто переподключить его) .
Многие пользователи, кстати, при перестановке мебели в попыхах просто забывают перепроверить все эти моменты.
Кроме этого, также обратите внимание на целостность кабелей: нет ли скруток, перегибов и т.д. 👇
Если есть возможность — попробуйте подключить монитор к системному блоку с помощью другого интерфейса. Например, было подключено по HDMI — попробуйте задействовать Display Port.
Разъемы мониторов (VGA, DVI, HDMI, Display Port). Какой кабель и переходник нужен для подключения монитора к ноутбуку или ПК
Настройка монитора: прием сигнала (Input)
У большинства мониторов есть поддержка как минимум 2-3 интерфейсов (например, в моем случае, это VGA, HDMI, Display Port).
И из-за этого «многообразия» в ряде случаев происходит следующее: вы подключили монитор к ПК по интерфейсу HDMI, а в настройках монитора прием сигнала установлен в режим VGA.
Т.е. монитор ждет видеосигнал совсем по другому интерфейсу, и не получив его — уходит в энергосберегающий режим.
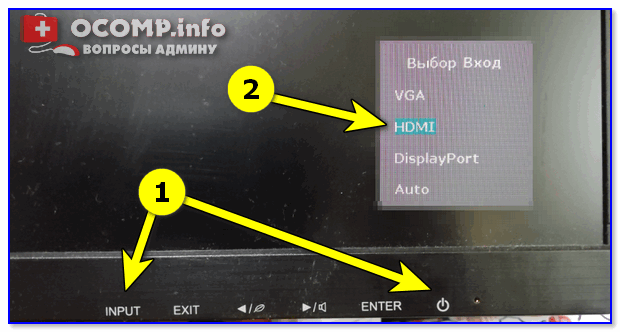
Настройки монитора — Input (получение сигнала)
Решение в данном случае простое: зайдите в настройки монитора (в раздел Input) и уточните, правильно ли задан интерфейс ( прим. : авто-режим — далеко не всегда правильно определяет источник сигнала, поэтому нужно именно вручную уточнить сей момент. ) .
Проверка плашек ОЗУ
Следующее, что порекомендовал бы сделать — это выключить компьютер, открыть крышку системного блока и вынуть все плашки ОЗУ (см. скрин ниже 👇).
Кстати, также не лишним будет отключить от системного блока всё периферийное оборудование по максимуму: принтеры, сканеры, колонки, мышки, клавиатуры, дисководы, передние панели USB и т.д. (оставить только самое основное).
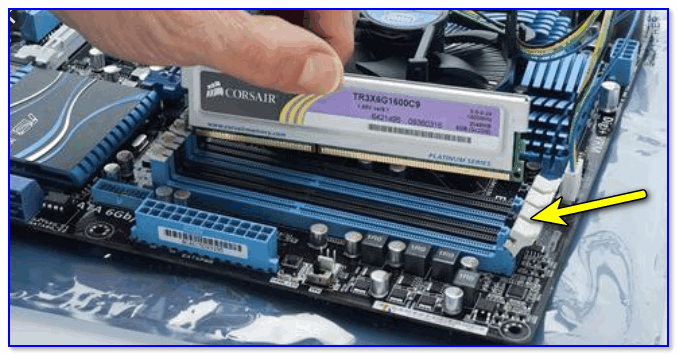
Слоты под плашки ОЗУ
Далее почистите контакты плашек с помощью ластика и кисточки. На время диагностики подключить только одну планку и попробовать включить ПК.

Чистка контактов памяти резинкой и кисточкой
Если ПК не включится — попробуйте эту планку переставить в последствии в другой слот и перепроверьте еще раз (дело в том, что очень часто какой-то слот под ОЗУ или сама планка начинает «глючить» и из-за этого ПК просто не включается. ) . Кстати, особенно часто подобные «проблемы» с планками ОЗУ встречаются как раз после переноски системного блока.
Сброс настроек BIOS
Если вышеперечисленное не принесло результатов — попробуйте сбросить настройки BIOS/UEFI. Для этого достаточно вынуть на несколько минут небольшую батарейку из спец. отсека на материнской плате (см. фото ниже 👇).
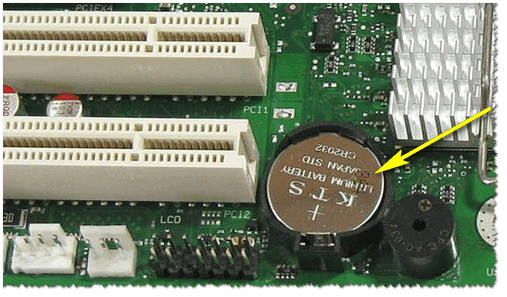
Батарейка на материнской плате ПК
Проверка работы видеокарты
Ну и последнее, что порекомендую сегодня — обратите внимание на работоспособность видеокарты. Если она плохо закреплена в системном блоке (прим.: некоторые пользователи не фиксируют ее) — то при его переноске контакты могли отойти, и.
В общем, попробуйте вынуть ее из своего слота и заново установить (если у вас есть еще одна видеокарта — очень желательно бы протестировать ПК с ней).
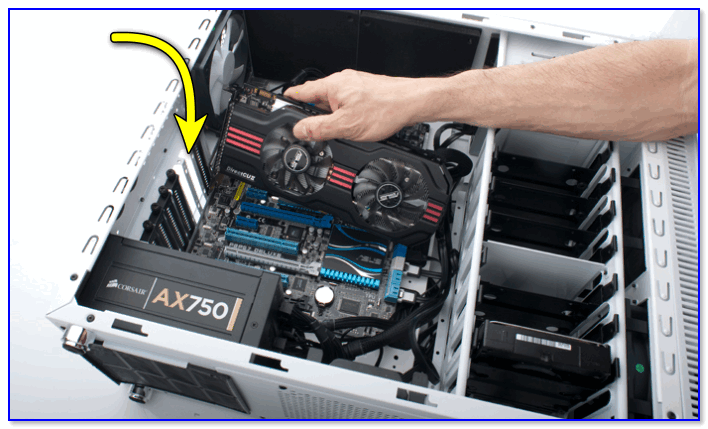
Кстати, возможно, что у вас есть встроенная видеокарта (ее наличие можно определить по доп. видео-разъемам на мат. плате). В этом случае попробуйте внешнюю видеокарту вынуть из слота и монитор подключить к встроенной.
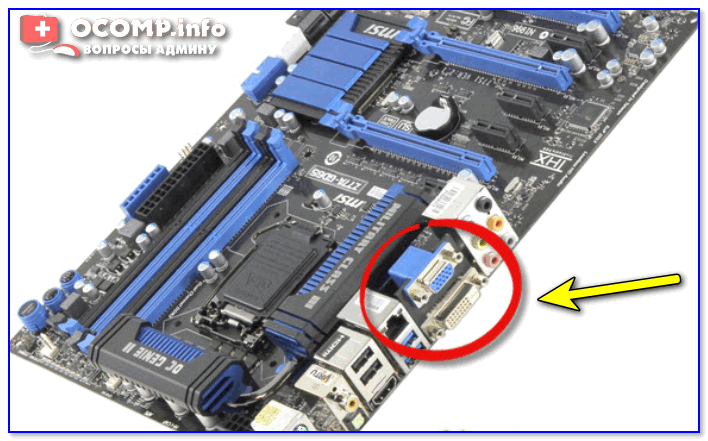
Есть интегрированная видеокарта
Если монитор вообще не показывает никакого изображения (а системный блок работает, по крайней мере слышно, как шумит) — рекомендую вот эту заметку —>
Если всё вышеперечисленное не дало результатов — очень вероятно, что есть какая-то аппаратная неисправность. В любом случае, дать пошаговые рекомендации по дальнейшей диагностике в рамках этой статьи — вряд ли возможно.
Как один из советов — воспользуйтесь услугами ближайшего к вам компьютерного сервиса.
How to Turn off Power Saving Mode
Plus, how to turn on power saving mode
:max_bytes(150000):strip_icc()/RyanDube-214359-8f50cb3133cd47c7ae1f3d4f09349f4e.JPG)
If you’re finding that your Windows 10 PC is dimming the screen before you want it to or even going into sleep mode altogether, sometimes it helps if you turn off power saving mode. There are a lot of behaviors that can exhibit from a machine running under power saving mode. Luckily, it’s easy to toggle this feature off and on.
In this article, you’ll also learn how to turn on power savings, as well as how to optimize the settings so you can fully use your computer while saving energy.
How to Turn off Power Saver in Windows 10
There are a lot of complex power saving settings in Windows 10, but it’s easy to quickly turn off power saving mode entirely.
Left-click the battery icon in the right hand side of the Taskbar.
Select Battery settings.
:max_bytes(150000):strip_icc()/batterysettings-67b0969571154f09ace7241ddc7c7be5.jpg)
Scroll down to the Battery saver section, and disable the checkbox next to Turn battery saver on automatically if my battery falls below.
:max_bytes(150000):strip_icc()/uncheckedbatterysaver-b8ea80dfcb3d42e5b64cd54710b73656.jpg)
When you completely disable battery saving in Windows 10, be aware that once your battery drops below the previously enabled setting, power will continue being consumed at the same rate. This could potentially shut down your laptop before you’ve had time to save your work.
Even though this turns off all power savings while your computer is running on battery, it does not turn off power savings while your computer is plugged in. To do this, right click the battery icon in the right hand of the Taskbar, and select Power Options.
:max_bytes(150000):strip_icc()/poweroptions-b005a4cbce854f96ad8542c9e0a98315.jpg)
On the left side panel, select Create a power plan.
:max_bytes(150000):strip_icc()/createpowerplan-355415a86f5d4e299aca54a8da33570a.jpg)
Under create a power plan, select High performance. In the Plan name field, name the plan Power Savings Off and select Next.
:max_bytes(150000):strip_icc()/highperformancepowerplan-127e1104501f4e4ab2aee64f044a4539.jpg)
In the next window, change all settings for power savings to Never for both On battery and Plugged in. Select Create when done.
:max_bytes(150000):strip_icc()/changesettingsforpowerplan-95da38face864a03ab299cf4fa9d1c83.jpg)
Select Change plan settings to the right of your newly created power plan.
:max_bytes(150000):strip_icc()/changeplansettings-8c8f83103bf740e99b70302475732c1d.jpg)
In the plan settings window, select Change advanced power settings.
:max_bytes(150000):strip_icc()/changeadvancedpowersettings-91f7f9768b944102aee3af8a3672b77a.jpg)
Scroll down to Hard disk and expand it. Change the Turn off hard disk after setting to Never for both On battery and Plugged in.
:max_bytes(150000):strip_icc()/turnoffharddisknever-f12f6703560b4271960660269f6ebf3a.jpg)
To update these settings to Never, you’ll need to type the word «Never» into the dropdown field for minutes.
Select Apply and then OK. Now you’ve completely turned off power saver for your Windows 10 computer.
How to Turn on Power Saver in Windows 10
If you prefer to conserve energy as much as possible while using your computer, you can quick turn power saver back on, and then adjust the settings as needed.
You can customize the settings so that the power saving behavior doesn’t interfere with the work you need to do on your computer.
Right click the battery icon in the taskbar and select Power Options.
If you want to save time, you can select the Balanced plan, which is the Windows 10 preconfigured power savings plan. Or, if you prefer to customize your own options, follow the steps in the previous section to create a new plan. Once you’ve created the new plan, select Change plan settings to the right.
:max_bytes(150000):strip_icc()/changepowerplansettings-ba5f4fbed82f4365ba4bec8fbdadda79.jpg)
You can adjust the time delay you’d like to use to turn off the display or put the computer to sleep in the Change Settings window. Select Save changes. Then, Select Change advanced power settings.
You can adjust the following settings in the Advanced settings tab. You can adjust each setting for both On battery, and Plugged in. Use the number of minutes you’d like the computer to wait before enabling that action.
- Turn off hard disk after: Stops the hard disk from spinning. This will cause a slight delay when you want to use your computer again (or even saving a file).
- Desktop background settings: Pauses any slideshow you’ve configured as your background.
- Sleep: Put your computer to sleep, or have it hibernate.
- Power buttons and lid: Make the laptop sleep when you close the lid.
- Display: Turn off the display (conserves more power than any other setting).
The remaining power settings not in this list include items like wireless adapter, usb, PCI Express, processor, and video card options that have minimal effect on power savings. However if you prefer to maximize battery savings, you can set these to either Optimize Battery or Maximize power savings as well. Just be aware that the more devices you choose to enable power savings, the longer the delay may be when you want to actively use your computer again.
How do I disable power save mode for win10 ?
Thank you for writing to Microsoft Community Forums.
To address your concern, kindly help us with the following queries:
- What is the make and model of the machine?
- Which build of Windows is installed on your PC? (To check that, press Windows + R keys and type winver).
- Were there any changes made to the PC prior to this issue? Any major updates that got installed?
Energy Saver Mode feature mainly saves energy when the user is away. Power plans can help you save energy, maximize system performance, or achieve a balance between the two. Balanced power plan offers full performance when you need it and saves power when you are not accessing the PC. It’s the best power plan option chosen by most of the users. To disable the power saving option, you may follow the steps listed below and check if it works:
Method 1: Disable Energy Saver settings.
- Rightclick on the Battery icon from the bottom corner of the taskbar and choose PowerOptions from the list.
- Click on Change plan settings beside any of your required option from Balanced or Power saver.
- Click on Change advanced power settings option and expand Energy Saver settings.
- From the Energy Saver settings, expand Energy saver on user away and choose Disable option to disable the Energy saver.
Method 2: Modify Power & sleep options in Settings.
Open Settings and click on System icon. Choose Power & sleep option from the left pane and make the changes accordingly to Screen and Sleep option.
Method 3: Change the computer sleep option.
- Search for Control Panel on double click on it. Click on Hardware and Sound and choose Power Options.
- Click on Change when the computer sleeps option from the left pane and choose Never from the drop down menu for both the options available there.
- Click on Save changes after making the changes and see if it works.
Additional Information: To save your battery from consuming a lot of power, you may refer to an article on —
Let us know how it goes. We are looking forward to hearing from you soon.


