- PSWindowsUpdate: Managing Windows Updates from PowerShell
- PSWindowsUpdate: Install Windows Update PowerShell Module
- Overview of PSWindowsUpdate Cmdlets
- PowerShell: List All Windows Updates Available for a Computer
- Install-WindowsUpdate: Installing Windows Updates with PowerShell
- Install Windows Update on Remote Computers with PowerShell
- Get-WUHistory: Viewing Windows Update History using PowerShell
- Remove-WindowsUpdate: Uninstalling Windows Updates
- Hide-WindowsUpdate: How to Hide Windows Updates with PowerShell?
- Записки IT специалиста
- Используем PowerShell для автоматизации установки обновлений
PSWindowsUpdate: Managing Windows Updates from PowerShell
It is very convenient to use the special PSWindowsUpdate module for PowerShell to manage Windows updates from the command line interface. The PSWindowsUpdate is not integrated into Windows and is a third-party module available in Technet Script Gallery. PSWindowsUpdate allows administrators to remotely check, install, remove and hide updates on Windows servers and workstations. The PSWindowsUpdate module is especially valuable to manage updates on Windows Server Core, Hyper-V editions having no graphic interface, as well as when configuring a Windows image in the audit mode.
PSWindowsUpdate: Install Windows Update PowerShell Module
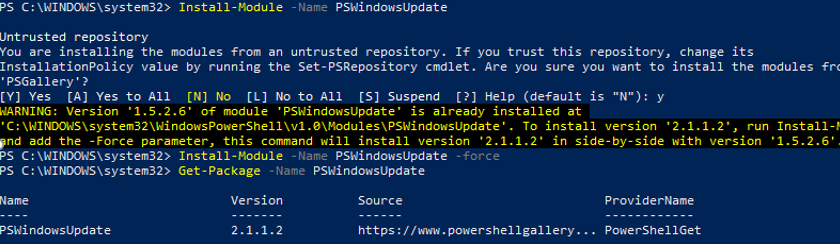
You can install the PSWindowsUpdate module on Windows 10 and Windows Server 2016 from the online repository (PSGallery) using the PackageManagement with a single command:
Install-Module -Name PSWindowsUpdate
In my case, a warning appeared that PSWindowsUpdate 1.5.2.6 was already installed appeared. To install a newer module version, you need to run the command:
Install-Module -Name PSWindowsUpdate –Force
After the installation is complete, you need to check the package:
Get-Package -Name PSWindowsUpdate
If you have an older Windows version (Windows 7/8.1/Windows Server 2008 R2/2012 R2) or you don’t have direct Internet access, you can install PSWindowsUpdate manually.
This module can be installed on any supported Windows versions starting from Vista / Windows Server 2008 with PowerShell 2.0 installed (though, PoSh 3.0 or newer is recommended).
After installing the PSWindowsUpdate module on your computer, you can remotely install it on other computers or servers using the Update-WUModule cmdlet. For example, to copy the PSWindowsUpdate module from your computer to two remote servers, run the commands (you need to access the remote servers via SMB protocol, TCP port 445):
$Targets = «lon-fs02», «lon-db01»
Update-WUModule -ComputerName $Targets –Local
To save (export) the PoSh module to a shared network folder for further importing of the module on other computers, run:
Save-Module -Name PSWindowsUpdate –Path \\lon-fs02\psmodules\
Overview of PSWindowsUpdate Cmdlets
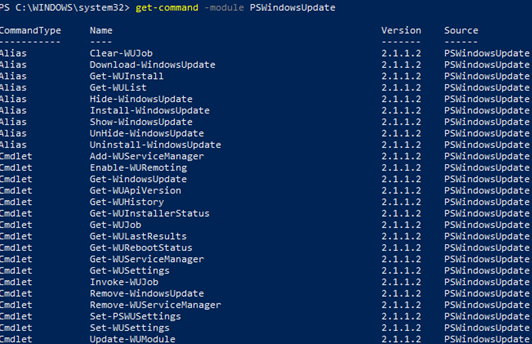
You can display the list of available cmdlets in the PSWindowsUpdate module as follows:
get-command -module PSWindowsUpdate
Let’s describe the usage of the module commands in brief:
- Clear-WUJob – use the Get-WUJob to call the WUJob in Task Scheduler;
- Download-WindowsUpdate (alias for Get-WindowsUpdate –Download ) — get a list of updates and download them;
- Get-WUInstall, Install-WindowsUpdate (alias for Get-WindowsUpdate –Install ) – install updates;
- Hide-WindowsUpdate (alias for Get-WindowsUpdate -Hide:$false ) – hide update;
- Uninstall-WindowsUpdate – remove update using Remove-WindowsUpdate;
- Add-WUServiceManager – register the update server (Windows Update Service Manager) on the computer;
- Enable-WURemoting — enable Windows firewall rules to allow remote use of the PSWindowsUpdate cmdlets;
- Get-WindowsUpdate (Get-WUList) — displays a list of updates that match the specified criteria, allows you to find and install the updates. This is the main cmdlet of the PSWindowsUpdate module. Allows to download and install updates from a WSUS server or Microsoft Update. Allows you to select update categories, specific updates and set the rules of a computer restart when installing the updates;
- Get-WUApiVersion – get the Windows Update Agent version on the computer;
- Get-WUHistory – display a list of installed updates (update history);
- Get-WUInstallerStatus — check the Windows Installer service status;
- Get-WUJob – run WUJob update tasks in the Task Scheduler;
- Get-WULastResults — dates of the last search and installation of updates (LastSearchSuccessDate and LastInstallationSuccessDate);
- Get-WURebootStatus — allows you to check whether a reboot is needed to apply a specific update;
- Get-WUServiceManager – list update sources;
- Get-WUSettings – get Windows Update client settings;
- Invoke-WUJob – remotely call WUJobs jobs in the Task Scheduler to immediately execute PSWindowsUpdate commands;
- Remove-WindowsUpdate – allows to uninstall an update by KB ID;
- Remove-WUServiceManager – disable Windows Update Service Manager;
- Set-PSWUSettings – save PSWindowsUpdate module settings to the XML file;
- Set-WUSettings – configure Windows Update client settings;
- Update-WUModule – update the PSWindowsUpdate module version (you can update the module on a remote computer by copying it from the current one, or updating from PSGallery).
PowerShell: List All Windows Updates Available for a Computer
You can list the updates available for this computer on the update server using the Get-WindowsUpdate or Get-WUList commands.

To check the list of available updates on a remote computer, run this command:
Get-WUList –ComputerName server2
You can check where your Windows should get updates from. Run the following command:

As you can see, the computer is configured to receive updates from the local WSUS server (Windows Server Update Service = True). In this case, you should see a list of updates approved for your computer.
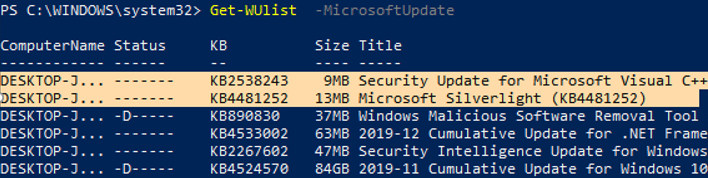
If you want to scan your computer on Microsoft Update servers in the Internet (in addition to Windows updates, these servers contain Office and other Microsoft product updates), run this command:
You will get this warning:
To allow scanning on Microsoft Update, run this command:
Add-WUServiceManager -ServiceID «7971f918-a847-4430-9279-4a52d1efe18d» -AddServiceFlag 7
You can now scan to Microsoft Update. As you can see, in this case, additional updates were found for Microsoft Visual C ++ 2008 and Microsoft Silverlight.
To check the version of the Windows Update Agent on the computer, run the command:

To remove certain products or packages from the list of updates received by your computer, you can exclude them by:
- Category (-NotCategory);
- Title (-NotCategory);
- Update number (-NotKBArticleID).
For example, let’s exclude OneDrive, drivers and the specific KB from the list of updates:
Get-WUlist -NotCategory «Drivers» -NotTitle «OneDrive» -NotKBArticleID KB4489873
Install-WindowsUpdate: Installing Windows Updates with PowerShell
To automatically download and install all available updates for your computer, run the command:
Install-WindowsUpdate -MicrosoftUpdate -AcceptAll -AutoReboot
The AcceptAll key accepts installation of all update packages, and AutoReboot allows Windows to automatically restart after the updates are installed.
You can save the update installation history to the log file (you can use it instead of WindowsUpdate.log file).
Install-WindowsUpdate -AcceptAll -Install -AutoReboot | Out-File «c:\logs\$(get-date -f yyyy-MM-dd)-WindowsUpdate.log» -force
You can install only the specific update packages by KB number:
Get-WindowsUpdate -KBArticleID KB2267602, KB4533002 -Install
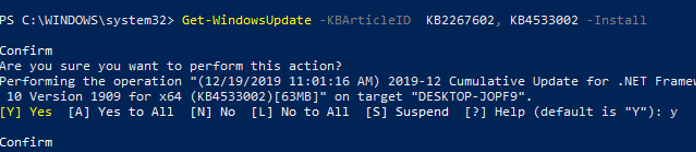
In this case, you need to confirm the installation of each update manually.
If you want to exclude some updates from the installation list, run this command:
Install-WindowsUpdate -NotCategory «Drivers» -NotTitle OneDrive -NotKBArticleID KB4011670 -AcceptAll -IgnoreReboot
Install Windows Update on Remote Computers with PowerShell
The PSWindowsUpdate module allows you to install updates remotely on multiple workstations or servers at once (the PSWindowsUpdate must be installed/imported on these computers). It is very convenient since an administrator doesn’t have to log on manually to all servers when update installation is scheduled.
Almost all PSWindowsUpdate module cmdlets allow you to manage and install updates on remote computers. To do this, use the attribute: -Computername server1, server2, server3
In order to manage updates on remote computers, you need to add host names to your winrm trusted host list:
Install the PSWindowsUpdate module on remote computers and allow to access the process dllhost.exe via dynamic RPC ports in the Windows Defender Firewall.
The following command will install all available updates on three remote servers:
In newer versions of the PSWindowsUpdate module, use the following command to remotely install updates on multiple computers:
You can install updates on a remote computer and send an email report to the administrator:
Install-WindowsUpdate -ComputerName nysrv1 -MicrosoftUpdate -AcceptAll — IgnoreReboot -SendReport –PSWUSettings @
Get-WUHistory: Viewing Windows Update History using PowerShell
Using the Get-WUHistory cmdlet, you can get the list of updates installed on a computer earlier automatically or manually.

You can get the information about the date of installation of a specific update:
Get-WUHistory| Where-Object <$_.Title -match "KB4517389">| Select-Object *|ft

To find out if the update has been installed on multiple remote computers, you can use this PowerShell code:
«server1″,»server2» | Get-WUHistory| Where-Object <$_.Title -match "KB4011634">| Select-Object *|ft
Remove-WindowsUpdate: Uninstalling Windows Updates
To correctly uninstall the updates from PowerShell, you can use the Remove-WindowsUpdate cmdlet. Just specify the KB number as an argument of the KBArticleID parameter. To delay automatic computer restart, add the –NoRestart key:
Remove-WindowsUpdate -KBArticleID KB4489873 -NoRestart
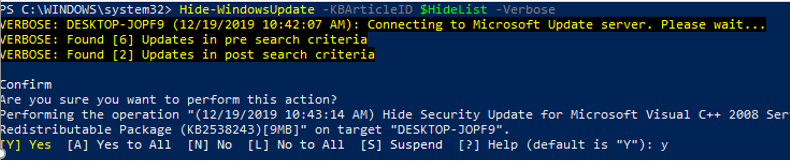
Hide-WindowsUpdate: How to Hide Windows Updates with PowerShell?
You can hide the specific updates so they will be never installed by Windows Update service on your computer (most often you need to hide the driver updates). For example, to hide the KB4489873 and KB4489243 updates, run these commands:
$HideList = «KB4489873», «KB4489243»
Get-WindowsUpdate -KBArticleID $HideList –Hide
Now the next time you scan for updates using the Get-WUInstall command, the hidden updates won’t be displayed in the list of updates available for installation.
This is how you can display the list of updates hidden on this computer:
Notice that the H (Hidden) attribute has appeared in the Status column of hidden updates.

To remove an update from hidden ones, run this command:
Get-WindowsUpdate -KBArticleID $HideList -WithHidden -Hide:$false
Show-WindowsUpdate -KBArticleID $HideList
For those who feel uncomfortable in the PowerShell console, I would recommend a graphic Windows Update MiniTool to manage Windows 10 updates.
Записки IT специалиста
Технический блог специалистов ООО»Интерфейс»
- Главная
- Используем PowerShell для автоматизации установки обновлений
Используем PowerShell для автоматизации установки обновлений
Установка большого количества обновлений Windows Update обычно относится к тем рутинным операциям, которые каждый системный администратор хотел бы как можно сильнее автоматизировать. Действительно, данная задача занимает довольно много времени и требует время от времени отвлекаться, чтобы перейти от одного этапа к другому. Отчасти выручить в этой ситуации может создание собственного дистрибутива, уже включающего все необходимые обновления, но воспользоваться им удается не всегда. Иногда надо просто быстро обновить до актуального состояния какую-либо систему, тогда на помощь нам придет PowerShell.
Кроме того, в режиме аудита Windows 8 использовать Центр обновления Windows нельзя и установить обновления привычным образом не получится.
В этих, а также во многих других, случаях имеет смысл воспользоваться специальным модулем PowerShell для работы с Windows Update. Скачать его можно со страницы разработчика на Technet: Windows Update PowerShell Module. Мы настоятельно рекомендуем скачивать данный модуль именно оттуда.
Данный модуль работает в системах, начиная с Windows Vista и Server 2008 и требует PowerShell 2.0, хотя оптимально будет использование PowerShell 3.0 и выше.
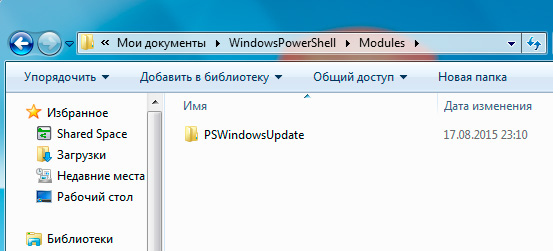
Архив с модулем содержит папку PSWindowsUpdate, которую следует разместить в одном из двух возможных расположений:
Если вы хотите использовать данный модуль на постоянной основе, то имеет смысл разместить его в системной папке, в остальных случаях лучше использовать для этого директорию в профиле пользователя. Учтите, в папке Мои документы отсутствуют вложенные директории WindowsPowerShell и Modules, поэтому их следует создать самостоятельно.
 Что дальше? В принципе уже сейчас можно воспользоваться одним из пакетных скриптов для данного модуля, доступных в сети. Но лучше сначала поработать с ним самостоятельно, после чего создать свой собственный пакетный файл.
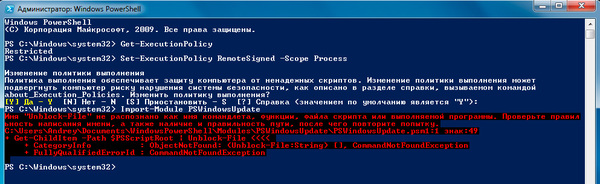
Откроем консоль PowerShell от имени Администратора. Прежде всего выясним установленную политику командой:
По умолчанию обычно установлена политика Restricted, которая запрещает выполнение скриптов даже администратору. Поэтому изменим ее на RemoteSigned, позволяющую запускать локальные скрипты, также, в целях безопасности, рекомендуем изменять политику только для текущего сеанса. Выполним команду:
Ключ -Scope позволяет задавать область применения политики, в данном случае это текущий процесс. Теперь можно выполнить импорт модуля командой:
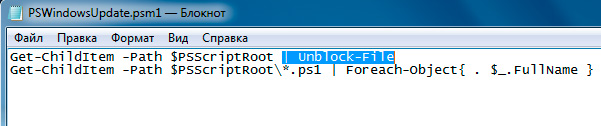
В Windows 7 и иных системах, использующих PowerShell 2.0 вы можете столкнуться со следующей ошибкой: Имя «Unblock-File» не распознано как имя командлета. Она возникает из-за использования в одном из скриптов функции появившейся в PowerShell 3.0.
 Однако ее несложно исправить. В папке с модулем откройте файл PSWindowsUpdate.psm1 и удалите в первой строке последовательность:
 Сохраните исправленный файл и повторите импорт модуля. Теперь можно приступить к работе с ним.
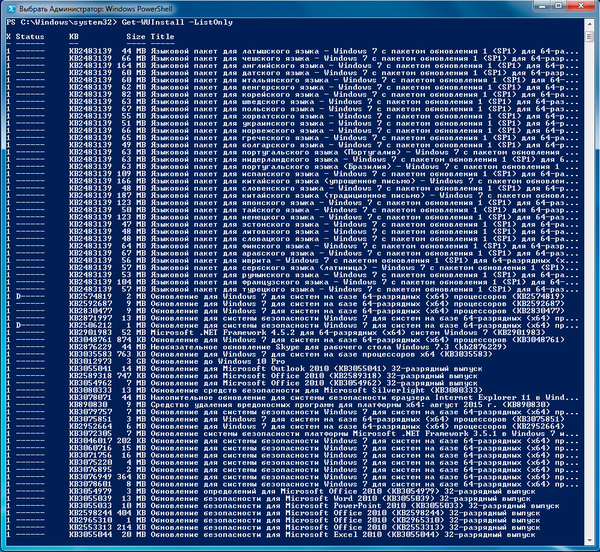
Прежде всего получим список доступных обновлений:
А вот и первый сюрприз, в списке обновлений присутствуют языковые модули, Skype и обновление для перехода на Windows 10. Все это приехало бы на ваш компьютер, воспользуйся вы одним из популярных скриптов для этого модуля, доступных в сети.
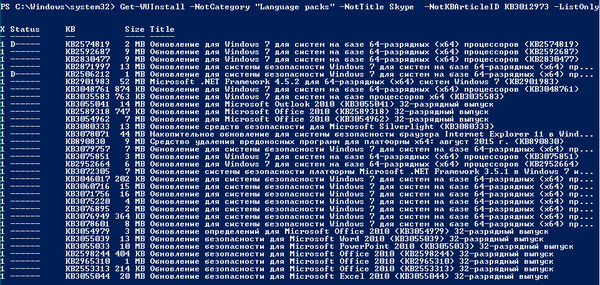
 К счастью модуль обладает широкими возможностями. Мы можем исключить пакеты из списка по их категории, ключ -NotCategory, названию, ключ -NotTitle, или номеру обновления, ключ -NotKBArticleID. Используем каждый из них, в нашем случае уберем категорию языковых пакетов, Skype и обновление до Windows 10:
Вот, уже гораздо лучше.
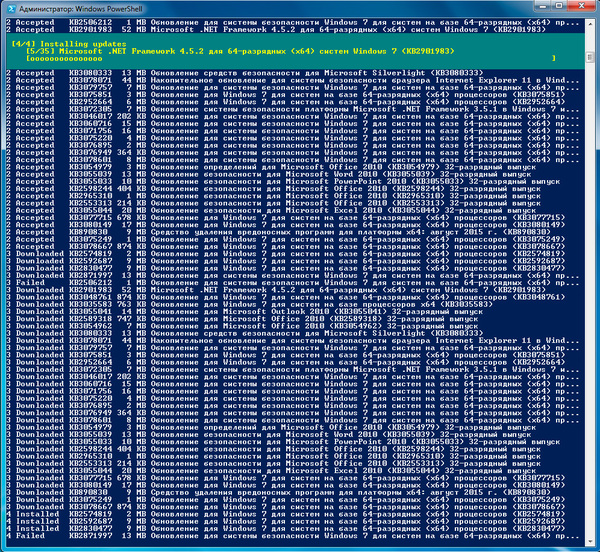
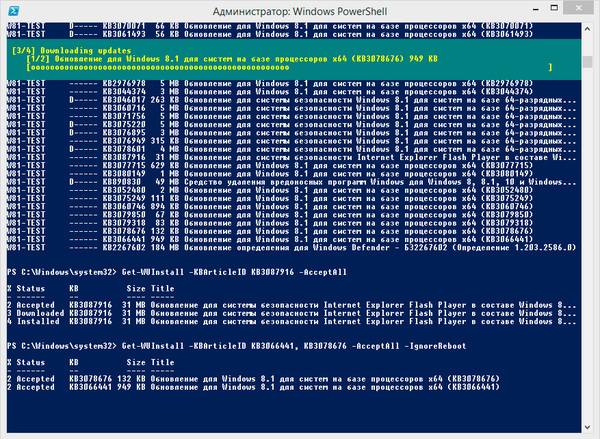
 Теперь можно установить обновления командой:
Ключи -AcceptAll и -IgnoreReboot включают одобрение всех пакетов и подавляют требование перезагрузки после установки некоторых обновлений.
 Убедившись, что все работает как надо, можно создать собственный пакетный файл, откроем блокнот и в одну строку запишем:
Данная команда запускает PowerShell, устанавливает политику RemoteSigned, импортирует модуль, затем передает ему вышеуказанную команду. В общем делает все тоже самое, что мы только-что выполнили вручную. Сохраните данный файл как PSWindowsUpdate.cmd и теперь все что вам потребуется, это разместить модуль в нужном расположении и запустить данный пакетный файл с правами администратора.
Удобно? Да. Правда учтите, что некоторые обновления требуют обязательной установки предыдущих, поэтому, если вы давно не обновлялись, данный скрипт придется запускать несколько раз. Но это все равно проще, чем проделывать все эти операции вручную, кликнул на скрипт и занимайся своими делами, время от времени поглядывая на экран.
В Windows 8 языковые пакеты через WindowsUpdate не распространяются, поэтому команду можно немного упростить.
Однако на этом возможности данного модуля не заканчиваются, он позволяет быстро установить нужные обновления зная только их номер. Это значительно облегчает задачу, так как не надо посещать сайт Microsoft, искать необходимую статью и скачивать пакет именно для вашей версии системы.
Для установки отдельного пакета используйте команду (номер пакета использован исключительно для примера):
Если надо установить несколько пакетов, то разделите их номера запятыми и добавьте ключ -IgnoreReboot, например:
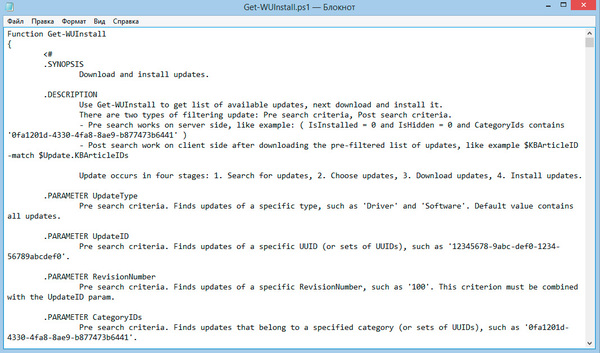
Мы не ставили своей целью дать в данной статье полный обзор этого модуля, сфокусировавшись на решении конкретной задачи. Поэтому, если вас заинтересовали иные возможности данного модуля, то обратитесь к встроенной справке. Для этого откройте в блокноте файл интересующей функции, например, Get-WUInstall.ps1, каждый из которых автор снабдил подробным описанием.
 Надеемся, что данный материал поможет вам автоматизировать некоторые рутинные задачи и добавит в ваш арсенал новый, удобный инструмент.
Помогла статья? Поддержи автора и новые статьи будут выходить чаще:
Или подпишись на наш Телеграм-канал: