- Настройка PPTP-клиента в Linux
- Комментарии:
- Записки IT специалиста
- Настраиваем VPN сервер. Часть 3 — PPTP. Платформа Linux.
- Настройка сервера PPTP
- Настройка клиентских ПК
- Дополнительные материалы:
- Connect to a PPTP VPN Server from Ubuntu Linux
- Setting up a PPTP VPN Server on Debian/Ubuntu
- Quick setup: Copy and Paste
- Install the PPTPD package
- Setup VPN and DNS IP addresses
- Add usernames and passwords
- Enable forwarding and create iptables rules
- Create a VPN connection on your computer
Настройка PPTP-клиента в Linux
Недавно автору этих строк понадобилось настроить PPTP-соединение в Linux. После чтения документации оказалось что всё очень просто.
Приводимые здесь инструкции применимы в первую очередь для Debian/Ubuntu, однако, скорее всего без больших изменений ими можно воспользоваться и на других дистрибутивах.
Во-первых нужно установить несколько пакетов:
Во-вторых создаём файл /etc/ppp/peers/vpn0 следующего содержания:
Далее открываем в редакторе файл /etc/ppp/chap-secrets и добавляем строку:
Наконец выполняем команду:
И всё работает. В системе должен появиться новый ppp-интерфейс. Проверить это можно командой:
Если же соединения не происходит, то можно попытаться выполнить команду:
И посмотреть какие ошибки будут выданы на экран.
Если нужно чтобы соединение выполнялось автоматически при загрузке компьютера, то нужно добавить в файл /etc/network/interfaces строки:
Таким способом автор успешно подключается к описанному ранее PPTP-серверу.
Комментарии:
Небольшое дополнение: чтобы вальнуть весь трафик через vpn нужно добавить в /etc/ppp/peers/vpn0 строчку:
Единственным недостатком такого подключения является то, что, если по каким либо причинам соединение разорвалось, то интерфейс падает и не переподключается. Мне нужно было создать впн подключение, что бы оно было на фиксированном интерфейсе(для создания правил в iptables), при разрыве переподключалось и не пересоздавала интерфейс(что бы можно было удобно всё это дело мониторить по snmp)
В общем нашел такое решение в роутере ASUS wl500gP, и сплагатил их конфиг себе
Ну собственно создаём файл /etc/ppp/peers/vpn0 с таким содержимым:
noauth refuse-eap
user ‘ ‘
password ‘ ‘
connect true
sync pty ‘pptp —idle-wait 0 —nolaunchpppd —nobuffer —sync’
lock
idle 1800 demand
maxfail 0
#Отвечает за переподключение при падении соединения
persist
ktune
default-asyncmap nopcomp noaccomp
novj nobsdcomp nodeflate
lcp-echo-interval 10
lcp-echo-failure 6
defaultroute
#Создадим подключение на интерфейсе ppp999
unit 999
Anonymous 2011-06-24 11:22:53 (#)
Уважаемый MooSE, не могли бы Вы дополнить статью нюансами подключения к офисному pptp-серверу (построеному по http://www.ylsoftware.com/news/538) через домашний роутер (типа TRENDnet TEW-432BRP). Несколько часов блуждания по форумам успеха не принесли. Напрямую, без роутера, всё работает.
Не могу:) Да и не хочу:) Потому что я знаю в чём проблема и решать еёё дело не благодарное. Сабжевый роутер скорее всего использует классический NAT, описанный ещё в RFC 1631. Этот NAT не содержит хаков для поддержки PPTP, который defective by design.
Моё ИМХО: или ставить роутер с соответствующими хаками, или не использовать сей арахичный протокол, ибо существуют куда как более вменяемые альтернативы.
Основная проблема PPTP в том что он использует GRE, который не работает через NAT. Есть роутеры, которые палят пакеты, идущие на tcp/1723 и вытаскивают из них информацию о туннеле после чего его корректно натят. Но это нарушение RFC 1631. Так что нафиг такое счастье.
Источник
Записки IT специалиста
Технический блог специалистов ООО»Интерфейс»
- Главная
- Настраиваем VPN сервер. Часть 3 — PPTP. Платформа Linux.
Настраиваем VPN сервер. Часть 3 — PPTP. Платформа Linux.

Рассмотрев в предыдущих частях теоретические вопросы перейдем к практической реализации. Сегодня мы рассмотрим создание VPN сервера PPTP на платформе Ubuntu Server. Данный материал рассчитан на читателей, имеющих навыки работы с Linux, поэтому мы не будем отвлекаться на вещи описанные нами в других статьях, таких как настройку сети и т.п. Если вы испытываете затруднения — предварительно изучите другие наши материалы.
Практическое знакомство с VPN мы начнем с PPTP, как наиболее простого в реализации. Однако следует помнить о том, что это слабозащищенный протокол и его не следует использовать для доступа к критически важным данным.
Рассмотрим схему, которую мы создали в нашей тестовой лаборатории для практического знакомства с данной технологией:

У нас имеется локальная сеть 10.0.0.0/24 с сервером терминалов 10.0.0.2 и роутером10.0.0.1, который будет выполнять функции VPN сервера, для VPN мы зарезервировали сеть 10.0.1.0/24. Внешний интерфейс сервера имеет условный выделенный IP адрес X.X.X.X. Наша цель — предоставить удаленным клиентам доступ к терминальному серверу и общим ресурсам на нем.
Настройка сервера PPTP
Установим пакет pptpd реализующий функционал PPTP VPN:
Теперь откроем файл /etc/pptpd.conf и зададим основные настройки VPN сервера. Перейдем в самый конец файла, где укажем адрес сервера в VPN сети:
И диапазон адресов для выдачи клиентам:
Адресов нужно выделить не меньше, чем возможных одновременных соединений, лучше с небольшим запасом, так как их увеличение без перезапуска pptpd невозможно. Также находим и раскомментируем строку:
Это позволит передавать VPN клиентам широковещательные пакеты внутренней сети.
Также можно использовать опции listen и speed, первая позволяет указать IP адрес локального интерфейса для прослушивания входящих PPTP соединений, второй указать скорость VPN соединений в бит/с. Например разрешим серверу принимать PPTP соединения только с внешнего интерфейса:
Более тонкие настройки находятся в файле /etc/ppp/pptpd-options. Настройки по умолчанию вполне соответствуют нашим требованиям, однако кратко рассмотрим некоторые из них, чтобы вы имели представление о их назначении.
Секция #Encryption отвечает за шифрование данных и проверку подлинности. Данные опции запрещают использование устаревших и небезопасных протоколов PAP, CHAP и MS-CHAP:
Далее предписывается использовать безопасный протокол проверки подлинности MS-CHAP v2 и 128-битное шифрование MPPE-128:
Следующая секция #Network and Routing, здесь следует обратить внимание на опцию ms-dns, которая позволяет использовать DNS сервер во внутренней сети. Это может быть полезно при доменной структуре сети или наличия в ней DNS сервера который содержит имена всех ПК сети, что дает возможность обращаться к компьютерам по их именам, а не только по IP. В нашем случае данная опция бесполезна и закомментирована. Подобным образом можно задать и адрес WINS сервера опцией ms-wins.
Здесь же находится опция proxyarp, включающая, как несложно догадаться из названия, поддержку сервером Proxy ARP.
В секции #Miscellaneous содержится опция lock, которая ограничивает клиента одним подключением.
На этом настройку сервера можно считать законченной, осталось создать пользователей. Для этого внесем необходимые записи в /etc/ppp/chap-secrets. Записи должны иметь вид:
Первая запись позволяет подключаться к серверу пользователю ivanov c паролем 123 и присваивает ему произвольный IP адрес, вторая создает пользователя petrov с паролем 456, которому при подключении будет присваиваться постоянный адрес 10.0.1.201.
Важное замечание! Если pptpd не хочет перезапускаться, зависая на старте, а в /var/log/syslog добавляя строку long config file line ignored обязательно добавьте в конец файла /etc/pptpd.conf перенос строки.
Наш сервер готов к работе.
Настройка клиентских ПК
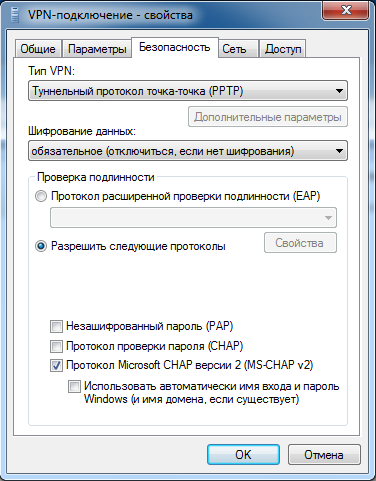
В общем случае достаточно настроить VPN соединение с опциями по умолчанию. Однако мы советуем явно указать тип соединения и отключить лишние протоколы шифрования.
 Далее, в зависимости от структуры сети, необходимо указать статические маршруты и основной шлюз. Эти вопросы подробно разбирались в предыдущих частях.
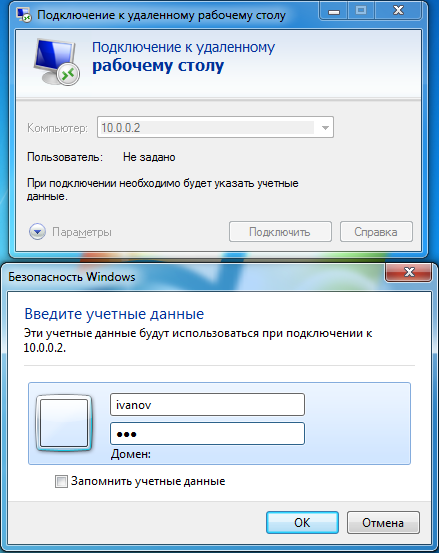
Устанавливаем VPN соединение и пробуем пропинговать какой либо ПК в локальной сети, мы без каких либо затруднений получили доступ к терминальному серверу:
 Теперь еще одно важное дополнение. В большинстве случаев доступ к компьютерам локальной сети будет возможен только по IP адресам, т.е. путь \\10.0.0.2 будет работать, а \\SERVER — нет. Это может оказаться неудобным и непривычным для пользователей. Существует несколько способов решения данной проблемы.
Если локальная сеть имеет доменную структуру, достаточно указать DNS сервером для VPN подключения DNS сервер контроллера домена. Воспользуйтесь опцией ms-dns в /etc/ppp/pptpd-options сервера и данные настройки будут получены клиентом автоматически.
Если DNS сервер в локальной сети отсутствует, то можно создать и использовать WINS сервер, информацию о нем также можно автоматически передавать клиентам при помощи опции ms-wins. И наконец, если удаленных клиентов немного, использовать на клиентских ПК файлы hosts (C:\Windows\System32\drivers\etc\hosts), куда следует добавить строки вида:
По одной для каждого ПК в локальной сети к ресурсам которого требуется доступ.
Дополнительные материалы:
Помогла статья? Поддержи автора и новые статьи будут выходить чаще:

Или подпишись на наш Телеграм-канал: 
Источник
Connect to a PPTP VPN Server from Ubuntu Linux
This howto outlines how to connect to a PPTP VPN server from a Linux computer running Ubuntu (or a Ubuntu based distribution). It covers the installing of the PPTP VPN client, configuration, and connecting/disconnecting from the VPN connection.
Installing the PPTP client for Linux on Ubuntu
The PPTP VPN client package is packaged under the name “pptp-linux” in the Ubuntu repositories. You can install it using the following command:
Configuring the PPTP VPN connection
Start by editing the chap-secrets file, which will contain the username and password to use for the new connection.
This is what a blank, default chap-secrets file looks like:
Add in the username and password, along with a name to identify that this will be used for the PPTP VPN connection. In this howto I am using the name “workvpn”.
The format should be:
You can space out the sections if you want them to line up with the headings at the top of the file. A * character can be used for the IP address if you are assigned a IP address from the server.
Example chap-secrets file with the details entered:
Save and exit the chap-secrets file.
Create a new ppp peers file for the new vpn connection. To make life easy, name it the same as the “server” section in the chap-secrets.
Paste in the following lines, and modify to suit:
Modify the VPN server address from “vpn.server.hostname.here.com” to either the IP address, or DNS hostname of the destination PPTP VPN server.
Modify the “name” parameter to use the username you set up in the chap-secrets file earlier.
The “remotename” parameter must match the “server” name in the chap-secrets file. The ipparam parameter is used for the route script later on. Keep it the same as the “remotename” parameter to make things easier to manage and remember.
Save the file and exit the editor.
Create a route script that will get run after the PPP connection establishes.
This script will get run whenever any PPP connection is established, so using the below script, we specify that the route is only added if the PPP connection that gets established is for “workvpn”.
Replace 192.168.20.0/24 with the network mask of the remote network you are connecting into. Make sure that your local LAN and the remote LAN aren’t on the same network range, or you may get connectivity issues.
If you need need to route more networks over the VPN connection, simply add another route line directly underneath the existing route line.
Save the file and exit the editor.
Make the vpn route script executable:
The configuration of the PPTP VPN connection is now complete.
Connecting to the PPTP VPN Server
To connect to the remote PPTP VPN server, issue the following command:
Where “workvpn” is the name used previously to identify the VPN connection.
To confirm that the connection is up, run ‘ifconfig’ to ensure a ppp interface gets created, and assigned an IP address.
If its all working so far, use ‘route -n’ to make sure the routes have been configured.
If the ppp connection doesn’t get established, check the /var/log/messages log file for errors:
$ sudo tail -n 50 /var/log/messages
Disconnecting from the PPTP VPN Server
The simplest way to disconnect from the PPP connection is to use the following command:
To kill all active PPP connections, you can use the following:
or, to explicitly disconnect just one PPP session, assuming you know the PPP device name you want to disconnect, you can run the following command:
Replace ppp0 with the device name you wish to disconnect
Источник
Setting up a PPTP VPN Server on Debian/Ubuntu

Last month the undersea cable SEA-ME-WE 4 cable was cut near Egypt causing a massive degradation of internet speed in India. For me several websites including the world’s 6th popular website Wikipedia didn’t load at all. And to make matters worse I wasn’t able to access my own blog :'( as it was located in Dallas (so traffic had to pass through damaged cable). So I quickly setup VPN server on an AWS micro instance running Linux (Ubuntu) and accessed everything I wanted, so here I am writing this article for the benefit of all netizens. To create a similar type of VPN server in windows read this tutorial. You’ll find a lot of articles on the internet with the similar topic but in this article I’ll keep the configuration part as short as possible setting up only the bare minimum to get a PPTP VPN server running in the time it takes to make noodles!
Quick setup: Copy and Paste
This section is for the impatient. All you have to do is login to your Debian/Ubuntu server and copy paste the following commands and you’ll have a working VPN server in less than 2 mins.
In this section I assume you’re logged in as the root user, do NOT have any instance of pptpd installed now or earlier and the “net.ipv4.ip_forward” is commented in the /etc/sysctl.conf file.
Notice the bolded username and password you should change it to your preferred combination. To save IPtables rules read this tutorial. Proceed to creating a VPN connection.
Install the PPTPD package
On Debian/Ubuntu operating systems
Setup VPN and DNS IP addresses
Edit the following file
And add the following lines to the end
You can use any private IP address range just make sure it is not already used in your local network and the local IP and the remote IP are in the same range.
Edit the following file to mention DNS servers
Add the following lines to the end
You can use any DNS server here I’m using Google Public DNS just as an example.
Add usernames and passwords
Edit the following file
and add username/password combinations one in each line in the following format
If only you are going to use this VPN server a single username/password combination is enough.
Restart the pptpd service
Enable forwarding and create iptables rules
Our main purpose of setting up this VPN server is to access website right ? So our traffic has to be forwarded out of the VPN server’s public network interface.
Enable port forwarding on Linux by editing the sysctl.conf file
Add or find and comment out the following line
Save, close the file and run the following command to make the changes take effect.
The following iptables firewall rules allow port 1723, GRE and perform NAT
In the last rule replace “eth0” with the interface connecting to the internet on your VPN server. Finally the following rule is required to ensure websites load properly
Replace 172.20.1.0/24 with the IP address range used in the “remoteip” option in the /etc/pptpd.conf this firewall rule is used to ensure a proper MTU value is used to prevent fragmentation. To save the IPTables rules read this article.
Create a VPN connection on your computer
If you are using Linux at home refer this article.
Windows users follow the instructions below.
1. Navigate to Control Panel\Network and Internet\Network and Sharing Center and click “Setup a new connection or network”.
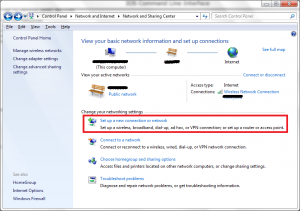 Choose setup a new connection or network from Network and Sharing Center
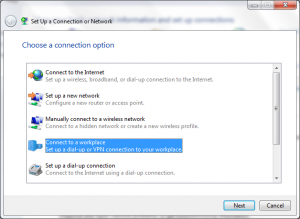
2. Choose “Connect to a workplace” option and click next.
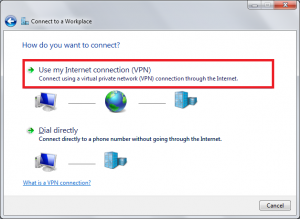
3. Under “How do you want to connect?” click “Use my internet connection (VPN)”.
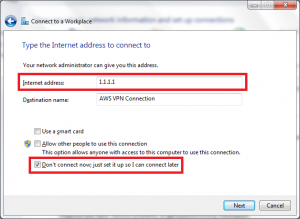
4. Enter the public IP address or the FQDN of the VPN server configured previously, enter a name for the VPN connection, also check “Don’t connect now; just set it up so I can connect later” and click next.
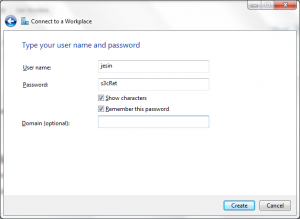
5. In the final screen enter an username/password combination from the chap-secrets file, click create and close.
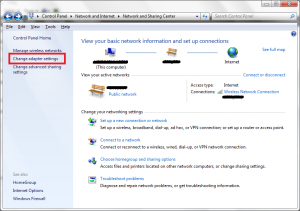
6. Back in the “Network and sharing center” from the top left click “Change Adapter Settings”.
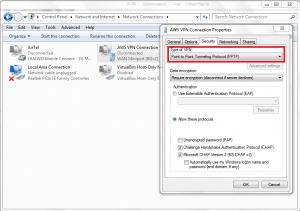
7. Right-click the VPN connection created now, go to properties, choose the “Security” tab, under “Type of VPN” select “Point to Point Tunneling Protocol (PPTP)” and click OK.
8. Now click connect, fire your favourite browser and go to this page to check if you are using a different IP address.
Any problems/suggestions just comment below. Happy browsing .
Hire me to setup this PPTP VPN on your server.
Источник


