- What to do before you sell, give away, or trade in your Mac
- Create a backup
- Sign out of iTunes in macOS Mojave or earlier
- Sign out of iCloud
- Sign out of iMessage
- Reset NVRAM
- Optional: Unpair Bluetooth devices that you’re keeping
- Erase your hard drive and reinstall macOS
- About Startup Security Utility
- Open Startup Security Utility
- Set a firmware password
- Change Secure Boot settings
- Full Security
- Medium Security
- No Security
- About System Information on your Mac
- Customize your Mac with System Preferences
- Explore system preferences
- Set options in a preference pane
- Find options in System Preferences
- Customize System Preferences
- Проверка правописания и грамматики на Mac
- Использование автокоррекции
- Проверка правописания и грамматики
- Выбор языков для автоматической проверки правописания
What to do before you sell, give away, or trade in your Mac
Back up your data, then restore to factory settings by turning off certain features and services, erasing your Mac, and reinstalling macOS.
Moving to a new Mac? Before taking these steps, you can use Migration Assistant to move your files from the old Mac to your new Mac.
Create a backup
Make sure that you have a current backup of your important files. Learn how to back up your Mac.
Sign out of iTunes in macOS Mojave or earlier
If you’re using macOS Mojave or earlier, open iTunes. From the menu bar at the top of the screen or iTunes window, choose Account > Authorizations > Deauthorize This Computer. Then enter your Apple ID and password and click Deauthorize.
Learn more about deauthorizing computers used with your iTunes account.
Sign out of iCloud
If you’re using macOS Catalina or later, choose Apple menu > System Preferences, then click Apple ID. Select Overview in the sidebar, then click Sign Out.
If you’re using macOS Mojave or earlier, choose Apple menu > System Preferences, click iCloud, then click Sign Out.
You will be asked whether to keep a copy of your iCloud data on this Mac. You can click Keep a Copy, because you’re erasing your Mac later. Your iCloud data remains in iCloud and on any other devices that are signed in to iCloud with your Apple ID.
Sign out of iMessage
If you’re using OS X Mountain Lion or later, open the Messages app, then choose Messages > Preferences from the menu bar. Click iMessage, then click Sign Out.
Reset NVRAM
Shut down your Mac, then turn it on and immediately press and hold these four keys together: Option, Command, P, and R. Release the keys after about 20 seconds. This clears user settings from memory and restores certain security features that might have been altered.
Optional: Unpair Bluetooth devices that you’re keeping
If your Mac is paired with a Bluetooth keyboard, mouse, trackpad, or other Bluetooth device that you plan to keep, you can unpair it. This optional step prevents accidental input when the Mac and device have separate owners but remain in Bluetooth range of each other.
If you’re unpairing Bluetooth input devices from a desktop computer such as an iMac, Mac mini, or Mac Pro, you must plug in a USB keyboard and mouse to complete the remaining steps in this article.
To unpair a Bluetooth device, choose Apple menu > System Preferences, then click Bluetooth. Move your pointer over the device that you want to unpair, then click the remove (x) button next to the device name.
Erase your hard drive and reinstall macOS
The best way to restore your Mac to factory settings is to erase your hard drive and reinstall macOS.
After macOS installation is complete, the Mac restarts to a setup assistant that asks you to choose a country or region. To leave the Mac in an out-of-box state, don’t continue setup. Instead, press Command-Q to shut down the Mac. When the new owner turns on the Mac, the setup assistant guides them through the setup process.
No matter the model or condition, we can turn your device into something good for you and good for the planet: Learn how to trade in or recycle your Mac with Apple Trade In.
Источник
About Startup Security Utility
Use Startup Security Utility to make sure that your Mac always starts up from your designated startup disk, and always from a legitimate, trusted operating system.
If you’re using a Mac with the Apple T2 Security Chip, Startup Security Utility offers three features to help secure your Mac against unauthorized access: Firmware password protection, Secure Boot, and External Boot.

Open Startup Security Utility
- Turn on your Mac, then press and hold Command (⌘)-R immediately after you see the Apple logo. Your Mac starts up from macOS Recovery.
- When you’re asked to select a user you know the password for, select the user, click Next, then enter their administrator password.
- When you see the macOS utilities window, choose Utilities > Startup Security Utility from the menu bar.
- When you’re asked to authenticate, click Enter macOS Password, then choose an administrator account and enter its password.
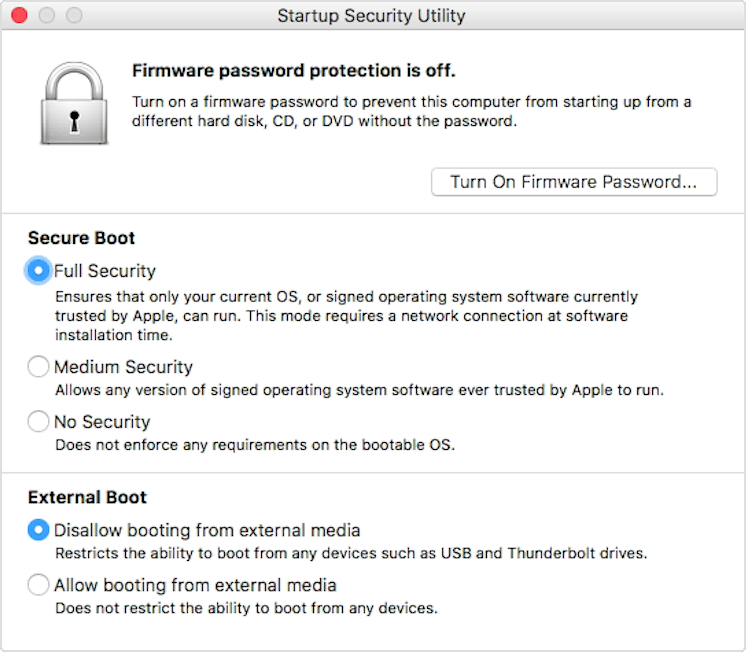
Set a firmware password
You can use a firmware password to prevent anyone who doesn’t have the password from starting up from a disk other than your designated startup disk. To set a firmware password in Startup Security Utility, click Turn On Firmware Password, then follow the onscreen instructions. Learn more about firmware passwords.
You can also change your external boot setting to prevent even those who know the firmware password from starting up from external media.
Change Secure Boot settings
Use these settings to make sure that your Mac always starts up from a legitimate, trusted operating system.
Full Security
Full Security is the default setting, offering the highest level of security. This is a level of security previously available only on iOS devices.
During startup, your Mac verifies the integrity of the operating system (OS) on your startup disk to make sure that it’s legitimate. If the OS is unknown or can’t be verified as legitimate, your Mac connects to Apple to download the updated integrity information it needs to verify the OS. This information is unique to your Mac, and it ensures that your Mac starts up from an OS that is trusted by Apple.
If FileVault is enabled while your Mac is attempting to download updated integrity information, you’re asked to enter a password to unlock the disk. Enter your administrator password, then click Unlock to complete the download.
If the OS doesn’t pass verification:
- macOS: An alert informs you that a software update is required to use this startup disk. Click Update to open the macOS installer, which you can use to reinstall macOS on the startup disk. Or click Startup Disk and choose a different startup disk, which your Mac will also attempt to verify.
- Windows: An alert informs you that you need to install windows with Boot Camp Assistant.
If your Mac can’t connect to the Internet, it displays an alert that an Internet connection is required.
- Check your Internet connection, such as by choosing an active network from Wi-Fi status menu in the menu bar. Then click Try Again.
- Or click Startup Disk and choose a different startup disk.
- Or use Startup Security Utility to lower the security level
Medium Security
During startup when Medium Security is turned on, your Mac verifies the OS on your startup disk only by making sure that it has been properly signed by Apple (macOS) or Microsoft (Windows). This doesn’t require an Internet connection or updated integrity information from Apple, so it doesn’t prevent your Mac from using an OS that is no longer trusted by Apple.
If the OS doesn’t pass verification:
- macOS: An alert informs you that a software update is required to use this startup disk. Click Update to open the macOS installer, which you can use to reinstall macOS on the startup disk. This requires an Internet connection. Or click Startup Disk and choose a different startup disk, which your Mac will also attempt to verify.
- Windows: An alert informs you that you need to install windows with Boot Camp Assistant.
No Security
No Security doesn’t enforce any of the above security requirements for your startup disk.
Источник
About System Information on your Mac
Use the System Information app to see a summary of information about your Mac hardware, software, and network.
The System Information app provides detailed specifications and other information about your Mac hardware and software, including your network and external devices. In some versions of OS X, this app is called System Profiler.
Choose Apple menu > About This Mac. This opens an overview of your Mac, including your Mac model, processor, memory, serial number, and version of macOS. To see the greater detail provided by the System Information app, click the System Report button.

To open System Information directly, press and hold the Option key and choose Apple menu > System Information. You can also use Spotlight to find System Information, or open it from the Utilities folder of your Applications folder.
System Information opens to a system report for your Mac:
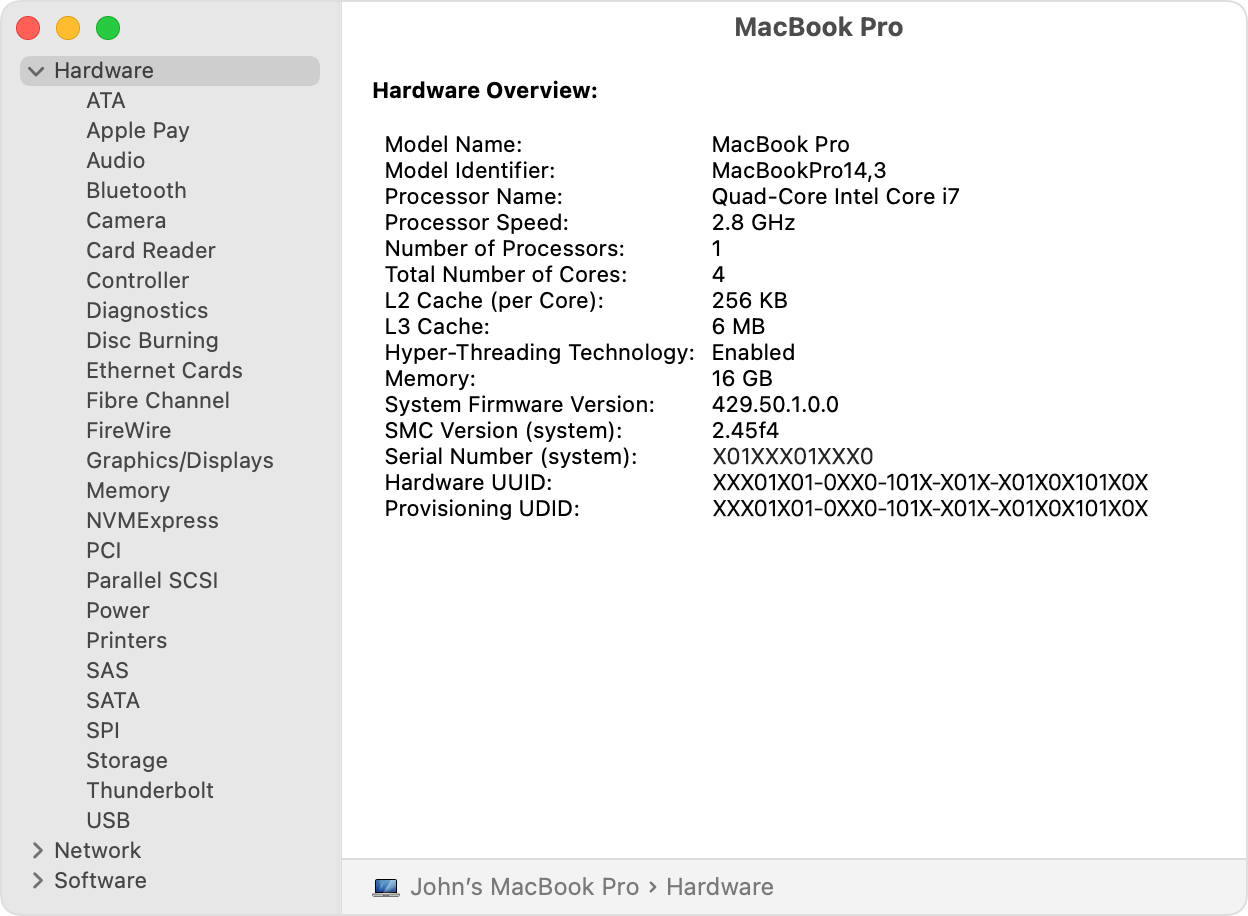
Select items in the sidebar to see information about each item. For example:
- The Hardware section shows your Mac serial number
- The Memory section shows how much RAM is installed in each internal memory slot.
- The Software section shows which startup disk (boot volume) your Mac is using.
- The Network section shows details such as your IP address, the connections allowed by your macOS firewall, the signal strength of nearby Wi-Fi networks, and more.
Источник
Customize your Mac with System Preferences
You can change system settings to customize your Mac. For example, you can change the size and location of the Dock, choose a light or dark appearance, change the desktop picture, and more.

To change System Preferences on your Mac, click the System Preferences icon  in the Dock or choose Apple menu

Explore system preferences
Options for your Mac are organized into preferences. For example, options you can set for Spotlight are located in Spotlight preferences.
Preferences appear as a grid of icons; the icons shown may vary depending on your Mac and the apps you have installed. Click an icon to open a preference pane and see the options.

Set options in a preference pane
Each preference pane contains options you can set. Most panes include a Help button  to click for more information about the options.

Some preference panes are locked to protect your Mac. If the lock at the bottom left of a pane is locked  , click it to unlock the preference pane.
Find options in System Preferences
If you don’t know where to find an option in System Preferences, use the search field at the top of the window. Options that match your search text are listed, and the preference panes where they’re located are highlighted.

Customize System Preferences
Hide a preference: Choose View > Customize, deselect the checkbox of the preference, then click Done at the top of the window.
Show a hidden preference: Choose View > Customize, select the checkbox of the hidden preference, then click Done at the top of the window.
Reorganize preferences: Choose View > Organize by Categories or Organize Alphabetically.
If you see a red badge on the System Preferences icon in the Dock, you need to take one or more actions. For example, if you didn’t fully set up iCloud, the badge appears on the icon in the Dock; when you click the icon, the preferences are displayed so you can complete setup.
To change options for an app, such as Mail or Safari, open the app, click the app’s name in the menu bar, then choose Preferences. Some apps don’t offer preferences.
Источник
Проверка правописания и грамматики на Mac
Во многих приложениях macOS правописание проверяется по мере ввода текста и ошибки исправляются автоматически. Можно отключить эту функцию и использовать другие параметры проверки правописания при вводе сообщений электронной почты, текстовых сообщений и документов.
Спросите Siri. Произнесите, например: «Как пишется [слово]?» Узнайте, как спросить Siri.
Использование автокоррекции
При проверке правописания приложение подчеркивает неправильно введенные слова красной линией и предлагает варианты замены.
На Mac выберите пункт меню «Apple»

> «Системные настройки», нажмите «Клавиатура», затем нажмите «Текст».
Установите флажок «Автоматически исправлять ошибки».
Начните вводить текст в приложении.
Если распознаны слова с ошибками, выполните следующее.
Как принять предложенный вариант: Если приложение предложило только один вариант замены, просто продолжите ввод текста — слово будет исправлено автоматически. Если предложено несколько вариантов, выберите нужный вариант.
Как игнорировать предложенные варианты: Нажмите клавишу Escape и продолжайте вводить текст.
Как отменить автоматически внесенное исправление: Автоматически исправленное слово на некоторое время подчеркивается синей линией. Чтобы восстановить исходное написание, поместите курсор непосредственно после исправленного слова — на экране появится исходный вариант написания. Выберите его. Можно также нажать слово, удерживая клавишу Control. На экране также появится исходный вариант, и его можно выбрать.
Чтобы отключить автокоррекцию в определенном приложении, откройте ее, выберите пункт меню «Правка» > «Правописание и грамматика» > «Автоматически исправлять ошибки» (если этот флажок не отображается, автокоррекция отключена).
Даже если в меню «Правка» приложения нет команды проверки правописания или грамматики, проверьте настройки или меню этого приложения — возможно, в нем предусмотрено собственное средство проверки правописания.
Если при вводе текста нажать клавишу F5, будут отображаться предлагаемые варианты слов (в зависимости от модели Mac может потребоваться также нажать клавишу Fn). Если у Вашего Mac есть панель Touch Bar, в настройках можно включить показ вариантов для ввода в панели Touch Bar.
Примечание. Чтобы при вводе первого слова предложения или имен (например, Санкт-Петербург или Михаил) со строчной буквы она автоматически заменялась прописной, установите флажок «Автоматически писать слова с заглавной буквы» в панели «Текст» настроек клавиатуры.
Проверка правописания и грамматики
В приложениях на Mac можно сделать следующее.
Как проверить правописание. Выберите «Правка» > «Правописание и грамматика» > «Проверить документ сейчас». Выделяется первая ошибка. Чтобы перейти к следующей ошибке, нажмите Command-точка с запятой (;). Чтобы посмотреть предлагаемые варианты написания слова, щелкните его мышью при нажатой клавише Control.
Как проверить грамматику: Выберите «Правка» > «Правописание и грамматика» > «Проверять грамматику и правописание» (флажок показывает, что эта функция включена). Грамматические ошибки подчеркиваются зеленой линией. Наведите курсор на подчеркнутое слово, чтобы прочитать описание ошибки.
Примечание. Проверка грамматики доступна только для английского и испанского языков.
Как игнорировать слова с ошибками: Нажмите слово, удерживая клавишу Control, затем выберите «Игнорировать правописание». Если найденное слово встречается несколько раз, то в текущем документе оно будет пропущено, а во всех остальных документах — выделено.
Как добавить слово в орфографический словарь: Нажмите слово, удерживая клавишу Control, затем выберите «Запомнить правописание». Это слово не будет отмечаться как ошибочное ни в каких документах.
Удаление слова из орфографического словаря. Нажмите слово, удерживая клавишу Control, затем выберите «Не запоминать правописание».
При проверке длинных документов иногда удобнее пользоваться окном «Правописание и грамматика». Выберите «Правка» > «Правописание и грамматика» > «Показать правописание и грамматику».
Выбор языков для автоматической проверки правописания
По умолчанию правописание проверяется автоматически вне зависимости от того, какой язык используется на компьютере Mac. Можно добавить и другие языки.
На Mac выберите пункт меню «Apple»
> «Системные настройки», нажмите «Клавиатура», затем нажмите «Текст».
Для этого выполните следующее:
Проверка правописания для одного языка. Нажмите всплывающее меню «Правописание» и выберите язык.
Проверка правописания для нескольких языков. Нажмите всплывающее меню «Правописание», выберите «Настроить», выберите все нужные языки и нажмите «Готово».
Источник


