- Pre shared key vpn windows 10
- Настройка предварительного ключа для использования с подключениями протокола туннелинга 2-го уровня в Windows Server 2003
- Аннотация
- Настройка предварительного ключа для VPN-клиента
- Типы VPN-подключений VPN connection types
- Встроенный клиент VPN Built-in VPN client
- Подключаемый модуль VPN универсальной платформы Windows Universal Windows Platform VPN plug-in
- Настройка типа подключения Configure connection type
- What is a Pre-Shared Key and how do you get it [VPN]
- 5 Best VPNs we recommend
- What is a Pre-Shared Key?
- How to get a preshared key for your VPN?
- How to find Shared Secret VPN Windows
- The VPN shared secret is incorrect
- Final thoughts on VPN Pre-Shared Keys
Pre shared key vpn windows 10


Внимание! Для корректной работы VPN по протоколу L2TP/IPSec потребуется редактирование реестра Windows (добавление параметра). Эта проблема указана на официальном сайте Microsoft: https://support.microsoft.com/en-us/kb/926179. Как отредактировать реестр будет описано в п.1 данной инструкции. Если Вы не готовы внести исправление в реестр Windows, то в качестве протокола VPN для Windows Вы можете использовать PPTP (настройки здесь), работа с которым не требует исправления реестра.

2. После правки реестра можно приступать к созданию VPN L2TP/IPSec подключения. Войдите в меню Пуск и выберите пункт «Параметры»:

3. В открывшемся окне «Параметры Windows» щелкните на значок «Сеть и Интернет»:

4. В окне «Сеть и Интернет» щелкните на значок «VPN»:

5. В окне «VPN» щелкните на ссылку «Добавить VPN-подключение»:

6. На следующей странице:
* в списке «Поставщик услуг VPN» выберите Windows (встроенные)
* в поле «Имя подключения» введите VPN-SMART
* в поле «Имя или адрес сервера» укажите выданный Вам ip-адрес Вашего VPN-сервера
* в поле «Тип VPN» выберите «L2TP/IPSec с предварительным ключом»
* в поле «Общий ключ» введите выданный Вам IPSec pre-shared key
* в поле «Тип данных для входа» выберите «Имя пользователя и пароль»
* в полях «Имя пользователя» и «Пароль» укажите полученные Вами Имя пользователя VPN и Пароль VPN
* поставьте галочку «Запомнить мои данные для входа» и нажмите кнопку «Сохранить»:

7. На открывшейся странице мы увидем только-что созданное подключение VPN-SMART. Но перед подключением необходимо ещё настроить параметры адаптера. Нажмите на «Настройка параметров адаптера»:

8. В открывшемся окне выделяем VPN-SMART и в его контекстном меню (правая кнопка мыши) нажимаем на «Свойства»:

9. На вкладке «Общие» ещё раз проверьте адрес Вашего VPN-сервера:


11. Теперь всё готово. Можно подключаться к VPN серверу. Для этого в окне «Сеть и интернет» нажимаем на кнопку «Подключиться». Если кнопки Подключиться, Дополнительные Параметры и Удалить не отображаются, то для их отображения следует предварительно нажать на «VPN-SMART»:

В дальнейшем, после того как VPN подключение уже было создано, VPN канал включается/выключается кликами мышки по иконке «Сеть»:
Настройка предварительного ключа для использования с подключениями протокола туннелинга 2-го уровня в Windows Server 2003
В этой статье обсуждается настройка предварительного ключа для использования с протоколом L2TP.
Исходная версия продукта: Windows Server 2003
Исходный номер КБ: 324258
Аннотация
Чтобы использовать L2TP в Microsoft Windows Server 2003, необходимо иметь инфраструктуру открытых ключей (PKI) для выдачи сертификатов компьютера серверу виртуальной частной сети (VPN) и клиентам, чтобы можно было пройти проверку подлинности IKE.
В Windows Server 2003 для проверки подлинности IKE можно использовать предопластояный ключ. Эта функция полезна в средах, в которых в настоящее время не используется PKI, или в ситуациях, когда серверы Windows Server 2003 L2TP используют подключения к сторонним VPN-серверам, которые поддерживают только предварительно заранее открытые ключи.
Корпорация Майкрософт не рекомендует использовать предоплавационные ключи, так как это менее безопасный способ проверки подлинности, чем сертификаты. Предварительные ключи не предназначены для замены использования сертификатов; Вместо этого предварительные ключи являются еще одним методом тестирования и внутренних операций. Майкрософт настоятельно рекомендует по возможности использовать сертификаты с L2TP.
В следующих разделах описано, как настроить предоплаплаваемые ключи как на клиенте L2TP, так и на сервере. Если вы используете операционную систему Windows Server 2003 как для клиентского, так и для VPN-сервера, выполните инструкции в обоих разделах, чтобы L2TP, использующий заранее открытый ключ, работал. Если вы используете VPN-клиент Windows Server 2003 и сторонний VPN-сервер, необходимо следовать шагам, которые необходимо предпринять в разделе «Настройка предварительного доступа к клиенту VPN» этой статьи, а также настроить предоплаваемые ключи на сторонном устройстве.
Настройка предварительного ключа для VPN-клиента
На Панели управления дважды щелкните Сетевые подключения.
В разделе «Виртуальная частная сеть» щелкните правой кнопкой мыши подключение, для которого необходимо использовать предоплачную клавишу, и выберите «Свойства».
Щелкните вкладку Безопасность.
Щелкните «Параметры IPSec».
Параметры IPSec можно затенять, если на вкладке «Сеть» для типа VPN установлено VPN PPTP. Предварительно настроенный ключ можно настроить, только если для этого параметра установлено значение L2TP IPSec VPN или Автоматически.
Щелкните, чтобы выбрать предоплаляемую клавишу «Использовать» для проверки подлинности.
В поле «Ключ» введите предварительное значение ключа. Это значение должно соответствовать значению предварительного ключа, введенного на vpn-сервере.
Два раза нажмите кнопку ОК .
Типы VPN-подключений VPN connection types
Относится к: Applies to
- Windows 10 Windows 10
- Windows 10 Mobile Windows 10 Mobile
Виртуальные частные сети (VPN) — это соединения точка-точка в частной или общедоступной сети, например в Интернете. Virtual private networks (VPNs) are point-to-point connections across a private or public network, such as the Internet. VPN-клиент использует специальные протоколы на основе TCP/IP или UDP, которые называют протоколами тунеллирования, для виртуального вызова виртуального порта VPN-сервера. A VPN client uses special TCP/IP or UDP-based protocols, called tunneling protocols, to make a virtual call to a virtual port on a VPN server. В стандартом развертывании VPN клиент инициирует виртуальное соединение точка-точка с сервером удаленного доступа через Интернет. In a typical VPN deployment, a client initiates a virtual point-to-point connection to a remote access server over the Internet. Сервер удаленного доступа отвечает на вызов, проверяет подлинность вызывающей стороны и передает данные между VPN-клиентом и частной сетью организации. The remote access server answers the call, authenticates the caller, and transfers data between the VPN client and the organization’s private network.
Существует множество вариантов VPN-клиентов. There are many options for VPN clients. В Windows 10 встроенный подключаемый модуль и платформа подключаемых модулей VPN универсальной платформы Windows (UWP) основаны на VPN-платформе Windows. In Windows 10, the built-in plug-in and the Universal Windows Platform (UWP) VPN plug-in platform are built on top of the Windows VPN platform. В этом руководстве рассматриваются клиенты VPN-платформы Windows и возможности, которые можно настроить. This guide focuses on the Windows VPN platform clients and the features that can be configured.
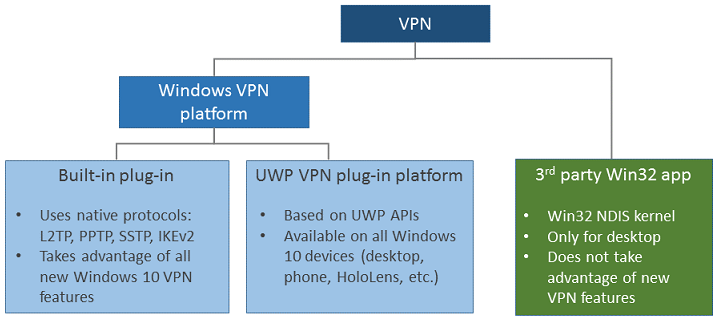
Встроенный клиент VPN Built-in VPN client
Протоколы тунеллирования Tunneling protocols
Настройте свойства шифрования туннеля IPsec/IKE с помощью параметр Пакет средств криптографической защиты в разделе Поставщик службы конфигурации (CSP) VPNv2. Configure the IPsec/IKE tunnel cryptographic properties using the Cryptography Suite setting in the VPNv2 Configuration Service Provider (CSP).
L2TP с проверкой подлинности с общим ключом (PSK) можно настроить с помощью параметра L2tpPsk в разделе VPNv2 CSP. L2TP with pre-shared key (PSK) authentication can be configured using the L2tpPsk setting in the VPNv2 CSP.
SSTP поддерживается только в выпусках Windows для настольных компьютеров. SSTP is supported for Windows desktop editions only. SSTP невозможно настроить с помощью решения управления мобильными устройствами (MDM), но это один из протоколов, который система пытается использовать, если выбран параметр Автоматически. SSTP cannot be configured using mobile device management (MDM), but it is one of the protocols attempted in the Automatic option.
Когда используется VPN-плагин, адаптер будет указан как адаптер SSTP, несмотря на то, что протокол VPN, используемый, является протоколом подключаемого подключения. When a VPN plug-in is used, the adapter will be listed as an SSTP adapter, even though the VPN protocol used is the plug-in’s protocol.
Параметр Автоматически означает, что устройство будет пытаться использовать каждый из встроенных протоколов тунеллирования до успешного подключения. The Automatic option means that the device will try each of the built-in tunneling protocols until one succeeds. Перебор идет от наиболее безопасного до наименее безопасного. It will attempt from most secure to least secure.
Выберите значение Автоматически для параметра NativeProtocolType в разделе VPNv2 CSP. Configure Automatic for the NativeProtocolType setting in the VPNv2 CSP.
Подключаемый модуль VPN универсальной платформы Windows Universal Windows Platform VPN plug-in
Подключаемые модули VPN универсальной платформы Windows (UWP) были представлены в Windows 10, хотя первоначально отдельные версии были доступны для платформ Windows 8.1 Mobile и Windows 8.1. The Universal Windows Platform (UWP) VPN plug-ins were introduced in Windows 10, although there were originally separate versions available for the Windows 8.1 Mobile and Windows 8.1 PC platforms. При использовании платформы UWP сторонние поставщики VPN могут создавать подключаемые модули, размещаемые в контейнере приложений, с помощью API-интерфейсов WinRT, что упрощает процесс и устраняет проблемы, связанные с написанием драйверов системного уровня. Using the UWP platform, third-party VPN providers can create app-containerized plug-ins using WinRT APIs, eliminating the complexity and problems often associated with writing to system-level drivers.
Существует ряд VPN-приложений универсальной платформы Windows, такие как Pulse Secure, Cisco AnyConnect, F5 Access, Sonicwall Mobile Connect и Check Point Capsule. There are a number of Universal Windows Platform VPN applications, such as Pulse Secure, Cisco AnyConnect, F5 Access, Sonicwall Mobile Connect, and Check Point Capsule. Если вы хотите использовать подключаемый модуль VPN платформы UWP, обратитесь к поставщику за сведения о настройке вашего решения VPN. If you want to use a UWP VPN plug-in, work with your vendor for any custom settings needed to configure your VPN solution.
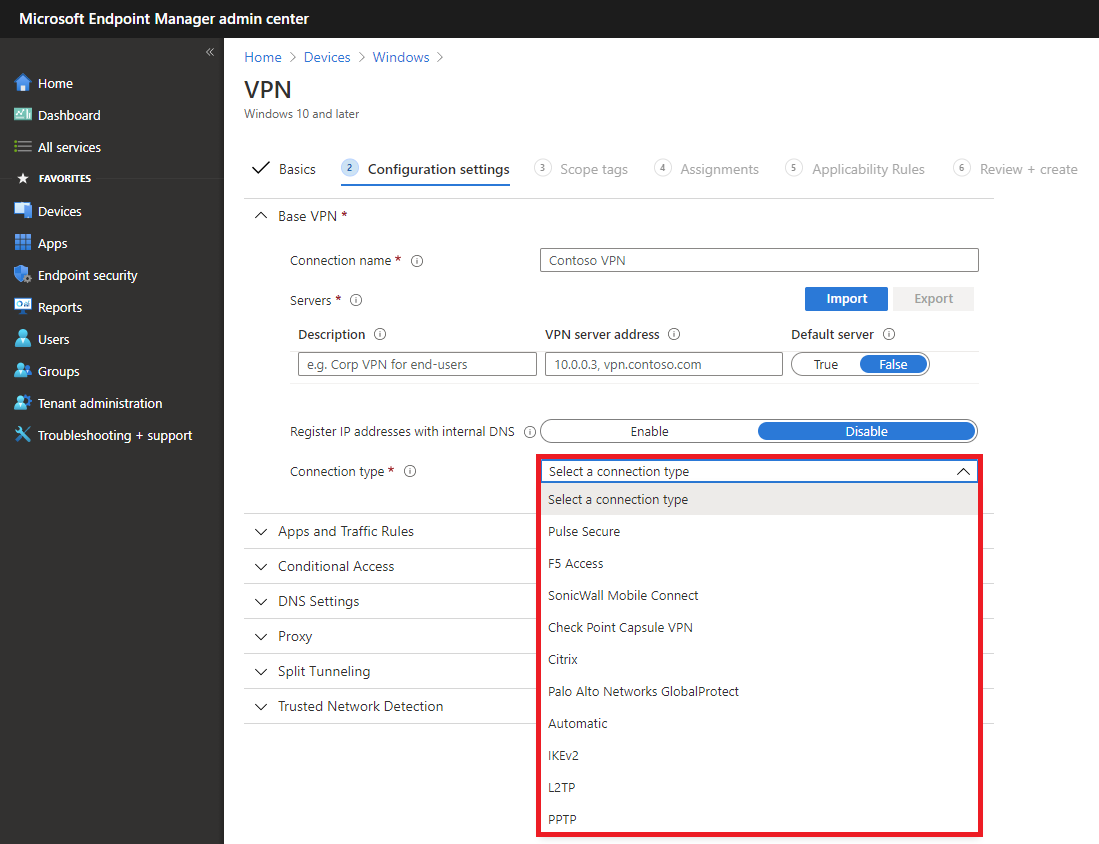
Настройка типа подключения Configure connection type
Сведения о настройке XML см. в разделе Параметры профиля VPN и VPNv2 CSP. See VPN profile options and VPNv2 CSP for XML configuration.
На следующем изображении показаны параметры подключения в политике конфигурации профилей VPN с помощью Microsoft Intune: The following image shows connection options in a VPN Profile configuration policy using Microsoft Intune:
В Intune можно также включить настраиваемый XML для сторонних профилей подключаемого подключения: In Intune, you can also include custom XML for third-party plug-in profiles:
What is a Pre-Shared Key and how do you get it [VPN]

- Nowadays, VPNs have become somewhat of an epitome of privacy and security. But that would’ve been impossible without strong security protocols.
- For instance, certain VPN protocols involve using a Pre-Shared Key (PSK), which can be a great extra layer of security.
- Check out our VPN Section for the latest VPN news, tools, and guides.
- Visit our Security Hub to learn more about keeping your online identity safe.

Nowadays, VPNs have become somewhat of an epitome of privacy and security. Of course, this type of service wouldn’t have reached this level of trust, was it not for strong security measures.
If you’re familiar with VPNs, you probably know that they encrypt traffic. More so, you can’t just waltz yourself inside a VPN server, as you’d most likely need some sort of authentication.
Most services tackle this issue by making you create accounts, which are subsequently whitelisted, so you can access the VPN without an issue. But there’s way more to it than sees the eye.
Pre-shared keys (PSK), for instance, are a great example of additional security measures that you’ve probably never even heard of.
5 Best VPNs we recommend
| 79% Off + 2 free Months |  Check offer! Check offer! | |
| 83% Off (2.25$/Month) + 3 free Months | Check offer! | |
| 68% Off + 1, 12 or 24 free Months (random prize) | Check offer! | |
| 83% Off (2.21$/Month) + 3 free Months | Check offer! | |
| 76% (2.83$) on 2 Years plan | Check offer! |
What is a Pre-Shared Key?
A Pre-Shared Key (PSK) is a string of characters (so basically a password) that various services, including VPNs, rely on as an authentication method. However, note that PSKs are not exactly secure by themselves.
After its creation, the PSK needs to be shared with every device that has to use it. However, great caution must be practiced upon sharing the PSK, as revealing it to third-parties might easily jeopardize the security of your connection.
Furthermore, since the PSK needs to be exactly the same on all devices, it’s like a password that you use for multiple accounts (bad idea). All it takes is one device to be compromised for the PSK to become useless, or rather dangerous.
For those reasons, Pre-Shared Keys are used in conjunction with other similar security measures, such as traditional usernames and passwords.
Also, to increase their level of security, they must be long and random, to prevent them from being cracked by brute-forcing.
How to get a preshared key for your VPN?
There’s a lot of confusion when it comes to PSK. Most users believe that you have to acquire the PSK from a special place, but in fact, the PSK can be anything you want if you’re a VPN host.
On the other hand, if you’re about to connect to a VPN server, you might need a PSK, which you can get by asking the VPN server host.
For instance, your workplace might have a dedicated VPN that you can connect to, in order to be on the same network with your colleagues and share company resources. If that’s the case, just ask the network administrator for the Pre-Shared Key.
Last, but not least, you can use third-party tools such as password generators to create complicated keys. They’re usually more secure than coming up with your own password, which, let’s be serious, is almost always something easy to remember.
How to find Shared Secret VPN Windows
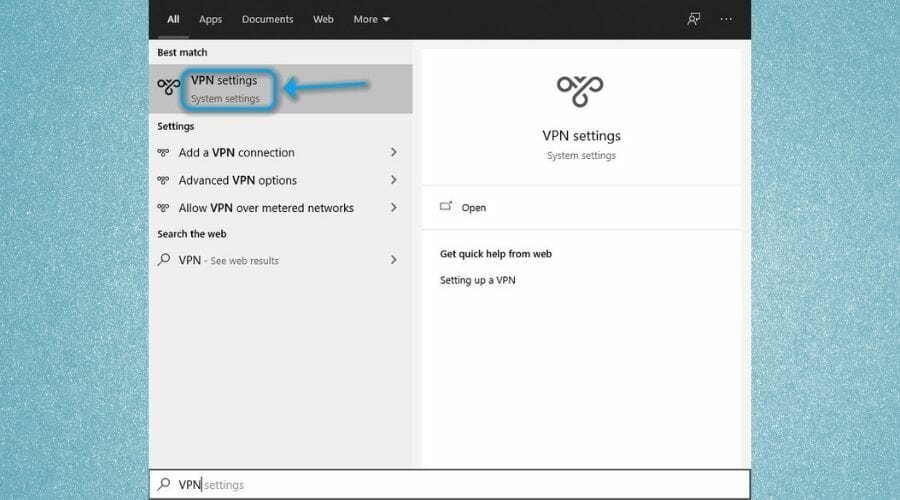
You can configure a Pre-Shared Key easily, especially if you’re using Windows’ built-in VPN feature. We’ll teach you how to find the Pre-Shared Key in a few easy steps:
- Press the Win key on your keyboard
- Type VPN
- Click VPN settings

- Select your secured VPN connection from the list
- Click Advanced options
- Press the Edit button
- Select L2TP/IPsec with pre-shared key from the VPN type menu
- Type the PSK in the appropriate field
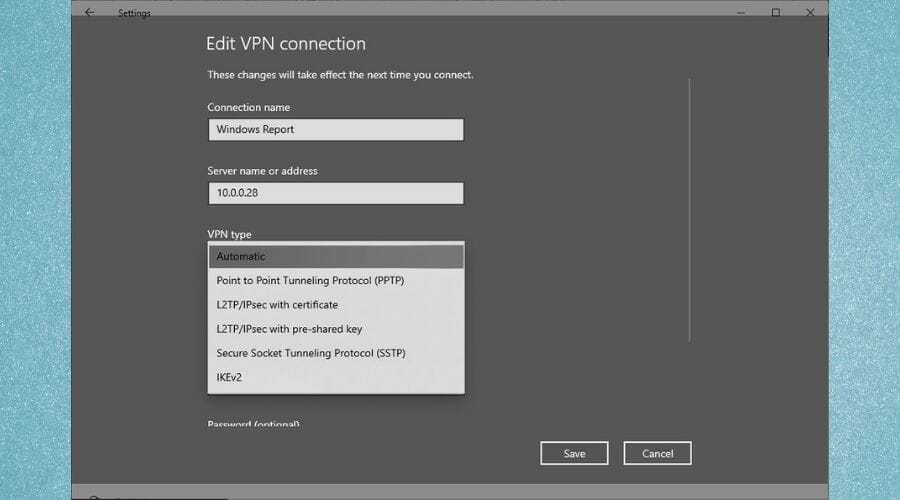
Alternatively: create a new VPN connection, if necessary, but make sure to choose L2TP/IPsec as the VPN type if your network uses a Pre-Shared Key.
If you were looking for ways to reveal a hidden PSK from an existing VPN connection, there’s no way to do that. Back in the day, you could’ve used an asterisk password revealer, or something similar.
However, those tools haven’t been working for a while, so there’s no way to reveal a PSK that’s been already saved to a VPN connection.
The VPN shared secret is incorrect
If your Pre-Shared Key is not typed correctly in the field we’ve mentioned above, you won’t be able to establish the connection. This could happen for two reasons:
- You didn’t copy/paste the PSK correctly within the appropriate field
- The VPN server administrator changed the key, and you need to acquire the new one
It’s not uncommon to paste your password all wrong, it happens to everyone once in a while. Just make sure you didn’t include any spaces before or after the PSK.
Final thoughts on VPN Pre-Shared Keys
All things considered, PSKs are quite useful tools that can help you secure a server with an additional security layer. Keep in mind that a PSK is not even near enough to secure things, especially given that multiple devices can use it.
However, setting a long, random PSK and changing it on a regular basis can definitely help you increase the security of your VPN server.


