- Решение проблемы с бесконечной подготовкой автоматического восстановления Windows 10
- Важная информация
- Способ 1: Загрузка в «Безопасном режиме»
- Способ 2: Специальные средства
- Способ 3: Отключение автоматического восстановления
- Способ 4: Точки восстановления
- Способ 5: Проверка оборудования
- Способ 6: Переустановка системы
- 2021 Quick Fix: Windows 10 Preparing Automatic Repair Loop
- #Guide 1:В Windows Preparing Automatic Repair Error
- Symptoms of Windows Preparing Automatic RepairВ Error
- Causes of WindowsВ «Preparing Automatic Repair»В orВ «Automatic Repair Loop»
- #Guide 2:В Rescue Windows Data from Preparing Automatic Repair Loop
- Method 1. Recover Data from Automatic Repair Computer with Bootable Data Recovery Software
- Method 2. Manually Get Data Off Automatic Repair Computer Drive on Another PC
- All Workable Solutions for Automatic Repair Loop with Blue & Black Screen
- #Guide 3-1: How to Fix WindowsВ Automatic Repair Loop with Blue Screen
- Fix 1. Extend the System Partition
- Fix 2. Disable Early Launch Anti-Malware Protection
- Fix 3. Run System File Checker & CHKDSK Disk Utility
- Fix 4. Rebuild BCD
- Fix 5. Restore Windows Registry
- Fix 6. Perform System Restore
- #Guide 3-2: How to Fix Preparing Automatic Repair Loop with BlackВ Screen
- Fix 1. Perform a Hard Reboot
- Fix 2. Boot into Safe Mode
- Fix 3. Disable Automatic Repair
- Fix 4. Refresh or Reset PC
- Fix 5. Fresh Install or Reinstall Windows 10
- It’s Your Turn, Bring Life Back on Your Computer
Решение проблемы с бесконечной подготовкой автоматического восстановления Windows 10
Важная информация
В ситуации с бесконечной подготовкой автоматического восстановления программы и данные становятся недоступными. Все действия будут выполняться в восстановительной среде Виндовс. Понадобится загрузочная флешка или диск, которые легко можно создать на другом компьютере. О том, как это сделать, подробно написано в отдельных статьях.
Сначала сделайте «жесткую перезагрузку» – нажмите соответствующую кнопку на системном блоке стационарного компьютера. Ноутбук отключите от сети и выньте батарею. Затем зажмите кнопку питания на 15-20 секунд, вставьте аккумулятор, подсоедините устройство к электросети и включите его. Если система не загрузилась, переходите к описанным ниже способам.
Способ 1: Загрузка в «Безопасном режиме»
Попробуйте загрузить Windows 10 в «Безопасном режиме». В этом случае задействуется минимальный набор файлов и компонентов, что увеличивает шанс успешного запуска. Если причиной проблемы стали какие-нибудь поврежденные системные файлы, то в БР при помощи утилит от Microsoft, SFC и DISM, можно выявить их и заменить правильными копиями.
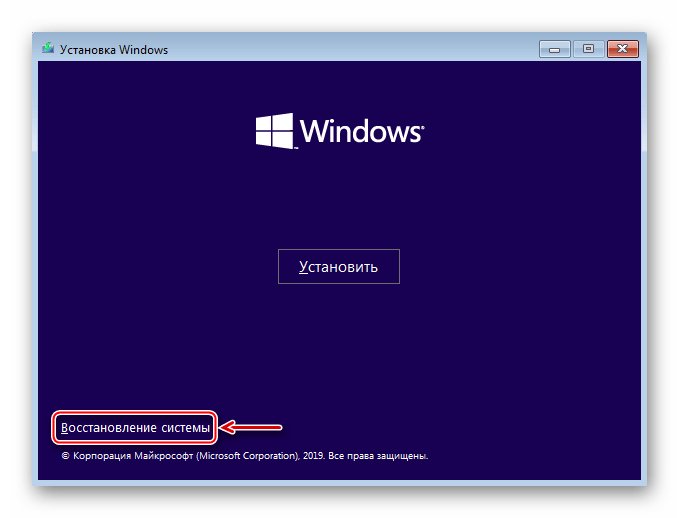
- Загружаемся с помощью загрузочной флешки, настраиваем языковые параметры и жмем «Далее».

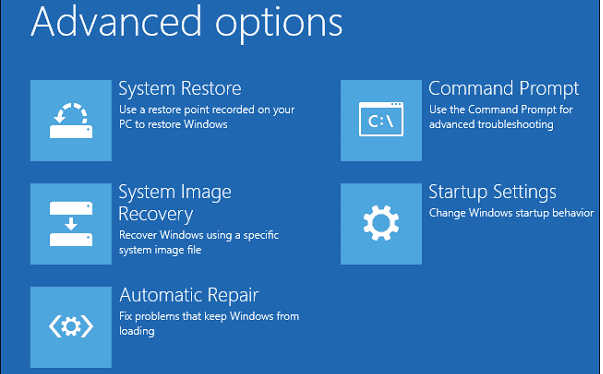
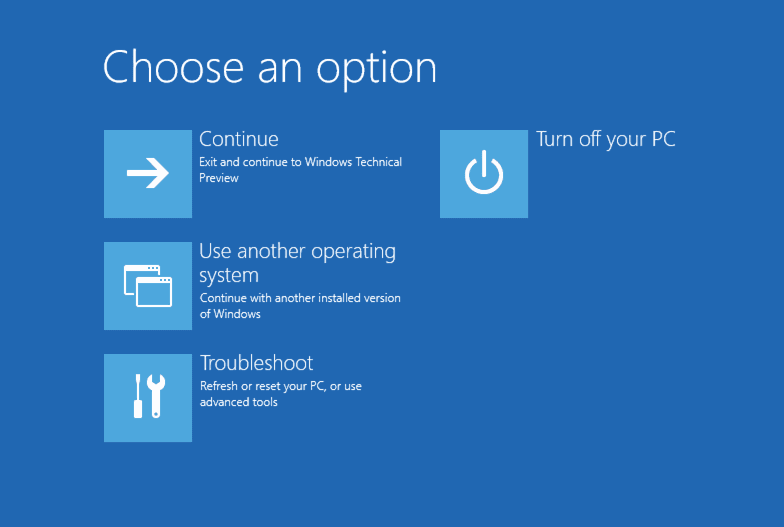
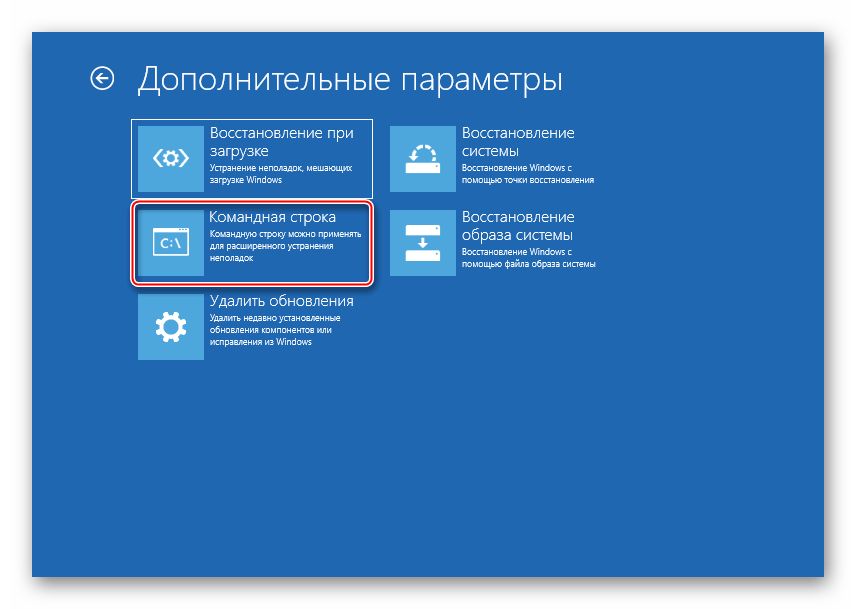
Выбираем «Поиск и устранение неисправностей».

Запускаем «Командную строку».
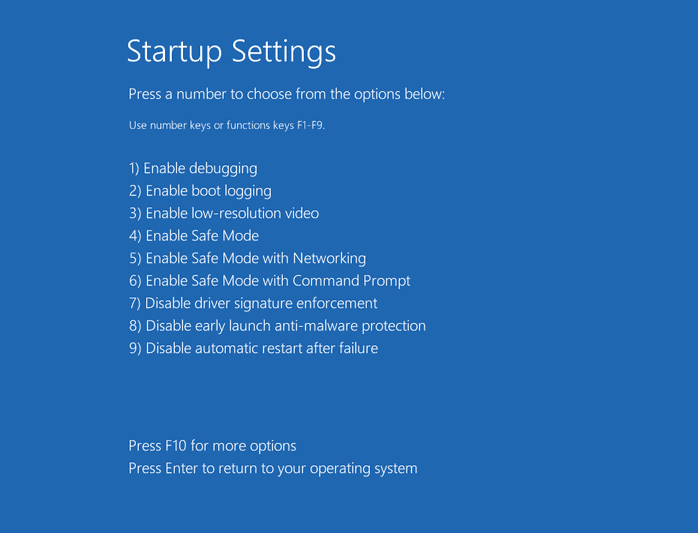
bcdedit /set
и нажимаем «Enter». Следующая загрузка Виндовс 10 будет в «Безопасном режиме».
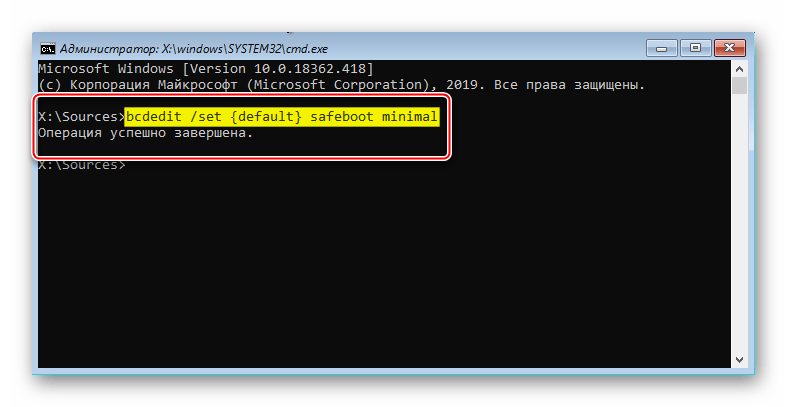
Теперь закрываем консоль и нажимаем «Продолжить».

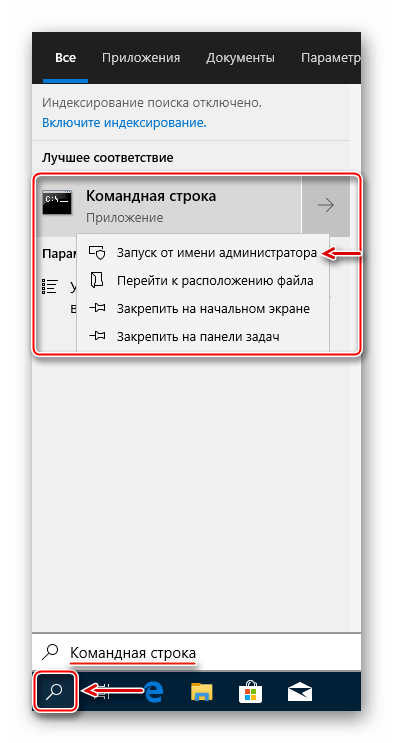
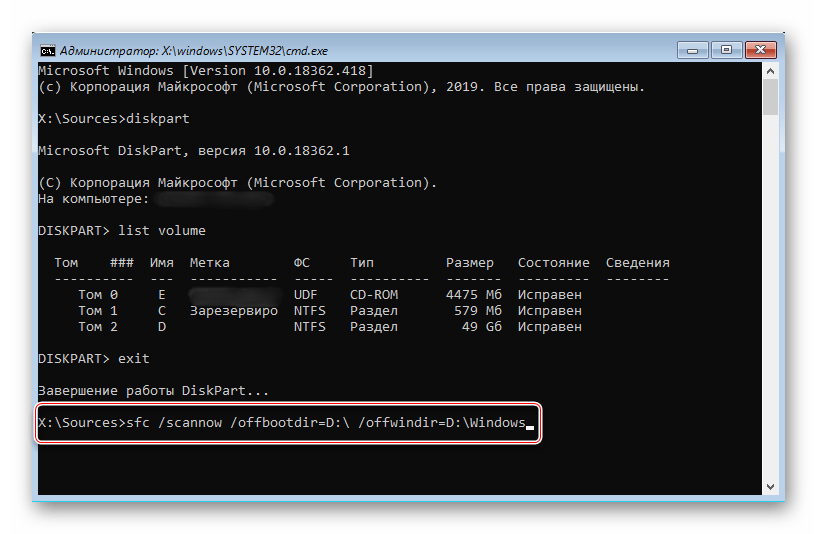
Если для входа в систему использовалась учетная запись, придется ввести ее пароль, даже если до этого стоял ПИН-код. В поиске Виндовс вводим «Командная строка» и запускаем приложение от имени администратора.
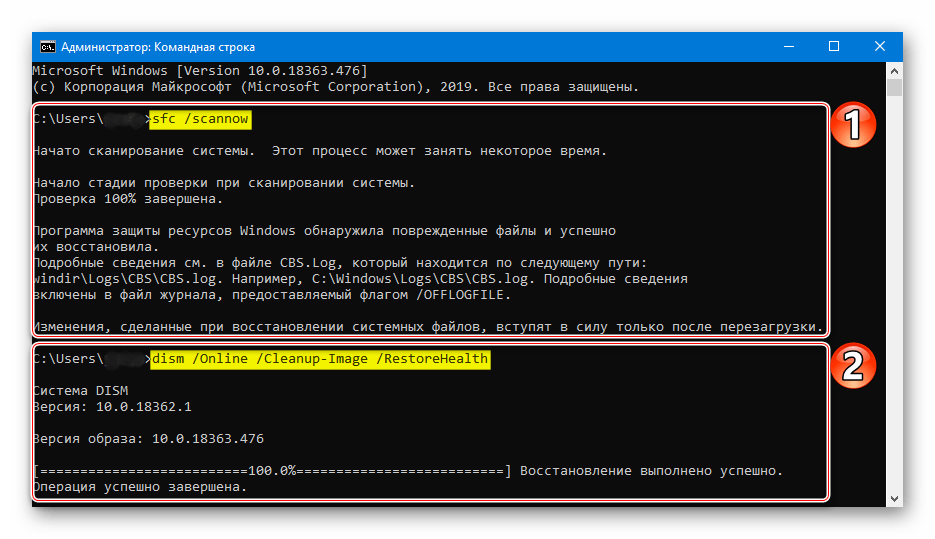
В поле консоли по очереди выполняем следующие команды:
dism /Online /Cleanup-Image /RestoreHealth
Ждем завершения процесса и перезагружаем компьютер.
В БР можно не только восстановить поврежденные системные файлы, но и сохранить важные данные с локальных дисков на внешний носитель. Ведь не исключено, что систему в итоге придется переустанавливать.
При этом высока вероятность, что Windows не загрузится в «Безопасном режиме» и тогда проверку целостности системных файлов придется запустить с помощью «Командной строки» в среде восстановления. Подробно об этом написано в следующей инструкции.
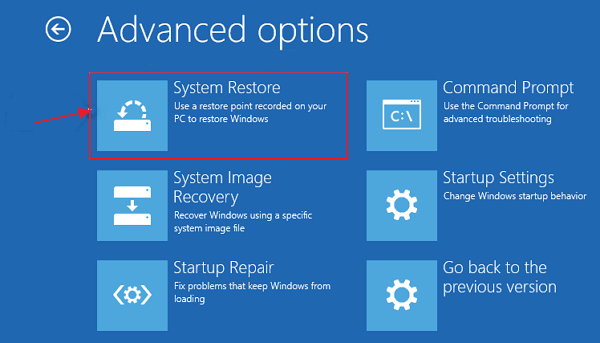
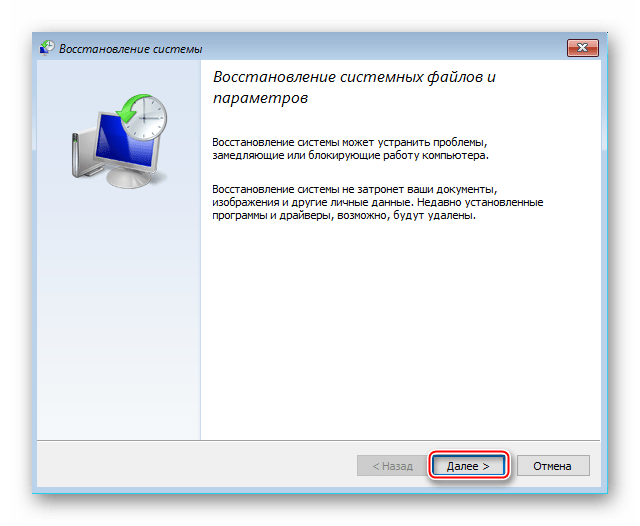
Способ 2: Специальные средства
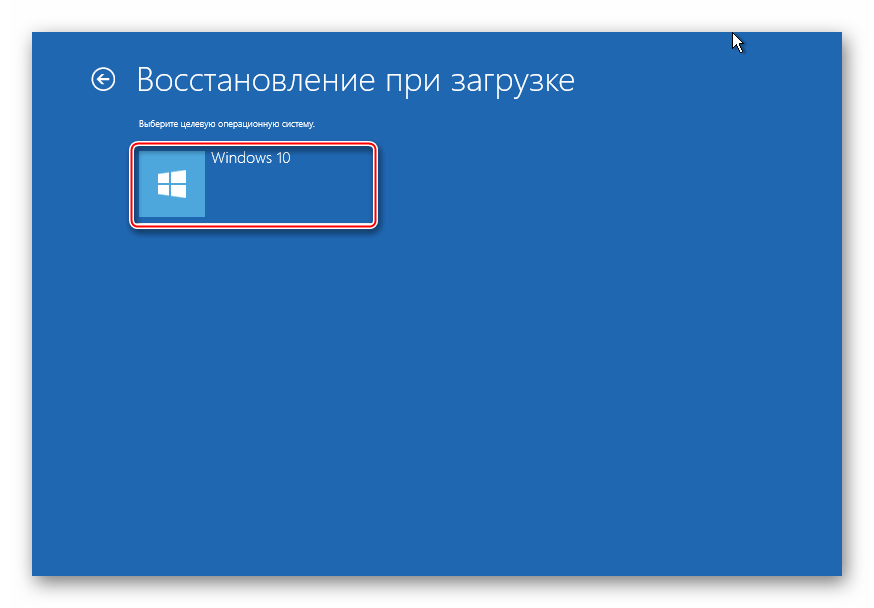
Запустите функцию «Восстановление при загрузке» — системный инструмент, предназначенный для обнаружения и устранения проблем, блокирующих запуск Виндовс.
- В разделе «Поиск и устранение неисправностей» жмем «Восстановление при загрузке».

Выбираем нужную операционную систему и ждем, когда восстановительное средство завершит работу.
Способ 3: Отключение автоматического восстановления
Если предположить, что проблема в самой функции автоматического восстановления, то есть возможность прервать ее цикл.
- В среде восстановления Windows снова запускаем «Командную строку» и вводим код:
bcdedit /set
Нажимаем «Enter» и пробуем перезагрузить компьютер.

Чтобы потом включить автоматическое восстановление, вместо значения No в конце пишем Yes.

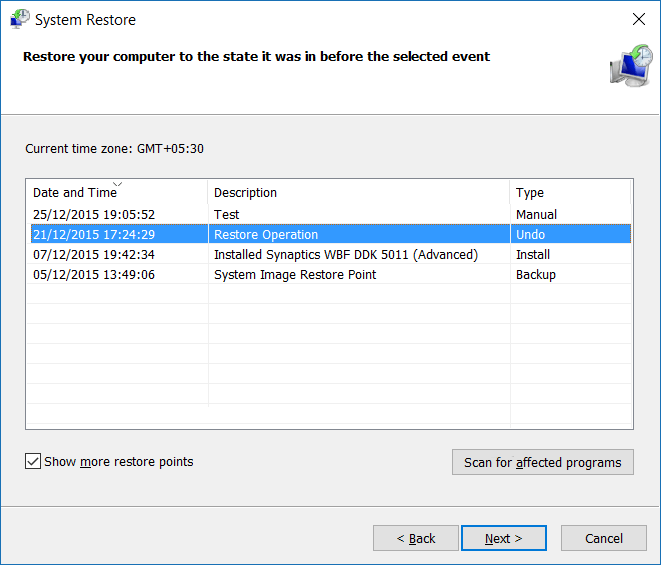
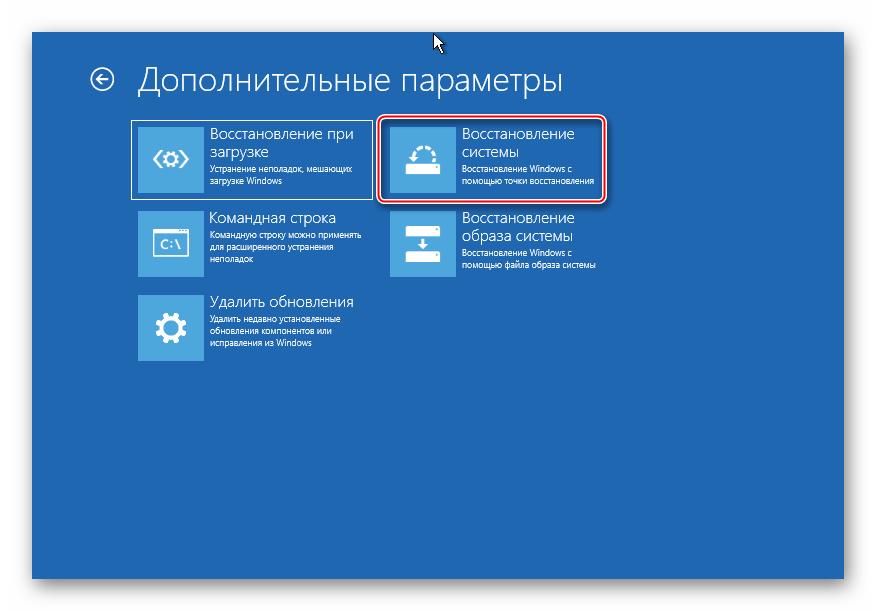
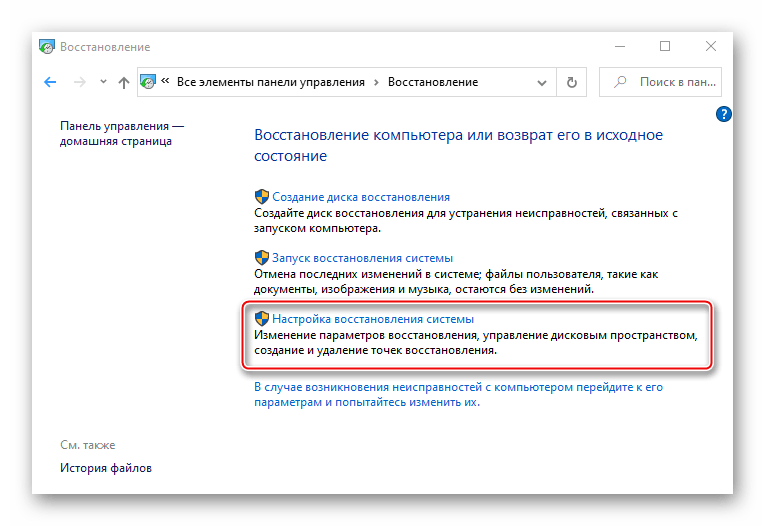
Способ 4: Точки восстановления
Если на компьютере настроены точки восстановления, можно попробовать откатить систему к рабочему состоянию. Данные пользователя при этом сохранятся, но будут отменены изменения в системных файлах и реестре операционной системы, а также удалены приложения, установленные с момента создания точки. В любом случае проверьте наличие таких бэкапов, так как вы можете просто не помнить, что когда-то включали эту опцию.
- Переходим в раздел «Восстановление системы».
Выбираем Виндовс 10.
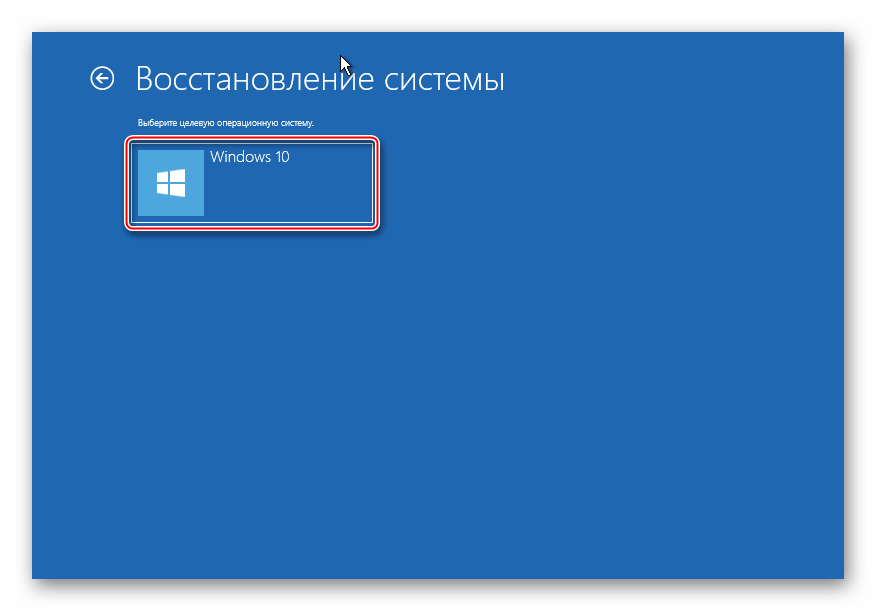
В следующем окне жмем «Далее».
Если на компьютере созданы точки восстановления, откроется их список. Выбираем из них ближайшую по дате и нажимаем «Далее». Ждем, когда завершится процесс восстановления.
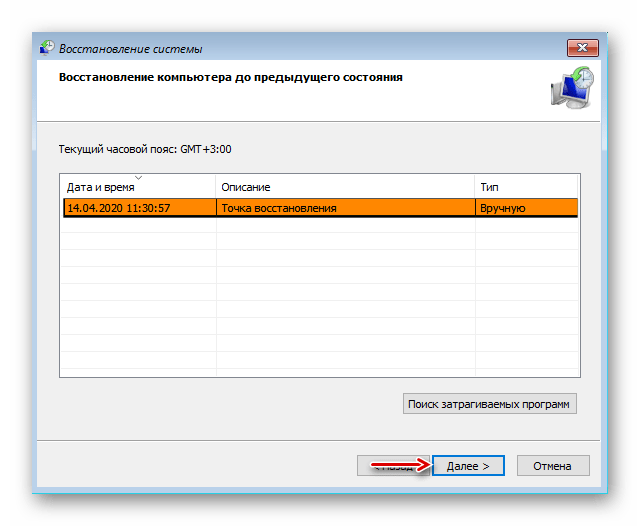
Если точки восстановления до этого не создавались, в будущем стоит задуматься об этом, так как откат системы часто помогает устранить разного рода неполадки. Более подробно о создании ТВ мы писали в отдельных статьях.
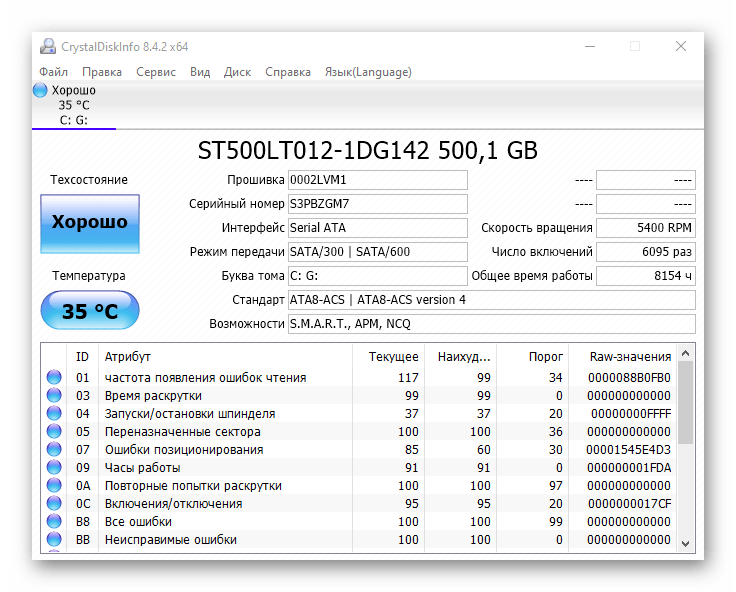
Способ 5: Проверка оборудования
Если Windows до сих пор не загрузилась, проверьте оборудование. В первую очередь отключите и заново подключите жесткий диск. Если их установлено несколько, отсоедините все и подключите только HDD с Windows 10. Дополнительно отключите все внешние USB-носители. Если есть возможность, подключите жесткий диск к другому компьютеру и проверьте его на наличие ошибок и битых секторов. О том, как сделать это, написано в отдельном материале.
Бывали случаи, когда помогала переустановка оперативной памяти. Выньте все планки из материнской платы, затем вставляйте их поочередно в слоты и после каждой пробуйте загрузить систему.
Способ 6: Переустановка системы
Если проблему не удалось решить предложенным методами, а с оборудованием проблем нет, остается переустановить Windows 10. Об этом детально написано в следующей статье.

Надеемся, что вы смогли запустить Виндовс 10 в штатном режиме. Тем не менее, если возникла такая проблема, не стоит сразу предпринимать описанные выше рекомендации. Возможно, система на самом деле пытается исправить какие-то неполадки, поэтому дайте ей время. На форумах описаны случаи, когда Windows благополучно загружалась и через 45 минут, а затем стабильно работала.
2021 Quick Fix: Windows 10 Preparing Automatic Repair Loop
Windows Automatic repair can get stuck in a loop of repairing, then restarting only to go back into the repair, or be stuck in the «Preparing Automatic Repair» screen. Depending on your specific situations, there are a few fixes that will help you get out of the problem. If you need to quickly access files from your stuck PC and save them elsewhere, you can apply the data recovery software — EaseUS Data Recovery Wizard.
Table of Contents
About the Author
Reviews and Awards
Is your computer keeps restarting with an error message, telling that «Preparing Automatic Repair» or «Automatic Repair couldn’t repair your PC»? Calm down and stay here with us.
On this page, we’ll offer you a complete guide to quick fix the «Preparing Automatic Repair» loopВ in Windows 10 or Windows 8.1/8 without losing any data:
Your Quick Guide:В By following through the guides, you’ll successfully restore your computer from the «Preparing Automatic Repair» loop on your own.В If you are not interested in learning the causes of this error, you may start from Guide 2.
#Guide 1:В Windows Preparing Automatic Repair Error
In this guide, you’ll learn:
- 1. What is Windows Automatic Repair Error?
- 2. What does it mean when your computer says preparing automatic repair?
- 3. What causes Windows Preparing Automatic Repair error?
Automatic Repair is a Windows built-in feature designed to fix boot-related issues when a startup problem arises automatically. Sometimes,В when itВ fails toВ work,В the «Automatic Repair loop» errorВ comes out,В makingВ your computerВ reboot again and again.
As a result, you willВ encounter computer boot failure, andВ all the programs, services, and files on the computer will become inaccessible.
Symptoms of Windows Preparing Automatic RepairВ Error
When Automatic RepairВ fails, your computer willВ haveВ one of the following symptoms:
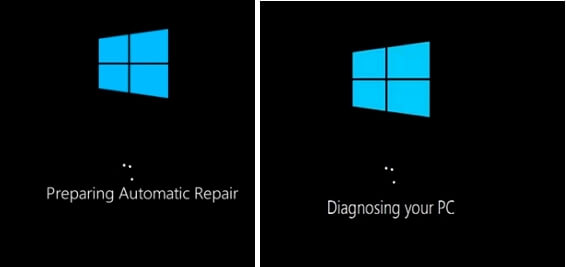
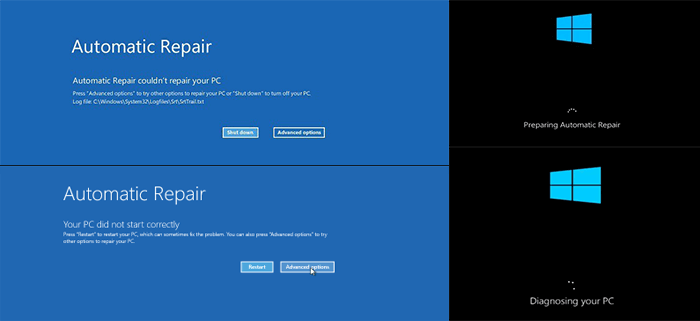
- ComputerВ stuck on a black screen with «Preparing Automatic Repair» or «Diagnosing your PC» error message.
- Windows saysВ «Preparing Automatic Repair» but results in a black screen with nothing on.
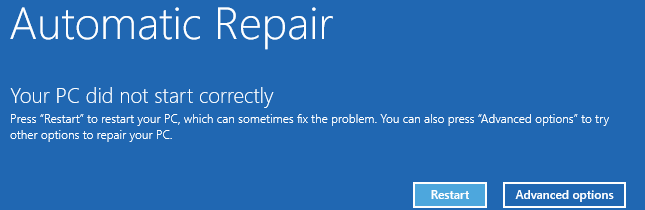
- Automatic RepairВ stuck on a blue screen, saying «Your PC did not start correctly», orВ «Automatic repair couldn’t repair your PC.» If you click «Restart», your computer will reboot andВ catchВ the Automatic Repair loop.
Causes of WindowsВ «Preparing Automatic Repair»В orВ «Automatic Repair Loop»
The «Preparing Automatic Repair» issue happens more on Windows 10/8.1/8 computers. Usually, the Automatic RepairВ or startup repair loop issue occursВ right after a Windows update or an unexpected Windows shutdown.
But causes this error? Here is a list ofВ common causes:
- Issues with Windows Registry
- BOOTMGR (Windows Boot Manager) file corruption
- Missing or damaged system files
- Issues with the hardware driver (hard drive driver, motherboard driver, graphics driver)
- Other unknown reasons
So how do you solve the «Preparing Automatic Repair» error? Follow Guide 2 and Guide 3В thoroughly, you’ll make the computer work normally again.
#Guide 2:В Rescue Windows Data from Preparing Automatic Repair Loop
No matter what kind of situation you are in, either a blue screen or a black screen of the «Automatic Repair» loop, the most important thing is to get your data out of the «dead» computer first.
Here, you’ll getВ methods to rescue your Windows data from this error:
В If you preferВ an easy andВ efficient way, Method 1 is worthВ trying.
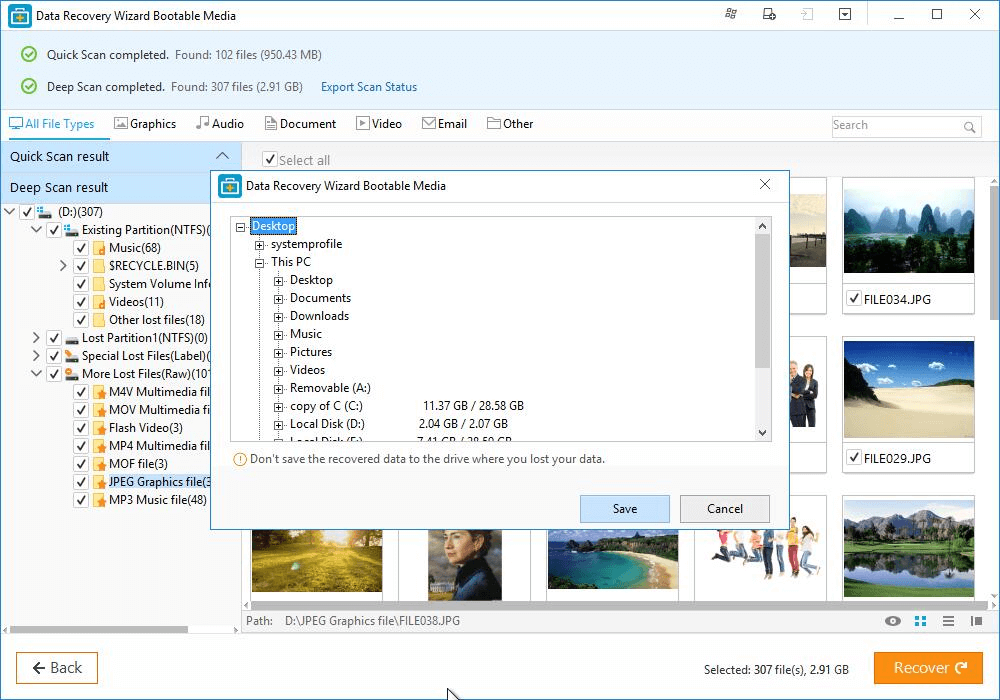
Method 1. Recover Data from Automatic Repair Computer with Bootable Data Recovery Software
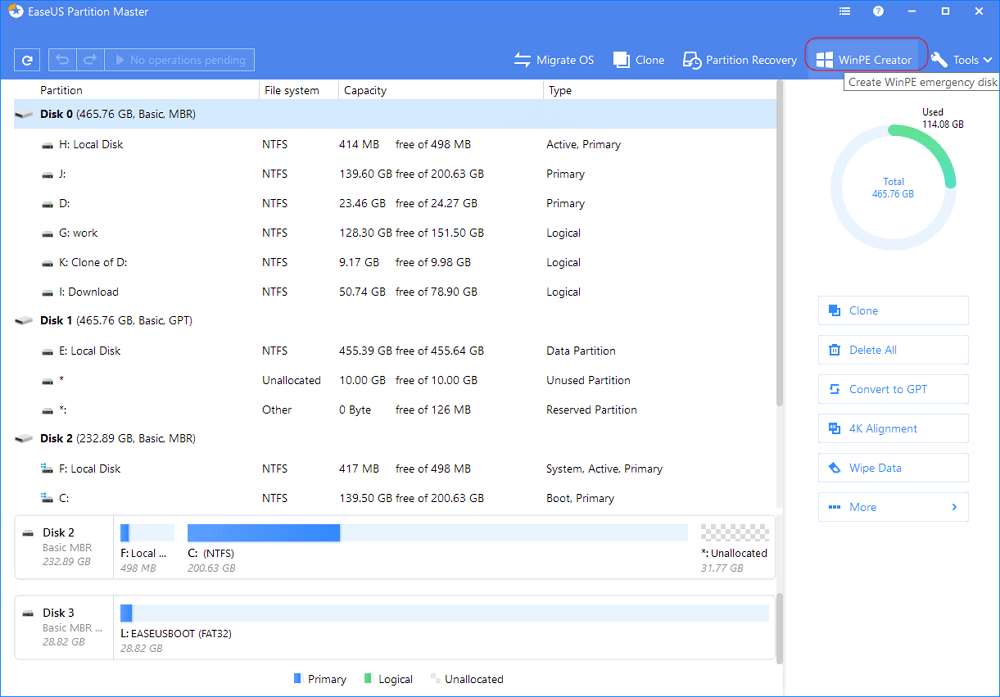
Reliable bootable data recovery software -В EaseUS Data Recovery Wizard with bootable mediaВ can help you boot up theВ computer with the «Automatic Repair» loop errorВ from aВ createdВ bootable disk.
Then you can scan and recover all data from the «unbootable» or «dead»В computer.
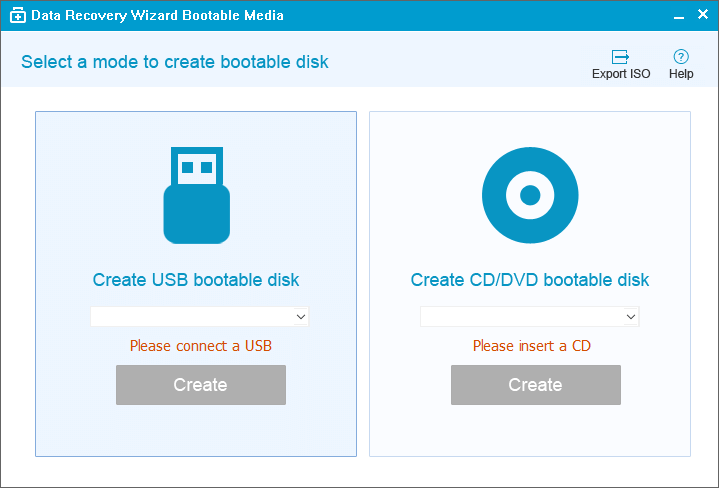
Step 1. Create a bootable disk.
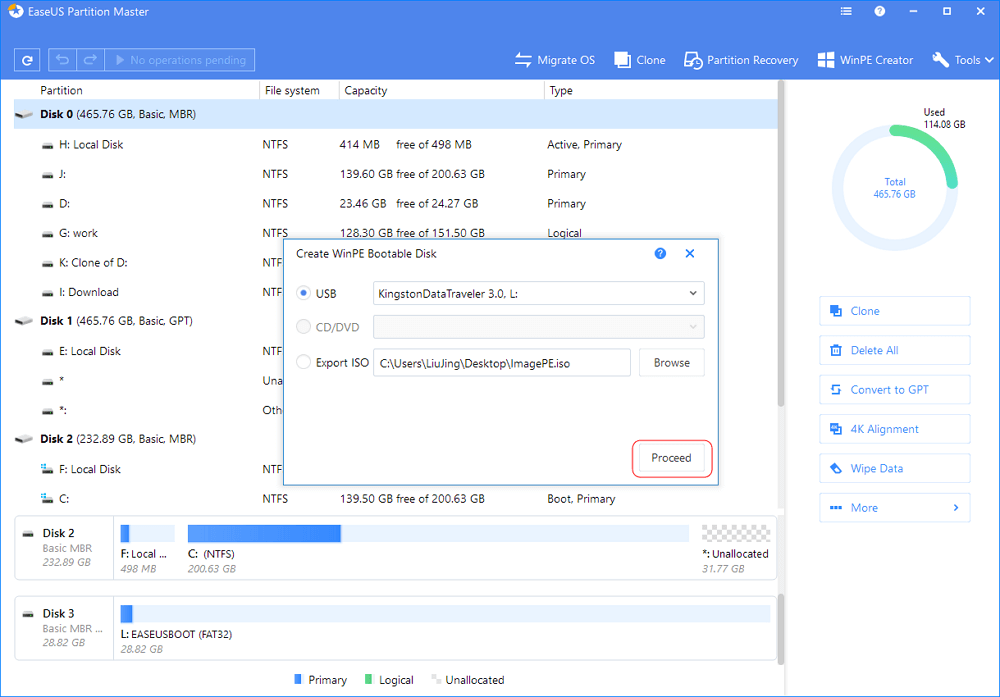
Prepare an empty USB. If you have important data on it, copy the data to another device. When you create a bootable disk, the data on the USB will be erased. EaseUS Data Recovery Wizard WinPE Edition will help you create a bootable disk. Connect the USB drive to PC, launch EaseUS Data Recovery Wizard WinPE Edition. Select the USB drive and click «Proceed» to create a bootable disk.
Step 2. Boot from the bootable USB.
Connect the bootable disk to PC that won’t boot and change your computer boot sequence in BIOS. For most users, it works well when they restart their computer and press F2 at the same time to enter BIOS. Set to boot the PC from «Removable Devices» (bootable USB disk) or «CD-ROM Drive» (bootable CD/DVD) beyond Hard Drive. Press «F10» to save and exit.
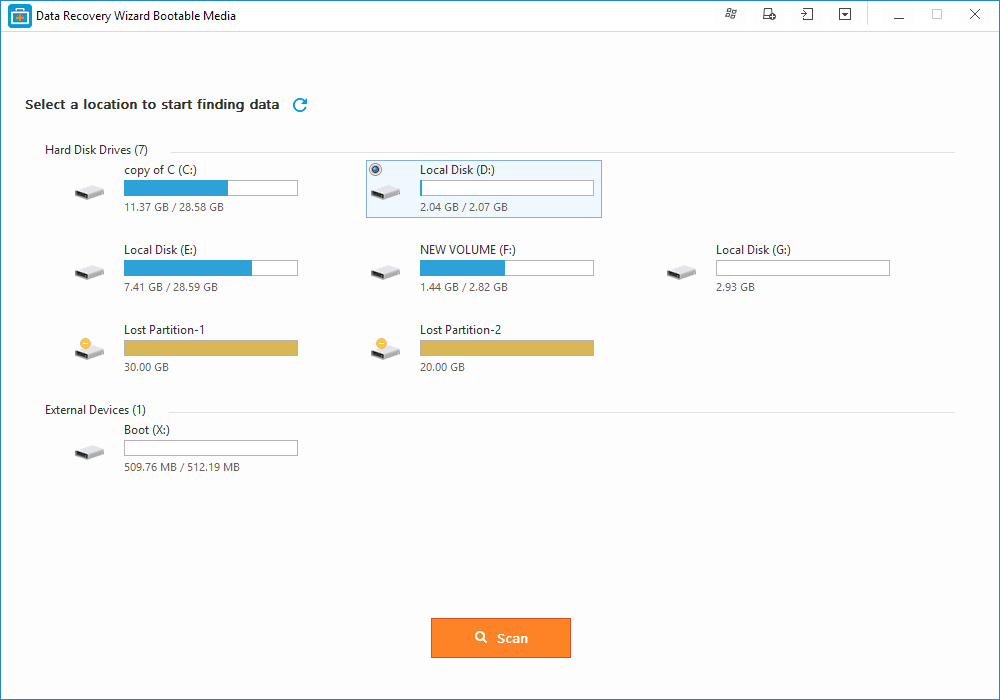
Step 3. Recover files/data from a PC/laptop hard drive that won’t boot.
When you boot from the USB, you can run EaseUS Data Recovery Wizard from the WinPE bootable disk. Select the drive you want to scan to find all your lost files.В
Click Scan to start the scanning process.
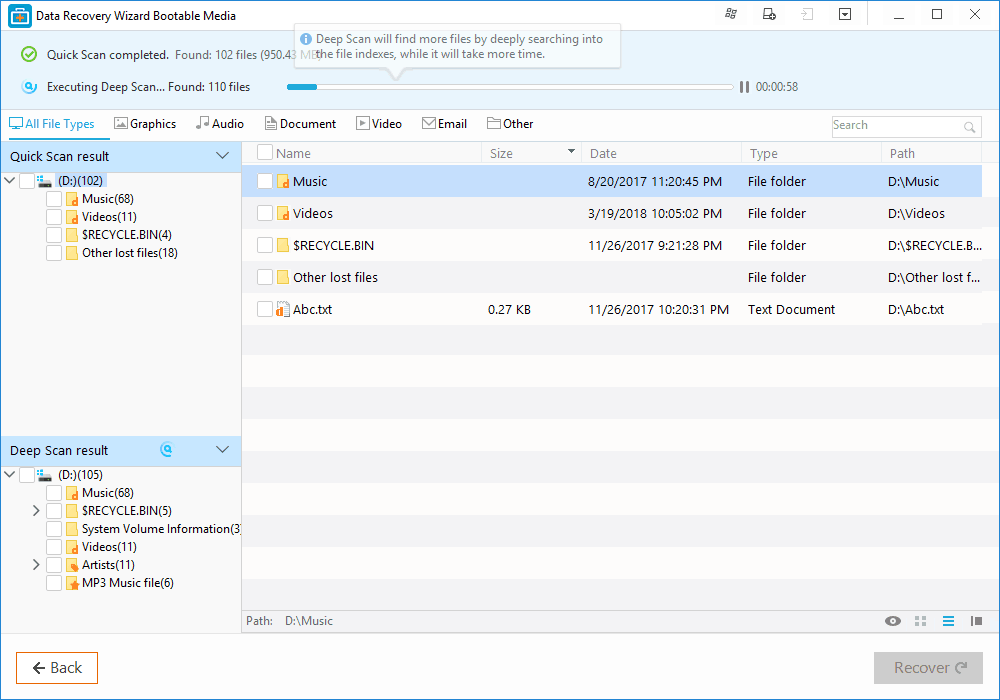
Recover data from the computer or laptop. After the scan completed, you can preview all recoverable files, select the targeted files, and click the «Recover» button to restore your files. You’d better save all of the recovered data to another place to avoid data overwriting.
Method 2. Manually Get Data Off Automatic Repair Computer Drive on Another PC
Step 1. Unlock the computer caseВ from your computer with an «Automatic Repair» error.
Step 2.В Remove the hard drive connection cables and unplug them from your computer.
Step 3.В Reconnect the hard drive to another healthy computer as an external disk.
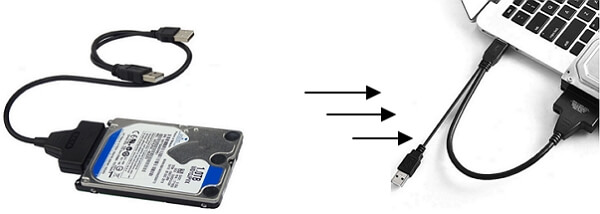
Step 4.В Restart the new PC and access the old computer drive data via File Explorer.
Step 5.В Copy and save all the hard drive data to another secure external hard drive.
After this, it’s time that you take action to fix the «Windows 10 preparing automatic repair» error.В
All Workable Solutions for Automatic Repair Loop with Blue & Black Screen
Depending on the specific situation you are in, you will have different solutions. Here is a table of all workable solutions thatВ canВ bypass automatic repair on your computer withВ two cases:В black screen or blue screen:
| Workable Solutions | Step-by-step Troubleshooting |
|---|---|
| Fix Automatic Repair & Blue Screen | |
| Fix Automatic Repair & Black Screen |