- Knowledge Base
- FireStudio Family — How do I Uninstall & Reinstall my FireStudio drivers in Microsoft Windows?
- Knowledge Base
- FireStudio Family — How do I Uninstall & Reinstall my FireStudio drivers on a Mac computer?
- Locating hidden Library folder on Mac
- PreSonus FireStudio Drivers Download
- Find All PreSonus FireStudio Drivers
- Popular Driver Updates for PreSonus FireStudio
- PreSonus FireStudio Driver Update Utility
- FireStudio Driver
- AudioBox USB Driver
- FireStudio Driver
- AudioBox USB Driver
- AudioBox USB Driver
- AudioBox USB Driver
- AudioBox USB Driver
- AudioBox USB Driver
- Recent Help Articles
- Popular Utilities
- How to Install Drivers
- Open Device Manager
- Install Drivers With Device Manager
Knowledge Base
FireStudio Family — How do I Uninstall & Reinstall my FireStudio drivers in Microsoft Windows?
Why would I need to Uninstall & Reinstall my FireStudio drivers?
- My Universal Control crashes when I launch it
- My device Device window is not opening properly or not opening at all
- My Universal Control launch window displays driver version «0.0.0»
Answer:
Sometimes drivers do not install properly and can cause numerous issues on your computer. This is usually caused by a file not being overwritten properly, so by uninstalling the driver before installing the new version, these issues can be easily over come.
Removing FireStudio family Driver Files
1. Disconnect your FireStudio Family interface
2. Quit all applications
3. Click on the START menu in the lower left hand corner of the screen
4. Select All Programs
5. Click on the PreSonus Folder and Open the PreSonus Universal Control folder
6. choose “Uninstall PreSonus Universal Control”
7. Windows Vista users will be asked to confirm the uninstall, click “yes”
8. You will be asked if you are sure you would like to uninstall PreSonus Universal Control. Click «yes»
9. The Uninstall process will begin.
10. Look in the System Tray in the lower right hand corner of your screen. If you see the red Universal Control icon, right-click it and select Quit from the pop-up menu
11. You will be prompted that the driver has been removed. Click OK
12. Now lets make sure the roaming folder is cleaned up.
13. Open your Start menu from the desktop and in the search field, type %appdata% and hit enter on your keyboard.
14. Now open the PreSonus folder and delete the Universal Control/FireStudio folders and any Universal Control .dmp files you see in the PreSonus folder.
An example of these files would be «Universal Control_Win x86_20121005_071000177«, delete any of these files as well, they may not be present, if you do not see any do not worry.
12. Reboot your computer
Downloading and Installing the latest driver
13. Go to http://www.presonus.com/technical-support/downloads/drivers-software/
14. Download the driver for you FireStudio family product from the PreSonus website and Save it to your desktop.
15. Quit your web browser and any other application you have running
16. Locate PreSonus_Universal_Control_XX.exe on your desktop (where XX is the Universal Control version number)
17. Double click on the PreSonus Universal Control Installer
18. Windows 7 and Vista Users will be asked if they want to run this file on their computer, click «Run»
19. Windows 7 and Vista Users will be asked if they want this file to make changes to their computer. Click «yes»
20. The Welcome screen will open, click «Next» to continue the installation
21. You will be told where the driver’s files will be installed, click «Next to continue the installation
22. You will be asked if you would like to create a desktop icon for the Universal Control application. As you will be using this control panel quite frequently, it is suggested that you do so. Click «Next» to continue the installation
23. Click «Install» to begin installing the files on your computer
24. When the installation is finished, you will be prompted to reboot your computer.
25. Power down your computer and then connect the device.
26. Boot the computer back up.
27. Once your computer has rebooted, your interface should sync with your computer and will be ready for use.
Knowledge Base
FireStudio Family — How do I Uninstall & Reinstall my FireStudio drivers on a Mac computer?
Why would I need to uninstall & reinstall my FireStudio drivers?
- I have a Red Exclamation Mark on Universal Control Icon
- My Universal Control crashes when I launch it
- My device window is not opening properly or not opening at all
- My Universal Control launch window displays driver version 0.0.0
- I have updated my OSX to 10.7 and need to Install FIreControl for the FireStudio 2626
- I have installed an outdated Universal Control driver on OSX 10.7+ and StudioOne is crashing
Answer:
There is a known issue that prevents the FireStudio family driver from properly overwriting earlier versions of its files on some systems. This can create a driver conflict that prevents the control panel from working properly. A complete manual uninstall of the driver can resolve this issue.
Please note: Your FireStudio family interface should have a solid blue sync light and will be recognized within the AudioMIDI setup utility as an available audio and MIDI device if a driver conflict is the cause of the errors listed above. This FAQ will guide you through the complete uninstall process and well as downloading the latest driver from the PreSonus website and installing in on your Mac.
NOTE: Since the release of Universal Control 1.7, we now have an uninstaller for OSX (10.6.8 and later ONLY) which will remove all Universal Control and Firestudio related files (just as a manual uninstall would). Download Universal Control 1.7 for Mac here, find your device and download the .dmg file. Double click on the Presonus_Universal_Control_17.dmg that you downloaded, and run the Un-installer first., then continue with the uninstall and re-install process starting with the section Removing .bom and .plist files below. * If you are installing the FireControl for the FireStudio 2626 and removing an older version of Universal Control please continue at number 1 below.
NOTE: On OSX 10.8 and later, you may need to temporarily disable Gatekeeper to allow the uninstaller to open and run. See here for info: http://support.apple.com/en-us/HT5290
Remove FireStudio family Driver Files
1. Disconnect your FireStudio Family interface.
2. The following list includes every possible file that may have been installed on your Mac, depending on which driver versions you have installed. If you do not see one of these files, do not be alarmed. The files are listed by location tree. For example, to locate the /Library/Preferences/PaeFireStudio.startup file, you will double click on MacHD and then Open the Library folder.
Delete the following from your computer (note some files will require that you type in your administrative password):
/Applications/FireStudio Control Console
/Applications/FireStudio Lightpipe Mixer
(If you are using OSX 10.11 El Capitan, 10.10 Yosemite, 10.9 Mavericks, 10.8 Mountain Lion or 10.7 Lion, the User Library folder is hidden.
Locating hidden Library folder on Mac
To get to it, with Finder open click the GO menu at the top, or control-click on Finder in the Dock, then select «Go To Folder» and enter:
/Library. This is necessary for deleting the next 4 files)
/Users/YOUR USERNAME /Library/Caches/Juce/jucAppLock_Universal Control
/Users/YOUR USERNAME/Library/Caches/Juce/Universal Control
/Users/YOUR USERNAME /Library/Preferences/FireControlSettings.settings
If you have other PreSonus products installed they may be shown in this folder. For the purpose of removing FireStudio you’ll want to delete the following folders found inside the /Users/YOUR USERNAME/Library/PreSonus folder.
/Users/YOUR USERNAME/Library/PreSonus/Universal Control (x64)
/Users/YOUR USERNAME/Library/PreSonus/Universal Control (note this folder may not show up on Mac OS X 10.9, 10.10 or 10.11 or later, that’s ok)
Remove .bom and .plist files
*If you’ve done the UC 1.7 uninstall script method above, and these files are not there, you can proceed with the next section.
Note: if you use OSX 10.11 El Capitan, 10.10 Yosemite, 10.9 Mavericks, 10.8 Mountain Lion, 10.7 Lion or 10.6 Snow Leopard, you also need to do the following:
a) Right Click the Finder
b) From the pop-up window select Go To Folder
c) Paste or type in this string: /private/var/db/receipts
d) In the folder that opens, find the files that have Universal Control in the label and move them to the Trash.
You are looking to delete these entries (they will be at the bottom of the list):
Repair Disk Permissions
(For version of Mac OS X 10.10 and prior)
5. Go to Applications > Utilities > Disk Utility
6. Select your system drive from list on the left
7. Click Repair Disk Permissions
8. Shut down your Mac once the Repair Disk operation is complete.
(For Mac OS X 10.11 — El Capitan, this screen has changed)
5. Go to Applications > Utilities > Disk Utility
6. Select your system drive from list on the left
7. Click First Aid
8. Shut down your Mac once the operation is complete.
Reset your PRAM
(After any removal of files as shown here will require all versions of Mac OS X to perform this function for the uninstall process to be considered complete)
9. Locate the following keys on the keyboard: Command, Option, P, and R. You will need to hold these keys down simultaneously
10. Disconnect all USB, FireWire, or Thunderbolt devices except for your keyboard and mouse. Turn on the computer
11. Press and hold the Command-Option-P-R keys. You must press this key combination before the gray screen appears.
12. Hold the keys down until the computer restarts and you hear the startup sound for the second time.
13. Release the keys. At this point, your computer should be completely zeroed out and you can reinstall.
Download and Install the latest driver
15. Download the driver for you FireStudio family product from the PreSonus website.
16. Quit your web browser and any other application you have running
17. Double click on the downloaded .dmg file to open the disk image on your desktop
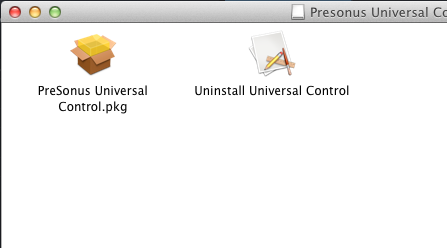
18. It should open a window with the installer package in it. If it doesn’t, double click on the PreSonus Universal Control disk image on your desktop
19. Double click on PreSonus Universal Control.pkg to launch the installer
20. When the installer launches, click “Continue”
21. Click on the icon of your Internal hard drive and click “Continue”
22. Click “Install”
23. When the installation has finished, click “Finish”
PreSonus FireStudio Drivers Download
Download the latest version of the PreSonus FireStudio driver for your computer’s operating system. All downloads available on this website have been scanned by the latest anti-virus software and are guaranteed to be virus and malware-free.
Find All PreSonus FireStudio Drivers
Popular Driver Updates for PreSonus FireStudio
PreSonus FireStudio Driver Update Utility
FireStudio Driver
Submitted Dec 22, 2016 by siddhik (DG Staff Member):
«Universal Control Driver File«
AudioBox USB Driver
Submitted Dec 22, 2016 by siddhik (DG Staff Member):
«AudioBox USB Driver File«
FireStudio Driver
Submitted Dec 22, 2016 by siddhik (DG Staff Member):
«Universal Control Driver File«
AudioBox USB Driver
Submitted Dec 22, 2016 by siddhik (DG Staff Member):
«Universal Control AudioBox Driver File«
AudioBox USB Driver
Submitted Dec 22, 2016 by siddhik (DG Staff Member):
«Universal Control AudioBox Driver File«
AudioBox USB Driver
Submitted Dec 22, 2016 by siddhik (DG Staff Member):
«AudioBox USB Driver File«
AudioBox USB Driver
Submitted Dec 22, 2016 by siddhik (DG Staff Member):
«AudioBox USB Driver File«
AudioBox USB Driver
Submitted Dec 22, 2016 by siddhik (DG Staff Member):
«AudioBox USB Driver File«
- Updates PC Drivers Automatically
- Identifies & Fixes Unknown Devices
- Supports Windows 10, 8, 7, Vista, XP
Recent Help Articles
Popular Utilities
If you have had recent power outages, viruses or other computer problems, it is likely that the drivers have become damaged. Browse the list above to find the driver that matches your hardware and operating system. To see more matches, use our custom driver search engine to find the exact driver.
Tech Tip: If you are having trouble deciding which is the right driver, try the Driver Update Utility for PreSonus FireStudio. It is a software utility that will find the right driver for you — automatically.
DriverGuide maintains an extensive archive of Windows drivers available for free download. We employ a team from around the world which adds hundreds of new drivers to our site every day.
How to Install Drivers
Once you download your new driver, then you need to install it. To install a driver in Windows, you will need to use a built-in utility called Device Manager. It allows you to see all of the devices recognized by your system, and the drivers associated with them.
Open Device Manager
In Windows 10 & Windows 8.1, right-click the Start menu and select Device Manager
In Windows 8, swipe up from the bottom, or right-click anywhere on the desktop and choose «All Apps» -> swipe or scroll right and choose «Control Panel» (under Windows System section) -> Hardware and Sound -> Device Manager
In Windows 7, click Start -> Control Panel -> Hardware and Sound -> Device Manager
In Windows Vista, click Start -> Control Panel -> System and Maintenance -> Device Manager
In Windows XP, click Start -> Control Panel -> Performance and Maintenance -> System -> Hardware tab -> Device Manager button
Install Drivers With Device Manager
Locate the device and model that is having the issue and double-click on it to open the Properties dialog box.
Select the Driver tab.
Click the Update Driver button and follow the instructions.
In most cases, you will need to reboot your computer in order for the driver update to take effect.
Visit our Driver Support Page for helpful step-by-step videos
If you are having trouble finding the right driver, stop searching and fix driver problems faster with the Automatic Driver Update Utility. Many computer problems are caused by missing or outdated device drivers, especially in Windows 10. If your deskttop or laptop is running slow, or keeps crashing or hanging, there is a good chance that updating your drivers will fix the problem. Automatic updates could save you hours of time.


