- How to temporarily prevent a Windows Update from reinstalling in Windows 10
- Symptoms
- Resolution
- More Information
- Allow or Prevent themes from changing Desktop icons in Windows 10
- Prevent themes from changing Desktop icons
- How to Prevent Users Changing Desktop Background in Windows 10
- How to Prevent Users Changing Desktop Background in Windows 10
- Password Recovery
- How to Prevent Windows 10 Changing Default Apps/Programs
- Replies (21)
How to temporarily prevent a Windows Update from reinstalling in Windows 10
Symptoms
In Windows 10, your device is always kept up to date with the latest features and fixes. Windows Updates are installed automatically, with no need to select which updates are needed or not needed. In rare cases, a specific update might temporarily cause issues with your device, and in this case you will need a way to prevent the problematic update from reinstalling automatically the next time Windows Updates are installed.
Resolution
If an update you are being offered is causing system crashes or instability and Windows was operating correctly prior to that change, you can follow these instructions to prevent the unwanted driver or update from being installed:
Type “View Installed Updates” in the Search box and then click on View Installed Updates – Control Panel from the Search results.
To uninstall the unwanted update, select it from the list and then click Uninstall.
To temporarily prevent the update from being reinstalled until an updated fix is available, a troubleshooter is available that provides a user interface for hiding and showing Windows Updates and drivers for Windows 10. You can obtain and run the «Show or hide updates» troubleshooter by downloading it from the Microsoft Download Center:
 Download the «Show or hide updates» troubleshooter package now.
Microsoft scanned this file for viruses. Microsoft used the most current virus-detection software that was available on the date that the file was posted. The file is stored on security-enhanced servers that help prevent any unauthorized changes to the file.
When you click on the download link, you will be prompted to open or save wushowhide.diagcab.

Opening wushowhide.diagcab will launch the troubleshooter. Then click Next to proceed and follow the instructions provided by the troubleshooter to hide the problematic driver or update.
More Information
3073930 — How to temporarily prevent a driver update from reinstalling in Windows 10
Allow or Prevent themes from changing Desktop icons in Windows 10
The Windows operating system offers you great liberty in customizing its user interface. Users like to change themes, windows colors, icons, mouse pointers, desktop wallpapers and even tweak the Windows Registry or hack system files to give it and its built-in application a cool new look. One of the most popular customization options is changing the themes. Changing a theme in Windows 10/8/7 typically involves changing the desktop wallpaper, the window color and maybe sounds, mouse pointers, and icons. If you like your icon-set and wish to prevent the theme from changing your desktop icons, you can do so, by following this easy tutorial.
Prevent themes from changing Desktop icons
Right-click on an empty area on your Windows 10 desktop, and click on Personalize.
The Personalization settings app will open. Click on Themes in the left panel.
Under Related Settings, click on Desktop icon settings to open its configuration box.
Here, uncheck the Allow themes to change desktop icons option,
Click on Apply/OK.
Close the Personalization window and allow the changes to take effect.
Now no theme will be able to change your favorite icons automatically. This tip can also be useful if your Desktop icons rearrange and move after reboot.
There are several other interesting things you can do with your desktop icons. You can resize icons on the desktop, display the desktop icons text on the side and quickly hide or unhide them.
UPDATE: MmeMoxie suggests in the comments that you download the freeware Iconoid program and use the “Save Icon Positions (relative)” and “Restore Icon Positions Now” option. They work.
How to Prevent Users Changing Desktop Background in Windows 10
If you Prevent Users Changing Desktop Background in Windows 10 your background remains what you want to have and anyone can not tamper it even after he tries. If you set a motivational image or your company logo as desktop background and a user changes without your permission it creates an inconvenient moment. So we are writing in this article How to Prevent Users Changing Desktop Background in Windows 10.
Desktop background in the face of a PC and you always try to place your preferred images, colors, and logos here. But few people might Waylay to change. If they succeed in their work it always spoils your mood and time as well. After you turn on the customization to Prevent Users to Change Desktop Background in Windows 10 with the help of Group Policy Editor you free yourself from this issue. Incorporating this tweak makes Background options in the personalization category greyed out. So anyone cannot touch it.
How to Prevent Users Changing Desktop Background in Windows 10
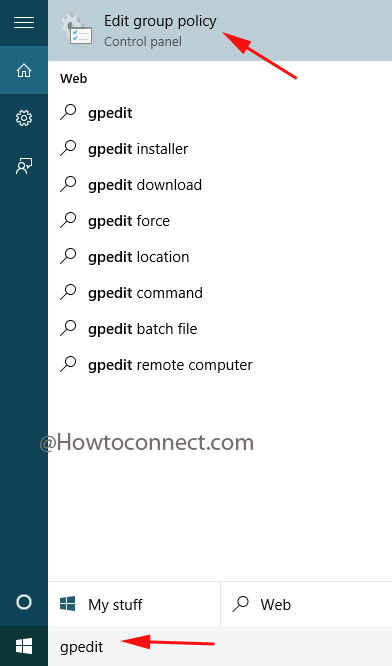
- Type gpedit.msc in the Cortana Search box and hit the same in the result section at the top.
- In the opened Window of Group Policy Editor Travel along with the path
User Configuration => Administrative Template => Control Panel => Personalization
- In the right side of the Window, you find 16 settings. Right click on Prevent changing Desktop background and select Edit.

- A new window rolls in. Here you see 3 radio boxes against 3 options Not configured, Enabled and Disabled. Check the radio box against the option in the middle which says Enabled.
- At last, click Apply then after Ok.
In this way, your desktop background is now protected and anyone can not tamper it until you do not change it to Not configured or disabled again.
Password Recovery
Need to lock down the desktop wallpaper on your computer to stop kids from changing it? In this tutorial, we’ll walk you through the steps to prevent users from changing the current desktop background using the Local Group Policy Editor and Registry Editor.
Method 1: Prevent Changing Desktop Background in Windows 10 Using Group Policy
- Open the Local Group Policy Editor and navigate to:
User Configuration -> Administrative Templates -> Control Panel -> Personalization
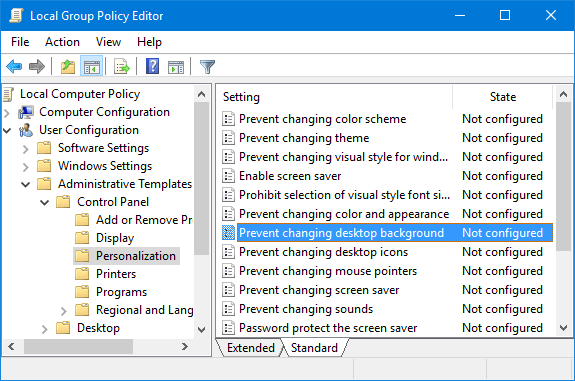
Double-click the Prevent changing desktop background policy on the right side.
Check the Enabled radio box, click Apply and OK.

Method 2: Prevent Changing Desktop Background in Windows 10 Using Registry Editor
- Open the Registry Editor and browse to the following key:
HKEY_CURRENT_USER\Software\Microsoft\Windows\CurrentVersion\Policies
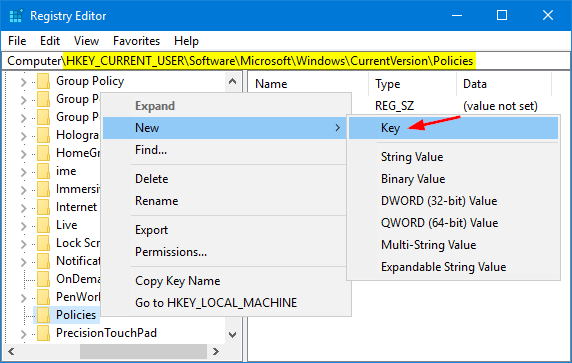
Right-click the Policies key on the left side, select New ->Key. Name it ActiveDesktop.
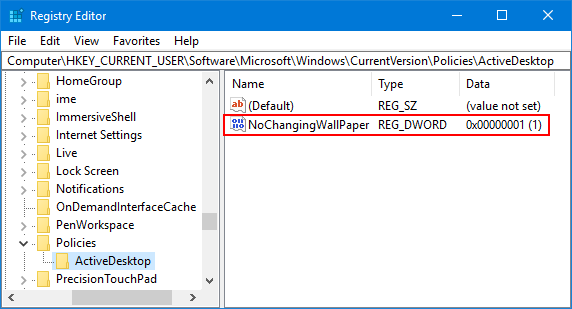
With the new ActiveDesktop key selected, right-click any empty space on the right side, select New ->DWORD (32-bit) Value. Name the new DWORD NoChangingWallPaper and set its value to 1.
Alternatively, you can also set a default desktop background in Windows 10 to prevent users from changing the desktop wallpaper image.
How to Prevent Windows 10 Changing Default Apps/Programs
I have Windows 10 Home 64 bit.
I prefer to use Internet explorer instead of Edge. Thus I have set Internet Explorer as the default applications for URLs, etc.
When I open outlook email and receive an email with a link, I can then click it. It always asks me to select a default application. which I always select Internet Explorer. How ever it does not seem to save my selection, because everytime I click a link it gives the same question to select a default application.
Also, the system notices frequently popup notifying that a default app has been changed to improve performance, etc.
How can I force Windows 10 to stop adjusting my default apps that I select? Also, to retain my selections?
Replies (21)
* Please try a lower page number.
* Please enter only numbers.
* Please try a lower page number.
* Please enter only numbers.
![]()
Sorry for the inconvenience caused.
Are you making changes from an administrator account?
To change the defaults, try via classic UI:
Right-click Start, click Control Panel, Default Programs, Set your default programs.
Hope this helps. Get back to us for further queries on the issue above. We are happy to help!
5 people found this reply helpful
Was this reply helpful?
Sorry this didn’t help.
Great! Thanks for your feedback.
How satisfied are you with this reply?
Thanks for your feedback, it helps us improve the site.
How satisfied are you with this reply?
Thanks for your feedback.
I have tried setting the defaults per your instructions. However, the defaults are either not retained or are changed by the system still. Also, I use my default account as my admin account since I am the only one at home that uses this computer. This account is setup with no password.
What should I try next?
7 people found this reply helpful
Was this reply helpful?
Sorry this didn’t help.
Great! Thanks for your feedback.
How satisfied are you with this reply?
Thanks for your feedback, it helps us improve the site.
How satisfied are you with this reply?
Thanks for your feedback.
Run DISM and check
- Open command prompt by pressing Windows key + X and selecting “Command prompt admin”.
- In command prompt, type the following commands and press Enter after each command:
DISM.exe /Online /Cleanup-image /Scanhealth
DISM.exe /Online /Cleanup-image /Restorehealth
- Close the command prompt and restart the PC and check if it works.
I suggest you to install the latest Windows updates and check if this helps in resolving the issue.
Windows Update helps keep your computer up to date with the latest system updates and drivers which can resolve the issue you are facing. You can check Windows Update manually to help ensure you have the latest updates.
- In search type Windows Updates
- Click on Windows Updates
- Click on Check for updates and install the latest windows updates.
Hope this information helps. Please let us know if you need any other assistance with Windows in future. We will be happy to assist you.
2 people found this reply helpful
Was this reply helpful?
Sorry this didn’t help.
Great! Thanks for your feedback.
How satisfied are you with this reply?
Thanks for your feedback, it helps us improve the site.
How satisfied are you with this reply?
Thanks for your feedback.
I did this and still will not retain my default selection of «Internet Explorer 11»
Also, the utility indicated that no corruption was detected.
I have fooled around with this default setting a little bit. Setting to firefox as default does retain in the settings. But for some reason. Only Microsoft would know. Internet Explorer is not retained as default when selected.
Any idea what to try next?
5 people found this reply helpful
Was this reply helpful?
Sorry this didn’t help.
Great! Thanks for your feedback.
How satisfied are you with this reply?
Thanks for your feedback, it helps us improve the site.
How satisfied are you with this reply?
Thanks for your feedback.
I suggest you to perform clean boot and check, using this Microsoft Article because may be a third party application is causing this issue.
NOTE: A clean boot is performed to start Windows by using a minimal set of drivers and startup programs. This helps eliminate software conflicts that occur when you install a program or an update or when you run a program in Windows. You may also troubleshoot or determine what conflict is causing the problem by performing a clean boot. You must log on to the computer as an administrator to be able to perform a clean boot. Your computer may temporarily lose some functionality when you perform a clean boot. When you start the computer normally, the functionality returns. However, you may receive the original error message, or experience the original behavior if the problem still exists. If the computer is connected to a network, network policy settings may prevent you from following these steps.
Once you perform clean boot do refer to the section “How to reset the computer to start normally after clean boot troubleshooting” to boot the computer in normal mode.
Hope this information helps. Please let us know if you need any other assistance with Windows in future. We will be happy to assist you.


