- Prevent Recovery of deleted files under Windows 10 / 8.1 without additional software!
- The solution is simple to wipe in Windows 10 / 8.1 without third-party tools to clearing free space and prevent recovery of files and folders!
- How to protect files from deletion in Windows 10
- How do I keep files safe from a deletion in Windows 10?
- 1. Use WinZip to lock a folder
- WinZip
- 2. Change security permission
- Prevent Cut, Paste, Copy, Delete, Re-naming of files & folders in Windows
- Prevent software for Windows PC
- Prevent Cut, Paste, Copy, Delete, Re-naming of files & folders
- Prevent Files From Being Deleted Or Renamed In Windows
- Prevent Files From Being Deleted Using The Default Option
- Prevent Files From Being Renamed And Deleted By Hiding Files
- Hiding Your Files To Prevent Them From Being Deleted
- Disable Viewing Hidden Files In Windows
- Use Prevent To Remove The File Delete And Rename Options
Prevent Recovery of deleted files under Windows 10 / 8.1 without additional software!
The solution is simple to wipe in Windows 10 / 8.1 without third-party tools to clearing free space and prevent recovery of files and folders!
If you don’t want use third-party tools, like the freeware . BlankAndSecure to prevent recovery of files and folders in Windows 8.1 or 10.
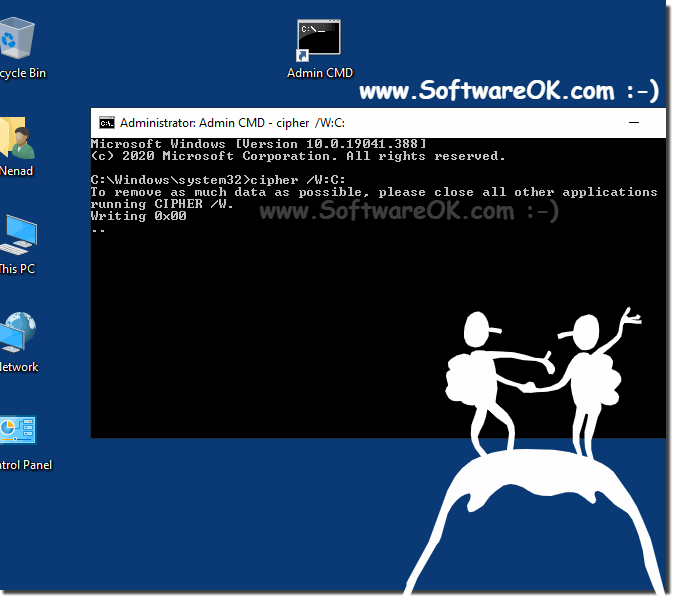
Use cipher via Command Prompt in Windows 8.1. For Example: cipher /W:C:\ to prevent recovery of files and folders on C:\ Drive. (. see Image-1)
| (Image-1) Prevent recovery of files and folders in Windows 8.1 or 8 |
 |

When you delete files or folders on Windows 8.1, the file and folder data is not initially removed from the hard disk. Instead, the space on the disk that was occupied by the deleted data is «deallocated.»
After it is deallocated, the space is available for use when new data is written to the disk. Until the space is overwritten, it is possible to recover the deleted data by using a low-level disk editor or data-recovery software.
Prevent Recovery of deleted files under Windows 10 Pro, Enterprise, Home, Windows 8.1, Windows 8, Windows-Server 2019, 2016, 2012, Windows 7 Basic, Professional, Starter, Ultimate
In Windows 8.1 the Administrators can use Cipher.exe to encrypt and decrypt data on drives that use the NTFS file system and to view the encryption status of files and folders from a command prompt. An updated version of the Cipher tool has been released for Windows 2000, and is included with Windows XP. The updated version adds another security option.
This new option is the ability to overwrite data that you have deleted so that it cannot be recovered and accessed.
How to protect files from deletion in Windows 10

- Accidentally deleting a file is a mistake many of us make more often than we’d like to admit.
- In order to protect files from such unfortunate events, solutions need to be taken.
- One product that can help you is WinZip, of which we’ve written plenty in our WinZip Hub.
- If you want more useful tutorials, check out our website’s How-To page.
- Unzip all major file formats: ZIP, RAR, 7Z, TGZ, TAR, etc.
- Encrypts the files you zip for maximum protection
- Manage your files easily (PC, Cloud, network)
Open archived files
with ease on your PC
You probably have certain files on your computer that you’d like to keep safe and secure. However, deletion is quite an easy process in Windows, so you can accidentally delete some of your precious files.
In case you delete an important file, perhaps the best solution is to try to restore it with a third-party program. But, safe is definitely better than sorry, so the right move is to secure your files from deletion in the first place.
Unfortunately, Windows 10 doesn’t have a straightforward option that will allow you to prevent your files from deletion, and that could be a big problem. However, there are a few ‘other’ ways to keep your files secure from deletion in Windows 10.
You can use a third-party program specially designed for preventing deletion, you can change security permissions of a file you want to secure, or you can completely lock it.
The choice is yours, and we’re just going to explain to you what each method does, and how to perform it. So, you can choose the best option for you.
How do I keep files safe from a deletion in Windows 10?
1. Use WinZip to lock a folder
This method involves doing the same thing as in the first method, but only with a third-party program. So, we’re going to use a file-locker software to forbid access to a file to everyone else.
This method is for those who want to this the simpler way, as using a program requires less effort. There are a handful of effective programs for protecting your files out there.
WinZip is one such tool, even though you may not consider it at first glance.
Despite starting off as a basic archiving and unzipping tool, WinZip has evolved over the years to include tools that make it an excellent addition to any office worker’s digital library.
Besides the efficient compression methods and formats, which include the best ones available, WinZip is now also capable of locking, encrypting, and sharing your archives over social media and the cloud.
Besides file lock and encryption, you can set passwords to specific folders and files, the interface being self-explanatory for setting it up.
WinZip
2. Change security permission
If you’re a fan of first-party solutions and don’t like to install various third-party tools on your computer, the only thing you can do to keep your files safe is to change some security permissions.
What you’ll need to do is to forbid access to a file you want to secure to everyone else except you. That way, only you’ll be able to access and delete the file, so you don’t have to be afraid that someone else will delete it.
Here’s exactly what you need to do:
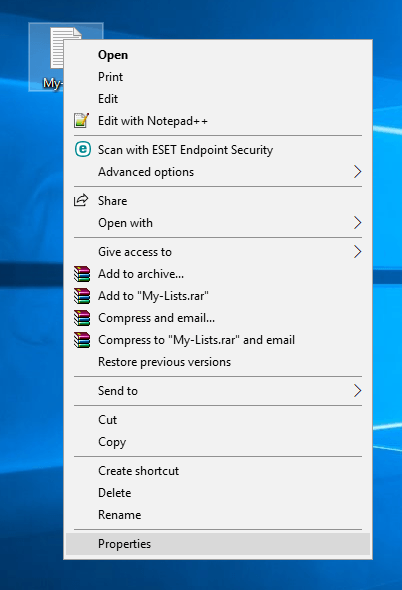
- Right-click the file you want to secure, and open Properties
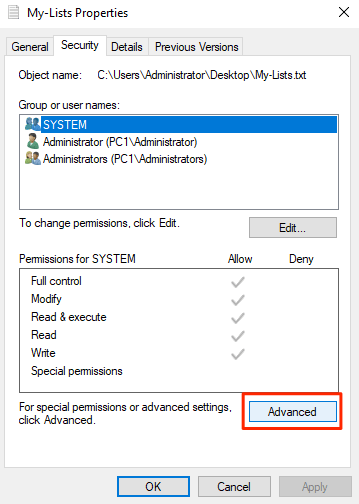
- Go to the Security tab, and choose Advanced
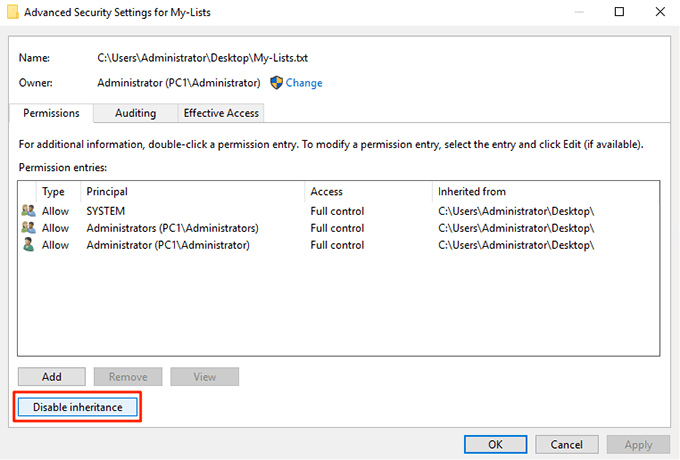
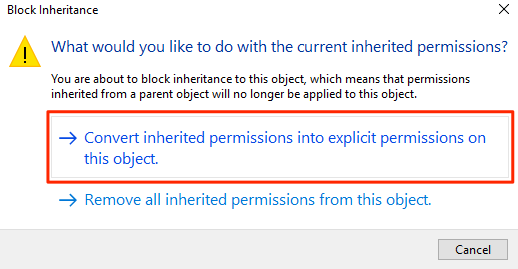
- Now, click on disable inheritance
- Click on a user you want to deny access to your file, and go to Edit
- From the Type: dropdown menu, select Deny, and click OK

- Repeat the previous three steps for each user account you want to deny access to
- Click OK
There you go, after performing this method, nobody but you will be able to access, change, or delete a secured file.
You can also forbid access to yourself, but then you’ll have to change security permissions each time you want to access the file.
That’s about it, you now know how to protect your files from a deletion in Windows 10. Unfortunately, the system doesn’t have its own option for this, and we doubt Microsoft will ever introduce it.
Therefore, you either need to find an alternative way or install a special program for that. But even that is better than nothing.
If you have any comments, questions, or suggestions, just let us know in the comments below.
Prevent Cut, Paste, Copy, Delete, Re-naming of files & folders in Windows
We are pleased to release Prevent, a free software that runs on all Windows OS. If you don’t want anyone deleting or renaming or messing around with your data, maybe your younger sibling, then Prevent may be able to help you.
Prevent software for Windows PC
The downloaded zip file consists of:
- Prevent.exe
- Pre_1
- Pre_2
- Read Me file.
- Uninstall.
Run the Prevent installer setup. The installer only places the Prevent folder in the system Program Files folder . A desktop shortcut will also be created.
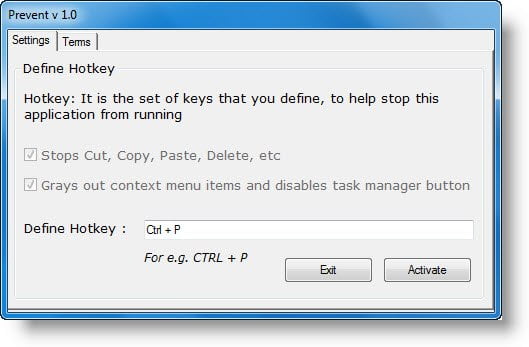
To run the program, click on Prevent. Set your Hotkey to stop Prevent. You may set it as Ctrl+P if you wish. Hotkeys Win+F8 kills Pre_1 and Win+F9 kills Pre_2, too. But the single hotkey set by you will kill all Prevent processes at the same time.
Prevent Cut, Paste, Copy, Delete, Re-naming of files & folders
- Stops Cut
- Stops Paste
- Stops Copy
- Stops Delete
- Stops Copy To
- Stops Move to
- Stops Send To
- Prevents renaming
- Disables Task Manager’s End Process button.
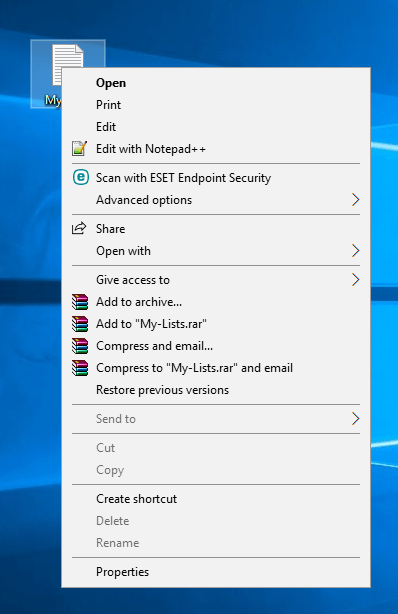
Also, it doesn’t allow you to right-click on the process name and click on the end process. It also grays out the context menu items, disables Ctrl+C, Ctrl+X, and Ctrl+V and/or stops the process.
To uninstall or remove Prevent, use the Uninstaller situated in the Prevent folder, or uninstall it via the Control Panel or simply delete its Program folder.
Prevent v1.0 has been developed by TWC Forum member, Ritesh Kawadkar for TheWindowsClub. It works on Windows 10/8/7/Vista. It was released in 2011 but still works on Windows 10 too.
Note : Since the application disables the Task Manager buttons and makes some system changes, some antivirus programs may identify it as malware. Rest assured that the program is clean and it’s a false positive.
You may want to check out our other freeware releases: FixWin | Ultimate Windows Tweaker.
Date: September 13, 2019 Tags: Security, TWC App
Prevent Files From Being Deleted Or Renamed In Windows
Stop standard users from messing with your stuff
No matter what purpose you use your computer for, there are likely some files on your machine that you don’t want anyone to rename or delete. But unfortunately the way Windows works, there’s really no default mechanism to help you prevent your files from being deleted on your computer. Any user who has access to your machine can find your files and modify, rename, and even delete them off your computer.
Safeguarding these important files is a task in itself. Although Windows doesn’t protect your files by default, it does offer an option that helps protect your files from any deletion attempts. In fact, there are multiple ways both in-built as well as third-party ones that help keep your files from getting modified on your computer.

Prevent Files From Being Deleted Using The Default Option
The best way to prevent file renaming and deletion in Windows is to use the default option available on your system. It requires no installation and can easily be accessed and used even by beginners.
- Locate the file that you want to prevent from being deleted in File Explorer. Right-click on the file and select the option that says Properties.
- When the properties dialog box opens, you’ll see four tabs at the top. Click on the tab that says Security as the option you’re looking for is located there.
- In the Security tab, you’ll find a button saying Advanced at the bottom. Click on it and it’ll open a new dialog box.
- The following screen lets you define permissions for your selected file. Click on the Disable inheritance button to be able to modify the file permissions.
- A prompt will appear with two options in it. Select the one that says Convert inherited permissions into explicit permissions on this object.
- You’ll now see all of your user accounts listed on your screen. Click on the account that you want to prevent from deleting your file and then click on the Edit button. It’ll let you edit the file permissions for your selected account.
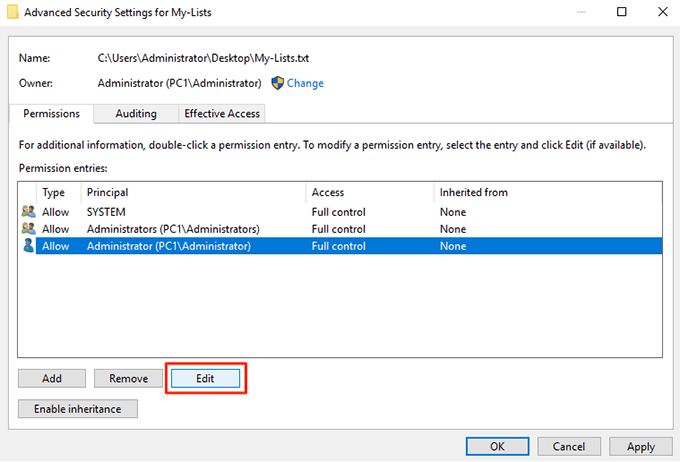
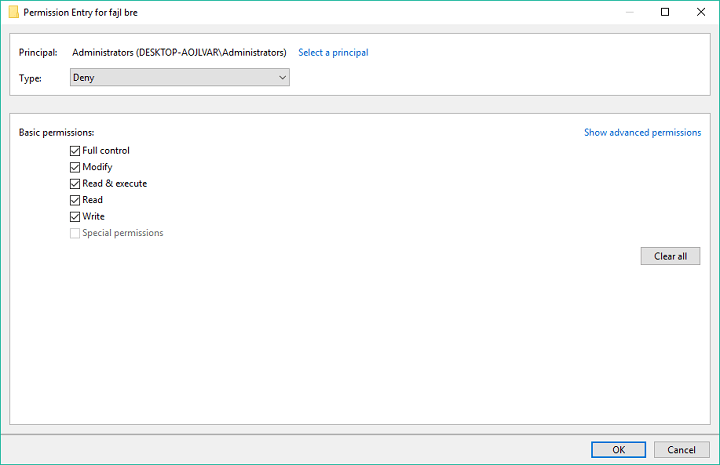
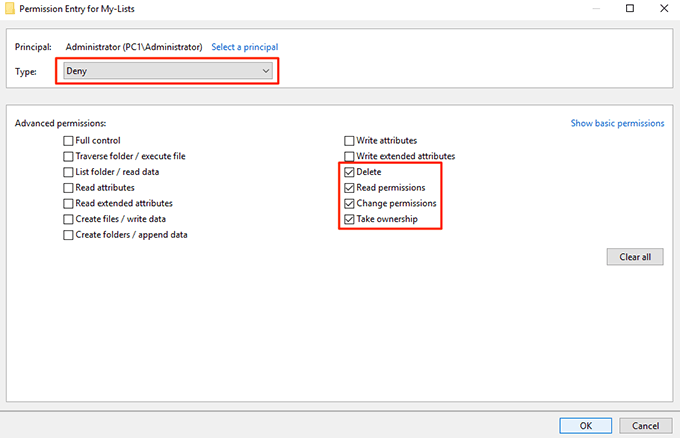
- Make sure to click on Show advanced permissions on the following screen so you can see all the available permissions. Also, select Deny from the Type dropdown menu.
Then, tick-mark the following options and these permission privileges will be taken away from your selected user account.
A) Read permissions
B) Change permissions
C) Take ownership
D) Delete
Click on OK when you’re done to save the changes
- Click on OK on the following screen as well and then exit all the open dialog boxes on your computer.
Your selected file is now protected from being modified, renamed, or deleted on your PC. If the user you’ve denied access tries to delete the file, they’ll get a permission error and they won’t be able to proceed with the task.
Prevent Files From Being Renamed And Deleted By Hiding Files
Another way you can prevent your files from being deleted or renamed is to hide your files. This way your files won’t appear in File Explorer and any other user won’t see it let alone deleting the file on your machine.
Hiding Your Files To Prevent Them From Being Deleted
- Right-click on your file and select Properties.
- You’ll be in the General tab by default. At the bottom of your screen, you’ll find an option saying Hidden. Tick-mark the option and click on OK.
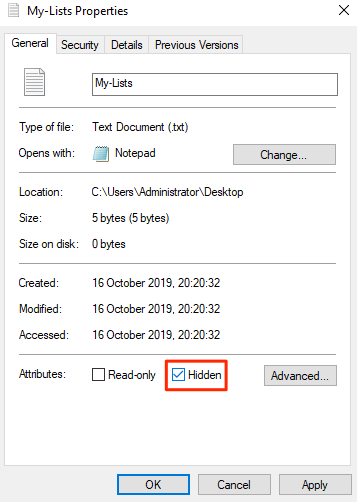
Your file should now be hidden.
If you have the option to view hidden files enabled on your machine, you’ll need to turn it off or your file will become visible.
Disable Viewing Hidden Files In Windows
- Open a File Explorer window on your PC.
- Click on the View menu at the top and you’ll reveal several new options. Find the option that says Options, click on it, and select Change folder and search options.

- Click on the View tab in the dialog box that opens on your screen. Find the entry named Don’t show hidden files, folders, or drives and enable it. Click on OK to save the changes.
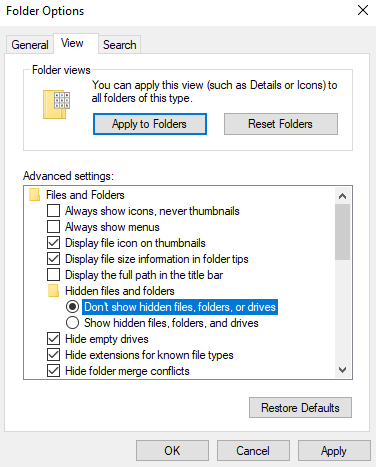
Your hidden file should now be completely hidden and it won’t be visible in the Explorer until the above option is enabled.
Use Prevent To Remove The File Delete And Rename Options
A user is able to delete or rename your files only because they get the option to do so in File Explorer. What if you could somehow disable the options that you don’t want in the Explorer menu so a user can’t even initiate any unwanted actions?
Well, there’s an app that lets you do it.
Meet Prevent, a small application that allows you to disable certain options in File Explorer on your computer. It lets you disable options like Rename, Delete, Cut, and Copy so no one can touch or modify your chosen files.
It’s completely free to download and use this app on your computer. Also, it only occupies a small amount of memory space on your machine.
- Download, install, and launch the Prevent app on your Windows PC.
- When the app launches, you’ll see that there’s only one option you can configure.
It’s called Define Hotkey and it allows you to specify a keyboard shortcut that stops the app from running. Use any of the available keyboard shortcuts and then click on Activate.
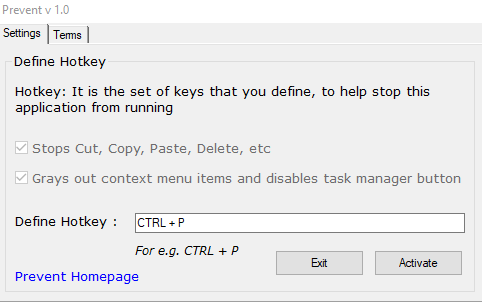
- The app will start running, and when you right-click on your file, you’ll find that the options mentioned above are grayed out. You can’t click or use them. The app disables the physical buttons for those actions as well.
When you decide that it’s time to allow those options to be used, simply press the keyboard shortcut you assigned to the app and the app will stop functioning. You can then rename, delete, cut, and copy your file as you could do before.
Mahesh has been obsessed with technology since he got his first gadget a decade or so ago. Over the last few years, he’s written a number of tech articles on various online publications including but not limited to MakeTechEasier and Android AppStorm. Read Mahesh’s Full Bio


