- How to Disable Automatic Driver Updates in Windows 10?
- How to Prevent Windows 10 from Automatically Updating Specific Drivers?
- How to Disable Driver Updates in Hardware Settings?
- How to Stop Automatic Driver Updates Using Group Policies?
- How to Disable Driver Updates in the Registry?
- Как временно отключить обновления драйвера в Windows 10
- Откат драйвера устройства
- How to temporarily prevent a driver update from reinstalling in Windows 10
- Rolling back a device driver
How to Disable Automatic Driver Updates in Windows 10?
When you connect a new device to your computer, laptop or tablet, Windows tries to automatically install a corresponding driver. The operation system further tries to update the driver version through the Windows Update. In most cases, this approach is optimal, since guarantees the installation of the latest driver versions that have been verified by Microsoft. However, in some cases the user deliberately uses the old driver versions and doesn’t want them to be updated automatically by Windows through Window Update.
Fortunately, you can prevent Windows 10 from automatically updating device drivers. In this article we will describe several ways we know on how to disable driver auto-update.
How to Prevent Windows 10 from Automatically Updating Specific Drivers?
You can stop automatic driver updates for a specific device in Windows 10. For example, you are using some kind of old (but stable) video card driver that stops working correctly after each automatic driver update. You want all computer drivers to be updated automatically, except for the driver for a specific device (your video card).
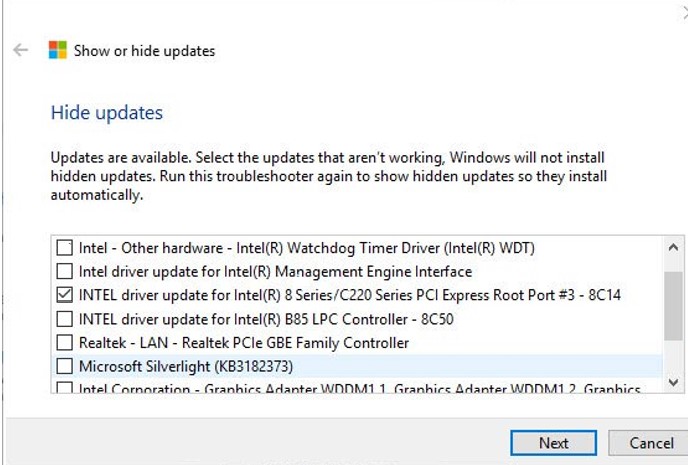
Microsoft suggests using a separate tool – wushowhide.diagcab (“Show or Hide Updates”), which allows you to hide specific updates or drivers in Windows 10.
- You can download the wushowhide.diagcab utility in the Microsoft Download Center (http://download.microsoft.com/download/f/2/2/f22d5fdb-59cd-4275-8c95-1be17bf70b21/wushowhide.diagcab);
- Run the wushowhide.diagcab utility and select the option “Hide Updates“;
- In the list of the available Windows updates and drivers, check the drivers for which you want to disable the auto update and click Next button;

- After that, the selected drivers will not be updated manually by Windows.
You can disable specific driver updates via the Group Policy. First of all, you need to determine the identifier of the device for which you want to disable the automatic driver updates.
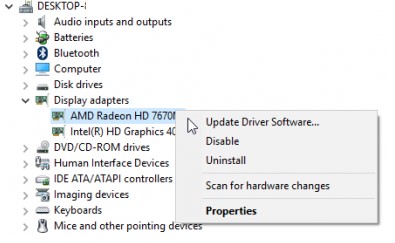
- Open the device manager snap-in (devmgmt.msc). In the hardware list find the device you need and open its properties;
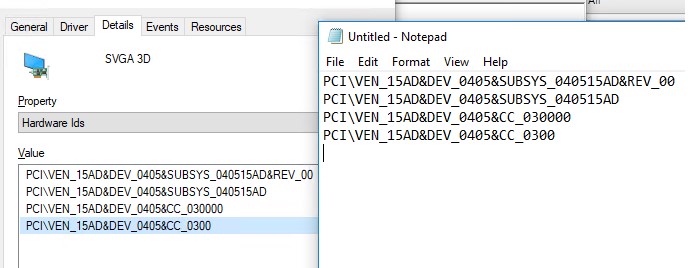
- Go to the Detail tab and select “Hardware IDs” from the drop-down list;
- Copy the values of the hardware identifiers associated with the device (in the format PCI\VEN_15AD&DEV_ ….) into the notepad.exe;
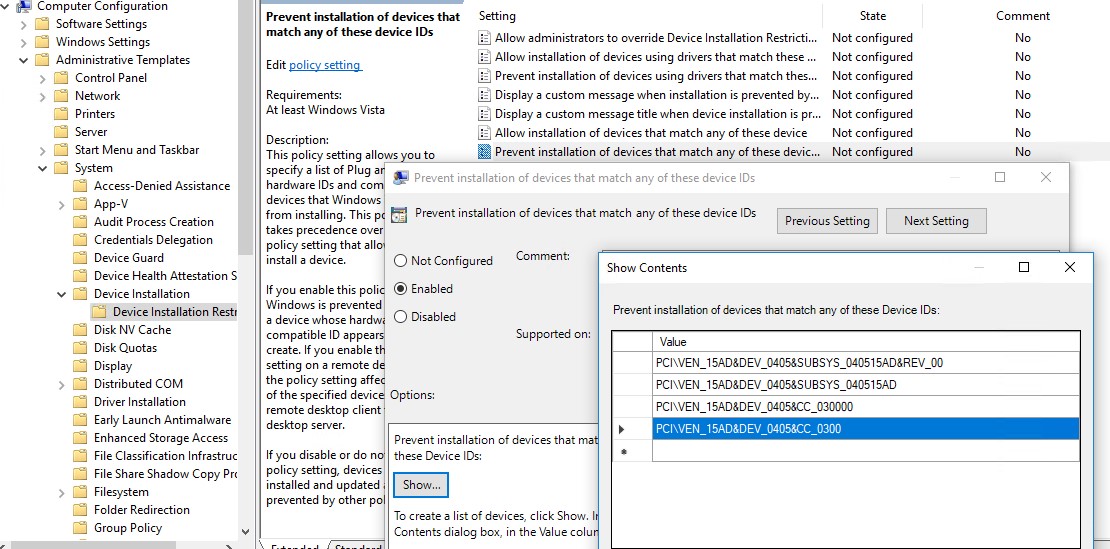
- In the Group Policy Editor console (gpedit.msc for local computer or gpmc.msc for domain workstations) go to the section Computer Configuration -> Administrative Templates -> System -> Device Installation -> Device Installation Restrictions. Enable the policy “Prevent installation of devices that match any of these device IDs”;
- Click the “Show” button in the policy settings and copy the graphic card IDs you received earlier into the table of values;
- Save the changes and update the group policies setting on the client with the command: gpupdate /force ;
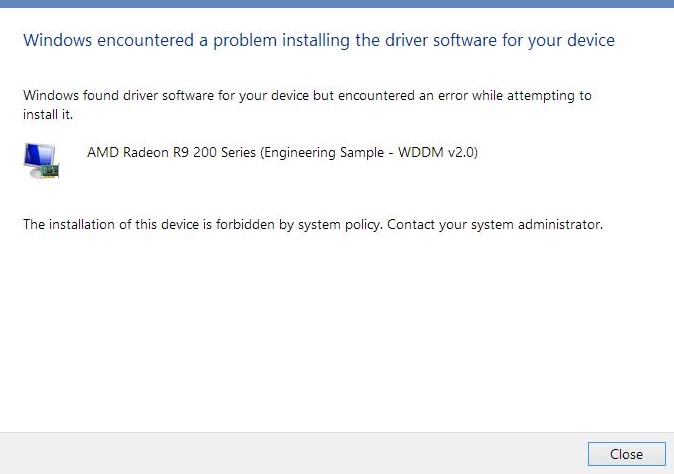
- Now, if the computer receives and downloads driver updates for these devices through WindowsUpdate, an error message will appear during their automatic installation (The installation of this device is forbidden by system policy. Contact your system administrator).
Also you can enable this policy through the registry. To do this, run the registry editor (regedit.exe) and go to the registry key HKLM\SOFTWARE\Policies\Microsoft\Windows\DeviceInstall\Restrictions\DenyDeviceIDs. In this section, create string (REG_SZ) parameters with the names in order, starting with 1 and the hardware ID value in each parameter.
You can disable driver updates for specific device types (printers, sound cards, USB controllers, etc) using the policy “Prevent installation of devices using drivers that match these device setup classes”. To do this, you need to specify the device class GUID. For example, <4d36e972-e325-11ce-bfc1-08002be10318>is a class of network adapters, <4d36e979-e325-11ce-bfc1-08002be10318>and <4658ee7e-f050-11d1-b6bd-00c04fa372a7>– printers, etc.
How to Disable Driver Updates in Hardware Settings?
The easiest way to prevent Windows from automatic drivers update is to change the system settings on the Hardware tab. To do this:
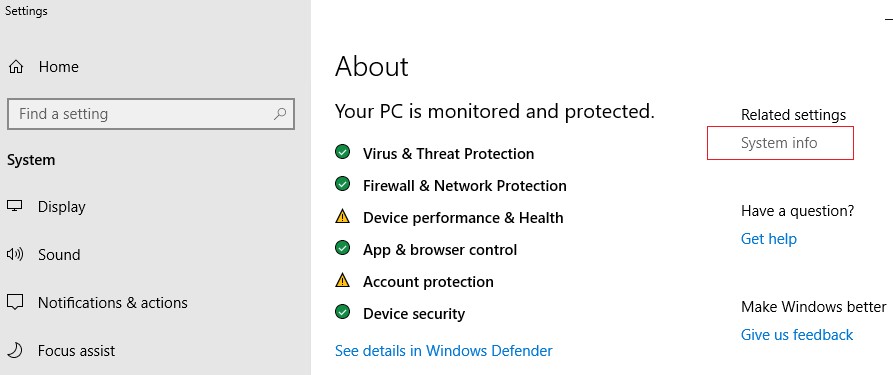
- Press Win + X and click System;
- In the Related settings section click on the link System Info;
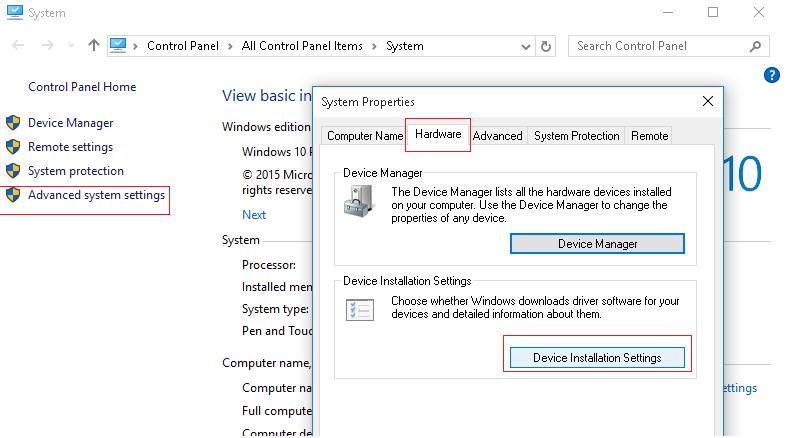
- In the left part of the window, click Advanced System Settings;
- In the next window, go to Hardware tab and click Device Installation Settings;
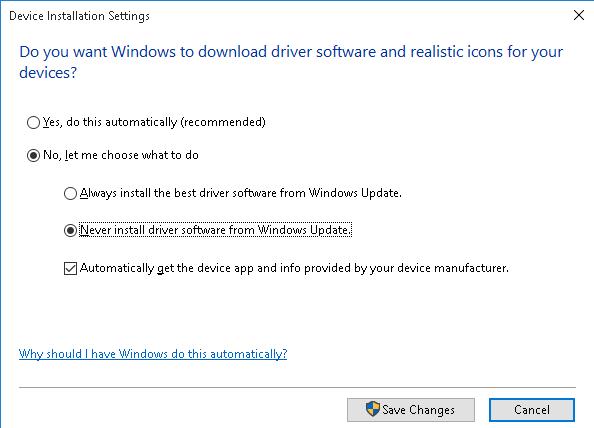
- In the Device Installation Settings window, check “No, let me choose what to do” and then “Never install driver software from Windows Update“;
- Save changes and restart your computer.
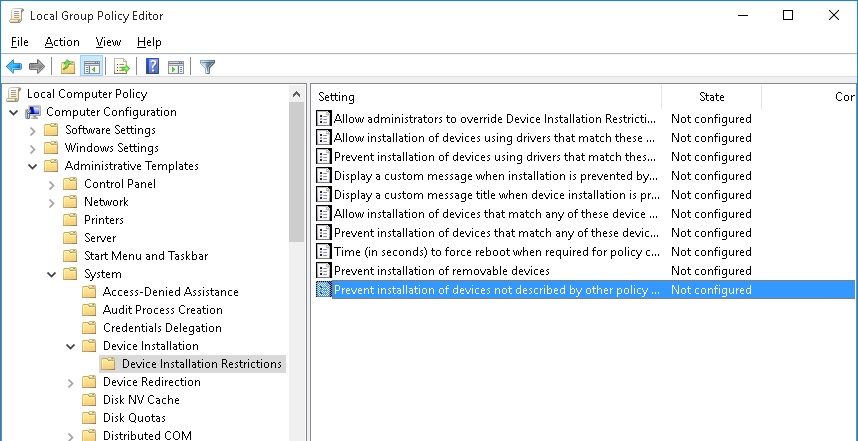
How to Stop Automatic Driver Updates Using Group Policies?
You can disable device driver updates in Windows 10 through Windows Update using Group Policies (it is also easier to configure settings on several computers in the AD domain at once via GPO or by copying the settings of local GPOs between computers in the workgroup using LGPO.exe):
- Press Win + R and type gpedit.msc in the next window (in Windows Home editions you can run the local group policy editor like this);
- In the Local Group Policy Editor, go to Computer Configuration -> Administrative Templates -> System ->Device Installation ->Device Installation Restrictions;
- Find the policy Prevent installation of devices not described by other policy setting;
- Enable the policy (“Enabled”) and save the changes;
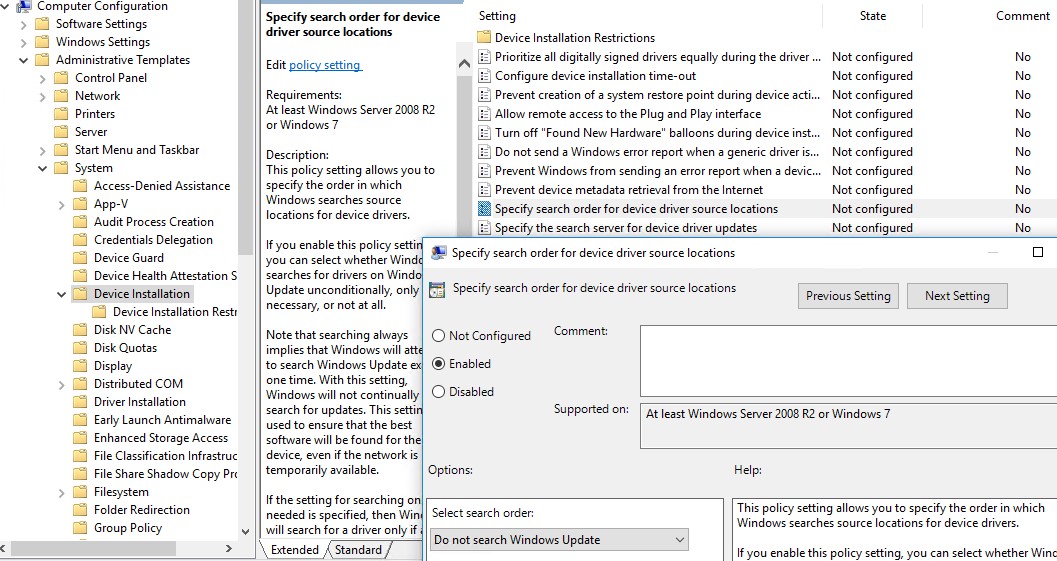
- Then enable the policy “Specify search order for device driver source locations”. This policy is located in the section Computer Configuration -> Administrative Templates -> System -> Device Installation). Change the policy setting to “Do not search Windows Update”. This policy allows you to exclude the search for driver updates on Windows Update sites (when installing a driver for any Windows device, it tries to find a more suitable driver through the Windows Update service);
- Go to the section Computer Configuration -> Administrative Templates -> Windows Components -> Windows Update, find and enable the policy named “Do not include drivers with Windows Update”;
How to Disable Driver Updates in the Registry?
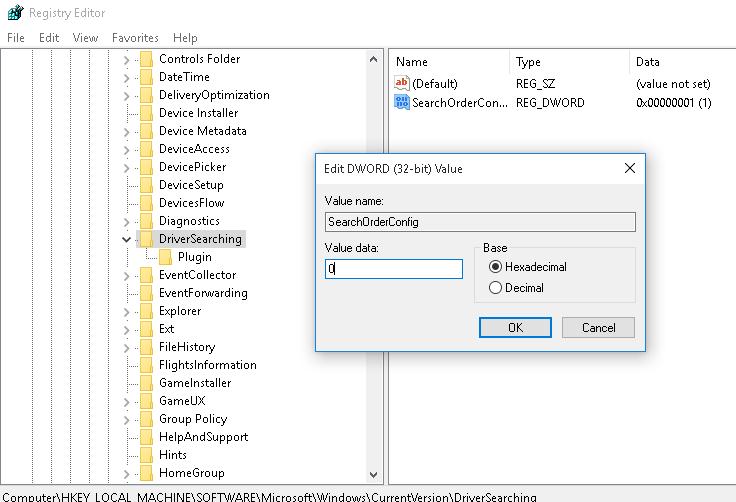
In Windows 10 Home editions with no Group Policy Editor, driver updates can be turned off using the Registry Editor.
- Open the Registry Editor (regedit.exe);
- Go to the registry key HKEY_LOCAL_MACHINE\SOFTWARE\Microsoft\Windows\CurrentVersion\DriverSearching;
- In the right panel, find SearchOrderConfig parameter and change its value to 0 (default value is 1, which means that the system allows driver updates);
- You also need to change the value of the ExcludeWUDriversInQualityUpdate parameter to 1 (in the registry key HKLM\SOFTWARE\Policies\Microsoft\Windows\WindowsUpdate);
- Save the changes.
You can apply this setting with the following commands:
reg add «HKLM\SOFTWARE\Policies\Microsoft\Windows\WindowsUpdate» /v ExcludeWUDriversInQualityUpdate /t REG_DWORD /d 1 /f
reg add «HKLM\SOFTWARE\Microsoft\Windows\CurrentVersion\DriverSearching» /v SearchOrderConfig /t REG_DWORD /d 0 /f
After the reboot, the automatic update of the drivers in the system will be blocked.
Several times I have seen that administrators disable driver updates after deploying a Windows 10 image and installing all the necessary drivers. To do this, you can disable the installation of the driver using the policy “Prevent installation of devices not described by other policy settings” (discussed above) or the command:
reg add «HKLM\SOFTWARE\Policies\Microsoft\Windows\DeviceInstall\Restrictions» /v DenyUnspecified /t REG_DWORD /d 1 /f
Как временно отключить обновления драйвера в Windows 10
В Windows 10 ваше устройство постоянно обновляется, чтобы получить последние функции и исправления. Драйверы устанавливаются автоматически, поэтому вам не нужно выбирать необходимые обновления. В редких случаях отдельные драйверы могут вызывать временные проблемы на вашем устройстве. В таких случаях вы можете отключить автоматическую переустановку проблемного драйвера во время установки следующего пакета обновлений Windows.
Откат драйвера устройства
Если предлагаемый драйвер вызывает системные сбои или нестабильность и если до внесения изменений Windows работала стабильно, вы можете воспользоваться данным способом для отката драйвера обратно на предыдущую версию.
Правильные действия для отката установки драйвера зависят от установленной у вас версии Windows 10. Перед удалением любых драйверов мы рекомендуем вам обновиться до последней версии Windows 10, поскольку это может решить проблему. С помощью Центра обновления Windows можно проверить наличие последних обновлений, нажав кнопку Пуск и выбрав Настройки > Обновление и безопасность > Центр обновления Windows, а затем — Проверка наличия обновлений. Либо можно установить последнюю версию Windows, перейдя на страницу Скачать Windows 10, а затем выбрав Обновить сейчас..
Если вы не уверены, какая версия Windows 10 у вас установлена, нажмите кнопку Пуск и последовательно выберите Настройки > Система > О системе.
Запустите диспетчер устройств. Для этого в поле поиска на панели задач введите диспетчер устройств и выберите Диспетчер устройств.
Найдите и щелкните правой кнопкой мыши по устройству с проблемным драйвером, а затем выберите Свойства.
Откройте вкладку Драйвер и нажмите кнопку Откатить.
Важно! Если у вас не установлена последняя версия Windows 10, мы рекомендуем установить ее прямо сейчас. Для обновления до последней версии, перейдите к Скачать Windows 10 и щелкните Обновить сейчас.
Запустите диспетчер устройств. Для этого в поле поиска на панели задач введите диспетчер устройств и выберите Диспетчер устройств.
Найдите категорию устройства и щелкните правой кнопкой мыши устройство, на котором установлен проблемный драйвер, выберите пункт Свойства, а затем выберите вкладку Драйвер.
В диалоговом окне Подтверждение удаления устройства поставьте галочку напротив Удалить драйвер ПО для данного устройства.
Выберите автоматические обновления
Для предотвращения повторной установки драйвера Центром обновления Windows используйте средство устранения неполадок «Показать или скрыть обновления», чтобы скрыть драйвер. Обновление Windows не будет устанавливать скрытые драйверы или обновления.
Загрузите средство устранения неполадок из Центра загрузки Майкрософт:
How to temporarily prevent a driver update from reinstalling in Windows 10
In Windows 10, your device is always kept up-to-date with the latest features and fixes. Drivers are installed automatically so that you don’t have to select which updates are needed. In rare cases, a specific driver might temporarily cause issues that affect your device. In this situation, you can prevent the problematic driver from reinstalling automatically the next time Windows Updates are installed.
Rolling back a device driver
If a driver that you are offered is causing system crashes or instability, and if Windows was operating correctly before that change, you can use this method to roll back the driver to the previous version.
The appropriate steps to roll back a driver installation depend on the version of Windows 10 that you have installed. We recommend that you update to the latest version of Windows 10 before you try to uninstall any drivers because this may resolve the issue. You can use Windows Update to check for the latest update by selecting the Start button, then selecting Settings > Update & security > Windows Update , and then Check for updates. Or you can install the latest version of Windows by going to Download Windows 10, and then selecting Update Now.
If you aren’t sure which version of Windows 10 you have, select the Start button, and then select Settings > System > About.
Start Device Manager. To do this, in the search box on the task bar type device manager, and then select Device Manager.
Locate and right-click the device that has the problem driver installed, and then select Properties.
Select the Driver tab, and then select Roll Back Driver.
Important If you don’t have the latest version of Windows 10, we recommend that you update now. To update to the latest version, go to Download Windows 10, and select Update Now.
Start Device Manager. To do this, in the search box on the task bar type device manager, and then select Device Manager.
Locate the category of device and right-click the device that has the problem driver installed, select Properties, and then choose the Driver tab.
In the Confirm Device Uninstall dialog box, select the Delete the driver software for this device check box.
Choose your automatic updates
To prevent the driver from being reinstalled by Windows Update, use the “Show or Hide Updates” troubleshooter to hide the driver. Window Update won’t install hidden drivers or updates.
Download the troubleshooter from the Microsoft Download Center:


