- How to delete old Windows install files and free up drive space
- How to delete old Windows installation files
- More resources
- Halo: MCC’s live service elements make it better, not worse
- Microsoft’s Surface Duo is not ‘failing up’
- Here’s what you can do if Windows 10 update KB5001330 is causing issues
- These are the best PC sticks when you’re on the move
- Remove previous Windows installations after a Windows 10 Upgrade & free up disk space
- Remove previous Windows installation(s)
- How to restore a Windows 7-based computer to a previous Windows installation by using the Windows.old folder
- INTRODUCTION
- More Information
- Step 1: Determine whether there is a Windows.old folder and whether there is sufficient free space on the Windows hard disk
- Step 2: Start the Windows Recovery Environment
- Step 3: Move the Windows 7 folders to a new Win7 folder
- Step 4: Copy the contents or move the contents of the Windows.old folder
- Step 5: Restore the boot sector for the previous Windows installation
- Step 6: Restore the Boot.ini file for the previous Windows installation of Windows XP or of Windows 2000
- Step 7: Close the Command Prompt window, and then click Restart
- How to Remove Previous of Windows Installation in Windows 10
- How to Delete Windows Installation Folder in Settings
- How to Remove Windows Installation Folder using Disk Cleanup
- How to Delete Windows .old Folder using Command Prompt
- To remove Windows .old Folder using Command Prompt at Boot, here’s how:
How to delete old Windows install files and free up drive space

When you update your PC from an existing Windows installation, the old files remain on your hard drive. They are saved there instead of being overwritten because something might go wrong during the update installation, or because you might want to roll your PC back to a previous installation if you aren’t happy with the new stuff.
If, however, the update to Windows 10 goes smoothly, and you’re sure you don’t want to return to a previous version of Windows, you can delete those old installation files to free up space on your hard drive. This is especially important for anyone using a device with a smaller solid-state drive (SSD).

Although removing old Windows installation files won’t harm your PC, it’s always a good idea to back everything up in case something goes wrong. Once you’re sure you’re completely satisfied with the Creators Update, this guide can help free up space on your hard drive.
How to delete old Windows installation files
Removing old Windows installation files can’t be done by simply selecting them and moving them to the Recycle Bin. You have to use Disk Cleanup, but luckily the process is simple and won’t take long.
- Right-click the Start button.
- Click Search.
Type Disk Cleanup.
![]()
Click the dropdown arrow below Drives.

Click OK.

Click the checkbox next to any other options to select or deselect whether or not they’re also removed. You might also want to choose to remove the following options:
- Temporary Windows installation files.
- Windows upgrade log files.

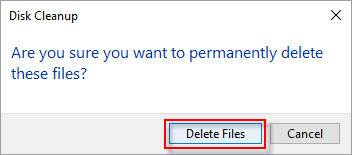
Click Delete Files.
Once the old installation files are removed, you won’t be able to roll back to a previous version of Windows. Unless you have a secondary backup that you can restore from, you’ll have to do a clean install of Windows to return to a previous state. So make sure you’re really ready before you remove the old files.
More resources
Don’t forget to create a backup of your data whenever you can. To help, we created a guide featuring a bunch of different ways to accomplish this. If you’d like more information on the latest Windows 10 update, the Creators Update, be sure to check out our Senior Editor Zac Bowden’s definitive review.
![]()
Halo: MCC’s live service elements make it better, not worse
Halo: The Master Chief Collection is more popular than ever, but some fans don’t agree with the live service approach 343 Industries has taken with it. Here’s why those elements are, at the end of the day, great for the game and for Halo overall.
![]()
Microsoft’s Surface Duo is not ‘failing up’
Microsoft announced this week that it was expanding Surface Duo availability to nine new commercial markets. While Surface Duo is undoubtedly a work in progress, this is not a sign of a disaster. It’s also doesn’t mean that Surface Duo is selling a ton either. Instead, the reason for the expansion is a lot more straightforward.
![]()
Here’s what you can do if Windows 10 update KB5001330 is causing issues
In this guide, we’ll show you the steps to get rid of the update KB5001330 to fix profile, gaming, and BSoD problems with the Windows 10 October 2020 Update and May 2020 Update.
![]()
These are the best PC sticks when you’re on the move
Instant computer — just add a screen. That’s the general idea behind the ultra-portable PC, but it can be hard to know which one you want. Relax, we have you covered!
Remove previous Windows installations after a Windows 10 Upgrade & free up disk space
If you have upgraded your Windows 10 to the latest version 1703 which is currently available, and you are very sure that you do not want to rollbackWindows to an earlier installation, then you may run Disk Cleanup Tool to remove previous Windows installations after the Windows Upgrade & free up disk space.
Remove previous Windows installation(s)
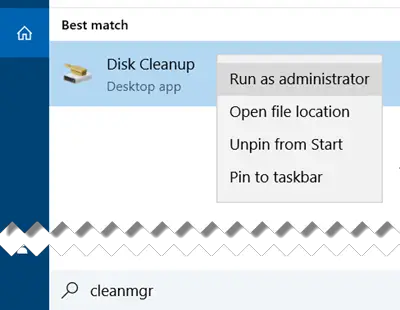
After upgrading Windows 10 to a newer version, you can free up several GBs of disk space by using the Remove previous Windows installations option in Disk Cleanup Tool. To do this, type cleanmgr in Start search, right-click on it and select Run as administrator to open the Disk Cleanup Tool in an elevated mode.
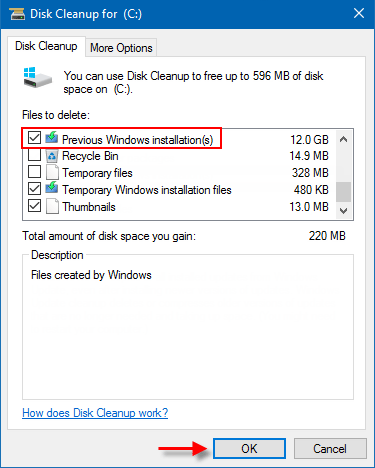
Once the tool opens, scroll down till you see Previous Windows installation(s). This will remove the Windows.old folder. Check this option and press on OK.
You will be warned that if you clean up the previous Windows installations or Temporary installation files, you will no longer be able to restore the machine mack to the previous version of Windows.
Click on Yes to proceed.
While there you may also want to delete these upgrade & installation files:
- Windows upgrade logs files: These files contain information that may help you troubleshoot upgrade & installation process. If your process has gone smoothly, you may delete these files.
- Windows ESD installation files: If you do not need to reset or refresh your PC, you may delete these files.
- Temporary Windows installation files: These installation files are used by Windows setup and they can be safely deleted.
Of course, if you do not do this, Windows 10 will still run a scheduled task later on to remove these installation files.
Date: April 12, 2018 Tags: Disk Space, Upgrade
How to restore a Windows 7-based computer to a previous Windows installation by using the Windows.old folder
INTRODUCTION
In certain scenarios you may need to restore your Windows 7 Computer back to the previous installation of Windows. This article walks you through the steps to manually restore your computer back to the previous version of Windows.
Note: To do this, you must use the command prompt, and you must type specific commands at the command prompt to rename and to move folders between the different versions of Windows.
Note: If you currently have Service Pack 1 for Windows 7 installed, the uninstall steps are the same as with Windows 7 without any service packs installed. If you are restoring back to a previous Windows 7 installation, you may need to Install Windows 7 Service Pack 1 to that installation.
This article is intended for a beginning to intermediate computer user.
More Information
To resolve this issue, follow the steps listed below to restore your computer back to a previous version of Windows using the Windows.OLD folder.
TIP: You may find it easier to follow the steps if you print this article first.
Step 1: Determine whether there is a Windows.old folder and whether there is sufficient free space on the Windows hard disk
Click Start  , and then click Computer.
On the View menu, click Details.
In the Free Space column, note how much space is available for Local Disk (C:) under the Hard Disk Drives area.
In the Hard Disk Drives area, double-click Local Disk (C:), and then determine whether the Windows.old folder exists.
Important If the Windows.old folder does not exist, you cannot follow the steps in this article to restore the previous Windows installation to this computer. You must backup and restore or transfer your files to the previous operating system.
Right-click the Windows.old folder.
Windows 7 will determine the size of the folder after several seconds.
Determine whether the Windows.old folder is smaller than the free space that is available for Local Disk (C:) in step 1.2.
Note If the Windows.old folder is two times as large as the free space that is available for the Local Disk (C:) entry, you may be unable to restore the previous Windows installation.
Step 2: Start the Windows Recovery Environment
Put the Windows 7 installation disc in the DVD drive, and then restart the computer.
Press a key when you are prompted to restart from the disc.
In the Install Windows window, select a language, a time, a currency, a keyboard input method or other input method, and then click Next.
In the Install Windows window, click Repair your computer.
In the System Recovery Options window, click the version of the Windows 7 operating system that you want to repair, and then click Next.
In the System Recovery Options window, click Command Prompt.
The Command Prompt window opens, and it displays the command prompt. The command prompt is where you will type the commands that are described in the following steps.
Step 3: Move the Windows 7 folders to a new Win7 folder
Note When you type one or more of the commands at the command prompt in the following steps and press ENTER, you may receive the following message:
The system cannot find the file specified.
If you receive this message, go to the next step in this section, and then type the command in that next step.
Type the following commands and press ENTER after each command:
Move Windows Win7\Windows
Move «Program Files» «Win7\Program Files»
Move Users Win7\Users
Attrib –h –s –r ProgramData
Move ProgramData Win7\ProgramData
Rd «Documents and Settings»
Step 4: Copy the contents or move the contents of the Windows.old folder
Note When you type one or more of the commands at the command prompt in the following steps and press ENTER, you may receive the following message:
The system cannot find the file specified.
If you receive this message, go to the next step in this section, and then type the command in the next step.
Type the following commands and press ENTER after each command:
move /y c:\Windows.old\Windows c:\
move /y «c:\Windows.old\Program Files» c:\
move /y c:\Windows.old\ProgramData c:\
move /y c:\Windows.old\Users c:\
move /y «c:\Windows.old\Documents and Settings» c:\
Step 5: Restore the boot sector for the previous Windows installation
Type one of the following commands at the command prompt, as appropriate for your situation.
Note In the following commands, D: represents the DVD drive. If the DVD drive on the computer is represented by a different letter, such as E:, use that letter in the command.
When the previous Windows installation was Windows Server 2003, Windows XP, or Microsoft Windows 2000
Type the following command, and then press ENTER:
D:\boot\bootsect /nt52 c:
When the previous Windows installation was Windows Vista
Type the following command, and then press ENTER:
D:\boot\bootsect /nt60 c:
Step 6: Restore the Boot.ini file for the previous Windows installation of Windows XP or of Windows 2000
Note Follow these steps only when the previous installation is Windows XP or Windows 2000.
Type the following commands and press ENTER after each command:
Attrib –h –s –r boot.ini.saved
Copy boot.ini.saved boot.ini
Step 7: Close the Command Prompt window, and then click Restart
Type the following command at the command prompt, and then press ENTER:
Click Restart to restart your computer.
Note After you have verified that Windows XP is functional, you can remove the C:\Win7 folder if it is not needed for data recovery.
How to Remove Previous of Windows Installation in Windows 10
Ten daysВ after you upgrade to Windows 10, your previous version of Windows will be automatically deleted from your PC. If your drive is low in space, you can manually delete the previous version of Windows installation. This article describes 3 ways to delete Windows installation files on Windows 10 PC.
How to Delete Windows Installation Folder in Settings
Deleting your previous version of Windows installation(s), here is how:
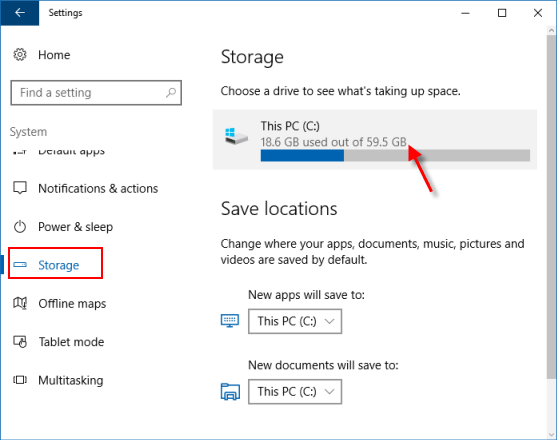
Step 1: Open Settings app, click System > Storage.
Step 2: Click on This PCВ and then scroll down the list andВ chooseВ Temporary files.
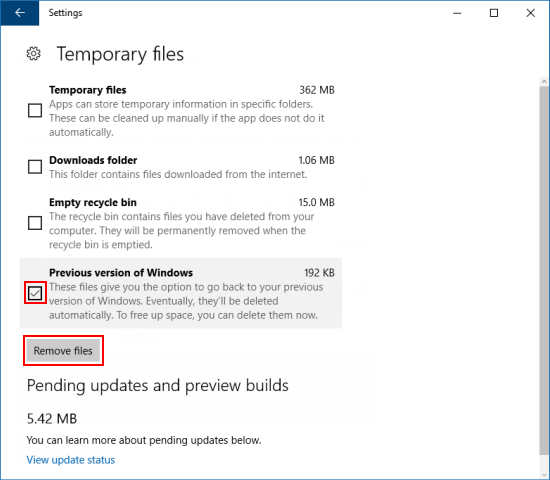
Step 3: Under Remove temporary files, select theВ Previous version of WindowsВ check box and thenВ chooseВ Remove files.
How to Remove Windows Installation Folder using Disk Cleanup
Windows .old folder contains a copy of the previous Windows installation in C: disk, and it takes up much of storage. It can free up several GBs of disk space by using theВ Remove previous Windows installationsВ option in Disk Cleanup Tool.
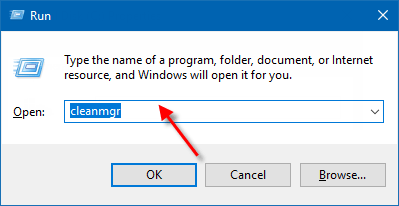
Step 1: Open the Disk Cleanup tool in the Run.
Press Win+R to open Run dialog, type cleanmgr, and then hit Enter key.
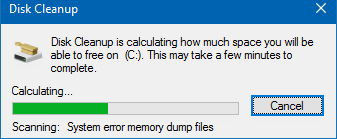
Wait while the system is calculating the amount of the used space.
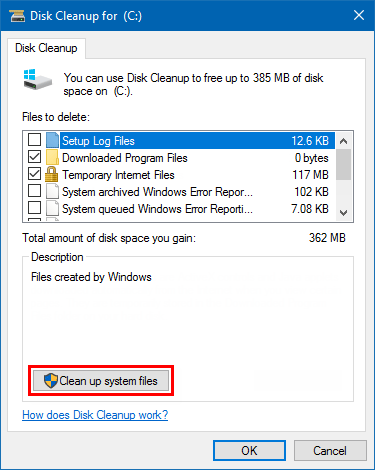
Step 2: Once the tool opens, click Clean up system file button.
Step 3: Scroll down till you seeВ Previous Windows installation(s). Check this option and click on OK.
Step 4: Click on Delete FilesВ to complete the task.
While there you may also want to delete these upgrade & installation files:
- Windows upgrade logs files: These files contain information that helps you troubleshoot upgrade & installation process. If your process has gone smoothly,В you may delete these files.
- Windows ESD installation files: If you do not need to reset or refresh your PC, you may delete these files.
- Temporary Windows installation files: These installation files are used by Windows setup and they can be safely deleted.
How to Delete Windows .old Folder using Command Prompt
If you can’t remove the Windows .old folder and other related files with the above options, you can try to remove Windows .old Folder using Command Prompt.
PressВ Windows logo + XВ shortcut keys, then hitВ AВ key on the keyboard.

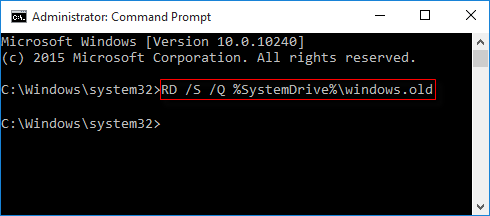
Step 2: In Command Prompt window, execute the delete command below, and press Enter.
RD /S /Q %SystemDrive%\windows.old
Or execute this command step by step if you like:
- cd C:\
- attrib -r -a -s -h C:\Windows.old /S /D
- takeown /f Windows.old /a /r
- rd /s /q Windows.old
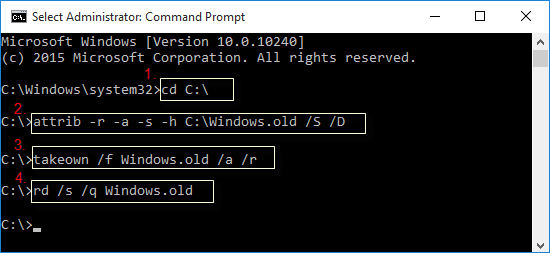
The Windows .old folder will be deleted immediately.
To remove Windows .old Folder using Command Prompt at Boot, here’s how:
Step 2: Next is going to Verify the Windows 10 Drive Letter at Boot.
The Windows 10 drive letter may not always beВ C:В at boot like it is while Windows is started, so be sure to verify it’s drive letter before doing the command.
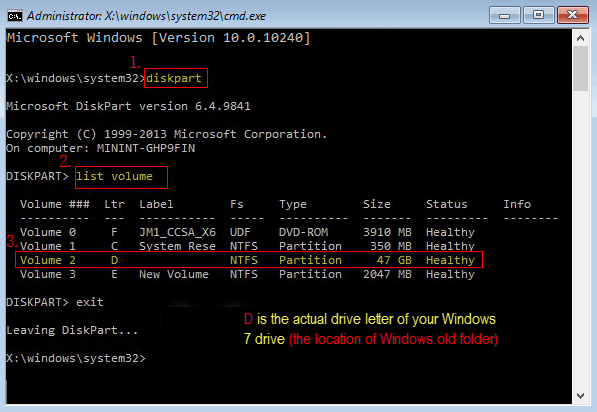
1. In the command prompt, typeВ diskpart, and press Enter.
2. Then typeВ list volume and press Enter.
3. From the listed volumes, look for and verify the drive letter of your Windows 10 drive.
4. Finally, typeВ exit and press the Enter key.
Step 3: Then execute delete the Windows .old folder command as follows:
RD /S /Q «D:\Windows .old»
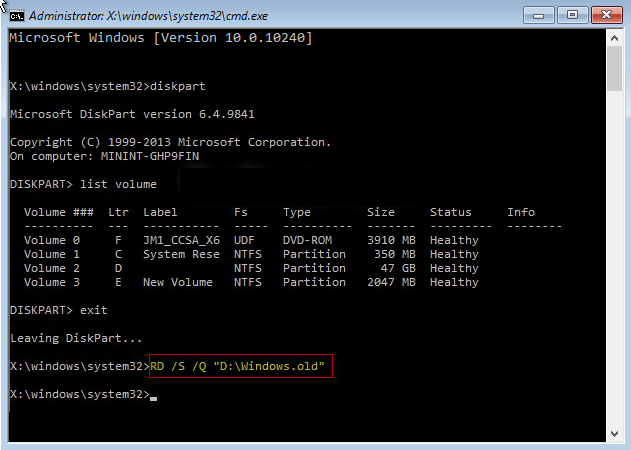
Tips: D is the actual drive letter of your previous version of Windows because it sizes 47GB. Another volume is too small that can’t store the system folders.
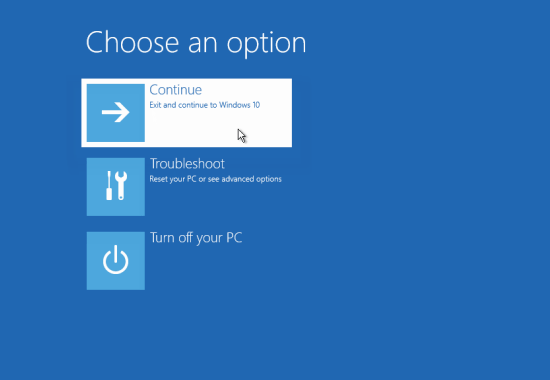
Step 4: Close the command prompt. Then click Continue to restart the computer to Windows 10.
The Windows .old folder will be deleted immediately.


