- Boot Device Not Found: Исправить ошибку при включении ПК
- 1. Проверьте соединение с загрузочным диском
- 2. Изменить порядок загрузки
- 3. Исправить загрузочную запись
- 4. Проверьте, активен ли основной раздел
- Компьютер не включается, выдает сообщение «detecting drivers please wait»
- Fix: No Device Drivers Were Found
- Solution 1: Switch to a USB 2.0 Port
- Solution 2: Set the Partition to Active
- Solution 3: Create a New Disc
- Solution 4: Enable the xHCI hand-off Option in BIOS
- Solution 5: Change Everything to Legacy and Set the Boot Device to Your DVD or USB
Boot Device Not Found: Исправить ошибку при включении ПК
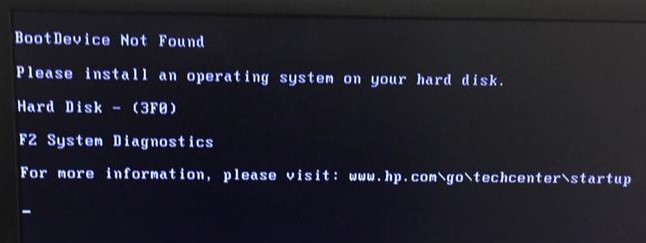
Иногда при включении ноутбука или ПК вы можете увидеть сообщение об ошибке «Boot Device Not Found. Please install an operating system on your hard disk, Hard Disk (3f0)» и будет предложено нажать F2 для диагностики системы. Дело в том, что когда вы устанавливаете систему Windows на диск HDD или SSD, то диск становится главным загрузочным устройством. Когда ноутбук или ПК загружается, то BIOS или UEFI ищет установленную систему Windows на этом главном загрузочном диске, и когда не находит ни одного устройства, с которого он может загрузиться, выдает ошибку, что загрузочное устройство не может быть найдено (Boot Device Not Found). Давайте разберем, что делать и как исправить эту ошибку?
1. Проверьте соединение с загрузочным диском
Если вы используете ПК, то его нужно разобрать и посмотреть провода SATA. Отключите для начало ПК от сети 220 и потом снимите крышку на самом ПК. Далее посмотрите внимательно все провода, которые идут от материнской платы до HDD или SSD. При возможно высуньте провода, продуйте фишки, и вставьте обратно. Если вы используете ноутбук, то нужны навыки, которые помогут вам открыть его и проверить наличие слабого соединения. Если нет таких навыков, то отнесите его в сервисный центр.
2. Изменить порядок загрузки
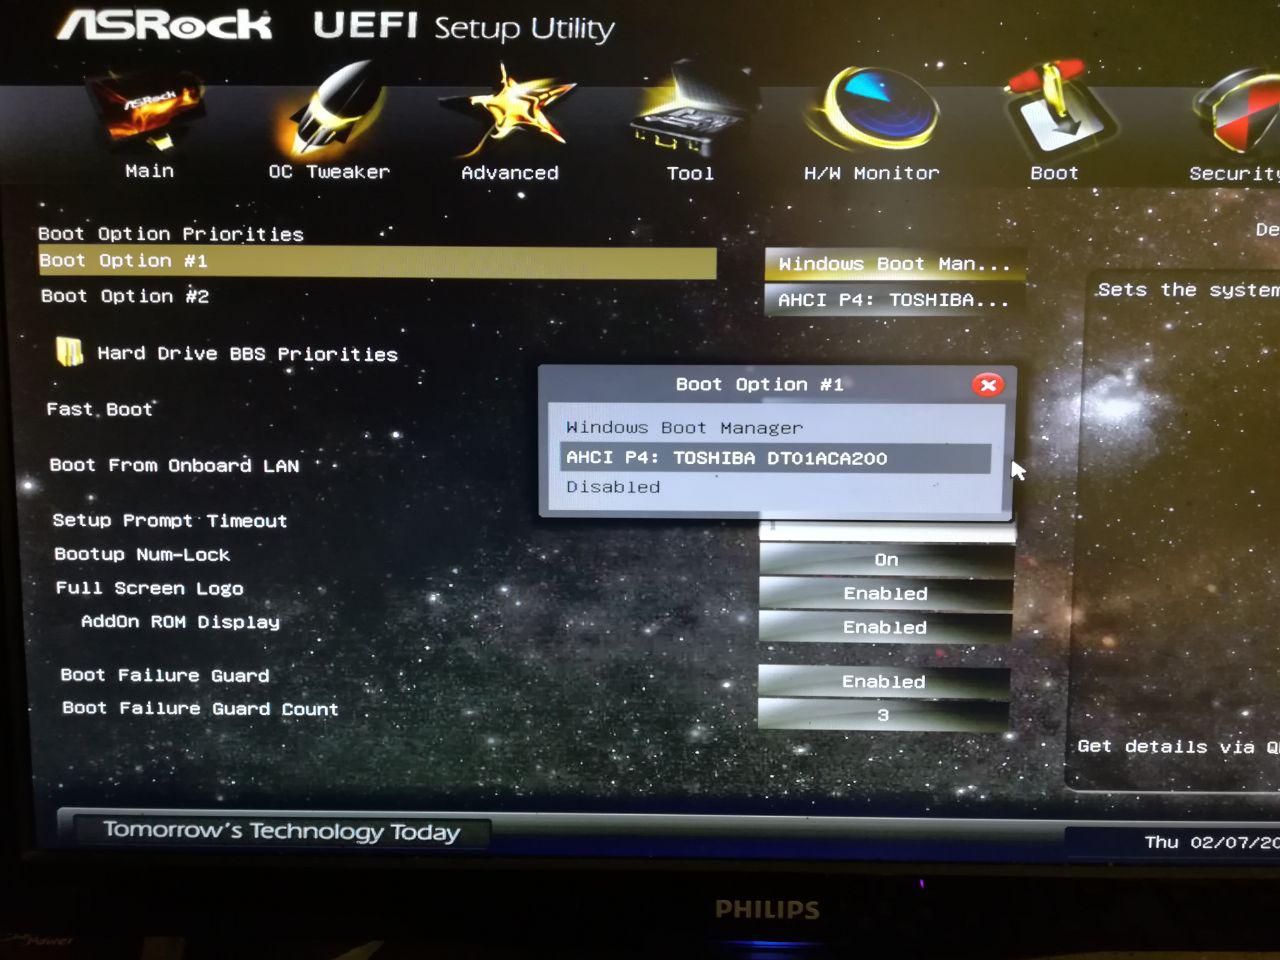
Если у вас всунута USB флешка в ПК или ноутбук, то попробуйте её извлечь и загрузиться. Если не помогло, то скорее всего, у вас стоит первым загрузочным устройством не диск на котором установлена ОС Windows. Давайте зайдем в BIOS и первом, какое загрузочное устройство стоит на первом месте.
При загрузке ПК или ноутбука нажмите DEL или F2, чтобы попасть в настройки BIOS. Далее перейдите в параметр Boot и выставьте HDD, где установлена сама система Windows, на первое место (Boot Option #1) и при следующей загрузке, ошибка Boot Device Not Found должна пропасть.
Это руководство поможет вам попасть в BIOS и выставить на первое место загрузчик в разных версиях BIOS.
3. Исправить загрузочную запись
Нужно запустить командную строку с дополнительных параметров загрузки. Чтобы попасть в эти параметры, нужно выключить и включить ПК, три и более раз, когда он доходит до ошибки.
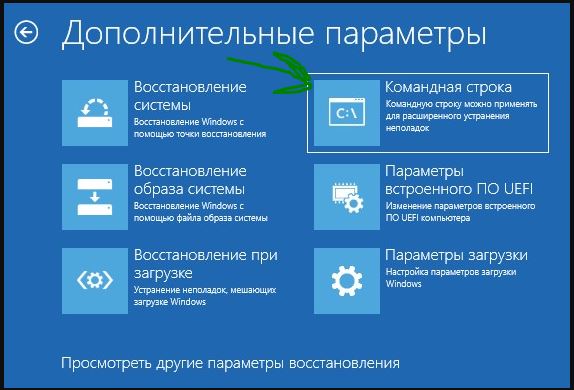
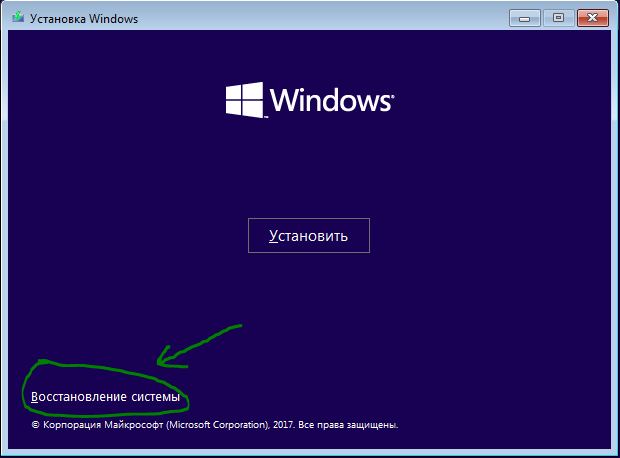
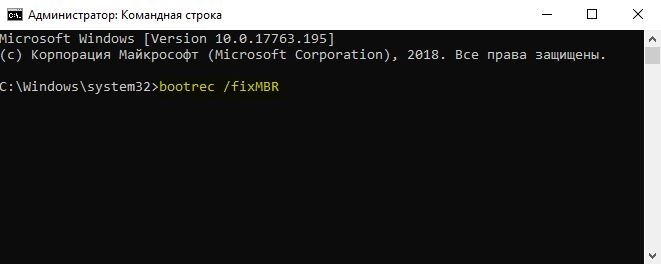
Если вы не можете попасть в такие параметры, то вам следует создать установочную флешку с Windows и начать процесс установки, но не устанавливать, а нажать ниже на кнопку «Восстановление системы«. Далее вас перебросит в дополнительные параметры загрузки, где вы сможете запустить командную строку, как показано выше на картинке.
В командной строке введите команды по очереди, чтобы восстановить загрузчик и исправить ошибку Boot Device Not Found:
- bootrec /fixmbr
- bootrec /fixboot
- bootrec /scanos
- bootrec /rebuildbcd
Если вы уверены, что у вас проблема в загрузчике, то смотрите это руководство по восстановлению загрузчика Windows 10 .
4. Проверьте, активен ли основной раздел
Если выше перечисленные способы не помогли исправить ошибку Boot Device Not Found, то нужно проверить, активен ли основной раздел. Раздел на диске, где установлена система Windows — называется основным и он должен быть активен. Запустите командную строку и следуйте ниже указаниям, чтобы проверить и активировать, если будет нужно:
- diskpart — Запуск инструмента.
- list disk — Список подключенных дисков к компьютеру.
- select disk 0 — Выбор жесткого диска на котором нужно активировать раздел. В моем случае, основной жесткий диск 0.
- list volume — Показывает разделы на выбранном жестком диски.
- select volume 2 — Выбрать локальный диск для активации. Выбирайте тот, где установлена сама система widows.
- active — Активировать раздел.
Компьютер не включается, выдает сообщение «detecting drivers please wait»


Довольно часто у владельцев компьютеров возникает проблема при его включении — выскакивает сообщение: «detecting drivers please wait». Если вы столкнулись с данн ой ошибк ой, то не стоит расстраиваться. В первую очередь нужно узнать суть данной ошибки, а проблем может быть несколько. О днако, все они сводятся к тому, что материнская плата не может обнаружить жесткий диск вашего устройства по тем или иным причинам. Давайте р ассмотрим несколько случаев и н ачнем с самых популярных.
Причиной данной проблемы почти всегда является плохой контакт шлейфа, идущего от материнской платы к жесткому диску, проблемы с шлейфом питания или с самим HDD . Для устранения «данной неприятности» необходимо отключить компьютер от сети 220, затем с нять боковую крышку и проверить контакты. Если визуально все подключено, то нужно просто отключить шлейф от порта материнской платы и от жесткого диска, а потом заново установить шлейф на место. Затем стоит проверить шлейф питания, идущей от блока питания . Теперь п одключ айте компьютер к сети и узна ете результат. Не помогло? Шагаем дальше.
Второй вариант.
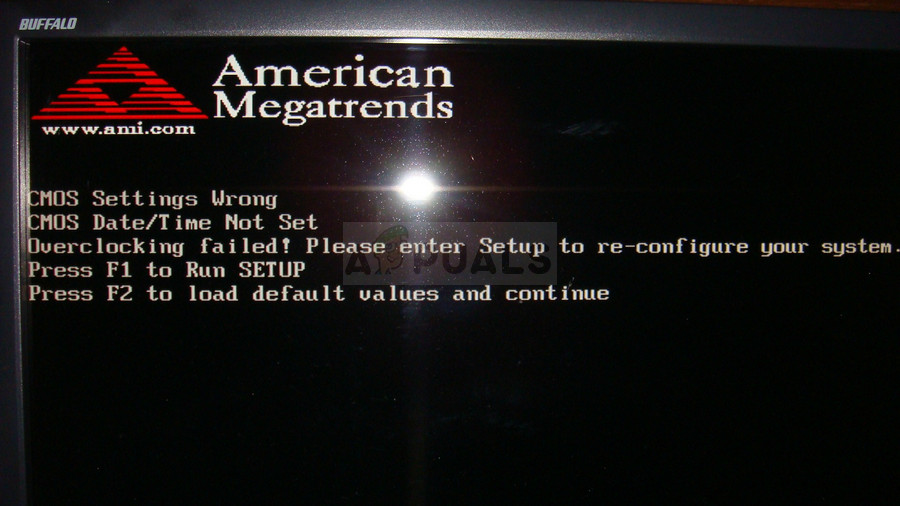
Возможно, сбились настройки в биосе или села батарейка на материнской плате. Да, да. Н а материнской плате вашего компьютера есть элемент питания «CR2032». Е сли батарейка разряжается , то все настройки сбрасываются на заводские. Это одна из част ых причин, по которой не включается компьютер и при этом выдаёт ошибк у «CMOS checksum error».
Проще всего перестраховаться и купить новый элемент питания . Прода ё тся он почти во всех магазинах, которые связаны с электроник ой. С тоимость варьируется от 10 до 90 рублей ( в зависимости от фирмы производителя и наглости продавца ). Срок службы данного э лемент а рассчитан на 3-5 лет.
После установки батарейки в гнездо в ключите компьютер, установите сегодняшн ю ю дату и точное время, зайдя в биос . П ерезагрузите ваш персональный компьютер. Е сли операционная система не запустил а с ь, то свер ьте все настройки с заводским мануалом. Мануал можно скачать с сайта производителя в электронном виде по модели материнской платы или «порыться» в документах, которые остались после покупки компьютера.
Третий вариант.
В настройках биоса отключен IDE/ SATA канал OnChip SATA Controller .
Примечание. SATA (Serial ATA) – это п оследовательный интерфейс подключения накопителей к материнской плате компьютера.
* Возможно что-то произошло с самим жестким диском. Проверить можно, подключив ваше устройство к другому компьютеру или воспользоваться загрузочным диском с Live CD .
* Вышел из строя шлейф (требуется замена, стоит до 100 рублей и продаётся в компьютерных магазинах).
* Что-то произошло с разъёмом. П опробуйте установить в другой. К ак правило на материнских платах интегрировано от 2 до 8 разъёмов SATA два IDE.
* Попробуйте сбросить настройки биоса. В ыберите Load BIOS Defaults и сохранит е настройки. Для этого нажмите F10, затем Yes и Ok.
* Так же возможна проблема в блоке питания. П роанализируйте после чего произошла проблема. М ожет Вы установили новую видео карту, двд привод или дополнительный жесткий диск!? В данном случае для запуска компьютера не хватает мощности блока питания.
Н адеюсь, что у вас все получилось и компьютер работа ет исправно.
Если же данные советы не помогли, то с тоит обратиться к высококвалифицированному специалисту или отнести компьютер в сервисной центр.
Уважаемые пользователи!
Если у вас возникли вопросы по данному материалу — оставьте свой комментарий и мы постараемся вам помочь.
С уважением, Администратор сайта snapcomp.ru
Дорогой друг! Возможно, тебе будут интересны следующие статьи:
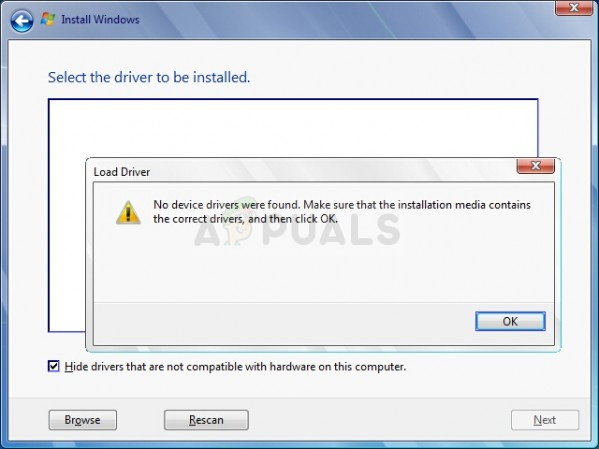
Fix: No Device Drivers Were Found
This error is quite specific as it occurs when users are either trying to reinstall their current operating system or when they are installing a new one using a DVD or USB installation storage device. The message indicates that the drivers on the installation media are either missing or corrupt but we will show that this is not always the case.
There are quite a few different solutions to this problem so make sure you try out all of them and we are certain that one of them will be successful. Good luck!
Solution 1: Switch to a USB 2.0 Port
If you have plugged the USB installation media from where you want to install the new operating system into a 3.0 USB on your computer, try disconnecting it and connecting to a 2.0 port. This is a weird fix but it has helped numerous users and this is definitely the easiest thing for you to check and take care off. Proceed with other solutions if this one doesn’t work out.
Solution 2: Set the Partition to Active
Setting the partition where you want to install Windows to as Active has also helped in countless cases where users were on the verge of giving up. This needs to be performed via Recovery tools which appear as an option before choosing to install Windows.
- Insert the installation media storage device you own and start your computer. The following steps are different from one operating system to another so follow them accordingly:
- WINDOWS XP, VISTA, 7: Windows Setup should open prompting you to enter the preferred language along with time and date. Enter them correctly and choose the Repair your computer option at the bottom of the screen. Keep the initial radio button as your choice when prompted with Use recovery tools or Restore your computer and click on the Next option. Choose Command Prompt when prompted with the Choose a recovery tool selection.
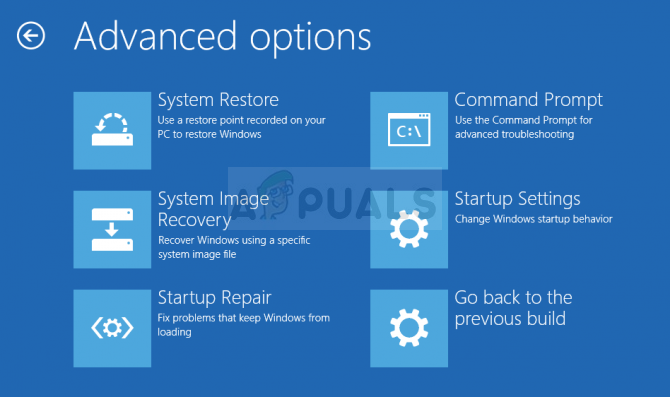
- WINDOWS 8, 8.1, 10: You will see a Choose your keyboard layout window so choose the one you want to use. The Choose an option screen will appear so click on Troubleshoot >> Advanced Options >> Command Prompt.
- Once Command Prompt opens successfully, type in the following commands and make sure you click the Enter key after you type in each one:
- Note that the X stands for the name of the disk in command “select disk X” and the X in command “select partition X” where you intend to install Windows to. After this, only one command remains:
- Now you can quit and restart your computer in order to apply the changes and to initiate the installing process with your new operating system.
Solution 3: Create a New Disc
If the reason for this error is simply the fact that the drivers weren’t burned successfully or if the disc or the USB device endured some damage in the meantime, there is no other choice than to try and burn another copy of the operating system. The important thing is that you keep your serial key as it can be used only once. Here are the complete instructions on creating a Windows 10 installation DVD or USB:
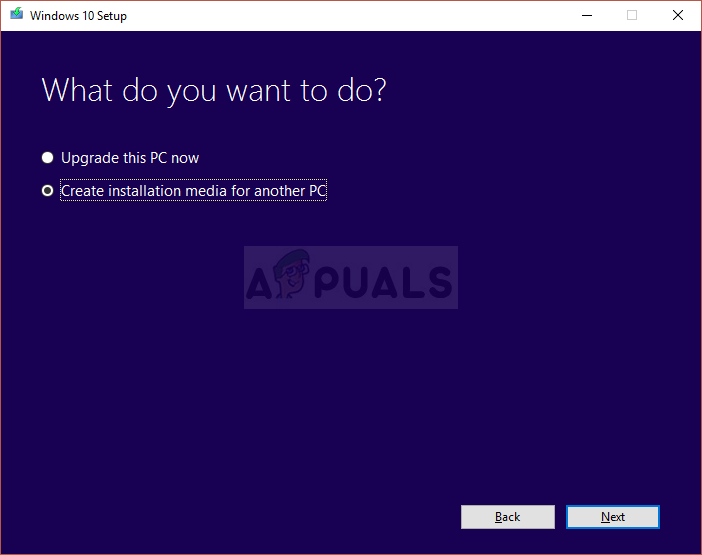
- Download the Media Creation Tool from Microsoft’s official website. Open the downloaded file called MediaCreationTool.exe in order to open the installation file and initiate the process. Tap Accept to agree on terms set by Microsoft.
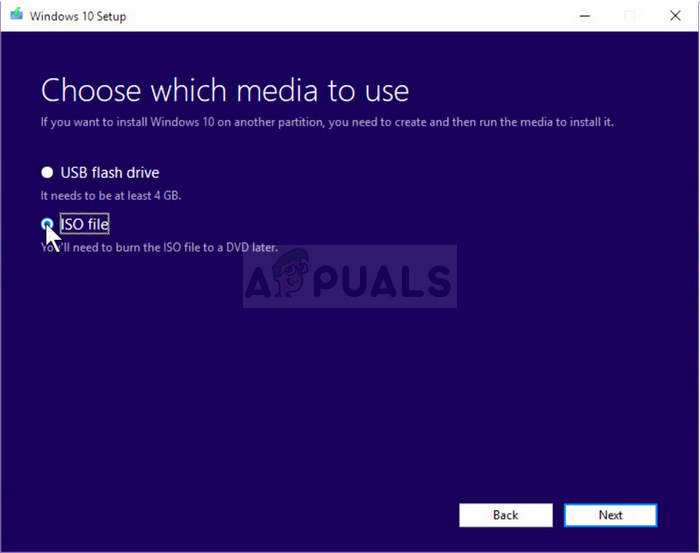
- Select the Create installation media (USB flash drive, DVD, or ISO file) for another PC from the initial window.
- The language, architecture, and edition of the bootable drive will be chosen based on your computer’s settings, but you should uncheck the Use the recommended options for this PC in order to select the correct settings for the PC which is encountering the error (if you are creating this on a different PC).
- Click Next and click on the USB drive or DVD option when prompted to choose between USB or DVD, depending on which device you want to use to store this image on.
- Click Next and choose the drive from the list which will show the storage devices connected to your computer.
- Click Next and the Media Creation Tool will proceed to download the files necessary to install create the installation device.
- Try installing your Windows 10 operating system using this drive and check to see if the same error appears.
Solution 4: Enable the xHCI hand-off Option in BIOS
This option is quite debatable and there are quite a few representations of what exactly does it to. However, the most accepted answer is that, when Disabled, it lets BIOS manage USB devices and ports and, when Enabled, it lets the operating system manage this. There are plenty of people who claim that enabling this option fixed their problem immediately. This is also recommended for new operating systems such as Windows 10 or Windows 8.
- Turn off your computer by going to the Start Menu >> Power Button >> Shut down.
- Turn your PC on again and try to enter BIOS settings by pressing the BIOS key as the system is about to start. The BIOS key is typically displayed on the boot screen, saying “Press ___ to enter Setup.” There are other keys as well. Common BIOS keys are F1, F2, Del, Esc and F10. Note that you will have to be quick about this as the message disappears pretty fast.
- The setting which you need to turn off is usually located under the Advanced tab which may be called different depending on the manufacturer. The setting is called BIOS xHCI Hand-Off or BIOS EHCI Hand-OFF and it’s usually right there under USB Configuration in the Advanced tab.
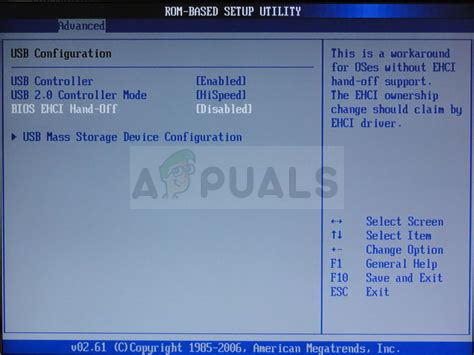
- Once you locate the correct settings, set it to Enabled. Navigate to the Exit section and choose to Exit Saving Changes. This will proceed with the computer’s boot. Make sure you try to run the installation again.
- Don’t forget to change the settings back to their original state after you have finished with the process and installed Windows 10 successfully on your computer.
Solution 5: Change Everything to Legacy and Set the Boot Device to Your DVD or USB
Setting certain settings to support Legacy has proven to be successful in many cases and sometimes your computer tries to boot from your HDD first ignoring the inserted Windows installation media which results in poor readings of the device. That is why you will need to assess the set of steps below in order to solve the problem.
- Navigate to BIOS by following the steps 1 and 2 from the solution above.
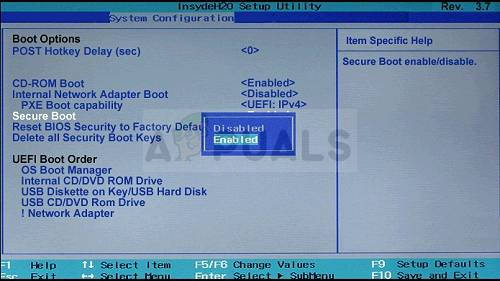
- Use the right arrow key to select the Security menu, use the down arrow key to select Secure Boot Configuration, and press the Enter key.
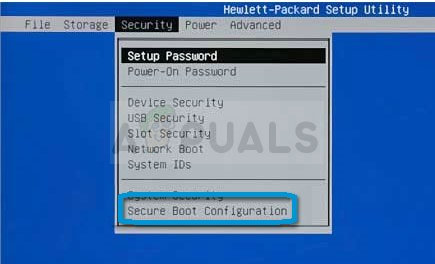
- Before you can use this option, a warning appears. Press F10 to continue to the Secure Boot Configuration menu.
- Use the down arrow key to select Secure Boot and use the right arrow key to modify the setting to Disable.
- Use the down arrow key to select Legacy Support, and then use the right arrow key to modify the setting to Enable. Press F10 in order to accept the changes.
- Use the left arrow key to select the File menu, use the down arrow key to select Save Changes and Exit, then press Enter to select Yes.
- The Computer Setup Utility closes and the computer restarts. When the computer has restarted, use the power button to turn the computer off.
If you are not certain how to boot from installation media, you need to know just which option to select when the boot menu opens. It will ask you from which device you want to boot your computer. Follow the instructions below to boot from your storage device easily.
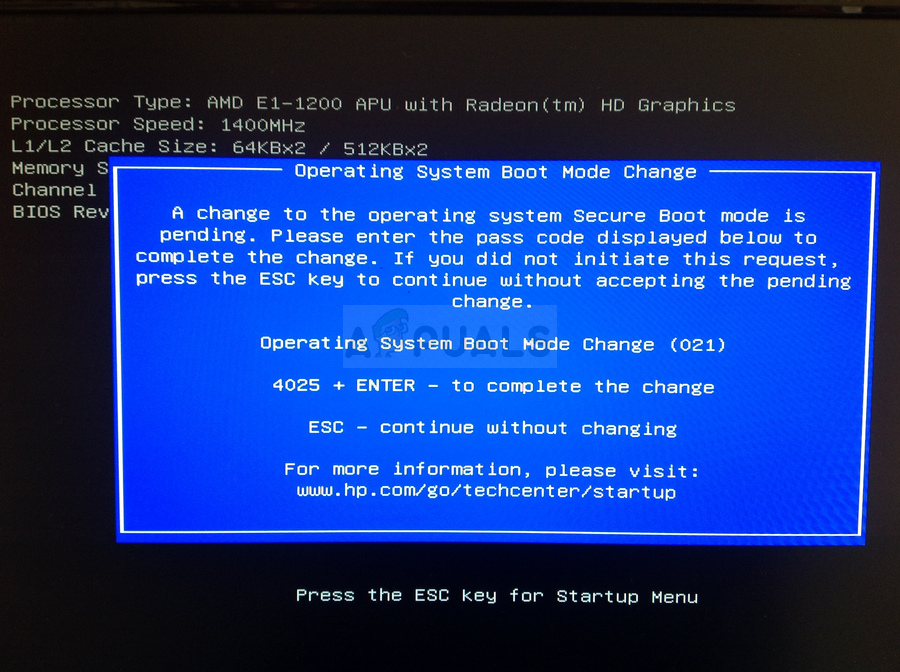
- Turn the computer on. As soon as the computer starts, a message appears indicating that the boot mode has changed.
- Type the four-digit code shown in the message, and then press Enter to confirm the change.
- Press the power button to turn off the computer, wait a few seconds, then turn on the computer and immediately press the Escape key repeatedly, about once every second, until the Startup menu opens. Press F9 to open the Boot Menu.
- Use the down arrow key to select your hard disk from the boot menu and make sure you choose it by clicking the Enter key. Restart your computer and check to see if the problem is solved.


