- Print from your app
- Register for printing
- Create a print button
- Format your app’s content
- Prepare print options
- Handle print option changes
- Preview selected pages
- Print Document. Print Page Событие
- Определение
- Тип события
- Примеры
- Комментарии
- How to Print a Web Page in Microsoft Edge
- How to Print a Web Page in Microsoft Edge on Windows 10
- Add a Printer if there is not any
Print from your app
Important APIs
Learn how to print documents from a Universal Windows app. This topic also shows how to print specific pages. For more advanced changes to the print preview UI, see Customize the print preview UI.
В Most of the examples in this topic are based on the Universal Windows Platform (UWP) print sample, which is part of the Universal Windows Platform (UWP) app samples repo on GitHub.
Register for printing
The first step to add printing to your app is to register for the Print contract. Your app must do this on every screen from which you want your user to be able to print. Only the screen that is displayed to the user can be registered for printing. If one screen of your app has registered for printing, it must unregister for printing when it exits. If it is replaced by another screen, the next screen must register for a new Print contract when it opens.
В If you need to support printing from more than one page in your app, you can put this print code in a common helper class and have your app pages reuse it. For an example of how to do this, see the PrintHelper class in the UWP print sample.
First, declare the PrintManager and PrintDocument. The PrintManager type is in the Windows.Graphics.Printing namespace along with types to support other Windows printing functionality. The PrintDocument type is in the Windows.UI.Xaml.Printing namespace along with other types that support preparing XAML content for printing. You can make it easier to write your printing code by adding the following using or Imports statements to your page.
The PrintDocument class is used to handle much of the interaction between the app and the PrintManager, but it exposes several callbacks of its own. During registration, create instances of PrintManager and PrintDocument and register handlers for their printing events.
In the UWP print sample, registration is performed by the RegisterForPrinting method.
When the user goes to a page that supports printing, it initiates the registration within the OnNavigatedTo method.
In the sample, the event handlers are unregistered in the UnregisterForPrinting method.
When the user leaves a page that supports printing, the event handlers are unregistered within the OnNavigatedFrom method.
If you have a multiple-page app and don’t disconnect printing, an exception is thrown when the user leaves the page and then returns to it.
Create a print button
Add a print button to your app’s screen where you’d like it to appear. Make sure that it doesn’t interfere with the content that you want to print.
Next, add an event handler to your app’s code to handle the click event. Use the ShowPrintUIAsync method to start printing from your app. ShowPrintUIAsync is an asynchronous method that displays the appropriate printing window. We recommend calling the IsSupported method first in order to check that the app is being run on a device that supports printing (and handle the case in which it is not). If printing can’t be performed at that time for any other reason, ShowPrintUIAsync will throw an exception. We recommend catching these exceptions and letting the user know when printing can’t proceed.
In this example, a print window is displayed in the event handler for a button click. If the method throws an exception (because printing can’t be performed at that time), a ContentDialog control informs the user of the situation.
Format your app’s content
When ShowPrintUIAsync is called, the PrintTaskRequested event is raised. The PrintTaskRequested event handler shown in this step creates a PrintTask by calling the PrintTaskRequest.CreatePrintTask method and passes the title for the print page and the name of a PrintTaskSourceRequestedHandler delegate. Notice that in this example, the PrintTaskSourceRequestedHandler is defined inline. The PrintTaskSourceRequestedHandler provides the formatted content for printing and is described later.
In this example, a completion handler is also defined to catch errors. It’s a good idea to handle completion events because then your app can let the user know if an error occurred and provide possible solutions. Likewise, your app could use the completion event to indicate subsequent steps for the user to take after the print job is successful.
After the print task is created, the PrintManager requests a collection of print pages to show in the print preview UI by raising the Paginate event. This corresponds with the Paginate method of the IPrintPreviewPageCollection interface. The event handler you created during registration will be called at this time.
В If the user changes print settings, the paginate event handler will be called again to allow you to reflow the content. For the best user experience, we recommend checking the settings before you reflow the content and avoid reinitializing the paginated content when it’s not necessary.
In the Paginate event handler (the CreatePrintPreviewPages method in the UWP print sample), create the pages to show in the print preview UI and to send to the printer. The code you use to prepare your app’s content for printing is specific to your app and the content you print. Refer to the UWP print sample source code to see how it formats its content for printing.
When a particular page is to be shown in the print preview window, the PrintManager raises the GetPreviewPage event. This corresponds with the MakePage method of the IPrintPreviewPageCollection interface. The event handler you created during registration will be called at this time.
In the GetPreviewPage event handler (the GetPrintPreviewPage method in the UWP print sample), set the appropriate page on the print document.
Finally, once the user clicks the print button, the PrintManager requests the final collection of pages to send to the printer by calling the MakeDocument method of the IDocumentPageSource interface. In XAML, this raises the AddPages event. The event handler you created during registration will be called at this time.
In the AddPages event handler (the AddPrintPages method in the UWP print sample), add pages from the page collection to the PrintDocument object to be sent to the printer. If a user specifies particular pages or a range of pages to print, you use that information here to add only the pages that will actually be sent to the printer.
Prepare print options
Next prepare print options. As an example, this section will describe how to set the page range option to allow printing of specific pages. For more advanced options, see Customize the print preview UI.
This step creates a new print option, defines a list of values that the option supports, and then adds the option to the print preview UI. The page range option has these settings:
| Option name | Action |
|---|---|
| Print all | Print all pages in the document. |
| Print Selection | Print only the content the user selected. |
| Print Range | Display an edit control into which the user can enter the pages to print. |
Clear the list of options that are shown in the print preview UI and add the options that you want to display when the user wants to print from the app.
В The options appear in the print preview UI in the same order they are appended, with the first option shown at the top of the window.
Create the new print option and initialize the list of option values.
Add your custom print option and assign the event handler. The custom option is appended last so that it appears at the bottom of the list of options. But you can put it anywhere in the list, custom print options don’t need to be added last.
The CreateTextOption method creates the Range text box. This is where the user enters the specific pages they want to print when they select the Print Range option.
Handle print option changes
The OptionChanged event handler does two things. First, it shows and hides the text edit field for the page range depending on the page range option that the user selected. Second, it tests the text entered into the page range text box to make sure that it represents a valid page range for the document.
This example shows how print option change events are handled in the UWP print sample.
В See the GetPagesInRange method in the UWP print sample for details on how to parse the page range the user enters in the Range text box.
Preview selected pages
How you format your app’s content for printing depends on the nature of your app and its content. A print helper class in used in the UWP print sample to format the content for printing.
When printing a subset of pages, there are several ways to show the content in the print preview. Regardless of the method you chose to show the page range in the print preview, the printed output must contain only the selected pages.
- Show all the pages in the print preview whether a page range is specified or not, leaving the user to know which pages will actually be printed.
- Show only the pages selected by the user’s page range in the print preview, updating the display whenever the user changes the page range.
- Show all the pages in print preview, but grey out the pages that are not in page range selected by the user.
Print Document. Print Page Событие
Определение
Происходит, когда необходимо вывести на печать текущую страницу. Occurs when the output to print for the current page is needed.
Тип события
Примеры
В следующем примере кода демонстрируется обработка PrintPage события. The following code example demonstrates handling the PrintPage event.
Комментарии
Чтобы указать выходные данные для печати, используйте Graphics свойство объекта PrintPageEventArgs . To specify the output to print, use the Graphics property of the PrintPageEventArgs. Например, чтобы указать строку текста, которую нужно напечатать, нарисуйте текст с помощью Graphics.DrawString метода. For example, to specify a line of text that should be printed, draw the text using the Graphics.DrawString method.
Помимо указания выходных данных, можно указать, есть ли дополнительные страницы для печати, задав PrintPageEventArgs.HasMorePages для свойства значение true . In addition to specifying the output, you can indicate if there are additional pages to print by setting the PrintPageEventArgs.HasMorePages property to true . Значение по умолчанию — false , что означает, что больше нет страниц для печати. The default is false , which indicates that there are no more pages to print. Параметры отдельных страниц также можно изменить с помощью, PageSettings а задание печати можно отменить, задав PrintPageEventArgs.Cancel для свойства значение true . Individual page settings can also be modified through the PageSettings and the print job can be canceled by setting the PrintPageEventArgs.Cancel property to true . Чтобы напечатать каждую страницу документа с помощью различных параметров страницы, обработайте QueryPageSettings событие. To print each page of a document using different page settings, handle the QueryPageSettings event.
Чтобы связать событие с обработчиком событий, добавьте в PrintPageEventHandler событие экземпляр делегата. To associate the event with your event handler, add an instance of the PrintPageEventHandler delegate to the event. Обработчик событий вызывается при каждом возникновении события. The event handler is called whenever the event occurs. Дополнительные сведения об обработке событий с помощью делегатов см. в разделе обработка и вызов событий. For more information about handling events with delegates, see Handling and Raising Events.
How to Print a Web Page in Microsoft Edge
Print a web page in Microsoft Edge – This browser facilitates you to draw printout of your favorite webpage. When you browse a web page in Microsoft Edge, you come across an interesting idea to print the web page triggered in your mind. So, in this post, we will share you the steps to print a web page in Microsoft Edge on Windows 10.
Just like Chrome web browser, on Microsoft Edge pressing Ctrl+P is sufficient to open print window. On the print window, you can customize the settings to get the printout in the paper having desired size and quality. But you could do manually too through more actions on Microsoft Edge. If you are reading an important article and need to make some changes web note feature is available in Microsoft Edge. The browser allows you to save and share the changes. Apart from this, you can set a custom start page whether it be a google.com or another one.
How to Print a Web Page in Microsoft Edge on Windows 10
- Launch the Microsoft Edge browser.
- Open a webpage that you want to print.
- Once there, click Ctrl+P.
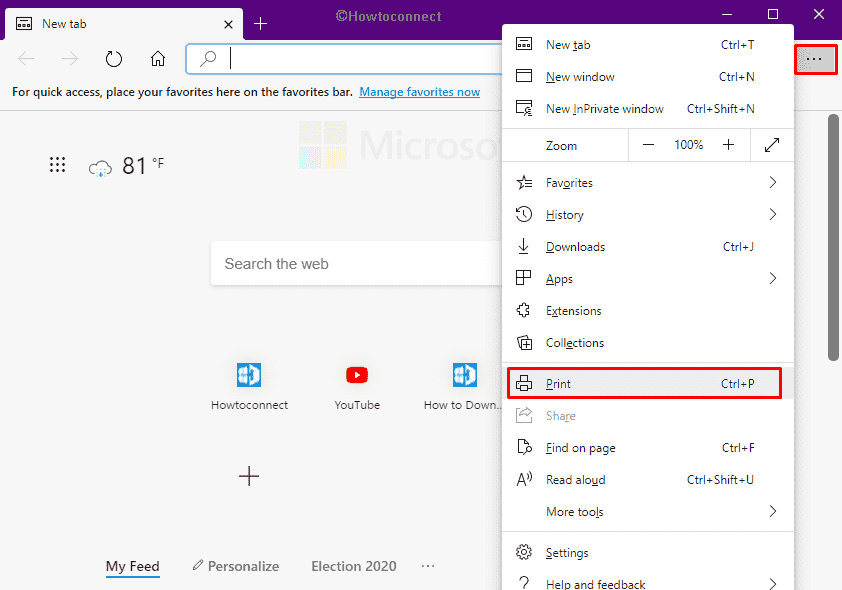
- Alternatively, select the three dots icon from top right
- Click Print.
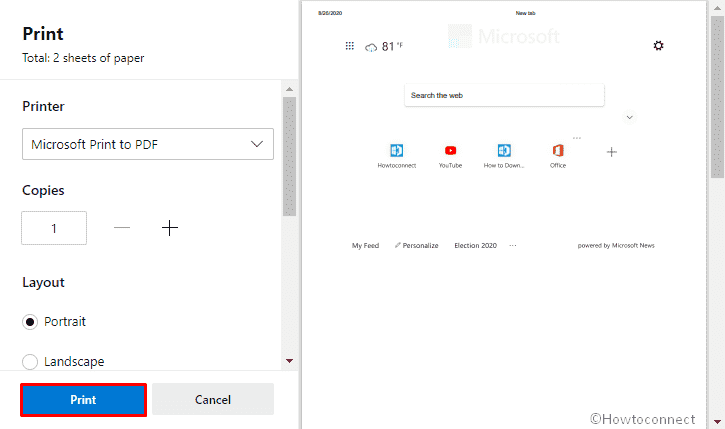
- When a print window appears, click the drop-down list present under Printer.
- Choose your printer name.
- You see various tools of customization here like layout, pages, etc. Do the changes as required. You can practice changing the print settings on your own choice.
- Portrait and Landscape are to choose whether you want to take the print in vertical or horizontal orientation.
- With Pages options, the number of pages you want to print at one time.
- Color facility let you choose if you want to print the page as black and white or with real tone.
- Click More settings link to spread out later section.
- Set Paper size, scale, Pager per sheet accordingly.
- Margins allow to scaling the distance of pages from the edge of the window.
- And finally, you can set to put on or off the header and footer to have in the printout you are getting.
- After making sure all things, hit Print button from the bottom.
Add a Printer if there is not any
If a Printer is not added till now, go through the below steps –
- Follow Step 1-4 from above discussion.
- Select Add a Printer.
- Doing so will redirect you to dedicated Windows Settings page.
- Click Add a printer or scanner from right pane.
- From the available list, pick the desired one.
- Hit Refresh if you don’t get the correct device.
This way, you can print a web page in Microsoft Edge in Windows 10 applying various tools presented.


