How to install the latest driver for your printer
Most printers require that you install the latest printer driver so that the printer will work well. If you recently upgraded from an earlier version of Windows, your printer driver might work with the previous version but might not work well or at all with Windows 10. Also, if you’ve experienced power outages, computer viruses, or other problems, your printer driver might be damaged. Downloading and installing the latest printer driver can often resolve these problems. Here are several ways to do this.
Windows Update might find an updated version of your printer driver. To use it:
Select the Start button, then select Settings > Update & Security , and select Check for updates.
If Windows Update finds an updated driver, it will download and install it, and your printer will automatically use it.
If your printer came with a disc, it might contain software that can help you install drivers for your printer or check for driver updates.
Check your printer manufacturer’s support site. To find that, search the internet for the name of your printer manufacturer plus the word “support,” such as “HP support.”
Driver updates are often available in the “Drivers” section of a printer manufacturer’s website. Some support sites let you search for your printer model number directly. Locate and download the latest driver for your printer model, then follow the installation instructions on the manufacturer’s website.
Most drivers are self-installing. After you download them, double-click (or double-tap) the file to begin installing it. Then follow these steps to remove and reinstall the printer.
Select the Start button, then select Settings > Devices > Printers & scanners .
Under Printers & scanners, find the printer, select it, and then select Remove device.
After removing your printer, add it back by selecting Add a printer or scanner. Wait for your device to find nearby printers, choose the one you want, and then select Add device.
What to do if the driver doesn’t install
If you double-click the installation file and nothing happens, follow these steps:
Select the Start button, then select Settings > Devices > Printers & scanners .
On the right, under Related Settings, select Print server properties.
On the Drivers tab, see if your printer listed. If it is, you’re all set.
If you don’t see your printer listed, select Add, and in the Welcome to the Add Printer Driver Wizard, select Next.
In the Processor Selection dialog box, select your device’s architecture, and then select Next.
In the Printer Driver Selection dialog box, on the left, select your printer manufacturer, on the right, select your printer driver, select Next, select Finish, and follow the instructions to add your driver.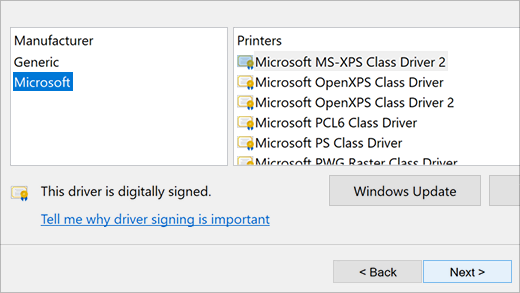
Follow the instructions in the section above to remove and reinstall the printer.
Introduction to Printing
The Microsoft Windows printing architecture consists of a print spooler and a set of printer drivers. By calling device-independent functions, applications can create print jobs and send them to many devices. This includes laser printers, vector plotters, raster printers, and fax machines.
Printer drivers include a rendering component and a configuration component. The rendering component converts the graphics commands from the application into a data format that the printer uses to render the image on the page. The configuration component contains a user interface component that enables users to control a printer’s selectable options and a program interface that communicates the printer’s configuration and features to an application.
When a Microsoft Win32 GDI application prints, it calls GDI functions in the Win32 API. These functions pass the information to the GDI graphics engine. The GDI graphics engine either spools the drawing instructions as an enhanced metafile (EMF) file or, together with a printer driver, renders a printable image that can be sent to the spooler. Spooler components interpret EMF files, and they can insert page layout information and job control instructions into the data stream. The spooler then sends the data stream to the serial, parallel, or network port driver associated with the target printer’s I/O port. In addition, if printing to an XPS device, the GDI print commands are converted through the GDI to XPS conversion component, and the print job is sent down the XPS print path.
In the XPS print path, printer drivers are based on the XML Paper Specification (XPS). When a Microsoft Win32 XPS application prints, the application calls XPS functions in the XPS Print API. When it prints to queues with XPSDrv printer drivers, the spooler passes the XPS spool file straight to the device for rendering and output. When the XPS file is printed to a GDI device, it is converted to an EMF file through the XPS to GDI Conversion Module. It is then sent through the GDI print path in a manner similar to Win32 GDI applications.
Windows Presentation Foundation (WPF) applications call WPF print support functions to spool XPS documents to the spooler in the XPS spool file format. As when printing from Win32 XPS applications, when the spooler prints to print queues with XPSDrv printer drivers, the spooler passes the spooled file in its original format to the XPSDrv printer driver for rendering and output to the printer. When the spooler prints to printers that have GDI-based, version 3 printer drivers, the spooler sends the data in the XPS spool file format to the GDI Conversion Module for conversion to an EMF file. It then sends the data to the GDI-based printer driver for printing. For more information about these data paths, see Windows Print Path Overview. For more information about XPS, see the XML Paper Specification Overview.
Spooler and driver components are replaceable, so hardware vendors can easily add support for new hardware. For more information about print spooler and driver components, see the following sections:
Support for a new printer usually requires only creating new data files for use with one of the Microsoft-supplied printer drivers. For more information about Microsoft printer drivers, see Printer Driver Overview.
You can customize the behavior of the Microsoft Universal Printer Driver and the Microsoft Postscript Printer Driver. For more information, see Customizing Microsoft’s Printer Drivers. You can also customize the print spooler. For more information, see Customizing Print Spooler Components.
Installing an IPP printer in Windows 10
Using a single USB printer on several computers isn’t the simplest task: you have to either connect the printer to each computer separately, share it from one (and start it up every time you need to use the printer) or, my personal choice, set it up on a Raspberry PI and share it with the world.
The information provided here covers the second half of the setup process – the client side of things. For the PI / CUPS server setup, you can read this tutorial. The steps below assume that the printer is already configured and available via CUPS.
Start by making sure IPP printing is enabled on Windows.
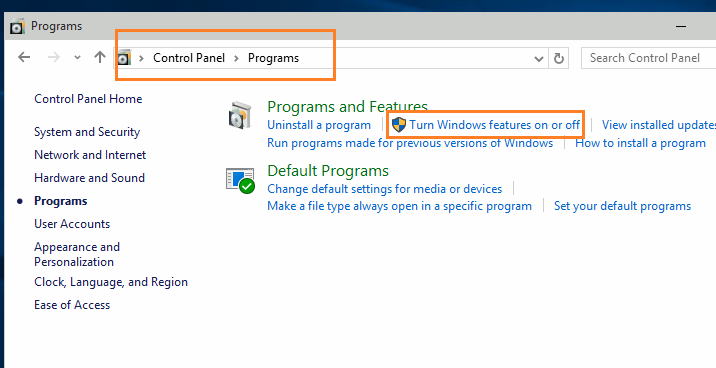
Go to Control Panel > Programs (in Windows 10 Control Panel is in the popup list when right-clicking on the Start button) and select Turn Windows Features On or Off.
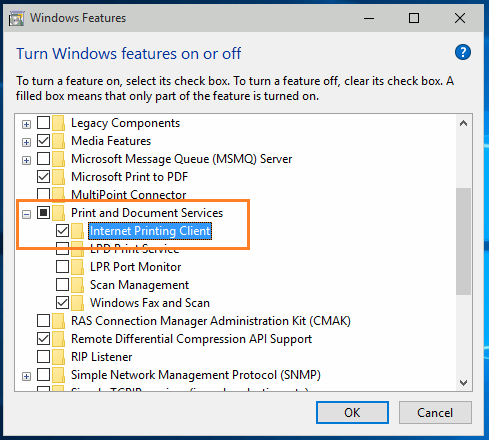
In the features list, scroll down to Print and Document Services and verify that the Internet Printing Client checkbox is checked.
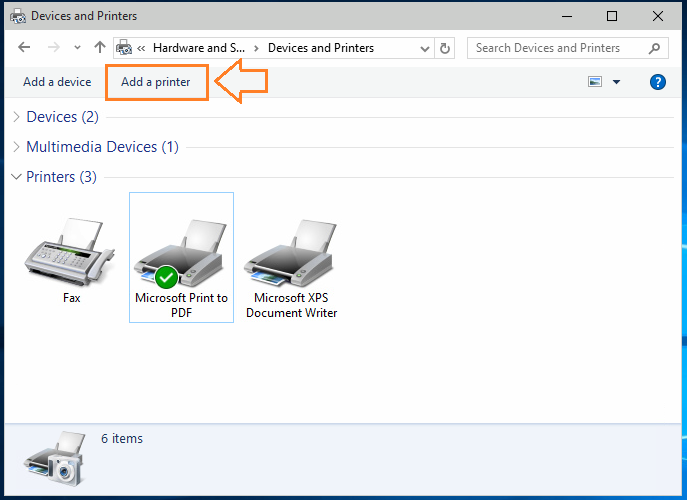
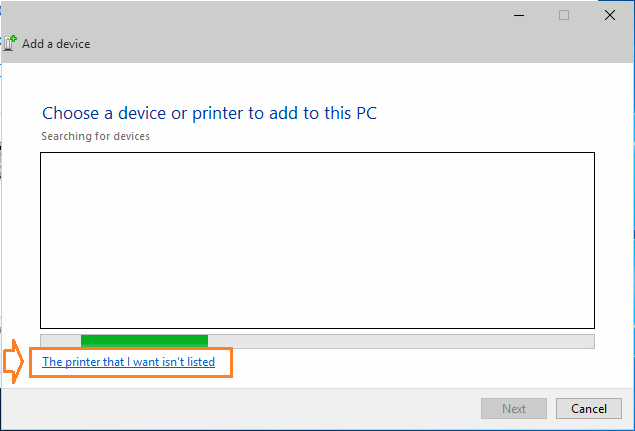
Navigate to View Devices and Printers in Control Panel (it’s in the Hardware and Sound group), click the Add a Printer button
Then click the The printer that I want isn’t listed link at the bottom of that dialog.
Select the Select a shared printer by name option and type in the address of your printer (which you can find in CUPS, in the Printers tab).

You can use either the hostname of your PI (if it is properly configured) or use the IP address to be safer. The address of your printer should be similar to the one in the image:
Click Next and Windows will attempt to connect.
If it succeeds, it will ask you for the driver. Select it from the available list or provide a driver disk. Once done, the printer will show up in the Devices and Printer list.
 If connection fails, click the back button and double check the address.
The procedure is similar for Windows 8.1, 8 and 7 with slight variations in dialogs appearance.
Share your network printer
In Windows 10, you can share your printer with many PCs on your network. To share a printer from the PC that the printer is connected to (the primary PC) with secondary PCs that the printer is not connected to, you must set up sharing settings for the printer, connect the printer to the primary PC (either wirelessly or by using a USB cable), and then turn on the printer. Also make sure the primary PC is turned on, connected to the printer, and connected to the network.
Note: When sharing a printer, make sure that sharing settings are set up on the primary and secondary PCs. Also, make sure you know the name of the primary PC. For more info, see the Set up Sharing settings and Find your PC name sections at the end of this topic.
Share the printer on the primary PC
There are two ways to share your printer: using Settings or Control Panel.
Share your printer using Settings
Select the Start button, then select Settings > Devices > Printers & scanners.
Choose the printer you want to share, then select Manage.
Select Printer Properties, then choose the Sharing tab.
On the Sharing tab, select Share this printer.
If you want, edit the share name of the printer. You’ll use this name to connect to the printer from a secondary PC.
Share your printer using Control Panel
In the search box on the taskbar, type control panel and then select Control Panel.
Under Hardware and Sound, select View devices and printers.
Select and hold (or right-click) the printer you want to share, select Printer properties, and then choose the Sharing tab.
On the Sharing tab, select Share this printer.
If you want, edit the share name of the printer. You’ll use this name to connect to the printer from a secondary PC.
Select the Start button, then select Settings > Devices > Printers & scanners.
Choose the printer you want to share, then select Manage.
Select Printer Properties, then choose the Sharing tab.
On the Sharing tab, select Share this printer.
If you want, edit the Share name of the printer. You’ll use this name to connect to the printer from a secondary PC.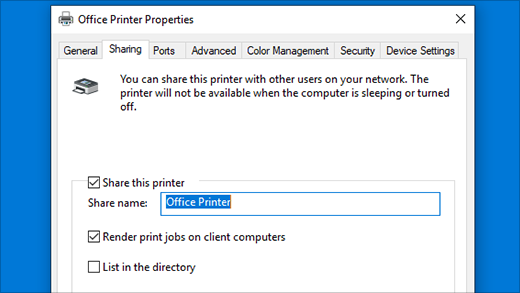
In the search box on the taskbar, type control panel and then select Control Panel.
Under Hardware and Sound, select View devices and printers.
Select and hold (or right-click) the printer you want to share, select Printer properties, and then choose the Sharing tab.
On the Sharing tab, select Share this printer.
If you want, edit the share name of the printer. You’ll use this name to connect to the printer from a secondary PC.
Connect the shared printer to another PC
There are two ways to connect a shared printer to another PC: using Settings or Control Panel.
Select the Start button, then select Settings > Devices > Printers & scanners.
Under Add printers & scanners, select Add a printer or scanner.
Choose the printer you want, and then select Add Device.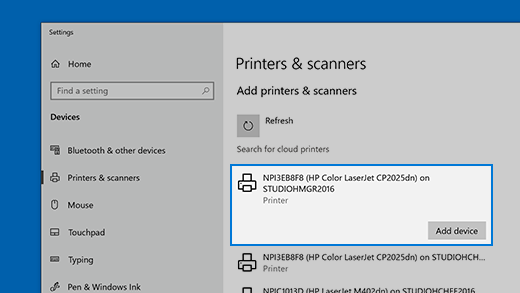
If you don’t see the printer you want, select The printer that I want isn’t listed.
In the Add printer dialog box, select Select a shared printer by name, and then enter the computer or device name of the primary PC and the share name of the printer using one of these formats:
When prompted to install the printer driver, select Next to complete the installation.
For more info about the computer or device name, see the Find your PC name section in this topic. By default, you need the user name and password of the primary PC to access the printer.
In the search box on the taskbar, type control panel and then select Control Panel.
Under Hardware and Sound, select View devices and printers, and then select Add a printer.
Select the printer you want, select Next. When prompted, install the printer driver.
If you don’t see the printer you want, select The printer that I want isn’t listed.
In the Add a device dialog box, select Select a shared printer by name, and then enter the computer or device name of the primary PC and the share name of the printer using one of these formats:
When prompted to install the printer driver, select Next to complete the installation.
For more info about the computer or device name, see the Find your PC name section in this topic. By default, you need the user name and password of the primary PC to access the printer.
Set up Sharing settings
The settings you use to share devices is often turned on by default. If not, follow the steps in this section to turn settings on using settings or Control Panel.
Select the Start button, then select Settings > Network & Internet > Wi-Fi.
Under Related settings, select Change advanced sharing options.
In the Advanced sharing settings dialog box, expand the Private section. Next, under Network discovery, select Turn on network discovery.
Under File and printer sharing, select Turn on file and printer sharing.
In the search box on the taskbar, type control panel and then select Control Panel.
Select Network and Internet > Network and Sharing Center > Change advanced sharing settings.
In the Advanced sharing settings dialog box, expand the Private section. Next, under Network discovery, select Turn on network discovery.
Under File and printer sharing, select Turn on file and printer sharing.
Find your PC name
You’ll need the name of your primary PC, also called the computer name or device name, to connect the secondary PC to the printer.
In the search box on the taskbar, type computer name.
Select View your PC name.
Under Device name, you’ll see the PC (computer) name.
In the search box on the taskbar, type control panel and then select Control Panel.
Select System and Security > System > See the name of this computer.
Under Computer name, you’ll see the PC (computer) name.


