- 5. Starting Privoxy
- 5.1. Debian
- 5.2. FreeBSD and ElectroBSD
- 5.3. Windows
- 5.4. Generic instructions for Unix derivates (Solaris, NetBSD, HP-UX etc.)
- 5.5. Mac OS X
- 5.6. Command Line Options
- 2. Installation
- 2.1. Binary Packages
- 2.1.1. Debian and Ubuntu
- 2.1.2. Windows
- 2.1.3. Mac OS X
- 2.1.4. Installation from ready-built package
- 2.1.5. Installation from source
- 2.1.6. FreeBSD
- 2.2. Building from Source
- 2.2.1. Windows
- 2.2.1.1. Setup
- 2.2.1.2. Build
5. Starting Privoxy
Before launching Privoxy for the first time, you will want to configure your browser(s) to use Privoxy as a HTTP and HTTPS (SSL) proxy. The default is 127.0.0.1 (or localhost) for the proxy address, and port 8118 (earlier versions used port 8000). This is the one configuration step that must be done !
Please note that Privoxy can only proxy HTTP and HTTPS traffic. It will not work with FTP or other protocols.
Figure 2. Proxy Configuration Showing Mozilla Firefox HTTP and HTTPS (SSL) Settings
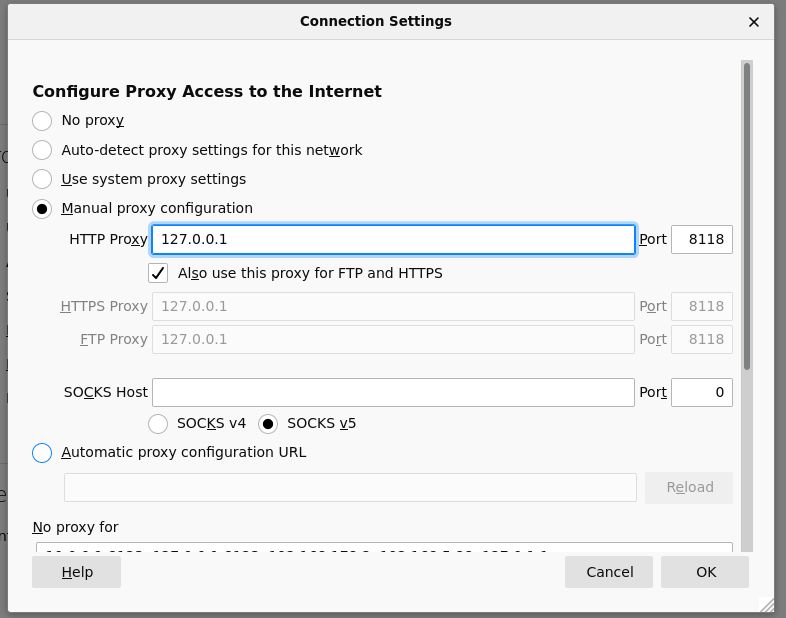
With Firefox , this is typically set under:
Edit -> Preferences -> Network Settings -> Settings
Or optionally on some platforms:
Edit -> Preferences -> General -> Connection Settings -> Manual Proxy Configuration
With Netscape (and Mozilla ), this can be set under:
Edit -> Preferences -> Advanced -> Proxies -> HTTP Proxy
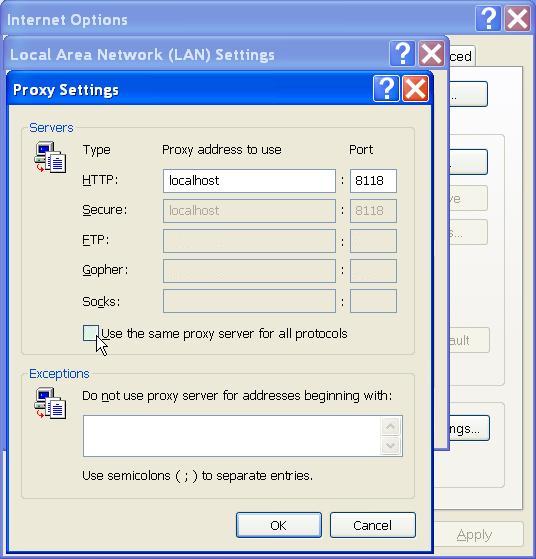
For Internet Explorer v.5-7 :
Tools -> Internet Options -> Connections -> LAN Settings
Then, check «Use Proxy» and fill in the appropriate info (Address: 127.0.0.1, Port: 8118). Include HTTPS (SSL), if you want HTTPS proxy support too (sometimes labeled «Secure» ). Make sure any checkboxes like «Use the same proxy server for all protocols» is UNCHECKED . You want only HTTP and HTTPS (SSL)!
Figure 3. Proxy Configuration Showing Internet Explorer HTTP and HTTPS (Secure) Settings
After doing this, flush your browser’s disk and memory caches to force a re-reading of all pages and to get rid of any ads that may be cached. Remove any cookies, if you want Privoxy to manage that. You are now ready to start enjoying the benefits of using Privoxy !
Privoxy itself is typically started by specifying the main configuration file to be used on the command line. If no configuration file is specified on the command line, Privoxy will look for a file named config in the current directory. Except on Win32 where it will try config.txt.
5.1. Debian
We use a script. Note that Debian typically starts Privoxy upon booting per default. It will use the file /etc/privoxy/config as its main configuration file.
5.2. FreeBSD and ElectroBSD
To start Privoxy upon booting, add «privoxy_enable=’YES'» to /etc/rc.conf. Privoxy will use /usr/local/etc/privoxy/config as its main configuration file.
If you installed Privoxy into a jail, the paths above are relative to the jail root.
To start Privoxy manually, run:
5.3. Windows
Click on the Privoxy Icon to start Privoxy . If no configuration file is specified on the command line, Privoxy will look for a file named config.txt. Note that Windows will automatically start Privoxy when the system starts if you chose that option when installing.
Privoxy can run with full Windows service functionality. On Windows only, the Privoxy program has two new command line arguments to install and uninstall Privoxy as a service. See the Windows Installation instructions for details.
5.4. Generic instructions for Unix derivates (Solaris, NetBSD, HP-UX etc.)
Example Unix startup command:
Note that if you installed Privoxy through a package manager, the package will probably contain a platform-specific script or configuration file to start Privoxy upon boot.
5.5. Mac OS X
The privoxy service will automatically start after a successful installation (and thereafter every time your computer starts up) however you will need to configure your web browser(s) to use it. To do so, configure them to use a proxy for HTTP and HTTPS at the address 127.0.0.1:8118.
To prevent the privoxy service from automatically starting when your computer starts up, remove or rename the file /Library/LaunchDaemons/org.ijbswa.privoxy.plist (on OS X 10.5 and higher) or the folder named /Library/StartupItems/Privoxy (on OS X 10.4 ‘Tiger’).
To manually start or stop the privoxy service, use the scripts startPrivoxy.sh and stopPrivoxy.sh supplied in /Applications/Privoxy. They must be run from an administrator account, using sudo.
5.6. Command Line Options
Privoxy may be invoked with the following command-line options:
Exit after loading the configuration files before binding to the listen address. The exit code signals whether or not the configuration files have been successfully loaded.
If the exit code is 1, at least one of the configuration files is invalid, if it is 0, all the configuration files have been successfully loaded (but may still contain errors that can currently only be detected at run time).
This option doesn’t affect the log setting, combination with —no-daemon is recommended if a configured log file shouldn’t be used.
Print version info and exit. Unix only.
Print short usage info and exit. Unix only.
Don’t become a daemon, i.e. don’t fork and become process group leader, and don’t detach from controlling tty. Unix only.
On startup, write the process ID to FILE . Delete the FILE on exit. Failure to create or delete the FILE is non-fatal. If no FILE option is given, no PID file will be used. Unix only.
After (optionally) writing the PID file, assume the user ID of USER , and if included the GID of GROUP. Exit if the privileges are not sufficient to do so. Unix only.
Before changing to the user ID given in the —user option, chroot to that user’s home directory, i.e. make the kernel pretend to the Privoxy process that the directory tree starts there. If set up carefully, this can limit the impact of possible vulnerabilities in Privoxy to the files contained in that hierarchy. Unix only.
Specifies a hostname (for example www.privoxy.org) to look up before doing a chroot. On some systems, initializing the resolver library involves reading config files from /etc and/or loading additional shared libraries from /lib. On these systems, doing a hostname lookup before the chroot reduces the number of files that must be copied into the chroot tree.
For fastest startup speed, a good value is a hostname that is not in /etc/hosts but that your local name server (listed in /etc/resolv.conf) can resolve without recursion (that is, without having to ask any other name servers). The hostname need not exist, but if it doesn’t, an error message (which can be ignored) will be output.
If no configfile is included on the command line, Privoxy will look for a file named «config» in the current directory (except on Win32 where it will look for «config.txt» instead). Specify full path to avoid confusion. If no config file is found, Privoxy will fail to start.
On MS Windows only there are two additional command-line options to allow Privoxy to install and run as a service . See the Window Installation section for details.
2. Installation
Privoxy is available both in convenient pre-compiled packages for a wide range of operating systems, and as raw source code. For most users, we recommend using the packages, which can be downloaded from our Privoxy Project Page.
Note: On some platforms, the installer may remove previously installed versions, if found. (See below for your platform). In any case be sure to backup your old configuration if it is valuable to you. See the note to upgraders section below.
2.1. Binary Packages
How to install the binary packages depends on your operating system:
2.1.1. Debian and Ubuntu
DEBs can be installed with apt-get install privoxy, and will use /etc/privoxy for the location of configuration files.
2.1.2. Windows
Just double-click the installer, which will guide you through the installation process. You will find the configuration files in the same directory as you installed Privoxy in.
Version 3.0.5 beta introduced full Windows service functionality. On Windows only, the Privoxy program has two new command line arguments to install and uninstall Privoxy as a service .
After invoking Privoxy with —install, you will need to bring up the Windows service console to assign the user you want Privoxy to run under, and whether or not you want it to run whenever the system starts. You can start the Windows services console with the following command: services.msc. If you do not take the manual step of modifying Privoxy’s service settings, it will not start. Note too that you will need to give Privoxy a user account that actually exists, or it will not be permitted to write to its log and configuration files.
2.1.3. Mac OS X
Installation instructions for the OS X platform depend upon whether you downloaded a ready-built installation package (.pkg or .mpkg) or have downloaded the source code.
2.1.4. Installation from ready-built package
The downloaded file will either be a .pkg (for OS X 10.5 upwards) or a bzipped .mpkg file (for OS X 10.4). The former can be double-clicked as is and the installation will start; double-clicking the latter will unzip the .mpkg file which can then be double-clicked to commence the installation.
The privoxy service will automatically start after a successful installation (and thereafter every time your computer starts up) however you will need to configure your web browser(s) to use it. To do so, configure them to use a proxy for HTTP and HTTPS at the address 127.0.0.1:8118.
To prevent the privoxy service from automatically starting when your computer starts up, remove or rename the file /Library/LaunchDaemons/org.ijbswa.privoxy.plist (on OS X 10.5 and higher) or the folder named /Library/StartupItems/Privoxy (on OS X 10.4 ‘Tiger’).
To manually start or stop the privoxy service, use the scripts startPrivoxy.sh and stopPrivoxy.sh supplied in /Applications/Privoxy. They must be run from an administrator account, using sudo.
To uninstall, run /Applications/Privoxy/uninstall.command as sudo from an administrator account.
2.1.5. Installation from source
To build and install the Privoxy source code on OS X you will need to obtain the macsetup module from the Privoxy Sourceforge CVS repository (refer to Sourceforge help for details of how to set up a CVS client to have read-only access to the repository). This module contains scripts that leverage the usual open-source tools (available as part of Apple’s free of charge Xcode distribution or via the usual open-source software package managers for OS X (MacPorts, Homebrew, Fink etc.) to build and then install the privoxy binary and associated files. The macsetup module’s README file contains complete instructions for its use.
The privoxy service will automatically start after a successful installation (and thereafter every time your computer starts up) however you will need to configure your web browser(s) to use it. To do so, configure them to use a proxy for HTTP and HTTPS at the address 127.0.0.1:8118.
To prevent the privoxy service from automatically starting when your computer starts up, remove or rename the file /Library/LaunchDaemons/org.ijbswa.privoxy.plist (on OS X 10.5 and higher) or the folder named /Library/StartupItems/Privoxy (on OS X 10.4 ‘Tiger’).
To manually start or stop the privoxy service, use the Privoxy Utility for Mac OS X (also part of the macsetup module). This application can start and stop the privoxy service and display its log and configuration files.
To uninstall, run the macsetup module’s uninstall.sh as sudo from an administrator account.
2.1.6. FreeBSD
Privoxy is part of FreeBSD’s Ports Collection, you can build and install it with cd /usr/ports/www/privoxy; make install clean.
2.2. Building from Source
The most convenient way to obtain the Privoxy source code is to download the source tarball from our project download page, or you can get the up-to-the-minute, possibly unstable, development version from https://www.privoxy.org/.
To build Privoxy from source, autoconf, GNU make (gmake), and, of course, a C compiler like gcc are required.
When building from a source tarball, first unpack the source:
To build the development version, you can get the source code by doing:
This will create a directory named /privoxy/, which will contain the source tree.
Note that source code in Git is development quality, and may not be stable or well tested.
It is strongly recommended to not run Privoxy as root. You should configure/install/run Privoxy as an unprivileged user, preferably by creating a «privoxy» user and group just for this purpose. See your local documentation for the correct command line to do add new users and groups (something like adduser, but the command syntax may vary from platform to platform).
/etc/passwd might then look like:
And then /etc/group, like:
Some binary packages may do this for you.
Then, to build from either unpacked tarball or Git checkout:
Using GNU make, you can have the first four steps automatically done for you by just typing:
in the freshly downloaded or unpacked source directory.
To build an executable with security enhanced features so that users cannot easily bypass the proxy (e.g. «Go There Anyway» ), or alter their own configurations, configure like this:
Note that all of these options can also be disabled through the configuration file.
WARNING: If installing as root, the install will fail unless a non-root user or group is specified, or a privoxy user and group already exist on the system. If a non-root user is specified, and no group, then the installation will try to also use a group of the same name as «user» . If a group is specified (and no user), then the support files will be installed as writable by that group, and owned by the user running the installation.
configure accepts —with-user and —with-group options for setting user and group ownership of the configuration files (which need to be writable by the daemon). The specified user must already exist . When starting Privoxy , it must be run as this same user to insure write access to configuration and log files!
Alternately, you can specify user and group on the make command line, but be sure both already exist:
The default installation path for make install is /usr/local. This may of course be customized with the various ./configure path options. If you are doing an install to anywhere besides /usr/local, be sure to set the appropriate paths with the correct configure options ( ./configure —help). Non-privileged users must of course have write access permissions to wherever the target installation is going.
If you do install to /usr/local, the install will use sysconfdir=$prefix/etc/privoxy by default. All other destinations, and the direct usage of —sysconfdir flag behave like normal, i.e. will not add the extra privoxy directory. This is for a safer install, as there may already exist another program that uses a file with the «config» name, and thus makes /usr/local/etc cleaner.
If installing to /usr/local, the documentation will go by default to $prefix/share/doc. But if this directory doesn’t exist, it will then try $prefix/doc and install there before creating a new $prefix/share/doc just for Privoxy .
Again, if the installs goes to /usr/local, the localstatedir (ie: var/) will default to /var instead of $prefix/var so the logs will go to /var/log/privoxy/, and the pid file will be created in /var/run/privoxy.pid.
make install will attempt to set the correct values in config (main configuration file). You should check this to make sure all values are correct. If appropriate, an init script will be installed, but it is up to the user to determine how and where to start Privoxy . The init script should be checked for correct paths and values, if anything other than a default install is done.
If install finds previous versions of local configuration files, most of these will not be overwritten, and the new ones will be installed with a «new» extension. default.action and default.filter will be overwritten . You will then need to manually update the other installed configuration files as needed. The default template files will be overwritten. If you have customized, local templates, these should be stored safely in a separate directory and defined in config by the «templdir» directive. It is of course wise to always back-up any important configuration files «just in case» . If a previous version of Privoxy is already running, you will have to restart it manually.
For more detailed instructions on how to build Redhat RPMs, Windows self-extracting installers, building on platforms with special requirements etc, please consult the developer manual.
2.2.1. Windows
2.2.1.1. Setup
Install the Cygwin utilities needed to build Privoxy . If you have a 64 bit CPU (which most people do by now), get the Cygwin setup-x86_64.exe program here (the .sig file is here).
Run the setup program and from View / Category select:
If you haven’t already downloaded the Privoxy source code, get it now:
Get the source code (.zip or .tar.gz) for tidy from https://github.com/htacg/tidy-html5/releases, unzip into and build the software:
If you want to be able to make a Windows release package, get the NSIS .zip file from https://sourceforge.net/projects/nsis/files/NSIS%203/ and extract the NSIS directory to privoxy/windows. Then edit the windows/GNUmakefile to set the location of the NSIS executable — eg:
2.2.1.2. Build
To build just the Privoxy executable and not the whole installation package, do:
Privoxy uses the GNU Autotools for building software, so the process is:
The usual configure options for building a native Windows application under cygwin are
You can set the CFLAGS and LDFLAGS envars before running configure to set compiler and linker flags. For example:
See the Developer’s Manual for building a Windows release package.


