- About User Profiles
- Types of User Profiles
- User Profile Tiles in Windows 7 and Later
- Create mandatory user profiles
- Profile extension for each Windows version
- Mandatory user profile
- How to create a default user profile
- How to make the user profile mandatory
- Apply a mandatory user profile to users
- How to apply a mandatory user profile to users
- Apply policies to improve sign-in time
About User Profiles
The system creates a user profile the first time that a user logs on to a computer. At subsequent logons, the system loads the user’s profile, and then other system components configure the user’s environment according to the information in the profile.
Types of User Profiles
- Local User Profiles. A local user profile is created the first time that a user logs on to a computer. The profile is stored on the computer’s local hard disk. Changes made to the local user profile are specific to the user and to the computer on which the changes are made.
- Roaming User Profiles. A roaming user profile is a copy of the local profile that is copied to, and stored on, a server share. This profile is downloaded to any computer that a user logs onto on a network. Changes made to a roaming user profile are synchronized with the server copy of the profile when the user logs off. The advantage of roaming user profiles is that users do not need to create a profile on each computer they use on a network.
- Mandatory User Profiles. A mandatory user profile is a type of profile that administrators can use to specify settings for users. Only system administrators can make changes to mandatory user profiles. Changes made by users to desktop settings are lost when the user logs off.
- Temporary User Profiles. A temporary profile is issued each time that an error condition prevents the user’s profile from loading. Temporary profiles are deleted at the end of each session, and changes made by the user to desktop settings and files are lost when the user logs off. Temporary profiles are only available on computers running WindowsВ 2000 and later.
A user profile consists of the following elements:
- A registry hive. The registry hive is the file NTuser.dat. The hive is loaded by the system at user logon, and it is mapped to the HKEY_CURRENT_USER registry key. The user’s registry hive maintains the user’s registry-based preferences and configuration.
- A set of profile folders stored in the file system. User-profile files are stored in the Profiles directory, on a folder per-user basis. The user-profile folder is a container for applications and other system components to populate with sub-folders, and per-user data such as documents and configuration files. Windows Explorer uses the user-profile folders extensively for such items as the user’s Desktop, Start menu and Documents folder.
User profiles provide the following advantages:
- When the user logs on to a computer, the system uses the same settings that were in use when the user last logged off.
- When sharing a computer with other users, each user receives their customized desktop after logging on.
- Settings in the user profile are unique to each user. The settings cannot be accessed by other users. Changes made to one user’s profile do not affect other users or other users’ profiles.
User Profile Tiles in Windows 7 and Later
In WindowsВ 7 or later, each user profile has an associated image presented as a user tile. These tiles appear to users on the User Accounts Control Panel item and its Manage Accounts subpage.. The image files for the default Guest and default User accounts also appear here if you have Administrator access rights.
NoteВ В The Manage Accounts subpage is accessed through the Manage another account link in the User Accounts Control Panel item.
- %ProgramData%\Microsoft\User Account Pictures\Guest.bmp
- %ProgramData%\Microsoft\User Account Pictures\User.bmp
The user’s tile image is stored in the %SystemDrive%\Users\ \AppData\Local\Temp folder as .bmp. Any slash characters (\) are converted to plus sign characters (+). For example, DOMAIN\user is converted to DOMAIN+user.
The image file appears in the user’s Temp folder:
- After the user completes the initial system setup (OOBE).
- When the user first launches the User Accounts Control Panel item.
- When the user goes to the Manage Accounts subpage of the User Accounts Control Panel item. In addition, tiles for all other users on the computer are shown.
Those instances are the only times that the images are created or updated. Therefore, there are several caveats to keep in mind when using the Temp folder location programmatically:
The user’s tile is not guaranteed to be present. If the user deletes the .bmp file, for instance manually or through a utility that deletes temporary files, that user tile is not automatically recreated until the user launches the User Accounts Control Panel item or Manage Accounts subpage.
User tiles for other users on the computer might not be present in the currently logged-on user’s Temp folder. For example, if User A creates User B through the User Accounts Control Panel item, User B’s tile is created in User A’s Temp folder when Windows sends User A to the Manage Accounts subpage. Because the directory structure is not created for User B until he or she logs on, User A’s Temp folder is the only location that User B’s tile is stored. When User B logs on, the only image stored in User B’s Temp folder is his or her own.
- To get all user tiles for users on a system, applications might need to search in each user’s Temp directory.
- Because the access control list (ACL) of these Temp directories allows access to SYSTEM, Administrator, and the current user, applications need to elevate to access for other users.
Other users’ tiles are not guaranteed to be up-to-date in their Temp folders. If User B updates his or her user tile, User A will not see the change until User A accesses the Manage Accounts subpage. Therefore, if applications use User A’s Temp folder to obtain User B’s tile, those applications can get an out-of-date image file.
Create mandatory user profiles
Applies to
A mandatory user profile is a roaming user profile that has been pre-configured by an administrator to specify settings for users. Settings commonly defined in a mandatory profile include (but are not limited to): icons that appear on the desktop, desktop backgrounds, user preferences in Control Panel, printer selections, and more. Configuration changes made during a user’s session that are normally saved to a roaming user profile are not saved when a mandatory user profile is assigned.
Mandatory user profiles are useful when standardization is important, such as on a kiosk device or in educational settings. Only system administrators can make changes to mandatory user profiles.
When the server that stores the mandatory profile is unavailable, such as when the user is not connected to the corporate network, users with mandatory profiles can sign in with the locally cached copy of the mandatory profile, if one exists. Otherwise, the user will be signed in with a temporary profile.
User profiles become mandatory profiles when the administrator renames the NTuser.dat file (the registry hive) of each user’s profile in the file system of the profile server from NTuser.dat to NTuser.man . The .man extension causes the user profile to be a read-only profile.
Profile extension for each Windows version
The name of the folder in which you store the mandatory profile must use the correct extension for the operating system it will be applied to. The following table lists the correct extension for each operating system version.
| Client operating system version | Server operating system version | Profile extension |
|---|---|---|
| Windows XP | Windows Server 2003 Windows Server 2003 R2 | none |
| Windows Vista Windows 7 | Windows Server 2008 Windows Server 2008 R2 | v2 |
| Windows 8 | Windows Server 2012 | v3 |
| Windows 8.1 | Windows Server 2012 R2 | v4 |
| Windows 10, versions 1507 and 1511 | N/A | v5 |
| Windows 10, versions 1607, 1703, 1709, 1803, 1809, 1903 and 1909 | Windows Server 2016 and Windows Server 2019 | v6 |
Mandatory user profile
First, you create a default user profile with the customizations that you want, run Sysprep with CopyProfile set to True in the answer file, copy the customized default user profile to a network share, and then you rename the profile to make it mandatory.
How to create a default user profile
Sign in to a computer running Windows 10 as a member of the local Administrator group. Do not use a domain account.
Use a lab or extra computer running a clean installation of Windows 10 to create a default user profile. Do not use a computer that is required for business (that is, a production computer). This process removes all domain accounts from the computer, including user profile folders.
Configure the computer settings that you want to include in the user profile. For example, you can configure settings for the desktop background, uninstall default apps, install line-of-business apps, and so on.
Unlike previous versions of Windows, you cannot apply a Start and taskbar layout using a mandatory profile. For alternative methods for customizing the Start menu and taskbar, see Related topics.
Create an answer file (Unattend.xml) that sets the CopyProfile parameter to True. The CopyProfile parameter causes Sysprep to copy the currently signed-on user’s profile folder to the default user profile. You can use Windows System Image Manager, which is part of the Windows Assessment and Deployment Kit (ADK) to create the Unattend.xml file.
Uninstall any application you do not need or want from the PC. For examples on how to uninstall Windows 10 Application see Remove-AppxProvisionedPackage. For a list of uninstallable applications, see Understand the different apps included in Windows 10.
It is highly recommended to uninstall unwanted or unneeded apps as it will speed up user sign-in times.
At a command prompt, type the following command and press ENTER.
(Sysprep.exe is located at: C:\Windows\System32\sysprep. By default, Sysprep looks for unattend.xml in this same folder.)
If you receive an error message that says «Sysprep was not able to validate your Windows installation», open %WINDIR%\System32\Sysprep\Panther\setupact.log and look for an entry like the following:

Use the Remove-AppxProvisionedPackage and Remove-AppxPackage -AllUsers cmdlet in Windows PowerShell to uninstall the app that is listed in the log.
The sysprep process reboots the PC and starts at the first-run experience screen. Complete the set up, and then sign in to the computer using an account that has local administrator privileges.
Right-click Start, go to Control Panel (view by large or small icons) > System > Advanced system settings, and click Settings in the User Profiles section.
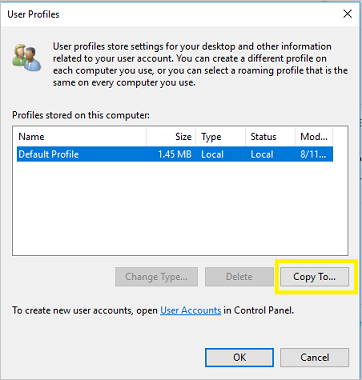
In User Profiles, click Default Profile, and then click Copy To.
In Copy To, under Permitted to use, click Change.

In Select User or Group, in the Enter the object name to select field, type everyone , click Check Names, and then click OK.
In Copy To, in the Copy profile to field, enter the path and folder name where you want to store the mandatory profile. The folder name must use the correct extension for the operating system version. For example, the folder name must end with «.v6» to identify it as a user profile folder for Windows 10, version 1607.
- If the device is joined to the domain and you are signed in with an account that has permissions to write to a shared folder on the network, you can enter the shared folder path.

- If the device is not joined to the domain, you can save the profile locally and then copy it to the shared folder location.
Click OK to copy the default user profile.
How to make the user profile mandatory
In File Explorer, open the folder where you stored the copy of the profile.
If the folder is not displayed, click View > Options > Change folder and search options. On the View tab, select Show hidden files and folders, clear Hide protected operating system files, click Yes to confirm that you want to show operating system files, and then click OK to save your changes.
Rename Ntuser.dat to Ntuser.man .
Apply a mandatory user profile to users
In a domain, you modify properties for the user account to point to the mandatory profile in a shared folder residing on the server.
How to apply a mandatory user profile to users
Open Active Directory Users and Computers (dsa.msc).
Navigate to the user account that you will assign the mandatory profile to.
Right-click the user name and open Properties.
On the Profile tab, in the Profile path field, enter the path to the shared folder without the extension. For example, if the folder name is \\server\profile.v6, you would enter \\server\profile.
Click OK.
It may take some time for this change to replicate to all domain controllers.
Apply policies to improve sign-in time
When a user is configured with a mandatory profile, Windows 10 starts as though it was the first sign-in each time the user signs in. To improve sign-in performance for users with mandatory user profiles, apply the Group Policy settings shown in the following table. (The table shows which operating system versions each policy setting can apply to.)
| Group Policy setting | Windows 10 | Windows Server 2016 | Windows 8.1 | Windows Server 2012 |
|---|---|---|---|---|
| Computer Configuration > Administrative Templates > System > Logon > Show first sign-in animation = Disabled |  | | | |
| Computer Configuration > Administrative Templates > Windows Components > Search > Allow Cortana = Disabled | | |  | |
| Computer Configuration > Administrative Templates > Windows Components > Cloud Content > Turn off Microsoft consumer experience = Enabled | | | | |
The Group Policy settings above can be applied in Windows 10 Professional edition.


