- Windows Programming/Device Driver Introduction
- Contents
- Types of Drivers [ edit | edit source ]
- Driver History [ edit | edit source ]
- Driver Issues [ edit | edit source ]
- Writing a Driver [ edit | edit source ]
- Device Driver Stack [ edit | edit source ]
- Buses and Physical Devices [ edit | edit source ]
- PnP [ edit | edit source ]
- Device Namespace, and Named Devices [ edit | edit source ]
- «Arbitrary Context» [ edit | edit source ]
- Floating Point Arithmetic [ edit | edit source ]
- WinDDK-7 вот , что нужно для создания драйвера
- Далее просто пробуем написать простейший kernel драйвер
- Отладка
- Write a Hello World Windows Driver (KMDF)
- Create and build a driver
- Write your first driver code
- Build the driver
- Deploy the driver
- Install the driver
- Debug the driver
Windows Programming/Device Driver Introduction
Contents
Types of Drivers [ edit | edit source ]
Windows device drivers generally come in 2 flavors: Virtual Device Drivers (VXD) and Windows Driver Model (WDM). VxD style drivers are older, and are less compatible, while WDM drivers are supposed to be fully code-compatible all the way back to Windows 98.
Driver History [ edit | edit source ]
In the old days of DOS, the computer was free land where anything goes. To that end, developers wrote their own hardware drivers, conforming to no specific specification or interface, using real-mode assembly code. With the advent of Windows 3.0, the operating system began to take a more hands-on approach to application management, by creating and maintaining a variety of virtual machines, to execute different programs in different processor contexts. Drivers could no longer exist as non-conformist real-mode DOS drivers, but instead had to mitigate access between multiple programs, running more or less in parallel with each other. Windows 3.0 changed the «real devices» into managed resources known as «virtual devices», and replaced the real-mode drivers with new virtual device drivers (VDD).
The Windows NT product line existed as a separate entity from the «regular» windows brand. These two operating systems were completely different in almost every imaginable way, except perhaps that the shells looked similar. Windows NT was a fully-managed operating system, and unauthorized resource accesses were blocked by the NT kernel. This meant that in Windows NT, device drivers needed to interface with the computer through specific methods, while standard windows drivers (Windows 3.0, 3.1, 3.11, 95, 98, Me) could access hardware directly, without any sort of management. The drivers for both systems at this point, were generally written in assembly language, as well.
Realizing that the market was split between Windows and Windows NT, Microsoft saw a need to introduce a single driver model, so that device drivers could be portable between Windows and Windows NT. In addition, Microsoft knew that drivers had to be writable in a higher-level language, like C, in order to be code-compatible for different hardware systems. To meet these needs, Microsoft created the Windows Driver Model (WDM). WDM drivers are compiled using the DDK, they are written in C, and they follow exacting specifications that ensure they can be executed on any windows system. This book will attempt to focus on WDM drivers, but will include notes on writing DOS TSR drivers, and VDDs as well.
Driver Issues [ edit | edit source ]
Device Drivers operate in kernel mode so writing, testing, and debugging drivers can be a tricky task. Drivers should always be well tested before they are installed.
Since device drivers do not operate in user mode, the user mode libraries (kernel32.dll, user32.dll, wingdi.dll, msvcrt.dll) are not available to a device driver. Instead, a device driver must link directly to ntoskrnl.exe and hal.dll which provide Native API and executive services.
Writing a Driver [ edit | edit source ]
Device drivers are typically written in C, using the Driver Development Kit (DDK). There are functional and object-oriented ways to program drivers, depending on the language chosen to write in. It is generally not possible to program a driver in Visual Basic or other high-level languages.
Because drivers operate in kernel mode, there are no restrictions on the actions that a driver may take. A driver may read and write to protected areas of memory, it may access I/O ports directly, and can generally do all sorts of very powerful things. This power makes drivers exceptionally capable of crashing an otherwise stable system.
The Windows platform DDK comes with header files, library files, and a command-line compiler that can be used to write device drivers in C or C++. There is no graphical interface to the DDK compiler.
Device Driver Stack [ edit | edit source ]
Windows implements device drivers in a highly-modular fashion, and it is important that we discuss some vocabulary before we continue the discussion of driver programming any further. The drivers necessary for any particular device are arranged in a driver stack, and are connected together internally by a singly-linked list, that starts at the bottom of the stack (the root driver), and terminates at the highest level driver. Each driver must contain at least 2 modules, a root driver, and a function driver. This combination, with some optional additions, constitute the whole of what people generally call a complete «device driver». Function Drivers will be the most common type of driver to be written, and will be of a primary focus in this wikibook.
Microsoft realized that certain classes of devices all behave similarly, and it would be a gigantic waste of time for every hardware manufacturer to have to write the entire driver code from scratch. To this end, Windows allows for a type of driver known as a class driver. Class drivers are themselves not complete function drivers, but class drivers can be dynamically linked to a regular function driver, and can simplify the development process quite a bit. It is possible to write your own class driver, but 3rd party programmers generally don’t worry about it. In general, Microsoft will supply the class drivers, and driver developers will tap into those class drivers. This ensures that class drivers are fully Microsoft tested and certified, and that they are very versatile.
Another classification of driver is the filter driver. There are two general types of filter driver, an upper filter driver, and a lower filter driver. Upper filter drivers exist in the stack above the function driver, and—as their name implies—they filter the incoming I/O requests. Lower filter drivers are placed in the stack between the function driver and the root driver. Filter drivers are generally implemented as bug fixes, or as quick hack extensions for preexisting drivers.
Here is a general diagram of a driver stack:
Buses and Physical Devices [ edit | edit source ]
For simplification, let us use the term «bus» to refer to any place on your computer where information can travel from one place to another. This is a very broad definition, and rightfully so: the term «bus» needs to account for everything from USB, Serial ports, PCI cards, Video outputs, etc. Each bus is controlled by its own root driver. There is a USB root driver, a PCI root driver, and so on.
Let’s now consider a mythical construct known as the root bus, a structure that all other buses connect into. A root bus object doesn’t actually physically exist in your computer, but it is handy to think about it. Plus, the root bus has its own driver. The root bus driver object is responsible for keeping track of the devices connected on any bus in your entire computer, and ensuring that the data gets to where it is all going.
PnP [ edit | edit source ]
Plug-n-Play (PnP) is a technology that allows for the hardware on the computer to be changed dynamically, and the PnP software will automatically detect changes, and allocate important system resources. PnP gets its own root driver, that communicates closely with the Root bus driver, to keep track of the devices in your system.
Device Namespace, and Named Devices [ edit | edit source ]
«Arbitrary Context» [ edit | edit source ]
Drivers execute in the context of whatever thread was running when windows accessed the driver. To this end, we say that drivers execute in an «arbitrary context». Therefore, it is not good practice for a driver programmer to make any assumptions about the state of the processor at the entry point to a driver. There are a few issues that arise with this, so we will discuss them here.
Floating Point Arithmetic [ edit | edit source ]
Drivers that want to use MMX or floating point arithmetic may find they are in for some undue difficulty. Because a driver may be entered in any context, at any time, the floating point unit may contain partial results and unhandled exceptions from the user mode program that was interrupted to call the driver. It is not enough to simply save the context and then to restore it, because any unhandled exceptions may become «unhandleable», and raise a system error or a bug check. There are only certain times when Microsoft recommends using floating point arithmetic, and we will discuss them later.
WinDDK-7 вот , что нужно для создания драйвера
У нас Windows 10-64.
Задача разработать например драйвер устройства под Windows.
Устанавливаем Windows Device Driver Kit 7 :
Скачиваем с офф.сайта microsoft ISO, разархивируем , запустим KitSetup.exe

Так выглядят в Панель управления\Программы\Программы и компоненты

Установлен у меня в C:\WinDDK\7600.16385.1
В C:\WinDDK\7600.16385.1\src много примеров исходных кодов.
Примечание : если у вас уже установлен Win Driver Kit 10 , то придется удалить.
Фишка в том , что сборку надо запускать через запуск сначала командного файла (который устанавливает переменные среды) :
см. Пуск->Windows Driver

Открывается консоль, где и надо ввести build (в каталоге вашего проекта). Процесс сборки выглядит примерно так:

Для x64 входим через C:\Windows\System32\cmd.exe /k C:\WinDDK\7600.16385.1\bin\setenv.bat C:\WinDDK\7600.16385.1\ fre x32-64
Windows 10 — надо сначала отключить проверку цифровой подписи (у меня срабатывает при нажатой SHIFT + клик Перезагрузка)
Отключаем.

Далее просто пробуем написать простейший kernel драйвер
На самом деле в дальнейшем в этой ветке сайта мы будем заниматься UMDF драйверами, но для проверки первого драйвера подвернулся пример driver.sys (kernel драйвер, драйвер уровня ядра)
Компилируем простейший драйвер (sys — кернел драйвер)
Для варианта сборки x86 пробуем зарегистрировать драйвер

Для варианта сборки amd64 получаем

Теперь по другому пробуем проверить запущен ли все-таки драйвер через программу OSR Driver Loader:

Получается драйвер все-таки запускается несмотря на ругань по поводу сертификата.
Смотрим например еще так :
Osr driver loader — прекрасно и сама регистрирует / запускает / останавливает / удаляет драйвер. Только не забывайте перезагружаться.
Отладка
У нас на сайте см. отдельный раздел по отладке драйверов.
Write a Hello World Windows Driver (KMDF)
This topic describes how to write a very small Universal Windows driver using Kernel-Mode Driver Framework (KMDF) and then deploy and install your driver on a separate computer.
To get started, be sure you have Microsoft Visual Studio, the Windows SDK, and the Windows Driver Kit (WDK) installed.
Debugging Tools for Windows is included when you install the WDK.
Create and build a driver
Open Microsoft Visual Studio. On the File menu, choose New > Project.
In the New Project dialog box, in the left pane, go to Visual C++ > Windows Drivers > WDF.
In the middle pane, select Kernel Mode Driver, Empty (KMDF).
In the Name field, enter «KmdfHelloWorld» for the project name.
When you create a new KMDF or UMDF driver, you must select a driver name that has 32 characters or less. This length limit is defined in wdfglobals.h.
In the Location field, enter the directory where you want to create the new project.
Check Create directory for solution. Select OK.
![]()
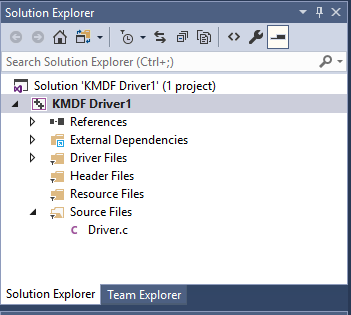
Visual Studio creates one project and a solution. You can see them in the Solution Explorer window, shown here. (If the Solution Explorer window is not visible, choose Solution Explorer from the View menu.) The solution has a driver project named KmdfHelloWorld.

In the Solution Explorer window, select and hold (or right-click) the KmdfHelloWorld project and choose Properties. Navigate to Configuration Properties > Driver Settings > General, and note that Target Platform defaults to Universal. Select Apply, and then select OK..
In the Solution Explorer window, again select and hold (or right-click) the KmdfHelloWorld project, choose Add, and then select New Item.
In the Add New Item dialog box, select C++ File. For Name, enter «Driver.c».
The file name extension is .c, not .cpp.
Select Add. The Driver.c file is added under Source Files, as shown here.
Write your first driver code
Now that you’ve created your empty Hello World project and added the Driver.c source file, you’ll write the most basic code necessary for the driver to run by implementing two basic event callback functions.
In Driver.c, start by including these headers:
If you can’t add Ntddk.h , open Configuration -> C/C++ -> General -> Additional Include Directories and add C:\Program Files (x86)\Windows Kits\10\Include\ \km , replacing with the appropriate directory in your WDK installation.
Ntddk.h contains core Windows kernel definitions for all drivers, while Wdf.h contains definitions for drivers based on the Windows Driver Framework (WDF).
Next, provide declarations for the two callbacks you’ll use:
Use the following code to write your DriverEntry:
DriverEntry is the entry point for all drivers, like Main() is for many user mode applications. The job of DriverEntry is to initialize driver-wide structures and resources. In this example, you printed «Hello World» for DriverEntry, configured the driver object to register your EvtDeviceAdd callback’s entry point, then created the driver object and returned.
The driver object acts as the parent object for all other framework objects you might create in your driver, which include device objects, I/O queues, timers, spinlocks, and more. For more information about framework objects, see Introduction to Framework Objects.
For DriverEntry, we strongly recommend keeping the name as «DriverEntry» to help with code analysis and debugging.
Next, use the following code to write your KmdfHelloWorldEvtDeviceAdd:
EvtDeviceAdd is invoked by the system when it detects that your device has arrived. Its job is to initialize structures and resources for that device. In this example, you simply printed out a «Hello World» message for EvtDeviceAdd, created the device object, and returned. In other drivers you write, you might create I/O queues for your hardware, set up a device context storage space for device-specific information, or perform other tasks needed to prepare your device.
For the device add callback, notice how you named it with your driver’s name as a prefix (KmdfHelloWorldEvtDeviceAdd). Generally, we recommend naming your driver’s functions in this way to differentiate them from other drivers’ functions. DriverEntry is the only one you should name exactly that.
Your complete Driver.c now looks like this:
This example illustrates a fundamental concept of drivers: they are a «collection of callbacks» that, once initialized, sit and wait for the system to call them when it needs something. This could be a new device arrival event, an I/O request from a user mode application, a system power shutdown event, a request from another driver, or a surprise removal event when a user unplugs the device unexpectedly. Fortunately, to say «Hello World,» you only needed to worry about driver and device creation.
Next, you’ll build your driver.
Build the driver
In the Solution Explorer window, select and hold (or right-click) Solution ‘KmdfHelloWorld’ (1 project) and choose Configuration Manager. Choose a configuration and platform for the driver project. For this exercise, we choose Debug and x64.
In the Solution Explorer window, select and hold (or right-click) KmdfHelloWorld and choose Properties. In Wpp Tracing > All Options, set Run Wpp tracing to No. Select Apply and then OK.
To build your driver, choose Build Solution from the Build menu. Visual Studio shows the build progress in the Output window. (If the Output window is not visible, choose Output from the View menu.) When you have verified that the solution built successfully, you can close Visual Studio.
To see the built driver, in File Explorer, go to your KmdfHelloWorld folder, and then to C:\KmdfHelloWorld\x64\Debug\KmdfHelloWorld. The folder includes:
- KmdfHelloWorld.sys — the kernel-mode driver file
- KmdfHelloWorld.inf — an information file that Windows uses when you install the driver
- KmdfHelloWorld.cat — a catalog file that the installer uses to verify the driver’s test signature
If you see DriverVer set to a date in the future when building your driver, change your driver project settings so that Inf2Cat sets /uselocaltime . To do so, use Configuration Properties->Inf2Cat->General->Use Local Time. Now both Stampinf and Inf2Cat use local time.
Deploy the driver
Typically when you test and debug a driver, the debugger and the driver run on separate computers. The computer that runs the debugger is called the host computer, and the computer that runs the driver is called the target computer. The target computer is also called the test computer.
So far you’ve used Visual Studio to build a driver on the host computer. Now you need to configure a target computer.
When you follow the steps to provision the target computer automatically using a network cable, take note of the port and key. You’ll use them later in the debugging step. In this example, we’ll use 50000 as the port and 1.2.3.4 as the key.
In real driver debugging scenarios, we recommend using a KDNET-generated key. For more information about how to use KDNET to generate a random key, see the Debug Drivers — Step by Step Lab (Sysvad Kernel Mode) topic.
On the host computer, open your solution in Visual Studio. You can double-click the solution file, KmdfHelloWorld.sln, in your KmdfHelloWorld folder.
In the Solution Explorer window, select and hold (or right-click) the KmdfHelloWorld project, and choose Properties.
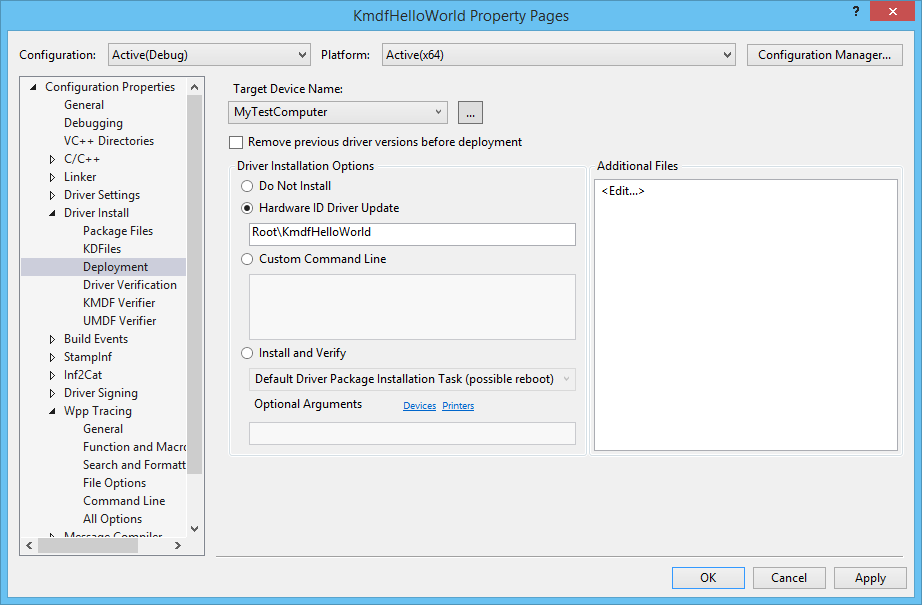
In the KmdfHelloWorld Property Pages window, go to Configuration Properties > Driver Install > Deployment, as shown here.
Check Remove previous driver versions before deployment.
For Target Device Name, select the name of the computer that you configured for testing and debugging. In this exercise, we use a computer named MyTestComputer.
Select Hardware ID Driver Update, and enter the hardware ID for your driver. For this exercise, the hardware ID is Root\KmdfHelloWorld. Select OK.
In this exercise, the hardware ID does not identify a real piece of hardware. It identifies an imaginary device that will be given a place in the device tree as a child of the root node. For real hardware, do not select Hardware ID Driver Update; instead, select Install and Verify. You’ll see the hardware ID in your driver’s information (INF) file. In the Solution Explorer window, go to KmdfHelloWorld > Driver Files, and double-click KmdfHelloWorld.inf. The hardware ID is located under [Standard.NT$ARCH$].
On the Build menu, choose Deploy Solution. Visual Studio automatically copies the files required to install and run the driver to the target computer. This may take a minute or two.
When you deploy a driver, the driver files are copied to the %Systemdrive%\drivertest\drivers folder on the test computer. If something goes wrong during deployment, you can check to see if the files are copied to the test computer. Verify that the .inf, .cat, test cert, and .sys files, and any other necessary files, are present in the %systemdrive%\drivertest\drivers folder.
For more information about deploying drivers, see Deploying a Driver to a Test Computer.
Install the driver
With your Hello World driver deployed to the target computer, now you’ll install the driver. When you previously provisioned the target computer with Visual Studio using the automatic option, Visual Studio set up the target computer to run test signed drivers as part of the provisioning process. Now you just need to install the driver using the DevCon tool.
On the host computer, navigate to the Tools folder in your WDK installation and locate the DevCon tool. For example, look in the following folder:
C:\Program Files (x86)\Windows Kits\10\Tools\x64\devcon.exe
Copy the DevCon tool to your remote computer.
On the target computer, install the driver by navigating to the folder containing the driver files, then running the DevCon tool.
Here’s the general syntax for the devcon tool that you will use to install the driver:
The INF file required for installing this driver is KmdfHelloWorld.inf. The INF file contains the hardware ID for installing the driver binary, KmdfHelloWorld.sys. Recall that the hardware ID, located in the INF file, is Root\KmdfHelloWorld.
Open a Command Prompt window as Administrator. Navigate to your folder containing the built driver .sys file and enter this command:
devcon install kmdfhelloworld.inf root\kmdfhelloworld
If you get an error message about devcon not being recognized, try adding the path to the devcon tool. For example, if you copied it to a folder on the target computer called C:\Tools, then try using the following command:
c:\tools\devcon install kmdfhelloworld.inf root\kmdfhelloworld
A dialog box will appear indicating that the test driver is an unsigned driver. Select Install this driver anyway to proceed.

Debug the driver
Now that you have installed your KmdfHelloWorld driver on the target computer, you’ll attach a debugger remotely from the host computer.
On the host computer, open a Command Prompt window as Administrator. Change to the WinDbg.exe directory. We will use the x64version of WinDbg.exe from the Windows Driver Kit (WDK) that was installed as part of the Windows kit installation. Here is the default path to WinDbg.exe:
C:\Program Files (x86)\Windows Kits\10\Debuggers\x64
Launch WinDbg to connect to a kernel debug session on the target computer by using the following command. The value for the port and key should be the same as what you used to provision the target computer. We’ll use 50000 for the port and 1.2.3.4 for the key, the values we used during the deploy step. The k flag indicates that this is a kernel debug session.
WinDbg -k net:port=50000,key=1.2.3.4
On the Debug menu, choose Break. The debugger on the host computer will break into the target computer. In the Debugger Command window, you can see the kernel debugging command prompt: kd>.
At this point, you can experiment with the debugger by entering commands at the kd> prompt. For example, you could try these commands:
To let the target computer run again, choose Go from the Debug menu or press «g,» then press «enter.»
To stop the debugging session, choose Detach Debuggee from the Debug menu.
Make sure you use the «go» command to let the target computer run again before exiting the debugger, or the target computer will remain unresponsive to your mouse and keyboard input because it is still talking to the debugger.
For a detailed step-by-step walkthrough of the driver debugging process, see Debug Universal Drivers — Step by Step Lab (Echo Kernel-Mode).
For more information about remote debugging, see Remote Debugging Using WinDbg.


