- Setting up a TFTP server for TFTP Recovery/Install
- What is TFTP Recovery over Ethernet?
- Is TFTP recovery over Ethernet Supported by my Device?
- Setting up TFTP Recovery/Install
- Setting up TFTP Server
- On Mac OSX
- Command-Line Native tftpd
- TFTPServer.app
- On Windows
- Tftpd64
- Tiny PXE
- On Linux
- Dnsmasq
- atftpd
- Testing TFTP server
- Перепрошивка WiFi-роутера от D-Link прошивкой dd-wrt из-под Linux.
- DBG-console
- Подготовка
- Немного теории:
- Приступим к практике:
- Начинаем веселье
- dimio.org
- Как загрузить прошивку dd-wrt при помощи tftpd
- Настройка atftpd
- airCube — Восстановление по TFTP
- Обзор
- Содержание
- Восстановление по TFTP
- Загрузка прошивки для Windows
- Загрузка прошивки для Linux
- Загрузка прошивки для macOS
- Installing OpenWrt via TFTP
- Bootloader contains TFTP client
- Mikrotik RouterBoards
- Example1
- Example2
- tftpd server on Mac OS X Lion
- tftpd on MacOS 10.4 «Tiger»
- Bootloader contains TFTP server
- Linux/BSD
- MacOS X
- Windows
- GUI TFTP clients
- TFTP command line client short Instructions
- Troubleshooting
- Example
Setting up a TFTP server for TFTP Recovery/Install
What is TFTP Recovery over Ethernet?
On most devices, the vendor provided boot loader is a partition separated from the actual firmware. In case of a failed flash process or in case of a misconfiguration, the device’s boot loader usually is still untouched and fully working. It the boot loader has a built-in “TFTP recovery mode”, it enables to regain control of a device with a broken firmware partition, by allowing a recovery flash process (which will also reset your configuration to the device defaults).
Some devices do not have automatic pull function and they need manual TFTP copy commands in recovery mode to get firmware from TFTP and firmware install.
The below article mainly advises on the “TFTP client at router” recovery.
Is TFTP recovery over Ethernet Supported by my Device?
Setting up TFTP Recovery/Install
Setting up TFTP Server
On Mac OSX
macOS provides a native tftpd server that runs the command line. There are also GUI applications that are available for those that prefer them.
Command-Line Native tftpd
For recent versions of macOS, the system-supplied tftpd is managed with launchctl . Users should be comfortable with command-line usage and sudo to take this approach. As confirmed on macOS Sierra 10.12.6 and macOS Mojave 10.14.2, the general steps involved are
TFTPServer.app
On Windows
Tftpd64
Download the portable version, and unzip it in a folder. You should see the manual, a license in a PDF file, a configuration file, and the application executable itself.
Place the file you want to send (the firmware file usually) in the same folder where you find the Tftpd64 program file. The folder exposed through TFTP can be changed by clicking on Browse button, but in most situations you don’t need to do that.
Configure your ethernet port according to your device’s own recovery method as detailed in Rescue from failed firmware upgrade, note that in most cases you can’t use that port to connect to the internet until you reconfigure it back like it was before.
Double-click on the Tftpd64 program file and you should get a Windows Firewall popup asking you to grant access. Check both options, to allow Tftpd64 to communicate over both home/work and public networks. This is very important, if the Windows Firewall blocks your TFTP server you won’t be able to access it from the device you want to recover.
Click on the drop-down menu called Server Interfaces and select your PC’s Ethernet port.
Tiny PXE
Tiny PXE seems to do the same as Tftpd64 plus BOOTP support (particularly useful for MikroTik devices).
On Linux
Dnsmasq
Dnsmasq is pre-installed in most distributions. Put an image file into your directory — actual name will vary. Then run TFTP server:
atftpd
You can also use atftpd:
Install atftpd from repository on Debian/Ubuntu/Mint
Install atftpd from repository on RedHat/Fedora/Centos
Create directory where you want to put the image file
Put an image file into your directory — actual name will vary
Change the ownership of the folder and the file in it
If not set, you should try running TFTP server as superuser.
Testing TFTP server
If you have received the file, congratulations, it’s ready.
Источник
Перепрошивка WiFi-роутера от D-Link прошивкой dd-wrt из-под Linux.
Стал у бедного админа виснуть роутер от D-Link, модель DIR-400.
И стал админ искать пути решения проблемы.
Погуглив полчаса наткнулся на прошивку от dd-wrt.com.
Поглядел на её возможности, обрадовался, и стал искать мануалов — как же всё таки эту прошивку залить (ибо стандартный прошивальщик, ребятами из D-Link писаный, не годится).
Нашёл мануал по заливке прошивки через DBG-console. Но вот беда — мануал на виндовых юзеров рассчитан, а винды под рукой нету, только Линукс праведный…
Ну, да ладно. Разобрался админ. Детали — под катом.
DBG-console
Есть у продутов от D-Link такая интересная фича — при включении железки в электросеть загрузчик на 2 секунды (значение по-умолчанию) поднимает сервер telnet на порту 9000.
Если за 2 секунды успеть залогиниться и послать железяке ‘^C’ — процесс загрузки остановится и мы получим доступ в инженерную консоль, в которой можно всякие интересные штуки делать — например, залить неофициальную похаченую linux-based прошивку. Приступим.
Подготовка
Немного теории:
Оговорюсь сразу — я дёргал питание роутера раз 20, с паузами 10-20 секунд, пока смог таки заставить железяку отдать мне инженерную консоль. В принципе это безопасно — достаточно дождаться полной загрузки роутера, и питание можно снова выдёргивать.
Ещё нюанс — линуховая версия telnet напрочь отказывается слать ‘^C’ по нажатию Ctrl-C вв момент подключения, пришлось включать моск — слать не один символ, а два, примерно так: при нажатом Ctrl жмём сначала V, потом C, отпускаем Ctrl.
И ещё — не бойтесь опечататься в инженерной консоли, все команды проходят валидацию, консоль просто не даст вам опечататься.
Приступим к практике:
Во-первых нам понадобится tftp сервер.
Ставим, кто как умеет (я юзал yum):
yum -y intall tftp-server
По-умолчанию tftp дёргается из xinetd, посему нужно немного подредактировать /etc/xinetd.d/tftp: выставить параметр disable = no и по вкусу отредактировать корневую директорию сервера (по-умолчанию — /tftpboot/, я её не менял).
Не забываем рестартануть xinetd.
Далее, идём сюда: dd-wrt.com/dd-wrtv3/dd-wrt/downloads.html
Там внизу — нечто вроде файлового менеджера, идём в директорию /stable/dd-wrt.v24 SP1/Consumer/Dlink/DIR-400 и качаем файлы linux.bin и dir400-firmware.bin в директорию /tftpboot/ (ну или на что вы там её изменили в конфиге).
Выдёргиваем из подопытного роутера все Ethernet-кабеля, отключаем всех WiFi-клиентов, втыкаемся в один из LAN-портов железки.
Назначаем своей машине статический IP 192.168.0.2, роутеру — 192.168.0.1.
Начинаем веселье
Дальнейшие действия требуют сосредоточенности.
Набираем в консоли
telnet 192.168.0.1 9000 (Enter пока не жмём, просто набираем для экономии времени — помните про 2 секунды?)
Выдёргиваем питание из роутера, ждём пару секунд, втыкаем питание, считаем до трёх, жмём Enter…
Далее идёт мой telnet session transcript, жирным выделено то, что я вводил в консоли, курсивом — мои комментарии.
Источник
dimio.org
В заметке про установку прошивки dd-wrt на D-Link DIR-620 я упоминал о замене стандартного загрузчика роутера на загрузчик от Zyxel Keenetic, после чего становится возможной загрузка прошивок в DIR-620 при момощи tftp. Нужно это может быть во-первых для того, чтобы не пересобирать сторонние прошивки в формат, понятный загрузчику, доступному через веб-интерфейс; во-вторых — для восстановления прошивки роутера, если что-то пошло не так и веб-интерфейс недоступен.
Поскольку процесс установки прошивки через tftp под Windows детально рассмотрен на сайте deadc0de, а я в основном использую Linux-машины дома, опишу загрузку dd-wrt в DIR-620 через tftp именно для Linux.
Как загрузить прошивку dd-wrt при помощи tftpd
- Для начала устанавливаем tftp-сервер — либо сам tftpd (работает в интерактивном режиме), либо atftp(клиент, можно использовать для проверки работы сервера)/atftpd(сервер), работающий в неинтерактивном режиме. atftp для загрузки прошивки удобней, чем tftp:
- Выключаем питание роутера, соединяем кабелем порт LAN1 роутера с выходом сетевой карты компьютера, в моем случае проводной интерфейс имеет имя eth0 (при необходимости изменить имя сетевого интерфейса в Linux можно за пару минут);
- Меняем IP-адрес и маску подсети на компьютере, с которого будет устанавливаться прошивка:
Команду нужно выполнять от суперпользователя, например при помощи sudo;
Набираем в консоли следующую команду:
Настройка atftpd
После установки ftp-сервера atftpd ( sudo apt-get install atftpd ) может возникнуть необходимость выполнить некоторые настройки для его корректной работы. Например — создать рабочую директорию, которая будет корневой для сервера:
Затем отключаем запуск демона через «супер-сервер» inet.d, изменив значение переменной USE_INETD в файлах /etc/default/atftpd и /etc/init.d/atftpd с TRUE на FALSE:
После этого ftp-сервер можно будет запускать с помощью команды /etc/init.d/atftpd start .
Постоянно используемые опции запуска можно перечислить в переменной OPTIONS, находящейся в файле /etc/init.d/atftpd. Например:
—user nobody — от имени какого пользователя будет запущен демон;
—bind-address 0.0.0.0 — ftp-сервер будет обрабатывать запросы, поступающие на указанный ip-адрес;
—no-multicast — сервер не будет реагировать на широковещательные запросы, обрабатывая только прямые;
/var/aftpd_dir — созданная ранее рабочая директория для сервера.
Остаётся только запустить сервер и проверить его работоспособность, подключившись к нему tftp 127.0.0.1 . Тестовый файл (test_file), расположенный в директории /var/aftpd_dir, можно получить при помощи команды put:
/test_file /test_file
Sent 10 bytes in 0.0 seconds
tftp>
Источник
airCube — Восстановление по TFTP
Обзор
В статье описывается, как войти в режим восстановления по TFTP на airCube перед загрузкой прошивки.
Содержание
Восстановление по TFTP
- Включите устройство, нажмите и удерживайте кнопку сброса. Удерживайте кнопку сброса до шага 4.
- Светодиодная панель должна быстро моргнуть несколько раз.
- Светодиодная панель должна загореться. Продолжайте удерживать кнопку сброса.
- Отпустите кнопку сброса, когда светодиодная панель устройства медленно моргнет три раза.
- Устройство находится в режиме восстановления по TFTP.
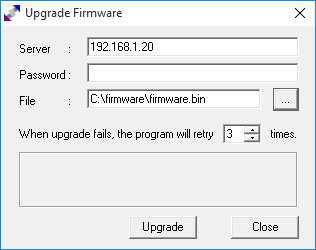
- Загрузите прошивку по адресу 192.168.1.20. Найдите последнюю версию прошивки на нашей странице загрузок airCube. Далее описывается каждая операционная система.
Загрузка прошивки для Windows
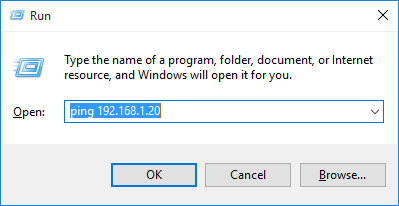
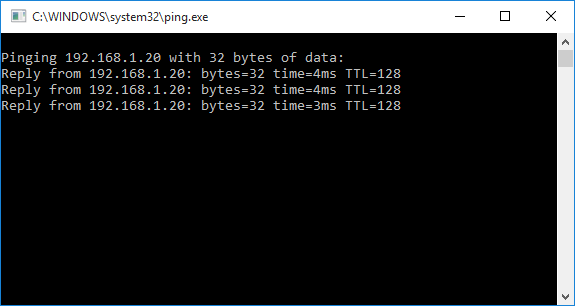
1. Убедитесь, что устройство отвечает на ping- запросы (сделайте ping-запрос 192.168.1.20 из окна DOS), если не отвечает, вернитесь к первому шагу и повторите.
2. Загрузите файл образа микропрограммного обеспечения (.bin), который вы скачали, на 192.168.1.20 через TFTP-клиент (двоичный режим). Используйте стандартный Windows TFTP-клиент командной строки или загрузите стороннюю утилиту для загрузки прошивки airOS. Ниже представлено два варианта:
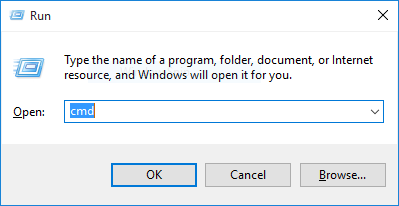
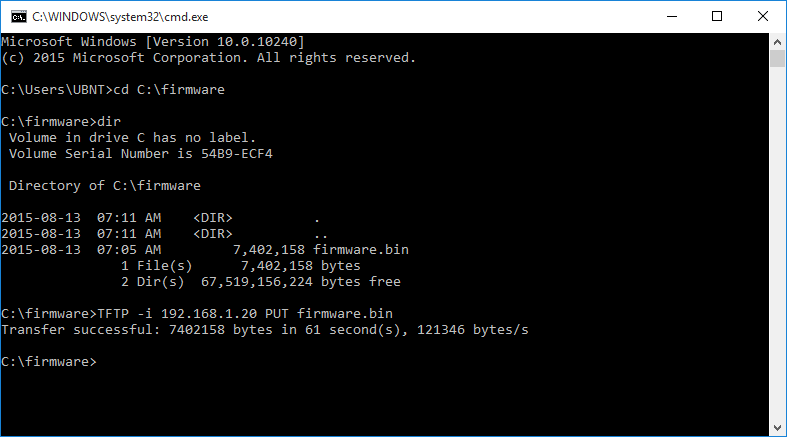
Метод 1: На ПК с Windows используйте командную строку TFTP из окна DOS (START >>> CMD):
перейдите в ту же структуру каталогов, что и прошивка (например, если вы сохранили файлы в c: \ каталог прошивки , введите команду : cd c: \ firmware ) и введите следующее (для справки введите TFTP -h), например:
tftp — i 192.168.1.20 put ACB.ar934x.v2.3.1.65d0016.180626.1612.bin
Метод 2: Загрузите и запустите tftp2 и настройте, как показано ниже:
3. Во время обновления прошивки светодиоды будут мигать один за другим 4 разными цветами. Подождите примерно 7-10 минут (в зависимости от устройства и прошивки). Не выключайте устройство во время обновления прошивки!
Загрузка прошивки для Linux
Общие дистрибутивы Linux имеют встроенный TFTP-клиент командной строки. С ПК на Linux загрузить прошивку по TFTP можно, введя в Терминал следующие команды:
Загрузка прошивки для macOS
1. Отправьте ping-запрос на ваше устройство на 192.168.1.20 через Терминал.
2. Получите доступ к встроенному TFTP-клиенту, набрав в Терминале tftp, затем введите следующие команды, нажмите Enter в конце каждой строки:
ACB.ar934x.v2.3.1.65d0016.180626.1612.bin, приведенный выше, — это пример прошивки, замените его на загруженный .bin файл.
3. На данном этапе вы увидите подтверждение sent, за которым следуют байты и продолжительность. Подождите несколько минут, следите за светодиодами.
4. Теперь вы можете зайти на свое устройство, перейдя по адресу 192.168.1.20. в браузере.
Источник
Installing OpenWrt via TFTP
Warning!
This section describes actions that might damage your device or firmware. Proceed with care!
 Cleanup IP addresses as 192.168.1.x is common, but not universal. Use of RFC5737 might be more appropriate or just italic ipv4.x.y.z indicators.
Bootloader contains TFTP client
Mikrotik RouterBoards
Example1
For example the bootloader implementation of the DIR-300 redboot contains a TFTP client. Two steps:
Example2
In case of the xxx Step 3 from Example 1 above is not applicable. There is no console to login to, the bootloader will automatically try to get a firmware over TFTP from a pre-configured IP address at every boot.
TODO
tftpd server on Mac OS X Lion
before you make changes to the config run:
to stop tftpd run:
to start tftpd run:
Here is an example config file that will work:
Differences from the default include removing this, to enable the service:
Add this to the ProgramArguments array to make it log to /var/log/syslog.log
Place the openwrt image file you want to serve in:
Notice that even after running launchctl start com.apple.tftpd you will not see tftpd running when executing ps aux | grep tftpd because of the way launchctl works. tftpd is in fact not running but launchctl will launch it as soon as it is required.
In some cases, when the output on the serial console is grabbled you can still act on faith and executer the following commands, which will work in most cases:
setenv serverip 192.168.1.100
tftpd on MacOS 10.4 «Tiger»
tftpd works out-of-the-box also on the old 10.4. Maybe the tftp dir is not yet created but this is just a mkdir. Get a root shell and issue these commands:
Bootloader contains TFTP server
The basic procedure of using a tftp client to upload a new firmware to your router:
Linux/BSD
The network link must be up and established during power up. One way to ensure this happens is to use a switch or hub inbetween your computer and the device you are flashing as this will leave the link established when you power off the device.
Another option is to disable network manager in Linux (or use a distro/LiveCD that doesn’t have it). Some commands that may disable it (depends on the distribution of Linux used):
Preparation Steps
Using atftp
As a single command-line:
Using netkit’s tftp
As a single command-line:
Setting “rexmt 1” will cause the tftp client to constantly retry to send the file to the given address. As advised above, plug in your box after typing the commands, and as soon as the bootloader starts to listen, your client will successfully connect and send the firmware.
Some devices will also respond to ping while others do not.
Note: for some versions of the CFE bootloader, the last line may need to be “put openwrt-xxx-x.x-xxx.bin code.bin”. If this does not work try other variations instead of code.bin — e.g. openwrt-g-code.bin or openwrt-gs-code.bin.
One CFE version only worked after renaming the ‘….bin’ file to ‘code.bin’. From Linux Ubuntu I then used the command ‘tftp -m binary 192.168.1.1 -c put code.bin’ and the transfer process came to life.
Using curl
using tftpd-hpa
MacOS X
Some people have had problems with the command line tftp client, however, and recommend using MacTFTP Client instead:
Alternatively, you can connect the router to the Mac via a hub or switch; see the troubleshooting section for more information.
Windows
There are multiple tftp clients that you can choose from.
GUI TFTP clients
TFTP command line client short Instructions
Note that some bootloaders do not respond to ping.
Troubleshooting
Don’t forget about your firewall settings, if you use one. It is best to run the “put” command and then immediately apply power to the router, since the upload window is extremely short and very early in boot.
Some machines will disable the ethernet when the router is powered off and not enable it until after the router has been powered on for a few seconds. If you’re consistantly getting “Invalid Password” failures try connecting your computer and the router to a hub or switch. Doing so will keep the link up and prevent the computer from disabling its interface while the router is off.
If you can flash your router and after that it says “Boot program checksum is invalid” or “Invalid boot block on disk” on serial console try a different tftp client — atftp works well. This occurs with some netkit tftp packages and big firmwares.
Example
would this be better to just exist in specific model’s wiki pages?
should we create a page to list models with tftp support, noting which ones need the reset button trick?
On many routers, including the Asus WL-500g Premium v1 that I use, you flash an image by disconnecting power, press and hold down the reset button, and connect the power again. Wait a few seconds and the PWR LED will start to blink. Release the reset button. The device will now have a TFTP server running on 192.168.1.1 .
Note that many TP-Link models are reported to support the same trick, including the TL-WR740Nv4, TL-WDR4300v1, TL-WDR3600v1, TL-WR842NDv1, TL-WR841NDv8, TL-MR3020v1, TL-MR3220v2, TL-MR3420v2, TL-WR940Nv2, TL-WR941NDv5, TL-WR1042NDv1 and possibly any other TP-Link model that has a recent firmware upgrade from the manufacturer. For a summary and ongoing experiments, see: http://bkil.blogspot.com/2014/12/hidden-tftp-of-tp-link-routers.html
Wait one minute and restart the box by disconnecting and reconnecting power. Some documentations claim that the device should restart by itself but I have never seen this happen, no matter how long I wait.
Источник


