- Proxmox и гостевые системы Windows.
- 1. Ballooning
- 2. QEMU Guest agent
- Qemu-guest-agent
- Contents
- Introduction — What is qemu-guest-agent
- Installation
- Guest
- Linux
- Windows
- Testing that the communication with the guest agent is working
- Windows 10 guest best practices
- Contents
- Introduction
- Install
- Prepare
- Launch Windows install
- Install Guest Agent and Services
- Guest Agent
- Drivers and Services
- Check for missing drivers
- Further information
- Disk-Image Format: raw vs qcow2
- VirtIO drivers
- Windows 2019 guest best practices
- Contents
- Introduction
- Install
- Prepare
- Launch Windows install
- Install Guest Agent and Services
- Guest Agent
- Drivers and Services
- Check for missing drivers
- Further information
- Disk-Image Format: raw vs qcow2
- VirtIO drivers
Proxmox и гостевые системы Windows.
После установки гостевой системы на Proxmox для того чтобы не было проблем с производительностью и резервным копированием необходимо произвести некоторые действия.
1. Ballooning
Для эффективного использования ресурсов Proxmox поддерживает технологию ballooning.
Ballooning – это динамическое управление памятью. Другими словами, вы прописываете в настройках виртуальной машины минимальный и максимальный объем памяти, выделяемой этой машине, а далее Proxmox сам распределяет необходимые ресурсы. Таким образом уменьшается влияние гостевой системы на весь хост.
Для начала выставим желательные параметры в настройках машины.
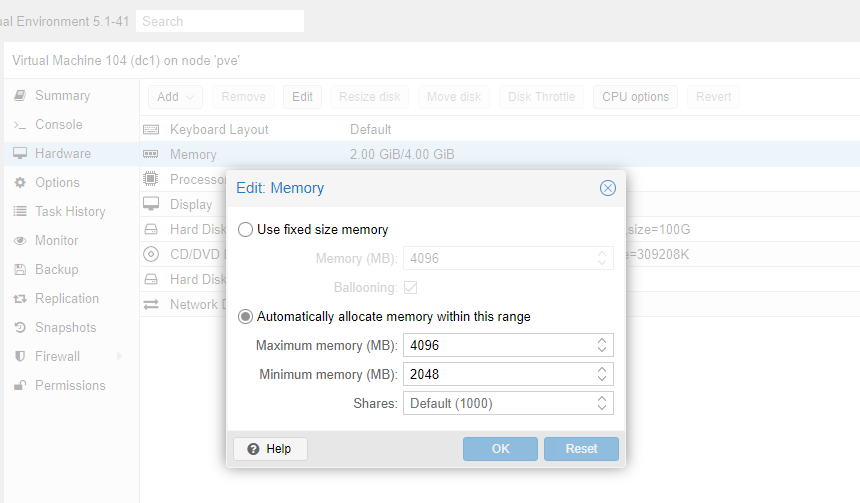
Чтобы их применить, машину нужно выключить и включить обратно.
Чтобы ballooning заработал, нам потребуется скачать и установить дополнительные драйвера.
Перейдем на гостевую систему и создадим каталог Balloon в папке Program files (c:/ Program files /Balloon). В эту папку со скачанного диска нужно скопировать драйвера для вашей операционной системы.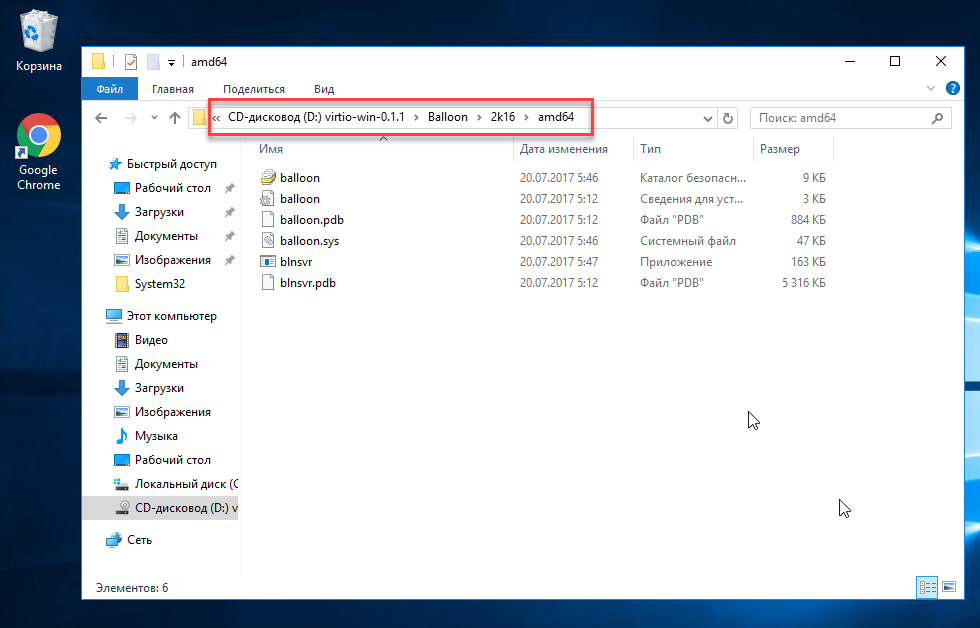
В диспетчере устройств появится новое оборудование и на него нужно установить эти драйверы.
После этого необходимо установить ballooning как службу.
Win + X, Выполнить, cmd
Win + X, Выполнить, services.msc
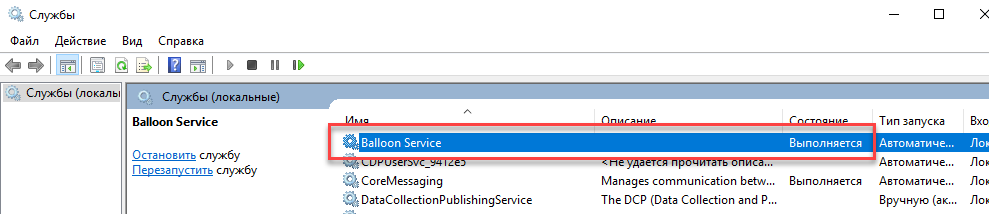
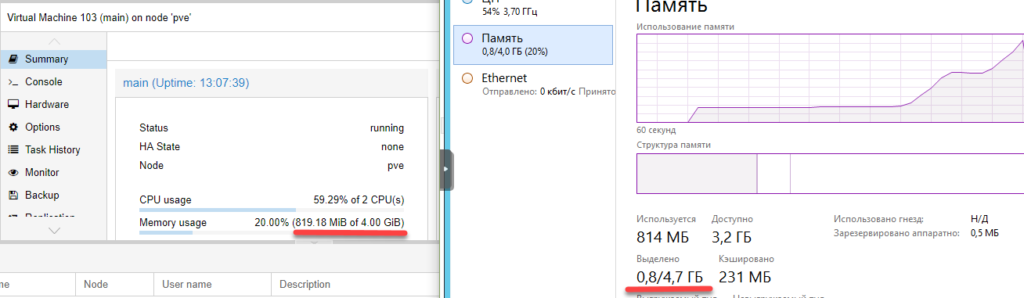
Выделение памяти теперь работает коректно.
2. QEMU Guest agent
Следующее что нужно сделать – установить QEMU Guest agent. Без этого не будет работать поддержка VSS (Volume Shadow Copy Service) т.е. служба теневого копирования тома.
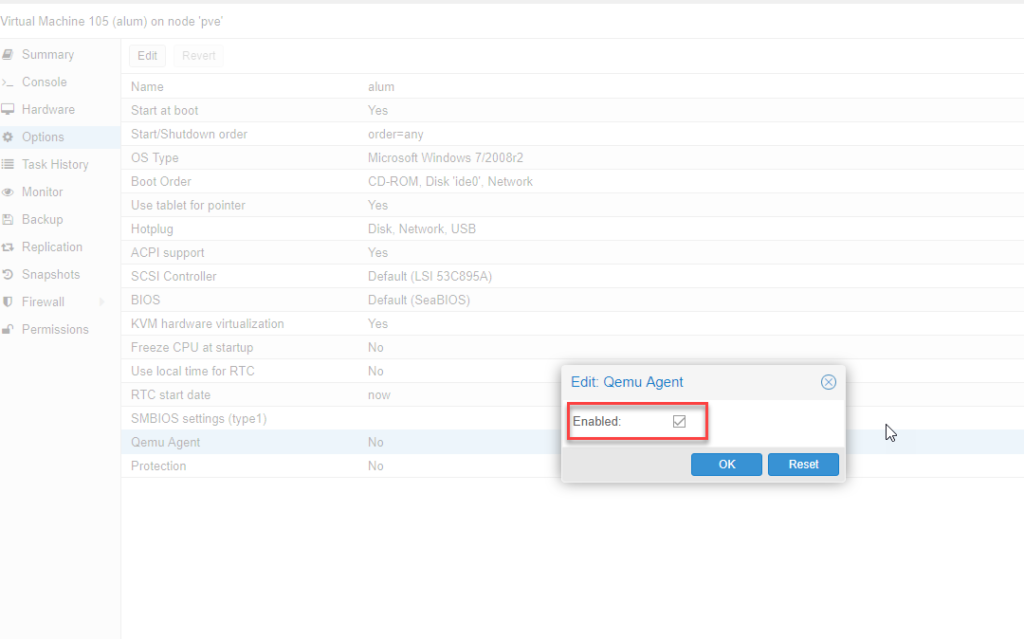
В настройках виртуальной машины включим агента. Чтобы настройки применились – выключим и включим снова данную виртуальную машину.
У нас появилось новое устройство:
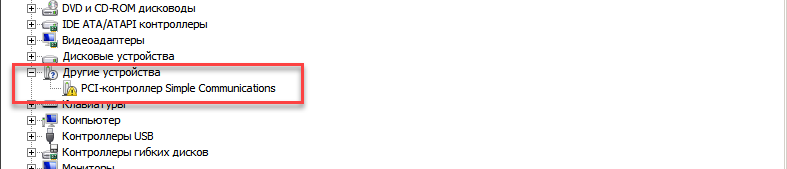
Драйверы находятся на том же диске в папке vioserial
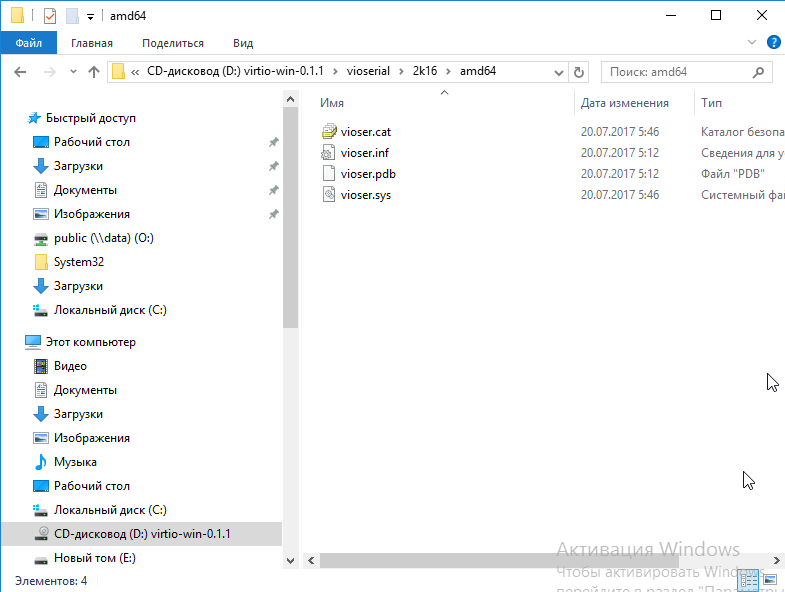
Устанавливаем и проверяем, что QEMU Guest agent запущен в сервисах.
Qemu-guest-agent
Contents
Introduction — What is qemu-guest-agent
The qemu-guest-agent is a helper daemon, which is installed in the guest. It is used to exchange information between the host and guest, and to execute command in the guest.
In Proxmox VE, the qemu-guest-agent is used for mainly two things:
- To properly shutdown the guest, instead of relying on ACPI commands or windows policies
- To freeze the guest file system when making a backup (on windows, use the volume shadow copy service VSS).
Installation
You have to install guest-agent in each VM and then enable it, you can do that in the Proxmox VE Webinterface (GUI)
or via CLI: qm set VMID —agent 1
Guest
Linux
On Linux you have to simply install the qemu-guest-agent, please refer to the documentation of your system.
We show here the commands for Debian/Ubuntu and Redhat based systems:
on Debian/Ubuntu based systems (with apt-get) run:
and on Redhat based systems (with yum):
Depending on the distribution, the guest agent might not start automatically after the installation.
Start it either directly with
(should work for most distributions) or reboot the guest.
Windows
First you have to download the virtio-win driver iso (see Windows VirtIO Drivers).
Then install the virtio-serial driver:
- Attach the ISO to your windows VM (virtio-*.iso)
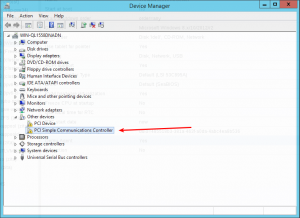
- Go to the windows Device Manager
- Look for «PCI Simple Communications Controller»
- Right Click -> Update Driver and select on the mounted iso in DRIVE:\vioserial\ \ where is your Windows Version (e.g. 2k12R2 for Windows 2012 R2)
After that, you have to install the qemu-guest-agent:
- Go to the mounted ISO in explorer
- The guest agent installer is in the directory guest-agent
- Execute the installer with double click (either qemu-ga-x86_64.msi (64-bit) or qemu-ga-i386.msi (32-bit)
After that the qemu-guest-agent should be up and running. You can validate this in the list of Window Services, or in a PowerShell with:
If it is not running, you can use the Services control panel to start it and make sure that it will start automatically on the next boot.
Testing that the communication with the guest agent is working
The communication with the guest agent takes place over a unix socket located in /var/run/qemu-server/ .qga You can test the communication qm agent:
if the qemu-guest-agent is correctly runnning in the VM, it will return without an error message.
Windows 10 guest best practices
Contents
Introduction
This is a set of best practices to follow when installing a Windows 10 guest on a Proxmox VE server 6.x. Right now it’s a work in progress.
Install
Prepare
To obtain a good level of performance, we will install the Windows VirtIO Drivers during the Windows installation.
- Create a new VM, select «Microsoft Windows 10/2016/2019» as Guest OS and enable the «Qemu Agent» in the System tab. Continue and mount your Windows 10 ISO in the CDROM drive
- For your virtual hard disk select «SCSI» as bus with «VirtIO SCSI» as controller. Set «Write back» as cache option for best performance (the «No cache» default is safer, but slower) and tick «Discard» to optimally use disk space (TRIM).
- Configure your memory settings as needed, continue and set «VirtIO (paravirtualized)» as network device, finish your VM creation.
- For the VirtIO drivers, upload the driver ISO (use the stable VirtIO ISO, download it from here) to your storage, create a new CDROM drive (use «Add -> CD/DVD drive» in the hardware tab) with Bus «IDE» and number 3. Load the Virtio Drivers ISO in the new virtual CDROM drive.
- Now your ready to start the VM, just follow the Windows installer.
Launch Windows install
- After starting your VM launch the noVNC console
- Follow the installer steps until you reach the installation type selection where you need to select «Custom (advanced)»
- Now click «Load driver» to install the VirtIO drivers for hard disk and the network.
- Hard disk: Browse to the CD drive where you mounted the VirtIO driver and select folder «vioscsi\w10\amd64» and confirm. Select the «Red Hat VirtIO SCSI pass-through controller» and click next to install it. Now you should see your drive.
- Network: Repeat the steps from above (click again «Load driver», etc.) and select the folder «NetKVM\w10\amd64», confirm it and select «Redhat VirtIO Ethernet Adapter» and click next.
- Memory Ballooning: Again, repeat the steps but this time select the «Balloon\w10\amd64» folder, then the «VirtIO Balloon Driver» and install it by clicking next. With these three drivers you should be good covered to run a fast virtualized Windows 10 system.
- Choose the drive and continue the Windows installer steps.
HINT: There is a video showing the process for a Windows Server 2016 installation which is the same as for Windows 10.
Install Guest Agent and Services
Guest Agent
If you enabled the Qemu Agent option for the VM the mouse pointer will probably be off after the first boot.
To remedy this install the «Qemu Guest Agent». The installer is located on the driver CD under guest-agent\qemu-ga-x86_64.msi.
Drivers and Services
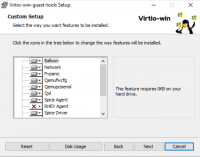
The easiest way to install missing drivers and services is to use the provided MSI installer. It is available on the driver CD since version «virtio-win-0.1.173-2».
Run the «virtio-win-gt-x64.msi» file located directly on the CD. If you do not plan to use SPICE you can deselect the «Qxl» and «Spice» features. Restart the VM after the installer is done.
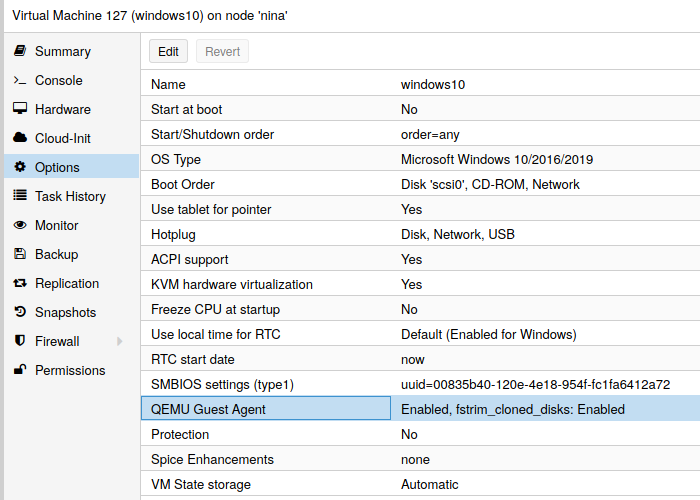
After all this the RAM usage and IP configuration should be shown correctly in the summary page of the VM.
For more information and configuration about ballooning, see Dynamic Memory Management
Check for missing drivers
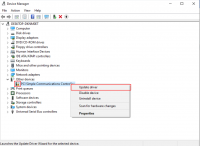
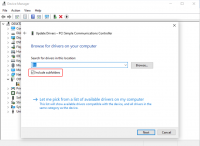
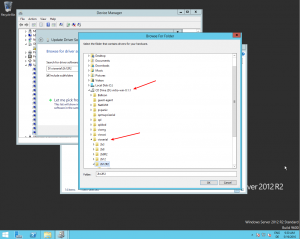
Go to the Device Manager to see if there are any drivers missing. For any unknown device:
- Right click an select «Update driver».
- Select «Browse my computer for driver software».
- Select the Driver CD. Make sure that «Include subfolders» is checked.
- Once a driver has been found you might be prompted with a security warning asking if you «Would like to install this device software». Click «Install».
Further information
Disk-Image Format: raw vs qcow2
Raw file format provides slightly better performance while qcow2 offers advanced features such as copy on write and Live_Snapshots. Since V2.3, qcow2 is the default format.
VirtIO drivers
Make it really easy: Build your ISO with drivers already included: Windows guests — build ISOs including VirtIO drivers
Windows 2019 guest best practices
Contents
Introduction
This is a set of best practices to follow when installing a Windows Server 2019 guest on a Proxmox VE server 6.x.
Install
Prepare
To obtain a good level of performance, we will install the Windows VirtIO Drivers during the Windows installation.
- Create a new VM, select «Microsoft Windows 10/2016/2019» as Guest OS and enable the «Qemu Agent» in the System tab. Continue and mount your Windows Server 2019 ISO in the CDROM drive
- For your virtual hard disk select «SCSI» as bus with «VirtIO SCSI» as controller. Set «Write back» as cache option for best performance (the «No cache» default is safer, but slower) and tick «Discard» to optimally use disk space (TRIM).
- Configure your memory settings as needed, continue and set «VirtIO (paravirtualized)» as network device, finish your VM creation.
- For the VirtIO drivers, upload the driver ISO (use the stable VirtIO ISO, download it from here) to your storage, create a new CDROM drive (use «Add -> CD/DVD drive» in the hardware tab) with Bus «IDE» and number 3. Load the Virtio Drivers ISO in the new virtual CDROM drive.
- Now your ready to start the VM, just follow the Windows installer.
Launch Windows install
- After starting your VM launch the noVNC console
- Follow the installer steps until you reach the installation type selection where you need to select «Custom (advanced)»
- Now click «Load driver» to install the VirtIO drivers for hard disk and the network.
- Hard disk: Browse to the CD drive where you mounted the VirtIO driver and select folder «vioscsi\2k19\amd64» and confirm. Select the «Red Hat VirtIO SCSI pass-through controller» and click next to install it. Now you should see your drive.
- Network: Repeat the steps from above (click again «Load driver», etc.) and select the folder «NetKVM\2k19\amd64», confirm it and select «Redhat VirtIO Ethernet Adapter» and click next.
- Memory Ballooning: Again, repeat the steps but this time select the «Balloon\2k19\amd64» folder, then the «VirtIO Balloon Driver» and install it by clicking next. With these three drivers you should be good covered to run a fast virtualized Windows 10 system.
- Choose the drive and continue the Windows installer steps.
HINT: There is a video showing the process for a Windows Server 2016 installation which is the same as for Windows Server 2019.
Install Guest Agent and Services
Guest Agent
If you enabled the Qemu Agent option for the VM the mouse pointer will probably be off after the first boot.
To remedy this install the «Qemu Guest Agent». The installer is located on the driver CD under guest-agent\qemu-ga-x86_64.msi.
Drivers and Services
The easiest way to install missing drivers and services is to use the provided MSI installer. It is available on the driver CD since version «virtio-win-0.1.173-2».
Run the «virtio-win-gt-x64.msi» file located directly on the CD. If you do not plan to use SPICE you can deselect the «Qxl» and «Spice» features. Restart the VM after the installer is done.
After all this the RAM usage and IP configuration should be shown correctly in the summary page of the VM.
For more information and configuration about ballooning, see Dynamic Memory Management
Check for missing drivers
Go to the Device Manager to see if there are any drivers missing. For any unknown device:
- Right click an select «Update driver».
- Select «Browse my computer for driver software».
- Select the Driver CD. Make sure that «Include subfolders» is checked.
- Once a driver has been found you might be prompted with a security warning asking if you «Would like to install this device software». Click «Install».
Further information
Disk-Image Format: raw vs qcow2
Raw file format provides slightly better performance while qcow2 offers advanced features such as copy on write and Live_Snapshots. Since V2.3, qcow2 is the default format.
VirtIO drivers
Make it really easy: Build your ISO with drivers already included: Windows guests — build ISOs including VirtIO drivers


