- Windows 2012 guest best practices
- Contents
- Introduction
- Install
- Prepare
- Launch Windows install
- Install Guest Agent and Services
- Guest Agent
- Drivers and Services
- Check for missing drivers
- Further Information
- RAW vs QCOW2
- VirtIO Drivers
- Windows 2008 guest best practices
- Contents
- Introduction
- Install
- Prepare
- Launch Windows install
- Install additional VirtIO drivers
- further info
- raw vs qcow2
- virtio drivers
- Power settings
- Windows 2016 guest best practices
- Contents
- Introduction
- Install
- Prepare
- Launch Windows install
- Install Guest Agent and Services
- Guest Agent
- Drivers and Services
- Check for missing drivers
- Further information
- Disk-Image Format: raw vs qcow2
- VirtIO drivers
- Windows 2003 guest best practices
- Contents
- Introduction
- raw vs qcow2
- virtio storage drivers
- Network
- E1000 NIC
- Virtio
- Packet Capture Fix
- KVM Network Performance
- Miscellaneous hints
- Power management
- Clock Drift
Windows 2012 guest best practices
Contents
Introduction
This is a set of best practices to follow when installing a Windows Server 2012(R2) guest on a Proxmox VE server 6.x.
Install
Prepare
To obtain a good level of performance, we will install the Windows VirtIO Drivers during the Windows installation.
- Create a new VM, select «Microsoft Windows 8.x/2012/2012r2» as Guest OS and enable the «Qemu Agent» in the System tab. Continue and mount your Windows Server 2012 ISO in the CDROM drive
- For your virtual hard disk select «SCSI» as bus with «VirtIO SCSI» as controller. Set «Write back» as cache option for best performance (the «No cache» default is safer, but slower) and tick «Discard» to optimally use disk space (TRIM).
- Configure your memory settings as needed, continue and set «VirtIO (paravirtualized)» as network device, finish your VM creation.
- For the VirtIO drivers, upload the driver ISO (use the stable VirtIO ISO, download it from here) to your storage, create a new CDROM drive (use «Add -> CD/DVD drive» in the hardware tab) with Bus «IDE» and number 3. Load the Virtio Drivers ISO in the new virtual CDROM drive.
- Now your ready to start the VM, just follow the Windows installer.
Launch Windows install
- After starting your VM launch the noVNC console
- Follow the installer steps until you reach the installation type selection where you need to select «Custom (advanced)»
- Now click «Load driver» to install the VirtIO drivers for hard disk and the network.
- Hard disk: Browse to the CD drive where you mounted the VirtIO driver and select folder «vioscsi\2k12\amd64» and confirm. Select the «Red Hat VirtIO SCSI pass-through controller» and click next to install it. Now you should see your drive.
- Network: Repeat the steps from above (click again «Load driver», etc.) and select the folder «NetKVM\2k12\amd64», confirm it and select «Redhat VirtIO Ethernet Adapter» and click next.
- Memory Ballooning: Again, repeat the steps but this time select the «Balloon\2k12\amd64» folder, then the «VirtIO Balloon Driver» and install it by clicking next. With these three drivers you should be good covered to run a fast virtualized Windows 10 system.
- Choose the drive and continue the Windows installer steps.
HINT: There is a video showing the process for a Windows Server 2016 installation which is the same as for Windows Server 2012.
Install Guest Agent and Services
Guest Agent
If you enabled the Qemu Agent option for the VM the mouse pointer will probably be off after the first boot.
To remedy this install the «Qemu Guest Agent». The installer is located on the driver CD under guest-agent\qemu-ga-x86_64.msi.
Drivers and Services
The easiest way to install missing drivers and services is to use the provided MSI installer. It is available on the driver CD since version «virtio-win-0.1.173-2».
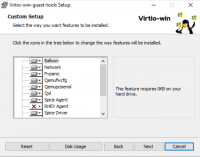
Run the «virtio-win-gt-x64.msi» file located directly on the CD. If you do not plan to use SPICE you can deselect the «Qxl» and «Spice» features. Restart the VM after the installer is done.
After all this the RAM usage and IP configuration should be shown correctly in the summary page of the VM.
For more information and configuration about ballooning, see Dynamic Memory Management
Check for missing drivers
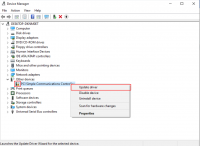
Go to the Device Manager to see if there are any drivers missing. For any unknown device:
- Right click an select «Update driver».
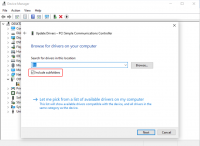
- Select «Browse my computer for driver software».
- Select the Driver CD. Make sure that «Include subfolders» is checked.
- Once a driver has been found you might be prompted with a security warning asking if you «Would like to install this device software». Click «Install».
Further Information
RAW vs QCOW2
The RAW file format provides slightly better performance WHILE qcow2 offers advanced features such as copy on write and Live_Snapshots independent of the backing storage. Since Proxmox VE version 2.3, qcow2 is the default format.
VirtIO Drivers
Make it really easy:Build your ISO with drivers already included: Windows guests — build ISOs including VirtIO drivers
Windows 2008 guest best practices
Contents
Introduction
This is a set of best practices to follow when installing a Windows Server 2008 R2 guest on a Proxmox VE server 2.x (2.3 at time of writing). Right now it’s a work in progress but hopefully soon it will be a comprehensive and reliable document. Please feel free to add to it, even if just to pose a potential best practice.
Install
Prepare
- After clicking «Create VM» enter a Name: for your vm, select your Resource Pool (if you have one) and click Next
- Select Microsoft Windows 7/2008 in the OS tab and click Next.
- Select an ISO Image: for Windows Server 2008 in the CD/DVD tab and click Next.
- Select Bus/Device: IDE, Storage: «your preferred storage» and Cache: Write back in the Hard Disk tab and click Next.
- Select number of Sockets and cores (the default of 1 is mostly sufficient) in the CPU tab and click Next.
- Select Automatically allocate memory and set the Maximum memory to a number you may require in the memory tab and click Next.
- Select Model: VirtIO (paravirtualized) in the Network tab and click Next
- Click finish and go to the Hardware tab of your newly created VM and click Add -> CD/DVD drive
- Select Storage:local and ISO image: virtio-win-x.x.iso and click create.
- To add a temporary disk for installing VirtIO block driver go to the Hardware tab of your newly created VM again and click Add -> Hard Disk
- Select Bus/Device: VIRTIO, Storage: «your preferred storage» and Cache: Write back and click Add
Launch Windows install
- start your newly created virtual machine using the «Start» link in the upper right.
- wait until the vm icon has turned white before you login using the «Console» link in the upper right. (NOTE: Sometimes the java console does not start at the first attempt. Please click refresh/reload in this case)
- Start the server install with «Install Now» and select the Operating System Flavor you like and click next and select «Custom: Install Windows only»
- Wait until Windows is installed and select a Password for the local Administrator account and login to Windows.
Install additional VirtIO drivers
- Start Explorer, Go to CDROM, copy folder WIN7\AMD64 to C:\Program Files\ and rename AMD64 to C:\Program Files\VirtIO
- open Device Manager and right click on Other Devices -> Ethernet Controller and select update driver software
- select «Browse my computer» select folder «C:\Program Files\VirtIO» and click «Install» for Red Hat VirtIO Ethernet Adapter.
- again in Device Manager right click on Other Devices -> PCI Device and select update driver software
- again «Browse my computer» select folder «C:\Program Files\VirtIO» and click «Install» for VirtIO Ballon Driver.
- open a powershell window, cd to «C:\Program Files\VirtIO» and enter: blnsvr.exe -i.
The BallonService that can help free up memory is installed. The BallonService is also responsible for displaying the correct amount of memory in the Proxmox console.
further info
raw vs qcow2
Raw file format provides better performance while qcow2 offers advanced features such as copy on write and snapshots. As of Qemu 1.4 / PVE 2.3 qcow2 is expected to provide superior performance.
virtio drivers
Use virtio dirvers for best performance. More info: Paravirtualized Block Drivers for Windows
Power settings
- In Windows Server 2008, you need to disable the ‘Shutdown Event Tracker’. This setting in Group Policy. If the server is part of a domain, you need to edit the group policy for the organizational unit with the server. If you’re not using a domain, you can edit the local group policy. This can be accessed by doing the following:
- Start -> Run -> gpedit.msc -> ok -> open «Computer Configuration» then «Policy» then «Administrative Templates» then «System». In the right pane, double click on ‘Display Shutdown Event Tracker’ and select ‘disable’ and OK. To make sure the new group policy is applied. Go to Start -> run -> cmd -> ok and type in ‘gpupdate /force’ without the quotes. Now when you select shutdown, you won’t be promoted with the box asking why you are shutting down the server.
- In order to make Windows 2008 R2 guest shutdown cleanly on the event of a shutdown (power button) on the Proxmox VE host you need make the following changes:
- Control Panel -> System and Security -> Power Options -> Edit Plan Settings -> Turn off the display: Never
Windows 2016 guest best practices
Contents
Introduction
This is a set of best practices to follow when installing a Windows Server 2016 guest on a Proxmox VE server 6.x.
Install
Prepare
To obtain a good level of performance, we will install the Windows VirtIO Drivers during the Windows installation.
- Create a new VM, select «Microsoft Windows 10/2016/2019» as Guest OS and enable the «Qemu Agent» in the System tab. Continue and mount your Windows Server 2016 ISO in the CDROM drive
- For your virtual hard disk select «SCSI» as bus with «VirtIO SCSI» as controller. Set «Write back» as cache option for best performance (the «No cache» default is safer, but slower) and tick «Discard» to optimally use disk space (TRIM).
- Configure your memory settings as needed, continue and set «VirtIO (paravirtualized)» as network device, finish your VM creation.
- For the VirtIO drivers, upload the driver ISO (use the stable VirtIO ISO, download it from here) to your storage, create a new CDROM drive (use «Add -> CD/DVD drive» in the hardware tab) with Bus «IDE» and number 3. Load the Virtio Drivers ISO in the new virtual CDROM drive.
- Now your ready to start the VM, just follow the Windows installer.
Launch Windows install
- After starting your VM launch the noVNC console
- Follow the installer steps until you reach the installation type selection where you need to select «Custom (advanced)»
- Now click «Load driver» to install the VirtIO drivers for hard disk and the network.
- Hard disk: Browse to the CD drive where you mounted the VirtIO driver and select folder «vioscsi\2k16\amd64» and confirm. Select the «Red Hat VirtIO SCSI pass-through controller» and click next to install it. Now you should see your drive.
- Network: Repeat the steps from above (click again «Load driver», etc.) and select the folder «NetKVM\2k16\amd64», confirm it and select «Redhat VirtIO Ethernet Adapter» and click next.
- Memory Ballooning: Again, repeat the steps but this time select the «Balloon\2k16\amd64» folder, then the «VirtIO Balloon Driver» and install it by clicking next. With these three drivers you should be good covered to run a fast virtualized Windows 10 system.
- Choose the drive and continue the Windows installer steps.
HINT: There is a video showing the process for a Windows Server 2016 installation which is the same as for Windows Server 2016.
Install Guest Agent and Services
Guest Agent
If you enabled the Qemu Agent option for the VM the mouse pointer will probably be off after the first boot.
To remedy this install the «Qemu Guest Agent». The installer is located on the driver CD under guest-agent\qemu-ga-x86_64.msi.
Drivers and Services
The easiest way to install missing drivers and services is to use the provided MSI installer. It is available on the driver CD since version «virtio-win-0.1.173-2».
Run the «virtio-win-gt-x64.msi» file located directly on the CD. If you do not plan to use SPICE you can deselect the «Qxl» and «Spice» features. Restart the VM after the installer is done.
After all this the RAM usage and IP configuration should be shown correctly in the summary page of the VM.
For more information and configuration about ballooning, see Dynamic Memory Management
Check for missing drivers
Go to the Device Manager to see if there are any drivers missing. For any unknown device:
- Right click an select «Update driver».
- Select «Browse my computer for driver software».
- Select the Driver CD. Make sure that «Include subfolders» is checked.
- Once a driver has been found you might be prompted with a security warning asking if you «Would like to install this device software». Click «Install».
Further information
Disk-Image Format: raw vs qcow2
Raw file format provides slightly better performance while qcow2 offers advanced features such as copy on write and Live_Snapshots. Since V2.3, qcow2 is the default format.
VirtIO drivers
Make it really easy: Build your ISO with drivers already included: Windows guests — build ISOs including VirtIO drivers
Windows 2003 guest best practices
Contents
Introduction
This is a set of best practices to follow when installing a Windows 2003 guest on a Proxmox VE server. Right now it’s a work in progress. Please feel free to add to it, even if just to pose a potential best practice.
raw vs qcow2
Raw file format provides better performance while qcow2 offers advanced features such as copy on write and snapshots.
virtio storage drivers
Note: the latest VirtIO iso do not include drivers for Windows 2003. You need to download an older version.
Network
E1000 NIC
Use e1000 NIC. It’s stable and performs well. BUT only with the latest drivers from Intel, download from intel.com! (If you use the integrated drivers, the device manager shows a working NIC, but it does not.)
Windows Server 2003 R2 SP2 ships with drivers that do work, but the ones from intel are newer.
Virtio
Use virtio driver as these are kept updated by Fedora virtio NIC drivers need to be loaded post install & can be found here : https://fedorapeople.org/groups/virt/virtio-win/direct-downloads/latest-virtio/ Information on install can be found here : http://pve.proxmox.com/wiki/Paravirtualized_Network_Drivers_for_Windows
Note: the latest VirtIO iso do not include drivers for Windows 2003. You need to download an older version.
Packet Capture Fix
I highly recommend to add this regfix http://www.intel.com/support/de/network/sb/cs-005897.htm (http://www.intel.com/support/network/sb/CS-005897.htm?wapkw=%284D36E972%29 in english). HKEY_LOCAL_MACHINE\SYSTEM\ControlSet001\Control\Class\<4d36e972-e325-11ce-bfc1-08002be10318>\00xx where you need to search for your network card an add a DWORD «MonitorModeEnabled»=»1». ControlSet001 can be CurrentControlSet.
KVM Network Performance
Apply the changes mentioned on the KVM Windows TCP/IP Performance page.
Miscellaneous hints
Power management
- In order for the Windows 2003 guest to shutdown cleanly in the event of a shutdown on the Proxmox VE host you need to:
- enable (Start -> Run -> secpol.msc -> «Security Settings\Local Policies\Security Options»)
- «Shutdown: Allow system to be shut down without having to log on».
- «Interactive logon: Do not require CTRL+ALT+DEL»
- disable logon screen screensaver using regedit
- Optional: It may also be useful to set Shutdown Warning Dialog Timeout. This can be done with the following .reg file
Alternatively you can you can use the following adm template to apply it via GPO
NOTE: For this policy to be visible in the Group Policy Object Editor the Only show policy settings that can be fully managed filter must be unchecked.
Clock Drift
If you have any problems with the time on your VM drifting, please see the Guest Time Drift document.


