- PTGui
- Create high quality panoramas
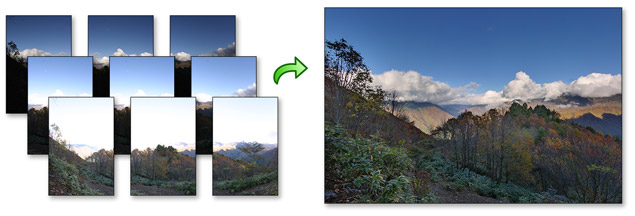
- Automatic
- Powerful
- Spherical Panoramas
- Gigapixel Panoramas
- HDR Panoramas
- Little Planet
- More features
- Gallery
- Learn
- PTGui Pro 10.0.11 — создания панорамных изображений
- PTGui Pro for Mac OS X 12.7
- Search Download:
- PTGui Pro for Mac OS X 12.7
- PTGui Pro for Mac OS X Full Download Summary
- PTGui Pro for Mac OS X 12.7 Full Description
- Support / FAQ
- Documentation and Tutorials
- Getting support
- Contact us
- Frequently asked questions
PTGui
Create high quality panoramas
Automatic
Powerful
Spherical Panoramas
Create fully spherical 360° x 180° panoramas. PTGui includes interactive panorama viewers both for local viewing on your computer, and for embedding in a web page.
Look around, up and down in the scene by clicking and dragging with the mouse.
![]()
Gigapixel Panoramas
HDR Panoramas

Little Planet
More features
Give PTGui a try! The trial version is fully functional, there’s no time limit, but stitched panoramas have a visible watermark.
Or purchase a license and start creating your own panoramas! A personal license for PTGui costs € 125 or US$ 149.
Gallery
«,»/galleryv2_images/spheretiles/perseverance_»,»The images for this panorama were obtained by NASA’s Mars Perseverance Rover’s 22-110mm Mastcam-Z camera. The mosaic, which stretches about 30,000 pixels width, includes 143 images taken on Sol 3 (February 21, 2021).
«,»/galleryv2_images/zoomify/david-osborn-photography-photoshopworkshops»,»Old town hall, Prague, Czech Republic. 20 frames stitched with PTGui. I teach landscape photography workshops using PTGui in my workflow.
Learn
First check out our video tutorials, these explain how to properly shoot images for a panorama, and how to stitch them with PTGui.
For in-depth tutorials on subjects like HDR, Masking and Viewpoint Correction see Tutorials »
Extensive documentation for every function is available by pressing F1 in PTGui (on Mac: fn + F1).
If you get stuck, check the Frequently Asked Questions (and answers): Support / FAQ »
In case your question is not answered there, ask for help in the Support Forum »
For tutorials written by PTGui users, books, workshops and panorama hardware: Links »
PTGui 12 released!
Mar 10, 2021 — We’re extremely happy to release the next major update of PTGui, version 12. more »
Источник
PTGui Pro 10.0.11 — создания панорамных изображений
PTGui Pro для Mac OS это профессиональная программа для создания панорамных изображений. PTGui Pro 9 имеет два режима работы — базовый, предназначенный для начинающих (в таком случае можно буквально в два клика мышью собрать вполне качественную панораму), и расширенный режим, рассчитанный на профессионалов. Программа может работать с несколькими рядами изображений и поддерживает склеивание сотен фотографий в рамках одного проекта. PTGui Pro 9 появилась поддержка изображения в формате HDR и OpenEXR, которые используются в профессиональной индустрии.
Возможности PTGui Pro:
- Создание сферических, цилиндрических или плоских панорам из любого числа исходных изображений.
- Полная автоматизация: создание панорамы в несколько щелчков мыши.
- Предварительный просмотр в реальном времени.
- Редактор панорам для визуального и диалогового редактирования.
- Полная поддержка 16-битного режима.
- Создание панорам, пригодных для обработки в Photoshop.
- Чтение информации EXIF c изображений, сделанных цифровыми камерами.
- Определение параметров линзы
Преимущества и особенности PTGui Pro:
- предварительный просмотр изображения с разными настройками без необходимости ожидания, пока будет выполнена обработка фотографий
- поддержка форматов hdr и openexr
- сохранение шаблонов с часто используемыми настройками
- создание HDR-панорам
- создание Гигапиксельных понорам из тысяч фотографий
- полный контроль слоев
- возможность автоматического создания панорам при полном контроле за операциями
- поддержка .psd формата
- создание панорам из изображений форматов — jpeg, tiff и psd.
Разработчик: New House Internet Services
Платформа: Apple Mac
Совместимость: OS X 10.6 или более поздняя версия
Язык интерфейса: Английский
Таблэтка: Присутствует (Блокировать доступ в интернет)
- Fix: Loading certain .png files would popup warning messages «known incorrect sRGB profile»
- Fix: error ‘Assertion failed: m_UnQueuedTasks.size() != 0’ for certain projects
- Fix: error ‘Assertion failed: clbuf() != 0’ for certain projects
- Fix: crash when aborting a stitch with uncompressed Photoshop output
- Fix: PTGui Web Viewer: In Firefox thin lines were visible around the tiles in the panorama. This is actually a Firefox problem with CSS 3D. To work around the problem the viewer now prefers to use WebGL in Firefox (if available).
- The Batch Stitcher can now handle projects for which the pixel format of one or more source images has been changed after the project file was saved. Previously the batch stitcher would abort with an error if, for example, an alpha channel was added to an image after the project was saved.
Скачать программу PTGui Pro 10.0.11 (30.37 MB):
Источник
PTGui Pro for Mac OS X 12.7
Search Download:
PTGui Pro for Mac OS X 12.7
PTGui Pro for Mac OS X Full Download Summary
User Rating: 2.8 ( 33 votes)

- File size: 25.90 MB
- Platform: Mac OS X
- License: Trialware
- Price: $ 289.00
- Downloads: Total: 3080 | This Month: 2
- Released: Jun 22, 2021
- Publisher:New House Internet Services B.V.
- Publisher URL:https://www.ptgui.com/
PTGui Pro for Mac OS X 12.7 Full Description
PTGui is panoramic stitching software for Windows and Mac OSX. Originally developed as a Graphical User Interface for Panorama Tools (hence the name), PTGui now is a full featured photo stitching application. Use PTGui to stitch any number of photos into a panoramic image.
Some benefits of PTGui, when compared to other stitching software:
Automatic stitching: create panoramas with just a few mouse clicks
Manual mode: full control over the final result
Live preview: instantly see the effect of different settings, without the need to stitch first
Multi row panoramas: images can be stacked both horizontally and vertically
Many panoramic projections
Stitch rotated and tilted images
Create HUGE panoramas: stitch hundreds of images into multi gigapixel panoramas
Support for jpeg, tiff and png source images
Support for many camera RAW source images (through dcraw)
Create panoramas in jpeg, tiff or Photoshop format
Photoshop large document (.psb) support (output only)
Layered Photoshop output, ideal for retouching
Full support for 16 bit images, for the best image quality
Panorama editor: interactive adjustment of the panorama perspective
QTVR ouput: directly create interactive QuickTime VR panoramas, or convert an existing panorama into QTVR format
Support for multiple processors / multiple core computers
Create templates with frequently used settings
Batch stitcher: prepare your projects and send them to the batch stitcher for stitching when you are away from your computer
Batch Stitcher can generate control points and set up a panorama
Batch Builder: scan folders for panoramic source images and automatically create projects based on a template
Support for Batch Lists (save and load a list of jobs for the Batch Stitcher)
Stitch and blend HDR source images into an HDR panorama
Stitch and blend bracketed LDR source images into an HDR panorama
Calculate camera response curve from bracketed LDR source images
Built in tone mapper
Support for OpenEXR (.exr) and HDR Radiance (.hdr) source images
Blend Priority parameter (useful for blending the nadir image in a spherical panorama)
Viewpoint correction
Vignetting, exposure and white balance correction
Global adjustment of exposure and white balance
Exposure Fusion
64 bit version (Windows only)
Configurable Project Settings: control the behaviour of templates, custom default file names and more
Источник
Support / FAQ
Documentation and Tutorials
The Video Tutorial on this site should help you get started using PTGui. Tutorials for advanced usage of PTGui can be found on the Tutorials page. And the Links page contains links to more tutorials, written by users of PTGui.
Detailed documentation for every feature and parameter is included with PTGui: in PTGui choose ‘Help -> Help for this tab’.
Getting support
If you have a question or problem please first check the list of frequently asked questions below. The answer to your question may already be listed here.
If this does not solve the problem, post your technical support questions to the PTGui Support Forum. You will quickly get an answer from the PTGui authors or from other users.
Contact us
For non-technical questions (e.g. related to purchasing, downloading, software activation) please contact us directly at support at ptgui dotcom. Technical support questions should be posted to the PTGui Support Forum.
Frequently asked questions
We send you your license key as soon as possible after receipt of your payment, though this may occasionally take up to 24 hours. If there is any delay we will send an order confirmation immediately after completing the order process. So if you don’t hear from us shortly after completing your order, this means that our email has failed to reach you. This occasionally happens, often caused by spam filter problems or full mailboxes.
If your mailbox has a Junk Mail folder, look for mail from PTGui Support . Many junk mail filters have a white list feature (often called ‘trusted senders’); please add our address to it.
Then login to your account (with the email address used for purchasing) to retrieve your license key and invoice. To login we’ll send you an access code by email; if you still don’t receive our mails please contact us from a different email address (at a different domain) so we can get back to you.
Yes, several older versions of PTGui and PTGui Pro are still available for licensed users. See the Downloads archive.
On macOS you may need to bypass Apple’s security restrictions (see Q4.8).
A personal license may be activated on up to two computers simultaneously, provided it is only used by the person to whom it is licensed. If multiple users use PTGui on those computers, multiple personal licenses or a company license should be purchased instead.
For the company license license keys are issued on a per machine basis: a separate license seat must be purchased for each computer on which the software is installed.
Other restrictions apply; see the End User License Agreement for details.
The license key is quite long and it is easy to make mistakes. Therefore please copy/paste the key from the original order confirmation email. Select the code and press Ctrl+C, then paste into PTGui using Ctrl+V. On mac use Cmd+C and Cmd+V instead. If you don’t have the license key anymore, login to your account to retrieve it. Be sure to login with the email address used for purchasing the license.
A license key purchased before September 2021 would look like this:
Keys purchased from September 2021 have a shorter format:
When you run PTGui for the first time on your computer it will ask you for your license key. This license key together with your computer’s hardware configuration is sent to our servers. Assuming the permitted total number of installations is not exceeded, we will then activate your license on this particular computer.
Subject to the conditions set forth in the End User License Agreement, a personal license may be activated on up to 2 computers, for personal use by the licensed person only. A company license consists of a number of seats; each seat can be activated on one computer.
A computer can be deactivated via Help — License Info — Deactivate. This makes the license key available for use on another computer. If you can no longer access the computer, go to your account and request us to deactivate your computer.
A license may be deactivated and reactivated as often as needed. However to prevent abuse of the deactivation facility, PTGui is required to verify the activation status at least once every 30 days. If an internet connection is available, this happens automatically while PTGui is running. Otherwise, offline activation must be repeated manually every 30 days.
Activation is not affected by small upgrades, like adding more memory. But larger upgrades may cause PTGui to consider the computer to be a different machine and ask for a new activation. Before performing a hardware upgrade it is therefore best to deactivate the license via Help — License Info — Deactivate. When you launch PTGui again after the upgrade, use the original license key to reactivate.
If you forgot to deactivate, you can request deactivation of your old hardware from your account, though processing may take up to 24 hours in this case.
For PTGui 11 and later: On the old computer, go to Help | License Info and press Deactivate. Now the license key can be used to install PTGui on the new computer. If you can no longer access the computer please go to your account and request us to deactivate your computer (but note that this may take up to 24 hours).
PTGui 10 and earlier can be deactivated by going to the About window, press Register and then press the Deactivate button. On Windows, ‘About’ can be found in the Help menu; on macOS it’s in the ‘PTGui [Pro]’ menu.
Each computer running PTGui must be activated. The activation process keeps track of the number of computers on which a PTGui license is used. Normally PTGui will ask for the license key to activate the software when it is run for the first time on a computer. This step can be automated by installing a provisioning file containing the license key. If such a provisioning file is present, the user does not have to enter the license key and PTGui will be activated automatically when it is run for the first time on a computer, using a license key from the provisioning file.
The provisioning file must be stored in this location on Windows computers:On macOS:On Linux:
licensekey.json should be a JSON file with the following structure:
If a proxy server is required for internet access, a «proxy» section can be added as follows:
Even if the «proxy» section is missing in the .json file, existing proxy settings (if any) in the PTGui configuration will still be used. The proxy settings can be edited in Options — Advanced. If the proxy settings are included in the .json file, the settings in the PTGui configuration will be updated whenever licensekey.json is used for activation.
The file can contain multiple license keys (2 in the first example above); PTGui will attempt to activate using the keys in this order. If a key is already activated on another computer, the next key will be used, until activation is succesful.
Note that PTGui license keys consist of two lines, but strings in JSON must be represented in a single line. PTGui ignores line endings in the license key, so the two lines of the license key can simply be concatenated into a single line. You can validate the syntax of your JSON file using (e.g.) JSONLint.
If activation fails, an error message is displayed and PTGui will show the regular activation window. The provisioning file will only be used if PTGui is not yet activated. If PTGui is already activated on a particular computer, licensekey.json will be ignored.
To install PTGui on multiple Windows computers in the network you can script your deployment system to run the PTGui installer in silent mode as follows (replace PTGuiSetup.exe with the actual file name of the installer):Note that the options are case sensitive, so use a capital /S and /D. The installer can be run without uninstalling a previous version first.
On a Mac no installation is necessary, just copy the PTGui application bundle into the Applications folder.
A license can be deactivated on a computer as usual, through Help — License Info — Deactivate from within PTGui on the licensed computer. If this is not possible, remote deactivation can be requested from your account. Be sure to remove licensekey.json after deactivation, otherwise PTGui will be reactivated automatically and silently when it is launched again.
For activation PTGui needs to be able to contact the activation server (see Q2.11). Also, PTGui needs to be able to create the file C:\ProgramData\PTGui\reg.dat and update it occasionally (reactivation is needed every 30 days) so appropriate permissions to this folder must be given to all users running PTGui.
To activate your license on your computer PTGui needs to contact the license server. This may fail if there is no internet connection or if the computer is behind a corporate firewall.
If there is a firewall, it should be configured to permit outgoing network connections to activation1.ptgui.com on TCP port 443. If necessary PTGui can use a proxy server to access the internet (see Q2.12).
If internet access is not available or restricted, PTGui offers an offline activation option: in the activation window press the Activate Offline button and follow the instructions.
A proxy server can be configured by pressing the Proxy button in the activation window, or in Options / Preferences — Advanced. Enter the URL of the proxy server, including the protocol and port number. For example:
http://proxy.example.com:8888 (HTTP proxy)
socks5://proxy.example.com:1080 (SOCKS proxy)
An HTTP proxy server should support the CONNECT keyword for HTTPS connections.
A personal license is licensed to a single person; only this person is permitted to use PTGui. For this reason a personal license is activated for a single user account on the computer only. For more information see Q1.5.
A company license is licensed per computer, and PTGui may be used by any person on that computer. Therefore the company license can be activated for all users on a computer.
To do so, ensure that all users have read and write permissions to this folder: (Windows) or (macOS). Activation data will be stored in a file named reg.dat in this folder. When activating PTGui with a company license key, and the above folder can be written to, PTGui will ask whether the license should be activated for all users on the computer. Answer Yes to do so. If PTGui was already activated for a single user, first deactivate the software via Help — License Info — Deactivate. Then re-activate the software by entering the license key after ensuring all users have write permissions to the above folder.
PTGui includes a viewer for publishing panoramas on a website. See Q6.15 for more information.
The web viewer included with PTGui is just a basic viewer for publishing individual panoramas. For a true virtual tour consisting of multiple panoramas linked by hotspots, clickable floor plans, etc, dedicated panorama publishing software exists. All panorama publishing software can load panoramas in 360 x 180 degree equirectangular projection, as created by PTGui. See Q6.15 for software recommendations.
Yes, PTGui uses LibRaw which allows it to read RAW files produced by many cameras.
Note that RAW files are not regular image files. The RAW file records the data straight from the camera’s sensor, which needs to be demosaiced and processed further before it can be used. Therefore RAW files should rather be seen as a digital ‘negative’ which first needs to be developed to get the actual image.
This development is done using standard settings, although PTGui Pro does allow you to adjust exposure and white balance in the HDR/Exposure tab.
If you need more control, use a dedicated RAW converter instead and save the converted RAW files as 16 bit TIFF images. The TIFF files can then be loaded into PTGui. This preserves the image quality and full dynamic range of the source images. Be sure to convert all source images in a panorama using the same settings, otherwise color or brightness differences may remain visible in the panorama.
Also, any adjustments made to the RAW file in Photoshop RAW (or other RAW converters) are ignored by PTGui. These programs do not actually change the RAW file; instead they write the modifications to a so-called sidecar (.xmp) file. The sidecar file contains closed proprietary data and cannot be read by other software. Therefore, if you need to make changes to RAW file or need finer control over the conversion, use a dedicated raw converter and save the images to 16 bit TIFF format.
Finally, since all RAW files are different it’s possible that LibRaw does not (yet) support your camera. In that case it’s also necessary to convert your images to TIFF before loading them into PTGui.
PTGui uses the open source LibRaw library for decoding raw files. See Supported Cameras on the LibRaw website for a list of cameras supported by LibRaw. PTGui can only read raw files supported by LibRaw. If LibRaw does not support your camera, use a dedicated raw converter to convert the images to 16 bit TIFF.
See Q3.7 for more information.
This copies the settings of another project to the current project, except for the images and the control points. This function is accessible both from the ‘Apply Template’ item in the File menu, and from the toolbar in PTGui. A template can be any PTGui project. In Tools/Options/Folders&Files, a folder can be configured where you store your templates (on Mac go to the PTGui menu, Preferences, Folders&Files). The template selection dialog will by default open in this folder. The ‘Apply Template’ button on the toolbar shows a drop down list of all templates in the configured template directory, for quick access.
Templates can be useful for a quick initialization of a project (lens settings, rough alignment of images), although this is usually not necessary since the Project Assistant can figure out the alignment of the panorama by itself.
Another use for templates is when you have an exact reproducable setup (high quality panoramic head with fixed angles). In this case you could copy all settings of a previous project and there would be no need for placing control points and optimizing.
By default, applying a template copies all settings from the template to the current project except for the source images and the control points. In PTGui Pro this behavior can be modified in the Project Settings tab, section ‘template behavior’.
By default applying a template copies all settings from the template except for the actual source images and the control points (see Q3.9). Control points are never copied since they are specific to the source images. For example a control point could originally point to the corner of a building in the template project, but in another project the same coordinates may be in the middle of plain blue sky. In other words the control points are meaningless outside the context of the original images.
If you just need a project to be stitched exactly like the template project, control points are not needed at all. Control points are only used by the optimizer to determine the best image parameters. The stitcher only uses the optimized image parameters and ignores the control points. Therefore it’s sufficient to apply the template (which copies the image parameters) and proceed straight to Create Panorama without running the optimizer.
Currently, the following metadata is copied to the generated panorama:
- EXIF: Original date and shooting date of the first image in the panorama, Author, Copyright info, GPS data, Camera make / model
- XMP metadata: Generally all XMP metadata is copied, except for metadata specific to the source image but not applicable to the panorama. For example metadata concerning focal length or the image size is not copied to the panorama, but replaced with appropriate values for the stitched image.
- Exposure data: exposure time, aperture and ISO sensitivity (only if identical for all source images)
- ICC Color Profile (for the selected output color space)
- For equirectangular panoramas: Google Photosphere Metadata, so that other applications will recognize the image as a spherical panorama.
- For rectilinear panos, PTGui also adds the FocalLength and FocalLengthIn35mm tag, corresponding to the field of view of the stitched panorama. In other words, the focal length that would give the same view on a full frame camera.
For HDR panoramas in PTGui Pro, the ‘blend planes’ output contains the exposure/iso/aperture of that particular exposure, for merging in external software.
Other EXIF data is currently not copied to the output file. The above metadata is written to JPEG, TIFF, psd and psb images. For .hdr no metadata is written. The .exr format does not support EXIF or XMP metadata and PTGui only includes the exposure information. The color profile is read and written in the .exr specific ‘chromaticities’ tag. But note that this is not widely supported. Many other applications (including Photoshop) ignore this entirely, and assume all .exr files have a linear sRgb color profile.
First of all, you don’t need a shift lens if you have PTGui! Shift lenses are often used for architectural photographs: photographing a building from ground level, while tilting the camera upwards, normally results in converging vertical lines. Shift lenses compensate for this effect by shifting the optical axis of the lens relative to the center of the image plane. The result is a photograph where parallel lines remain parallel.
The same effect can be achieved in PTGui: open the Panorama Editor window, press Ctrl-P to switch to ‘Panorama Edit’ mode. Now drag the panorama upwards or downwards until parallel lines in the scene are parallel in the panorama. You may need to increase the vertical field of view (using the slider to the right of the panorama).
If you do want to stitch images taken with a shift lens in PTGui, change the following parameters:
- Switch to Advanced mode by pressing the Advanced button in the side bar
- In the Lens Settings tab, select ‘Individual Shift Parameters’ for all images for which the lens was shifted
- Run the optimizer by pressing F5
Regardless whether a shift lens is used, or the panorama was shifted in the Panorama Editor, you will end up with some black space below or above the panorama. This can be removed by dragging yellow crop lines from the edges of the panorama in the panorama editor. The process is shown in detail in part two of our Video Tutorial.
PTGui stores its configuration data in this folder:
To open this folder, do Tools — Open Folder — PTGui Configuration Folder in PTGui. Most configuration data is stored in Configuration.xml in this folder. The default folders for Templates and Batch Lists also reside here.
The control point distance indicates how well a control point pair aligns in the panorama. When the distance is zero, the two points of a control point pair overlap exactly.
One should aim for the lowest control point distance possible, but the actual lowest distance that can be achieved depends on many factors. In general if your images were shot properly using a tripod with calibrated panorama head, a control point distance well below 5 should be achievable. Most remaining misalignments can usually be masked by the blender. An average distance higher than 5 usually indicates a problem, see Q5.4 for solutions.
It’s particularly important to look at ‘outliers’: if a control point has a distance of 20 while the average is below 5, this control point might have been placed on a moving object, or on a similar feature close to the proper location. Use the ‘Delete worst control points’ function (in the Control Points menu) to remove such outlying control points.
The Batch Stitcher of PTGui Pro can generate control points; it will do so if instructed by the ‘Do Align Images and save the modified project’ checkbox in the Project Settings. By default this is enabled if the control point generator has not yet been run for the project. This allows you to quickly generate a panorama in batch: start a new project, load your source images and press Save and Send to Batch Stitcher. The batch stitcher generates control points and stitches the panorama in one go.
After generating control points and aligning the images the batch stitcher overwrites the project file with the modified version. Since the Batch Stitcher will modify the project file, problems could occur if the project would remain opened at the same time in the main PTGui Pro window: both instances would be writing to the same project file, discarding each other’s changes.
For this reason, PTGui Pro will close the project after sending it to the batch stitcher if the Batch Stitcher is configured to modify the project. This ensures that only one instance of the project is open. A warning message is shown before the project is closed but the warning is no longer shown if ‘don’t show this again’ had been selected. To re-enable the warning message, go to Options/Preferences and click ‘Reset all warning messages’.
In previous version of PTGui, a temporary copy of the project would be sent to the batch stitcher. This functionality is still available through ‘Send Temporary Copy to Batch Stitcher’. This creates a copy of the current state of the project in a temporary file, which is sent to the batch stitcher for stitching. When stitching has finished the temporary project file is deleted by the batch stitcher.
If PTGui fails to properly align your images, the following question may appear:
«The optimizer failed to achieve a good alignment of the images. Possibly the current misalignment of the images causes the optimizer to get stuck. Re-initialization of the project may help in such a case. Would you like to re-initialize the project and try to optimize again?»
If you click OK, PTGui will reset the yaw, roll and pitch of all images to zero and reinitialize the lens settings based on the EXIF data. Then it will attempt to figure out the image positions from scratch and subsequently reoptimize the project.
In particular in cases where the optimizer got stuck in a so-called local minimum such an initialization from scratch can be the solution.
This function can be triggered manually using the Initialize and Optimize (in the Project menu).
No, PTGui will load the raw files as they came straight from the camera, any modifications are ignored. In Photoshop RAW files can be edited, but the changes are written to a ‘side car’ file (with the .xmp extension) rather than to the original raw file. The settings in the side car file are specific to the algorithms used by Photoshop and cannot be used by other applications.
To use the modified RAW files in PTGui, export them to 16 bit TIFF files and load those in PTGui instead. Since RAW files typically only have 12 or 14 bits per channel, the full dynamic range will be preserved by the 16 bit TIFF file, so there is no loss of quality.
Don’t attempt to align images manually: it’s impossible to get the required precision for a seamless stitch. Even if you would manage to accurately align an image to one neighbouring image, this would throw it out of alignment with its other neighbour images.
Instead, let the PTGui optimizer do all the hard work through control points. Control points tell PTGui which points of two images should overlap. By providing 3 or 4 control point for a pair of overlapping images, PTGui will know how they overlap and the optimizer will align the images with pixel accuracy.
For more information watch our our Video Tutorial.
By default (the Create Panorama tab will show ‘fix at 100% of optimum size’), PTGui will output your panorama at the so called Optimum Size. The optimum size is the output size at which the resolution of the panorama equals the resolution of the source images. For more information see Q3.26.
Because the optimum size depends on several parameters, including the focal length of the lens which is usually fine tuned by the optimizer, the optimum size may vary slightly after each optimization. This depends also on control point placement. If this fluctuation is unwanted, in the Create Panorama tab pick a desired size and select ‘Fix at . megapixels’. From now on PTGui will keep the number of pixels in the panorama constant.
The optimum size is the output size at which the resolution of the panorama equals the resolution of the source images. In other words, no detail from the source images is lost.
Because image warping is not uniform across the panorama, there is no true optimum size: some parts of the source images may get enlarged while other parts may be reduced in size. Therefore, somewhat arbitrarily, PTGui considers the optimum size to be the size where the angular resolution of the center of the source images equals the angular resolution of the center of the panorama. If images from multiple lenses are used, this calculation will be based on the source image having the highest resolution.
Because the optimum size depends on several parameters which are adjusted by the optimizer, the optimum size may vary slightly for different projects using the same lens. See Q3.25.
In PTGui 11 a new lens parameter, the ‘fisheye factor’ was introduced (see Q3.28). This allows it to perfectly model all practical fisheye projections. PTGui 10 didn’t include this parameter and used equidistant projection for all fisheye images. The difference between the actual projection and equidistant projection was modeled using the lens distortion (a/b/c) coefficients. When calculating the optimum size, the lens distortion coefficients are not taken into account, resulting in an error in the calculated optimum size. PTGui 11 does take the fisheye factor into account when calculating the optimum size.
In other words, the optimum size is calculated more accurately in PTGui 11 than in PTGui 10. Regardless, it’s still a somewhat arbitrary measure (see Q3.26) and it’s possible to output at any desired size.
There is no single fisheye projection, different fisheye lenses exhibit different optical projections. For example, equidistant, equisolid or orthographic fisheye lenses exist. For more information see Fisheye Projection (PanoTools wiki). Visually, these projections differ by the amount of compression or stretching of the image near the edge of the fisheye circle. PTGui up to version 10 simply modeled every fisheye lens using the equidistant projection. The deviation of the actual projection from equidistant projection was compensated for by using the a/b/c lens distortion correction polynomial. This worked, but with caveats: because the relation between focal length and field of view differs for each kind of projection, PTGui could misestimate the size of the cropping circle for circular fisheye lenses. And secondly, the control point generator would have more difficulty finding control points (especially near the edges of the image) if the wrong fisheye projection was used.
In PTGui 11 this was solved by introducing the Fisheye Factor parameter. Fisheye lenses are now modeled using the following formula:

Here, k is the fisheye factor, f is the focal length, θ is the angle of the light ray entering the lens and R is the radial distance from the image center of the projected light ray.
By varying the fisheye factor k the equation morphs into the different fisheye projections. Values of the fisheye factor for the common projections are:
Equidistant: k = 0
Stereographic: k = 0.5
Orthographic: k = -1.0
Equisolid: k = -0.5
Rectilinear (non-fisheye): k = 1.0
In normal use of PTGui the fisheye factor is initialized to the known value of the lens before running Align Images. PTGui knows the fisheye factor for many common models of fisheye lenses. If EXIF data is available PTGui can often recognize the brand and model of the fisheye lens automatically, and set the fisheye factor accordingly. If no EXIF data is available, the brand and model of the fisheye lens can be selected from a list. In practise no lens follows the above projection model exactly, therefore a/b/c lens distortion correction is used to compensate for any remaining small differences between the ideal and actual projection.
The fisheye factor of a lens can be determined by the PTGui optimizer. When optimizing the fisheye factor, care must be taken to avoid interference by the a/b/c lens distortion correction parameters: in the Lens Settings tab, press the Reset button to reset a/b/c to zero. Then in the Optimizer tab, enable optization of the fisheye factor and disable optimization of a/b/c. As always, for accurate optimization of the lens parameters, images without parallax should be used.
Yes, this is possible. Any version (trial, Pro, beta) can be installed in parallel to your current version of PTGui. In Windows, the installer will ask you for an installation folder (e.g. C:\Program Files\PTGui) and a Start Menu folder. If you enter different folder names, your current version will not be overwritten. On Mac, PTGui is distributed in a disk image (.dmg file). Double click the .dmg file to mount it. Inside there’s the PTGui application. Drag the application to the desktop, then rename the application. Finally move the application from the Desktop into the Applications folder.
PTGui project files will by default be opened in the last installed version. To change this under Windows: right click on a PTGui project file, at ‘Opens With’ click on Change, click ‘More Apps’, click ‘Look for another app on this PC’, then browse (under Program Files) to the particular version of PTGui to use.
On macOS: ctrl+click on a PTGui project file, select ‘Open With’, ‘Other. ‘, select the PTGui application to use, enable ‘Always Open With’ and click Open.
Keep in mind that the settings and license information are shared by all PTGui applications for the current user.
If you accidentally overwrote your licensed version of PTGui with a trial version, you can re-download your licensed version even if it was an older version; see Q1.8.
Many new features have been added to PTGui 12: automatic optimum seam placement, a new ‘zero overlap’ blending algorithm, color management and a new HDR processing workflow. Internally all processing is now done on linearized floating point pixel data. A new Post Processing side bar was added to the panorama editor for adjusting the toning curve and image saturation. The toning curve is now applied to raw files, which would look somewhat dull in PTGui 11. Color management ensures that out-of-gamut colors and clipped highlights after stitching and blending are properly handled.
We’ve tried hard to retain compatibility with PTGui 11, but all these changes mean that your stitched panorama may look somewhat different in PTGui 12 than in PTGui 11. First of all, if you are simply stitching properly manually exposed TIFF or JPG files, not using HDR, PTGui hardly needs to adjust anything to the images. The output will look very similar to the source images in terms of color and contrast, both in PTGui 11 and 12. But tone mapping, exposure fusion and raw conversion are subjective processes, and any changes we make here will have side effects, both positive and negative. A slight increase in the default contrast for example may be an improvement to one user for one specific panorama, but considered a degradation in another case. Default settings can be changed though!
If you’re just looking to get the same results as in PTGui 11 without any hassle: PTGui 11 is still available for download, see: Q1.8. You can even install PTGui 11 and 12 side by side on the same computer and run them at the same time: Q3.29. We’ve taken care to keep project files backwards and forward compatible as much as possible.
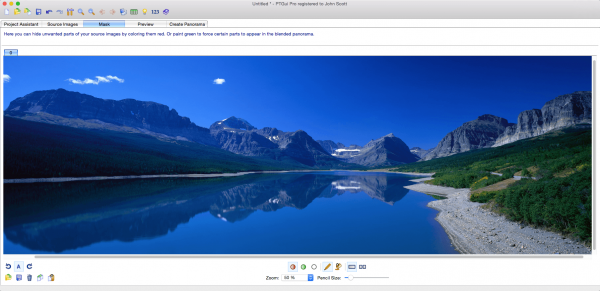
Automatic seam placement in PTGui Pro 12 means that the seams will be placed entirely different from PTGui 11. Generally this will make stitching errors less noticeable, but as a side effect objects may suddenly appear in the PTGui 12 panorama which would be hidden in the PTGui 11 panorama. It’s possible for example that PTGui 12 decides to show the tripod in the nadir of the panorama if this is considered to result in the optimum seam placement. This may happen even if a separate nadir image without tripod is available. PTGui is not smart enough to understand that the tripod is something you don’t want to show in the panorama. The solution is to mask any unwanted objects using red masks in the Mask tab. Just a coarse mask or a couple of red dots is sufficient: PTGui understands the mask is part of something that should be removed and it will attempt to route the seams around the entire object.
Also, automatic seam placement will cause the outer part of the source images to be used more, whereas PTGui 11 would simply place the seams in the middle of the overlap area, as far away as possible from the edges of all source images. Some lenses at wider aperture have better image quality in the center, and PTGui 12 may decide to use some of the worse parts of the source image. Again, seam placement can be adjusted by adding green or red masks.
And of course automatic seam placement can be disabled entirely by disabling ‘Find Optimum Seams’ in the Blending side bar of the panorama editor. You’ll also find a ‘precision’ slider there: moving this slider to the right will cause PTGui to calculate the seams at a higher resolution. But be careful, at the highest 1/1 setting it will take several minutes, or even hours, and use much memory. And the seams must be recalculated after every change to the panorama.
Another thing that’s changed in PTGui 12 is the blending. The new Zero Overlap blending algorithm works very well in combination with optimum seam placement. Because it doesn’t use any overlap it will give seamless results even if the seam is routed just very close around an object. The traditional multiband blending algorithm needs a certain amount of overlap and will cause the excluded object to still appear as a faint ‘ghost’ image if it is close to the seam. In general, Zero Overlap blending can also cope better with moving clouds and waves in water and it better handles exposure differences. But it may have trouble with finely patterned surfaces like ceilings or carpets. Also if a seam cuts through a moving object this may be more visible than with multiband blending. You can switch between Zero Overlap and Multiband in the Blending side bar to compare the results.
If you just want to have the same blending as with PTGui 11: disable ‘Find Optimum Seams’ and choose ‘Blender: Multiband’.
Handling of raw files was improved (in our opinion), but if you prefer the less contrasty look of PTGui 11, go to the Post Process tab in the panorama editor and reduce the ‘Shape’ and ‘Shift’ sliders of the Toning Curve closer to zero. Fine adjustments to the slider can be made by holding down the Shift key while dragging the slider. Settings can be saved to a file or to a template. And keep in mind that PTGui does not intend to replace a dedicated raw converter: images will definitely look better when you convert your raw files in Photoshop, Lightroom or another raw converter (see Q3.7).
The new Toning Curve is also applied as part of exposure fusion and tone mapping. The Post Processing tab replaces the Contrast and Saturation settings that were previously available in the Tone Mapping settings. If the tone mapped panorama is not to your taste, adjusting the Toning Curve or Saturation sliders in the Post Process tab may improve this. The response of the Sigma parameter (for Exposure Fusion) has slightly changed, again the advise is to experiment with the settings until the result is to your taste.
If all fails there’s still the option of outputting a 32 bit .exr file, or blend planes, from PTGui 12 and load this into PTGui 11 (or in a third party application) for tone mapping.
Handling of bracketed images has changed in PTGui Pro 12. In PTGui Pro 11 it was possible to stitch an HDR panorama from bracketed images without linking the images. In PTGui Pro 12, linking bracketed images is mandatory! Linking is required for getting optimum seam placement to work: when creating blend planes, the seams must be placed in the same location in each blend plane. To calculate the seams, PTGui must know which images belong to the same bracketed set, and you tell this by linking the bracketed images. If the images were taken by using the camera’s auto bracketing, they will follow a repeating exposure pattern. PTGui will recognize this and offer to link the images when running Align Images. You can also force PTGui to link the images by selecting Images -> Link HDR Bracketed Exposures. If PTGui reports that no bracketed sets were detected, this means that the exposure pattern is not repeating in exactly the same way for each bracketed set. You can still link images manually: go to the Source Images tab, select a group of images, right click and choose ‘Link Selected Images’. Repeat this for all bracketed sets.
Not linking bracketed exposures will lead to unexpected results in PTGui 12: the automatic optimum seam placement may decide to include or exclude entire images, because the same area is covered by multiple overlapping (bracketed!) images. Zero overlap blending will cause the excluded images not to be used at all. And optimizing or otherwise editing the panorama may completely change the seams, causing entirely different source images to be flipped into the panorama even when making just minor changes. Again, do Images -> Link HDR Bracketed Exposures to make sure that the images are linked.
Even though images have to be linked, it’s still possible to use hand held bracketed images. When linking the images, just tell PTGui that the images were not taken from a tripod. The images will get independent yaw/pitch/roll coordinates even though they are linked. There’s a new ‘Link’ checkbox in the Image Parameters tab to configure this for each set of bracketed image separately.
PTGui Pro 12 performs automatic optimum seam placement. Calculating the best location of a seam among millions of pixels takes considerable processing time. It’s also something that cannot easily be done in parallel: using a different starting point may result in a completely different optimum seam. Seam placement has a cascading effect: changing the seam at one side of the panorama may eventually affect the position of another seam at the opposite side. This cascading means that the seams have to be calculated sequentially and the process therefore cannot make efficient use of multiple CPU cores or the GPU.
If optimum seam placement is not desired, it can be disabled in the Blending side bar and the panorama will be stitched much faster. Switching to Multiband blending will speed up stitching even more, the new Zero Overlap blending is somewhat slower.
A normal application like PTGui (i.e. not a driver or a kernel process) is unable to crash an entire computer; the worst that could normally happen is the application itself crashing but not the entire computer.
If the computer crashes, shows a ‘blue screen’ error or spontaneously reboots this is usually indicating a problem with the hardware or a driver. It’s possible that you observe the problem only when running PTGui: stitching large panoramas places a heavy load on the processor, hard disk and memory. This could trigger any existing hardware problems for example due to the increased temperature of the processor, due to increased load on the power supply, or simply because any existing problem is more likely to be seen when the system is used intensively.
If you however observe crashes in PTGui but the operating system continues to run properly then this could be a bug in PTGui. The Windows version of PTGui includes a crash reporter; we encourage you to submit the crash data to us for analysis. Mac users please send the crash report to us at support at ptgui dotcom; crash reports on the Mac can be found in /Library/Logs/CrashReporter/.
When you press Align Images, PTGui analyzes your source images and looks for details which can be seen in multiple images. For example, the corner of a building might be visible in the right hand side of one image and in the left hand side of another image. On these matching details PTGui places so called Control Points. To see what control points look like, go to the Control Points tab in PTGui after you have run Align Images. In the Control Poins tab select two overlapping images by clicking the thumbnails above the images and you will see numbered markers indicating the matching features. Ultimately the control points are used by PTGui to set up the panorama: it warps and moves the images in such a way that the control points match as closely as possible.
If you see the above message, this means that PTGui was not able to find control points for all images. The human eye is still better in recognizing patterns than a computer and in this case you will need to help PTGui a bit. To do so, first open the Control Point Assistant (in the Tools menu). The Control Point Assistant will tell you what the problem is, for example ‘Image 4 does not have any control points’.
Besides single images lacking control points it’s also possible that there are clusters of images linked by control points: for example image 1,2 and 3 are linked by control points and image 4,5 and 6 are linked by control points, but there are no control points between images in either cluster. To create a panorama all images should directly or indirectly be linked by control points, so in this example adding control points between image 3 and 4 would solve the problem.
Suppose the Control Point assistant tells you that image 4 does not have control points: go to the Control Points tab in the main window, and choose image 4 in the left pane. In the right pane find an image which partially overlaps image 4 (most likely image 3 or image 5). Find an object which is visible in both images, click on that object in the left image and click on the same object in the right hand image. As you see a colored marker has been added. Repeat this until you have added at least 3 control points. Then go back to the Control Point Assistant and see if there are any other images that need control points.
When done, go back to the Project Assistant tab in the main window: the above error message is now gone. As the last step the project needs to be optimized: click on the blue underlined link to do this. The optimizer will re-align the images such that the control points match as closely as possible. Verify the result in the Panorama Editor window: the panorama should now be set up properly.
The above workflow is shown in detail in our Video Tutorial.
Sometimes an image contains no recognizable details at all (for example if the images contains pure blue sky only). In that case see Q6.28.
For more information use the on line help available for the Control Points tab and the Control Point Assistant window: in most screens you can get context help by pressing F1 (Windows) or Fn+F1 (Mac).
The orientation of the images the main window is synchronized with the orientation of the images in the stitched panorama. For example, if you rotate an image in the Panorama Editor 90 degrees clockwise, the image thumbnail in the Project Assistant will be rotated clockwise as well. And if you rotate the entire panorama 90 degrees, all images in the Project Assistant will be rotated too.
If PTGui seems to randomly rotate your images after running Align Images, most likely it was unable to properly align the panorama, resulting in misaligned and randomly rotated images in the Panorama Editor. It may seem that the misalignments are caused by the random rotation but it is in fact the other way round: due to the misalignments the images get randomly rotated in the panorama, and the orientation of the images in the Project Assistant simply reflect the orientation of the images in the panorama.
First of all, if you are new to PTGui check out our Video Tutorial. It may help you understand what the problem might be. In particular make sure that all images are taken from exactly the same viewpoint and that the camera is rotated around the entrance pupil of the lens (which is usually close to the front of the lens). In general a regular tripod is not suitable for taking panoramas; you need a dedicated panoramic head to ensure that the camera is rotated around the front of the lens and not around the tripod screw.
If this does not solve the issue please post your panorama to the PTGui support forum and we’ll be happy to take a look. Large files cannot be uploaded to the forum directly; instead create a zip file with your panorama and upload it to a file publishing site such as wetransfer, Dropbox or Google Drive. Then include the URL of the uploaded file in your forum post. To allow us to help you quickly, upload at least the PTGui project file (.pts). Depending on the problem we may need the image files as well.
This is caused by the fact that Photoshop isn’t aware that the left and right edge of the image wrap around. When doing local adjustments (in particular contrast enhancement) near one of the edges, pixels at the other edge should also be taken into account, otherwise a hard edge will be visible when the panorama is later wrapped around in a panorama viewer.
You can work around this limitation in Photoshop by extending the panorama: a section from the right hand side of the panorama is pasted next to the left hand side, and vice versa. Subsequent adjustments will then take properly into account the pixels ‘over the edge’. When done editing, reduce the panorama to the original size.
We’ve created a set of Photoshop scripts to accomplish this with a single mouse click: download PhotoshopExtendCanvas.zip. Please see readme.txt inside the zip file for installation instructions.
This may happen when installing older versions of PTGui on newer versions of macOS. Apple has locked down macOS to only allow running signed applications. Over the years Apple has changed the requirements for signing multiple times. The current PTGui version has the proper signatures but older PTGui versions will be rejected by macOS.
The signature verification can be bypassed as follows: Ctrl+click on the PTGui application, select ‘Open’. In the subsequent warning window, click ‘Open’.
QuickTime VR (or QTVR) was a special dialect in the QuickTime .mov video format supporting interactive playback of spherical panoramas. For many years this has been the format of choice for embedding panoramas in web pages: the QuickTime plugin was installed on every Mac and on many Windows computers (it was included with iTunes for Windows). With the introduction of QuickTime X in 2009, Apple has dropped support for QTVR panoramas. These days HTML5 is the format of choice for displaying panoramas on web pages (see Q6.15).
QTVR panoramas can still be viewed by installing QuickTime 7, but be aware that this creates a security risk: exploits for QuickTime 7 exist and Apple is no longer updating the software. That said:
Installing QuickTime Player 7 on your Mac
Download QuickTime 7 for Windows.
Windows users can alternatively use the DevalVR player (Unicode) which can also play back QTVR panoramas.
Pano2VR can be used to convert an existing QTVR .mov file to another format.
Seamless panoramic stitching requires that all images are taken from exactly the same viewpoint. Moving the viewpoint causes parallax which makes it impossible to stitch images perfectly. For more information about parallax see Q5.4 and watch the Video Tutorial.
This requirement is very critical: even photos taken from viewpoints spaced only a few centimeters can have significant parallax, causing clearly visible stitching errors on nearby objects. When taking panoramas with a single camera parallax should be avoided by using a panoramic tripod head: this ensures that the camera is rotated around the ‘no parallax point’ which is usually located near the front of the lens.
When using multiple cameras, parallax is unavoidable which means that it is simply impossible to stitch the images perfectly. This problem is particularly apparent in panoramic video because this can only be created from multiple cameras. The only real ‘solution’ is to lower your expectations and accept that stitching errors will be visible. That said, for the best results consider the following:
- Try to mount the cameras as closely as possible to reduce the parallax
- The effect of parallax diminishes as objects get further away from the camera. If there’s an object close to the camera try to make sure it is captured entirely in one of the images, instead of having a seam run through it.
- Making a stitching template for panoramic video is generally best done using images taken in a wide open space, placing control points only on distant objects (which don’t have much parallax due to the distance). This ensures that PTGui is able to correctly estimate the lens parameters. While you may be able to somewhat improve the stitching of a particular scene by adding extra control points on a nearby object, this will in fact degrade the stitching of other frames where the object or the camera has moved, so don’t do this when creating a stitching template.
- Enabling ‘Find Optimum Seams’ (in the Blending side bar of the panorama editor) can help to hide misalignments caused by parallax. On the other hand it is not suitable for stitching panoramic video or time lapse series: the seams will flip to different locations in each subsequent frame.
Essentally there are two different use cases for the batch builder:
- To stitch many panoramas using the exact same settings, without generating control points. This can be used for example with multi camera rigs, where all panoramas are guaranteed to have the same image orientations.
- or to automatically stitch a number of panoramas by just pointing PTGui to a folder with images. The images are taken for example by rotating the camera on a panoramic tripod head.
In the latter case the image positions in each panoramas will usually be slightly different. Even if the panoramic head has click stops, mechanical tolerances will cause small variations in the image orientations in each panorama. To compensate for this PTGui should analyze the images for each panorama and generate control points.
Whether the batch stitcher will generate control points is controlled by this setting in the project:
Project Settings -> Batch Stitcher actions -> Do ‘Align Images’ and save the modified project
This option should be checked in the template used in the Batch Builder, unless the image positions in each panorama will be absolutely identical.
If you are using a multi camera rig and need all panoramas to be stitched absolutely identically, uncheck this setting in your template:
Project Settings -> Batch Stitcher actions -> Do ‘Align Images’ and save the modified project
Also see Q4.11.
If you do require PTGui to generate control points but would like to keep the panorama size and projection as set in the template, see: Q6.24.
This is a known issue caused by a bug in Intel’s graphics driver. It’s affecting the PTGui Viewer only, the stitched panorama from PTGui should be fine. The problem seems to be limited to Windows computers with dual graphics processors (both a low power Intel integrated GPU and a more powerful AMD or NVIDIA discrete GPU). The problem can be solved by updating the Intel graphics driver. For laptops a driver package is usually made available on the laptop manufacturer’s website. Look for the driver package including the Intel graphics driver.
If a driver update is not possible, the problem can be solved by telling Windows 10 to always use the AMD or NVIDIA graphics (and not Intel’s integrated graphics) for the PTGui Viewer:
- Open the Windows 10 Settings app by pressing the Windows key + i
- Click on System
- Click on Display
- Scroll to the bottom and select ‘Graphics settings’
- Under ‘Graphics performance preference’ select ‘Classic app’
- Click Browse and browse to the PTGui Viewer application: C:\Program Files\PTGui\PTGuiViewer.exe
- The PTGui Viewer is now listed in the Graphics Settings window. Click its Options button, select ‘High performance’ and click Save
Another alternative is to use FSPViewer (which doesn’t use OpenGL) instead of the PTGui Viewer. See Q6.29.
This may happen on Windows machines with NVIDIA graphics hardware. Recently NVIDIA have released a driver update for Windows which appears to break GPU acceleration in PTGui 10. The problem does not seem to affect PTGui 11 and later.
If you don’t wish to upgrade to PTGui 11, you may do one of the following:
- Disable GPU acceleration in PTGui (see Options — Advanced)
- Or downgrade the GPU driver to an earlier version. NVidia’s driver version 397.64 is known to work. To download older nvidia drivers see: NVIDIA advanced driver search. But please understand that security problems may have been fixed in later drivers. Running older driver versions may be a security risk.
This problem occurs with older versions of the PTGui web viewer on recent versions of Firefox. It is fixed in the current version of the PTGui Viewer. Web pages created with Publish to Website in PTGui 11.28 should not exhibit the problem.
Источник


