Puppy Linux News
Puppy Linux in Virtual Machine
Puppy Linux 4.3.1rc2 in VirtualBox runs well, see the Forum article by playdayz.
. useful for those running Windows, so they might have a Puppy on their desktop.
. needs a physical machine with 1GB ram for VirtualBox and Puppy to run in Windows safely (or at least 768MB. )
1) download and install VirtualBox;
2) download and unpack this zip archive; the archive is 254MB and the unzipped folder is 274MB (the [size] increase over Puppy 4.3.1 is to install the VirtualBox services in order that all features will work; check download with md5sum = ee06f7ac6959b31e012aa8b352e9b849);
3) open VirtualBox and «File -> Import Appliance» and select the ovf file inside the folder Puppy431rc2. When it has been imported, select that virtual machine in VirtualBox and click Start. (Testing in XP, I had to manually enable some of the options such as USB and Network—just look at the list of options when you select Puppy 4.3.1 and click each option and then click the Enable box.)
See also vmPuppy 2.14X (Puppy with kernel 2.6.18 updated by ttuuxxx and running in VMWare).
Added by raffy October 15, 2009 (3:30PM)
stray77 on January 3, 2010 (5:09PM)
Elder Geek,
A battery backup would probably solve your problem about 99% of the time. Just a thought.
Glen on January 2, 2010 (5:14PM)
I am having some trouble with optimal configuration. First, off I cannot get puppy to fill the entire height and width of my screen in fullscreen mode. When I try xorgwizard it just sits there on an empty black screen after saying it may take a while to probe hardware. If I wait long X just restarts itself.
Also when I boot up I get the following message, even though xp is configured for 32 bit color:
edyar on December 26, 2009 (10:00PM)
is there a puppy remaster iso with all the virtualbox things included?
i have a dialup modem.(edimax) it is useless in puppy. so can someone upload his compiled version?
Elder Geek on December 18, 2009 (8:03PM)
I have a VMWare image of Puppy 4.1 that I have set up to act as an OpenVPN server. The only problem it has when it is not shut down properly. Upon the next boot it will not boot to a graphic login screen and has to be shutdown and restarted properly before it will work.
I thought it had to do with me installing to an ext2 partition but it does the same thing even when I changed from ext2 to ext3.
It is just a minor inconvenience. After a power outage someone has to log into the vmware image and restart it properly a second time to get it working. And you can’t do that remotely because OpenVPN is not running.
mark on November 28, 2009 (6:06PM)
OK. Regarding post above. never mind. I was able to get back on after resetting and the system said I didn’t close down X properly last time. I had been closing down using the Machine menu option and «close.» Instead, I am using the lower left Menu option and «shutdown, then power off.» That seems to have solved the problem. I guess I was shutting down VirtualBox and not Puppy Linux first.
mark on November 28, 2009 (2:25PM)
Can you offer some help?
I loaded Virtual Machine on Win XP and successfully loaded Puppy Linux. I followed instructions from here: http://www.virtualboximages.com/GettingStarted
Everything worked fine. until I tried to reboot the session. After I shut down, it won’t boot up again. Get’s hung up during boot process and doesn’t complete the script. I thought it was corrupted so I deleted and downloaded a completely new setup again. And it worked fine again on initial load but it will not reboot after it’s been shutdown.
I’d like to continue experimentation but I don’t know where to start troubleshooting.
As a side note, I loaded an ISO image of another Linux distribution and it worked fine. So because of that I think the problem is in Puppy vs. Virtual Box. Any ideas or thoughts?
Dan on November 13, 2009 (1:27PM)
On the bottom of the VirtualBox window is an icon that looks like a folder, and is for connecting shared host folders with the VB guest.
With the Puppy guest running, add a folder and it’s icon will appear on the desktop or in the Puppy Mount tool. Click on it. It’s mounted.
A 2GB SDA is a portable flash drive.
Wognath on November 11, 2009 (1:16PM)
Can you tell me how to mount the NTFS drive from the virtual Puppy? And can you explain what and where the 2GB sda1 is?
Thanks! I’m going to enjoy this.
raffy on October 17, 2009 (12:15AM)
You can use Puppy Linux search for VirtualBox, an example find is here. That uses Puppy version 2.17, whose kernel is new enough to handle dual-core PCs. There is also Erik Veenstra’s QEMU-Puppy. That also uses Puppy version 2.17.
gcmartin on October 16, 2009 (9:35PM)
Was VirtualBox installed on a Puppy distro.
Sounds like Puppy could be a great VM host (with VirtualBox added), because its so small and fast.
Источник
Puppy linux virtualbox ���
The fact is that you do not need to install Puppy Linux at all! You can simply download and burn it to an optical disc (CD, DVD, CD±RW, DVD±RW) or dd it to an USB drive and boot it live.
Burning an Optical disc or preparing a USB Drive
Optical
In any Linux, once you have downloaded the ISO image and verified its authenticity by checking its md5sum you can burn it to a DVD or a CD using any Linux optical burning tool. Just make sure you burn it as an image and not data otherwise it will not be bootable.
In Windows we recommend Imageburn (direct link to download) to burn the image to a CD or DVD.
All Linux versions come with a tool name dd. Our ISO images since 2013 come as iso hybrid images so they can be transferred directly to the USB drive using dd. Don’t attempt this with older puppy versions unless you know what you are doing. Here is a simple tutorial on using dd to make a bootable USB drive. Be very careful with your target drive name!
There is a Windows version of dd available on this site.
There is also a graphical tool for Windows called Win32 Disk Imager. A download is available from this page.
Booting
Depending on whether you have optical or USB media you may have to go into your computer’s BIOS Setup program to adjust the boot order of devices. You want to give your optical or USB ports priority over the harddrive.
Once you have your boot media and computer set up just insert the boot media and switch on your computer. You will see a couple of text screens go past and hopefully you will boot to a shiny new desktop with a quick setup screen followed by a welcome screen.
When you are finished you can decide to save the session or not! Not saving the session does not leave a trace of the operating system as Puppy runs entirely in RAM and as soon as the computer is powered off the RAM is flushed. This is ideal from a security perspective for internet banking or other sensitive financial transactions performed over the internet.
Saving the session can be achieved in a number of ways:
You can save the session to a harddrive or an USB drive in a vfat, ntfs or linux [1] partition. This will save all your settings to what is known as a pupsave [2] file or folder. When you boot off the same media next time the pupsave will be found and all your files and settings will be as you left them.
If you booted off of optical media you can save the session and all settings back to that same optical disc.
So you want to install Puppy
Naturally you can actually install Puppy if you wish. Once you boot Puppy and are happy with what you see it is time to open the Puppy Installer from Setup in the main menu. There are 3 main types of install; frugal, USB and traditional full install.
1. Frugal install (Recommended)
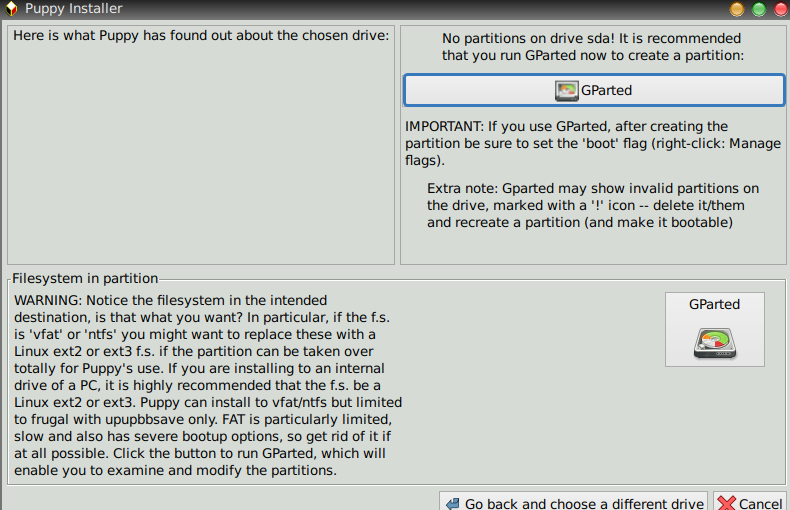
This type of install copies the main puppy files from the boot media (either optical or USB) to your harddrive. Firstly, you are presented with some information about your system and what partitions you have available. If you don’t have a suitable partition then you can use the included graphical partition manager GParted to shrink and move partitions as necessary to created a partition for your installation. Once this is done you are prompted for the location of your boot media files (either an iso image, optical media or just the files themselves) and once confirmed these are copied to a folder in your chosen partition. A bootloader is then installed and once finished you can reboot into your new system.
This will be a pristine system that requires you to save your session at shut down if you want to keep your settings. Once saving the session is complete, a pupsave file or folder is created. On you next boot your files and settings will be exactly as you left them at last shutdown.
2. USB Install (Recommended)
This type of install copies the main puppy files from the boot media (either optical or USB) to your chosen USB drive. Firstly, you should insert the USB drive that you want to use for installation. Again using the graphical partition manager GParted you need to make sure that there is a suitable partition on the USB drive. This can be formatted to fat32 Windows™ style filesystem (good for portability if you want to use the drive as storage to be used between Linux and Windows™) or one of the supported Linux filesystems. (Note: not all Puppies support the f2fs filesystem. The installer is intelligent enough to know this.) Again, you are prompted for the location of your boot media files (either an iso image, optical media or just the files themselves) and once confirmed these are copied to a folder in your chosen USB drive. A bootloader is then installed and once finished you can reboot into your new system. This can be booted on any computer you like! This is also a type of frugal installation.
Again, this will be a pristine system that requires you to save your session at shut down if you want to keep your settings. Once saving the session is complete, a pupsave file or folder is created. On you next boot your files and settings will be exactly as you left them at last shutdown.
3. Full Install
This is a traditonal Linux install to its own dedicated partition. If you don’t have a suitable partition then you can use the included graphical partition manager GParted to shrink and move partitions as necessary to created a partition for your installation. You must use a Linux filesystem. Once this is done you are prompted for the location of your boot media files (either an iso image, optical media or just the files themselves) and once confirmed these are expanded in your chosen partition. A bootloader is then installed and once finished you can reboot into your new system.
Once booted this will act like any other Linux installation.
Using Puppy
Puppy is famous for its ease of use. The desktop layout is traditional with a task bar at the bottom (or top) and icons on the desktop. Anyone coming from Windows™, Mac OSX™ or another Linux such as Ubuntu, Fedora or Arch will have little issue getting used to it. The interface is a typical WIMP style (Windows, Icons, Menus and a Pointing device).
While puppy comes with almost everything you need to write, calculate, enjoy videos and music, create artwork, work with your digital camera, and more there invariably comes a time when you need an an extra piece of software. Extra software comes in the form of pet packages which can be installed through the Puppy Package Manager or by downloading from a trusted source and simply clicking on the package. Puppy also has the capability of installing deb, rpm and tgz/txz packages from Debian family, Red Hat family and Slackware family of Linux operating systems.
The way Puppy is designed, if you use a frugal type install, software can be installed as an sfs (Squash File System) package. This is the preferred method to install very large packages such as LibreOffice. In fact the Puppy development environment, including the GNU Compiler Collection (GCC) and development libraries and headers, is shipped as an sfs; a separate download to the main ISO image. There is a tool call SFS Load which makes installing these packages a one step process. The sfs packages do not work on a full install.
Once you have been using Puppy for a little while you may want to try a remaster (see FAQ). This saves the state of your current installed system (minus some the personal stuff) to a burnable ISO image. This enables you to have your system setup and ready to go if you have several computers or you can share your remaster as a puplet with the community.
However you decide to install (or not) Puppy Linux, we hope you enjoy using it for years to come!
Notes
While we recommend frugal or USB installations the choice is entirely yours.
[1] Some common Linux filesystems that Puppy supports are ext2, ext3, ext4, f2fs. Windows™ filesystems supported are fat16, fat32 and ntfs.
[2] A pupsave file is a file that contains a linux filesystem. It can be stored on any supported partition. It is a fixed size and can be as small as 32MB and as large as 4GB (on fat32) and even larger on other filesystems. The pupsave file can be enlarged later on, but the challenge is to keep your system trim and clean by regularly deleting browser cache, cleaning up any stray files and storing other stuff outside the save file.
A pupsave folder can only be created on a linux filesystem. This allows you to store as much as your partition can hold.
Источник
DATAENGINER
Добрый день! Очень часто нам необходимо найти минималистичную современную операционную систему для своего старого слабого пк. Поэтому сегодня мы рассмотрим как установить одну из самых минималистичных и современных операционных систем с названием Puppy Linux. Устанавливать будем 64 битную версию Puppy Linux 8.
Системные требования для Puppy Linux:
- RAM: 64 МБ (рекомендуется 256 МБ)
- CPU: 333 МГц
Сам дистрибутив вы сможете скачать перейдя по данной ссылке.
Итак, приступим к установке.
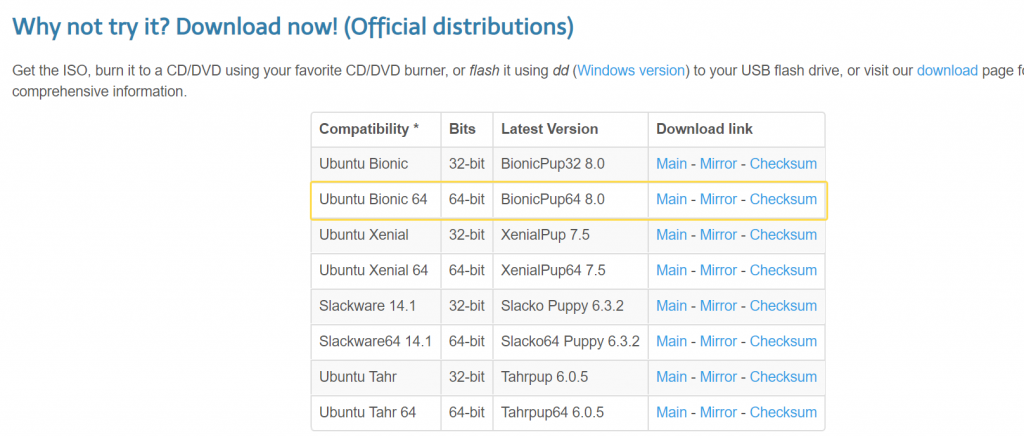
На данном шаге, загрузим 64 битную версию основанную на Ubuntu Bionic.
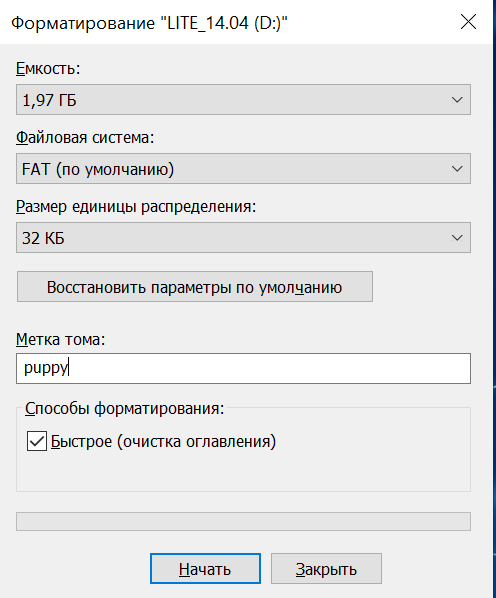
Далее подключим usb — носитель к нашему пк и отформатируем. Так как мы будем устанавливать Puppy Linux, то нам подойдет любой usb носитель размером более 1гб.
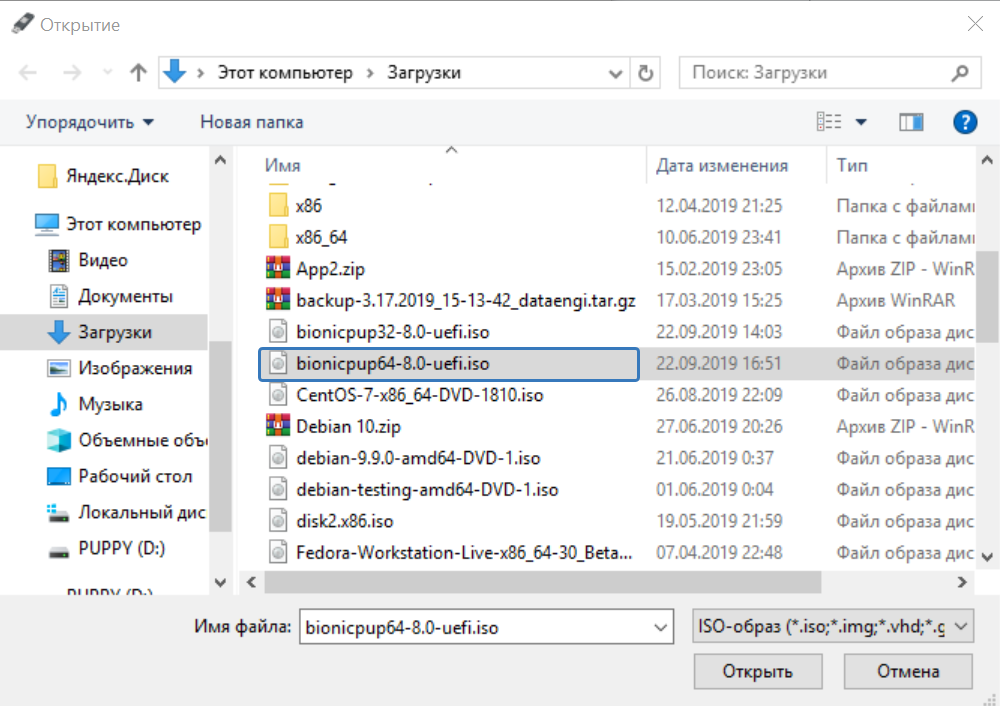
Образ будем записывать при помощи утилиты Rufus. Запустим данное приложение. И нажмем выбрать для выбора iso диска, который будет записан на флешку.
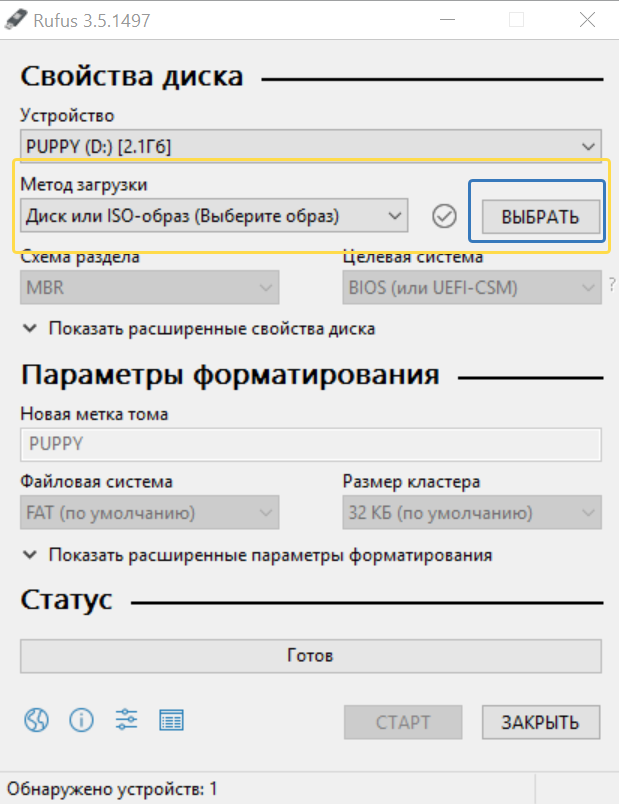
Перейдем в каталог где был сохранен образ, выберем сам образ и нажмем открыть.
Нажмем на старт для начала записи образа.
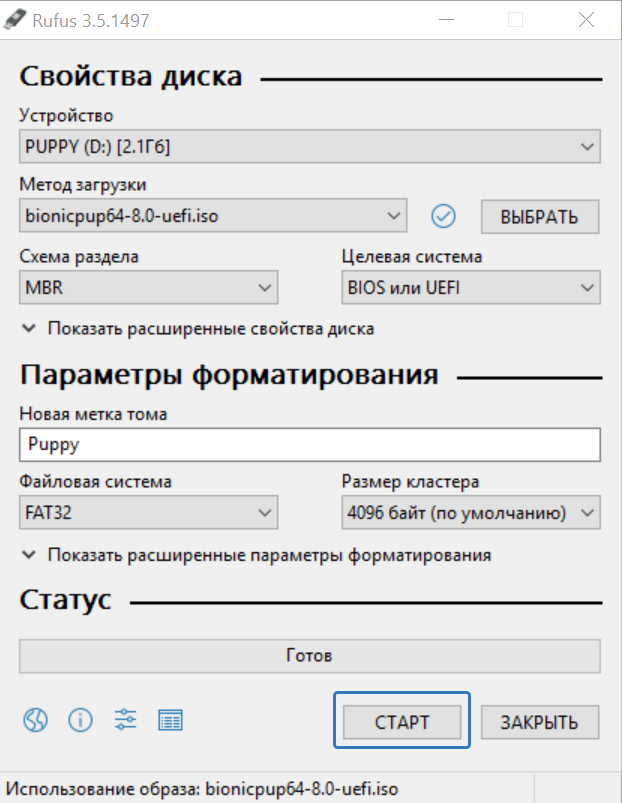
Выберем запись в режиме dd образ.

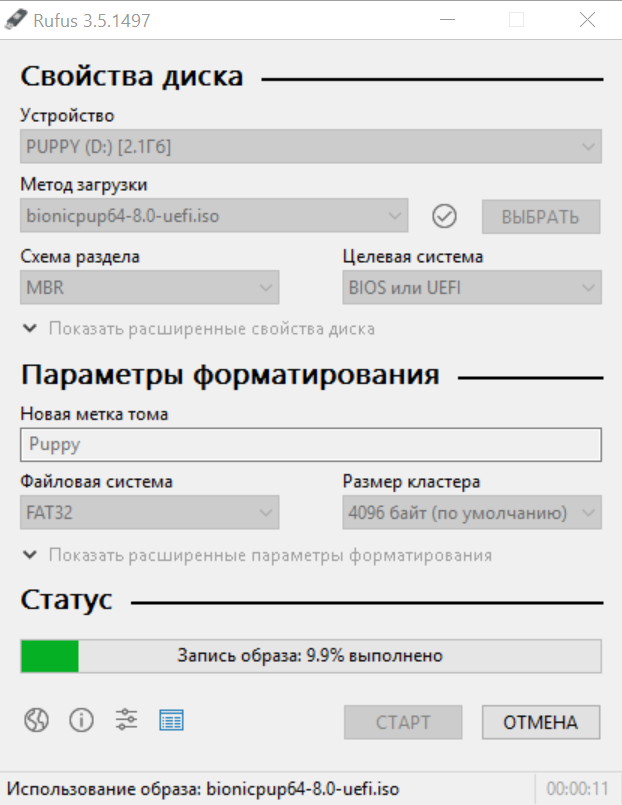
Дождемся окончания записи Puppy Linux на USB — флешку.
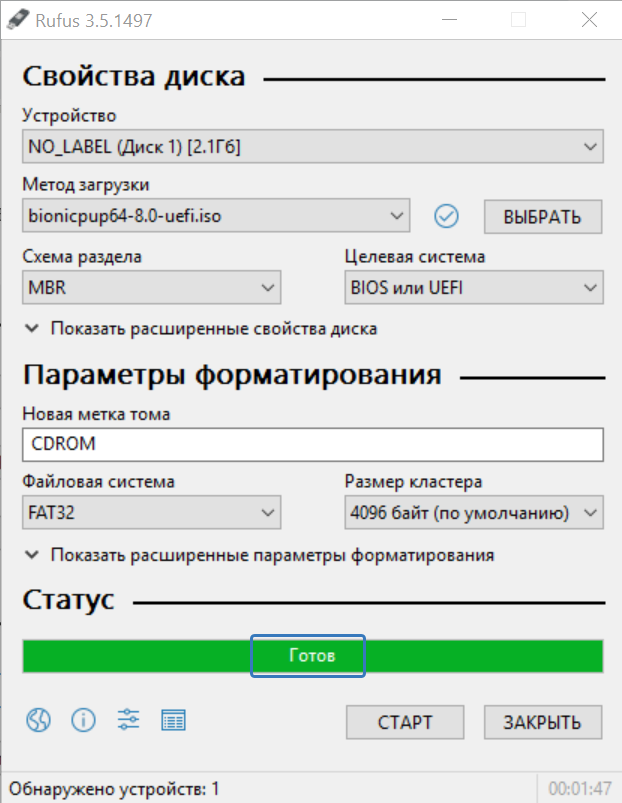
По окончании в полосе загрузки появится сообщение готово.
Теперь извлечем флешку, из компьютера с которого мы производили запись. И подключим к компьютеру, где будем проводить установку. Далее включаем наше устройство при виде загрузки.
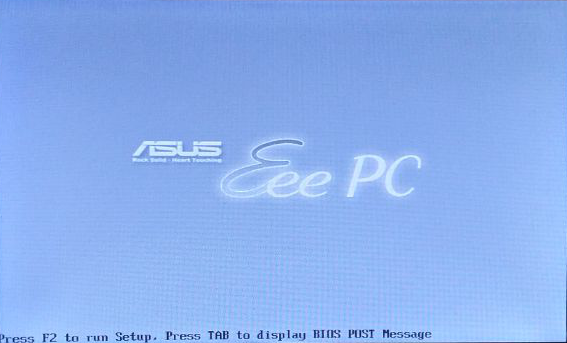
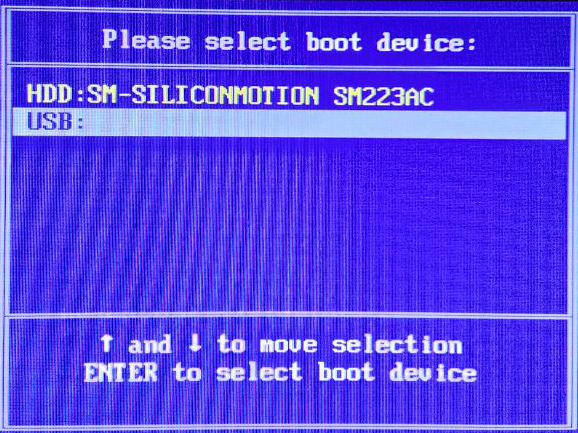
Нажмем несколько раз кнопку esc появится окно, которое предложит выбрать устройства с которого будет производится загрузка. Выбираем usb и нажмем enter.
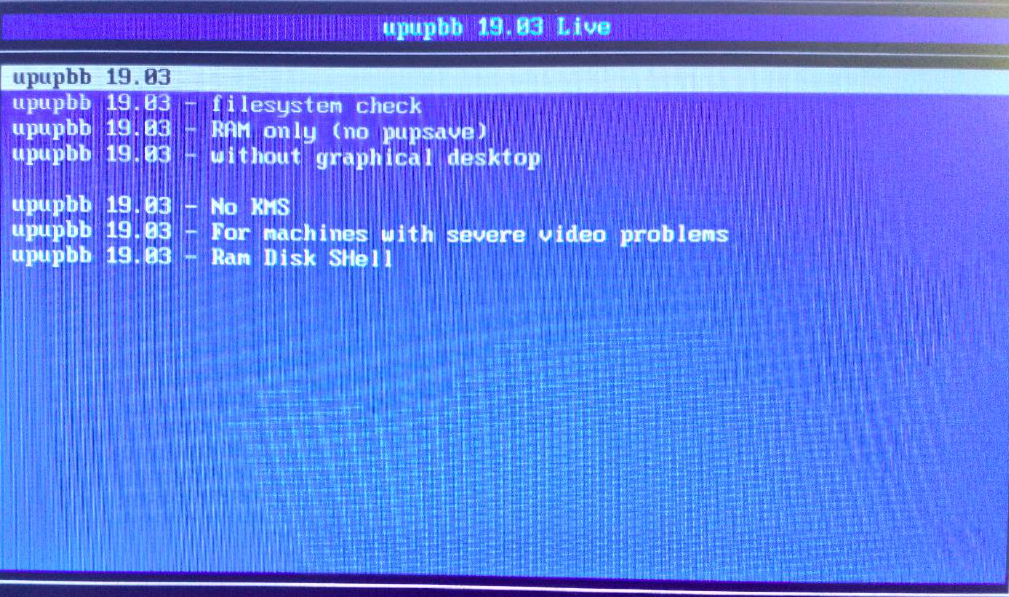
После этого появится меню загрузчика, что загрузится в live режиме оставим первый пункт. И нажмем Enter.
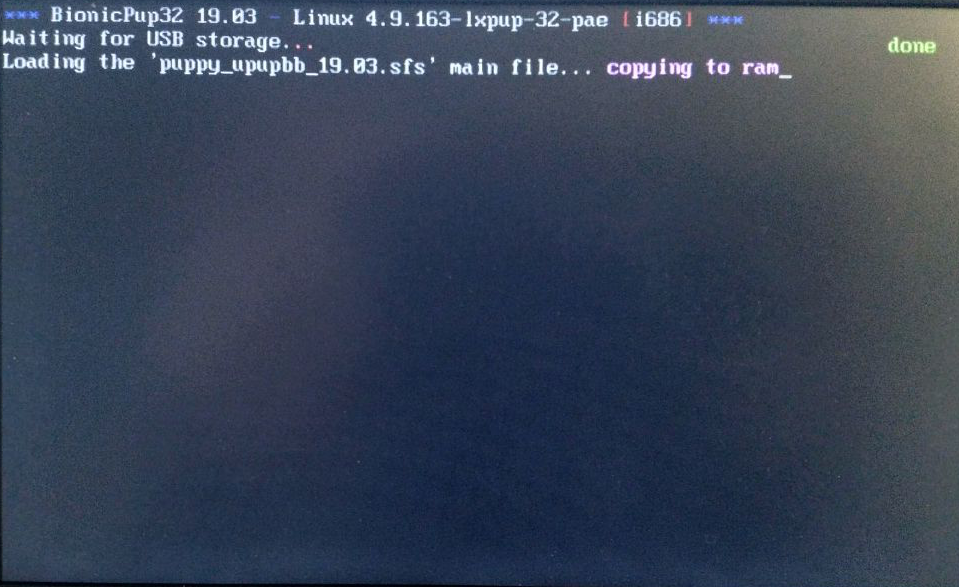
Начнется загрузка компонентов и модулей Live режима, дождемся ее окончания.
По окончании загрузки перед нами появится рабочий стол, на котором появится окно настроек.
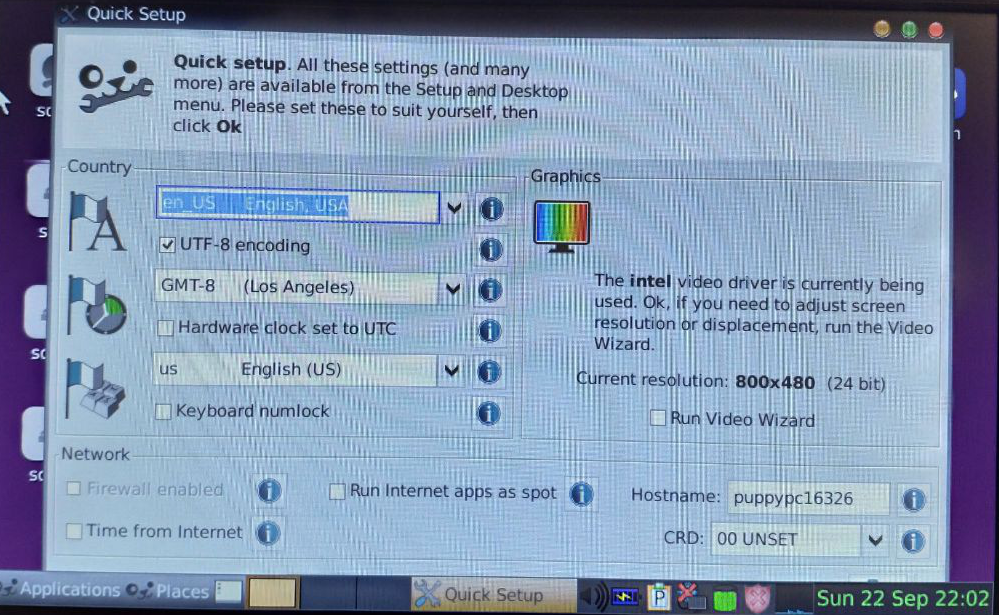
Мы пропустим настройки и закроем окно. Так как мы будем устанавливать систему. Далее для более качественной картинки, будут приводится скриншоты установки на виртуальную машину.
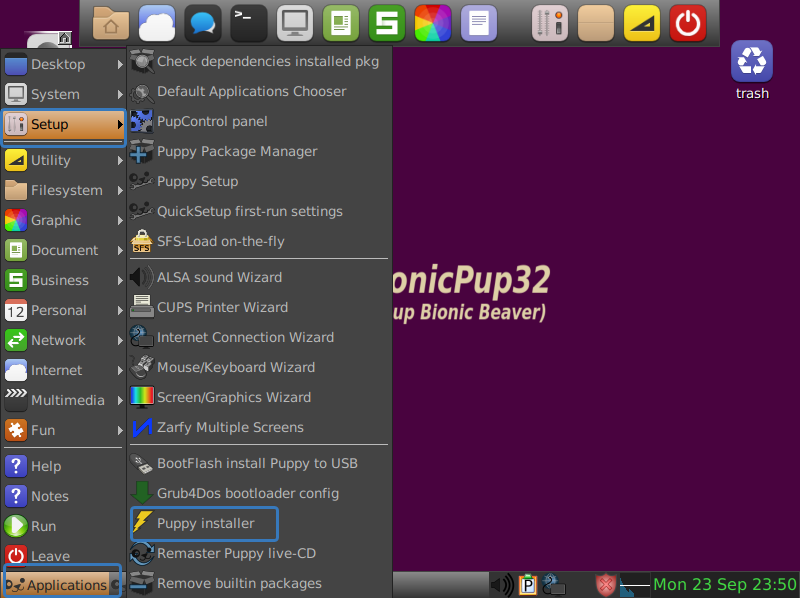
Для того, что приступить к установке нам необходимо открыть меню Application перейти к пункту Setup и выбрать Puppy installer
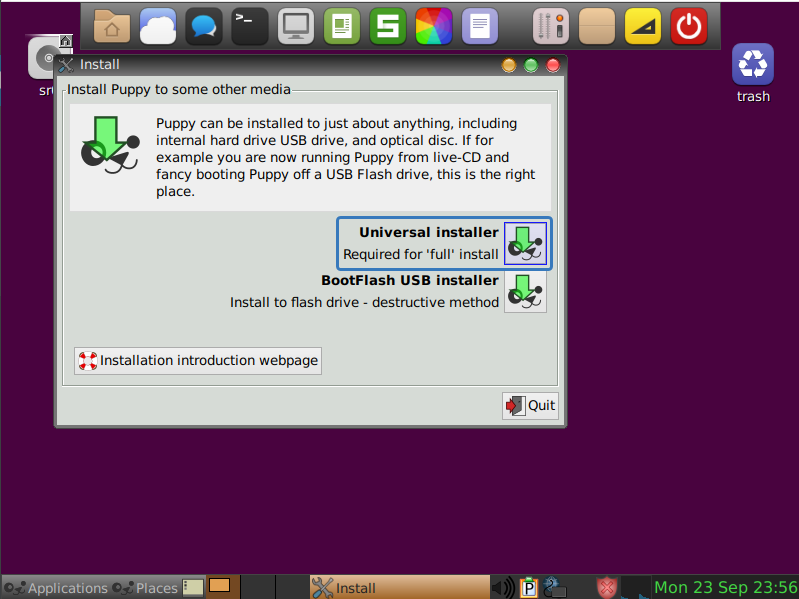
Появится инсталятор ОС, где мы выберем Universal Installer и приступим к процессу установки.
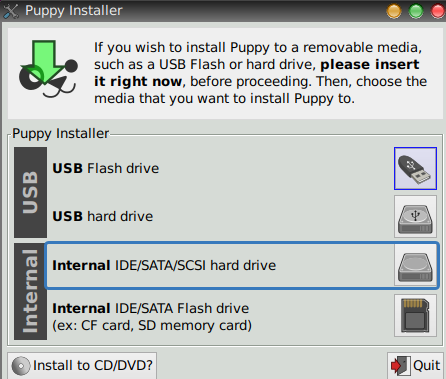
Выберем на какое устройство будем проводить установку в нашем случае это interval hard drive.
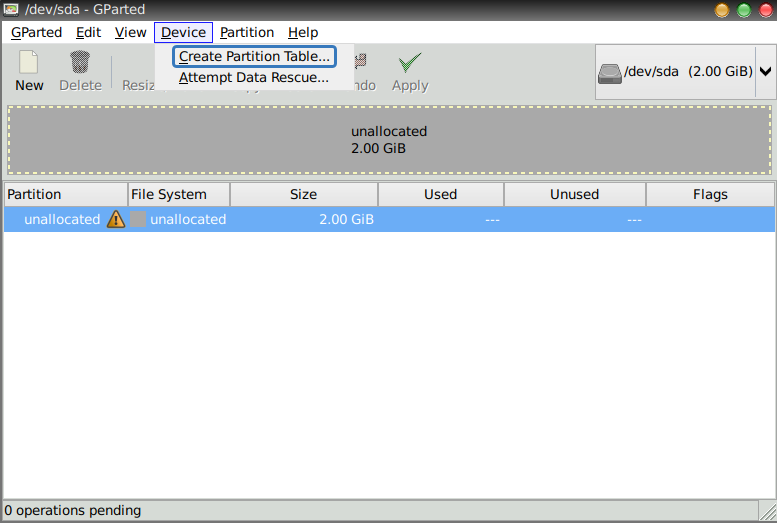
Далее при помощи утилиты Gparted создадим новую таблицу разделов куда будет проводится установка Puppy Linux 8.
Выбираем Device->Create Partition
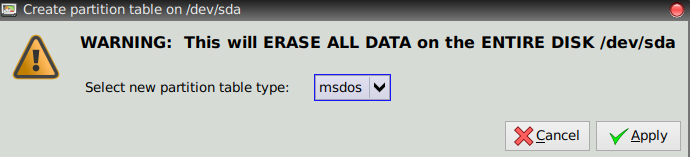
Оставляем тип раздела msdos и нажимаем apply.
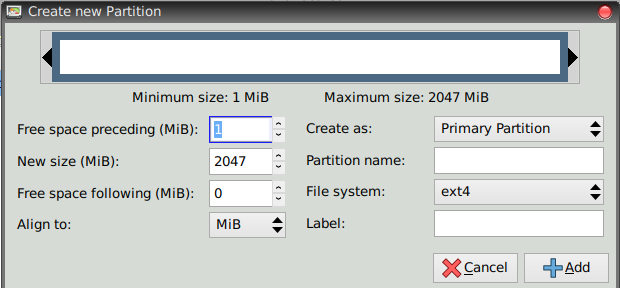
Теперь нажмем на раздел правой кнопкой мыши и нажмем New для создания нового раздела.
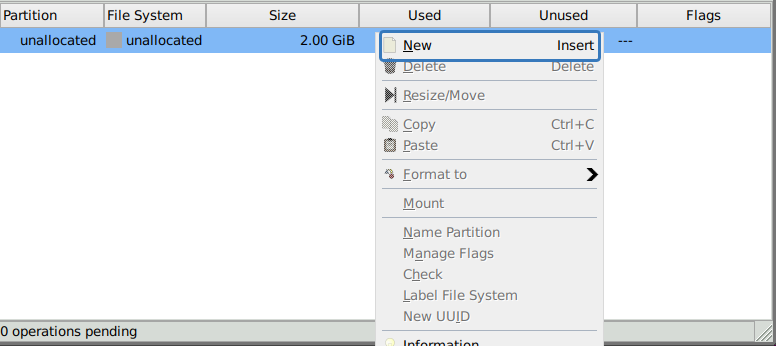
Все параметры оставим по умолчанию. После чего нажмем Add а в главном окне в верхнем меню нажмем Apply.
Теперь у вновь созданного раздела сменим флаг на загрузочный, для этого на раздел правой кнопкой мыши и выберем Manage Flags.
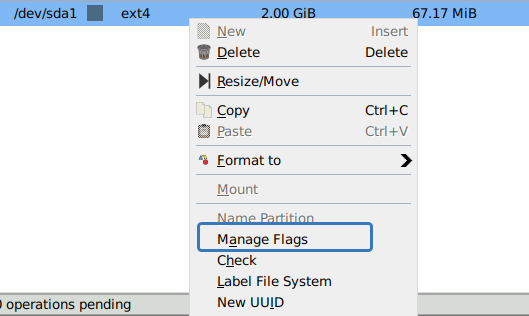
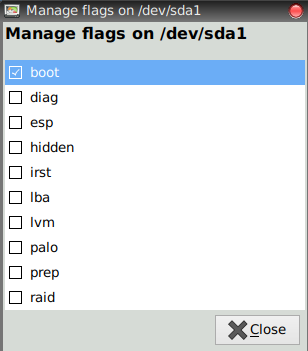
И выберем флаг boot, что сделать данным раздел загрузочным для Puppy Linux.
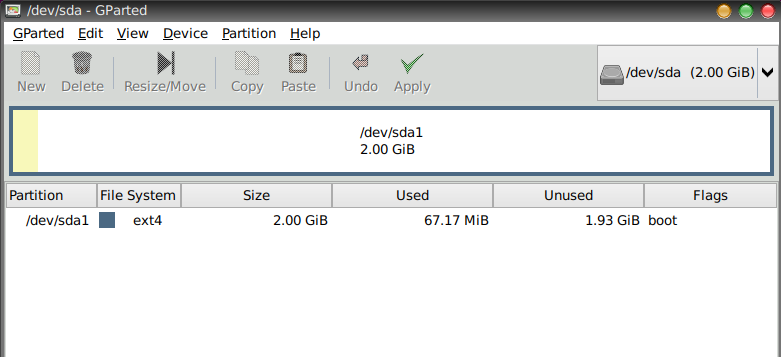
После чего наш раздел будет выглядеть следующим образом.
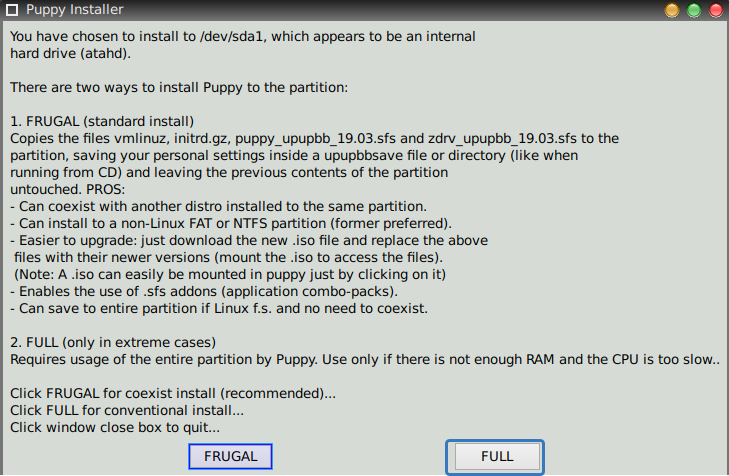
Для продолжения установки закроем утилиту Gparted. После чего перед нами появится снова установочная утилита, где мы выбираем установить Puppy на раздел sda1.
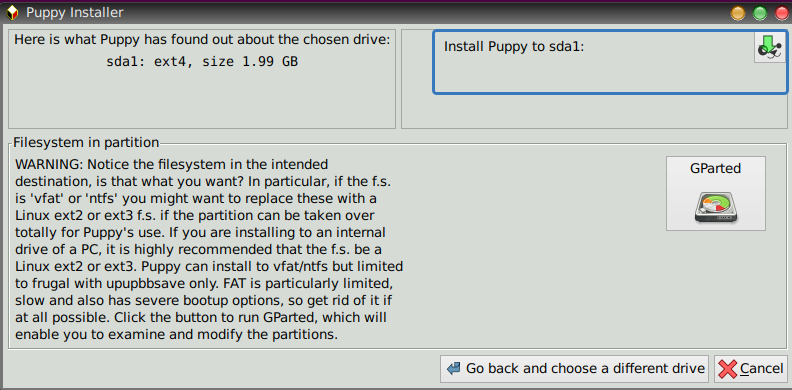
Выбираем полную установку. После чего подтверждаем нажав ОК.
Начнется копирование файлов на раздел, дождемся окончания копирования Puppy Linux.

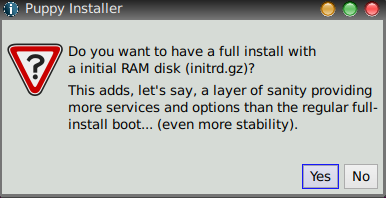
Подтвердим снова полную установку и инициализацию Ram diskа.
Далее подтвердим установку Grub загрузчика для Puppy Linux.
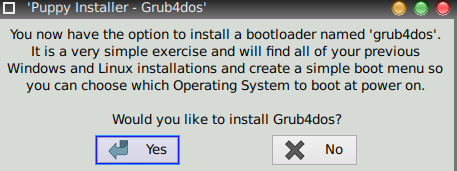
Подтвердим установку загрузчика Puppy Linux на sda раздел.
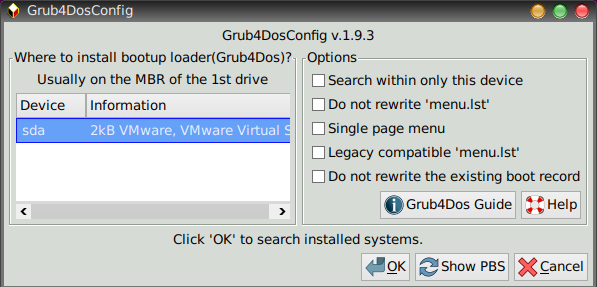
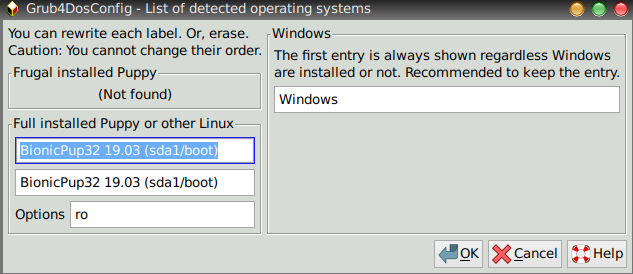
Примем или изменим предложенную конфигурацию загрузчика и флаги загрузки. И подтвердим установку дважды нажав ОК.
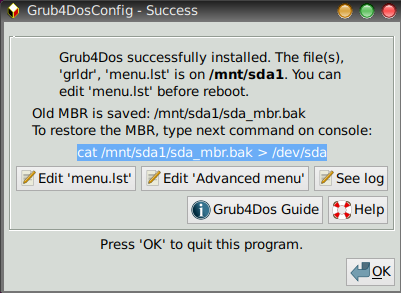
По окончании установки загрузчика Grub снова нажмем ОК.
Теперь перезагрузим систему и удостоверимся в ее работе. Нажмем на кнопку выключения и выберем reboot.
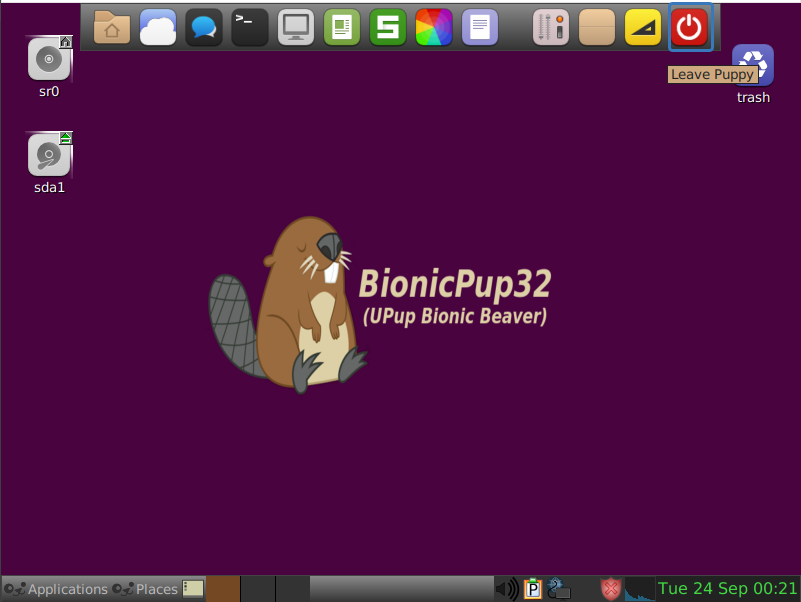
Дождемся окончания перезагрузки системы, когда снова появится рабочий стол. Теперь посмотрим какие ресурсы я использовал для установки, для начала взглянем на размер занимаемый системой на HDD.
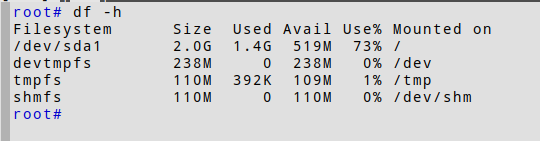
Как видите сама ОС Puppy Linux занимает менее 1.5 гигабайт данных и на диске объемом 2 гигабайта еще есть место под установку пары приложений.
Теперь посмотрим на ресурсы системы используемые Puppy Linux, вызвав консольный диспетчер задач командой top.
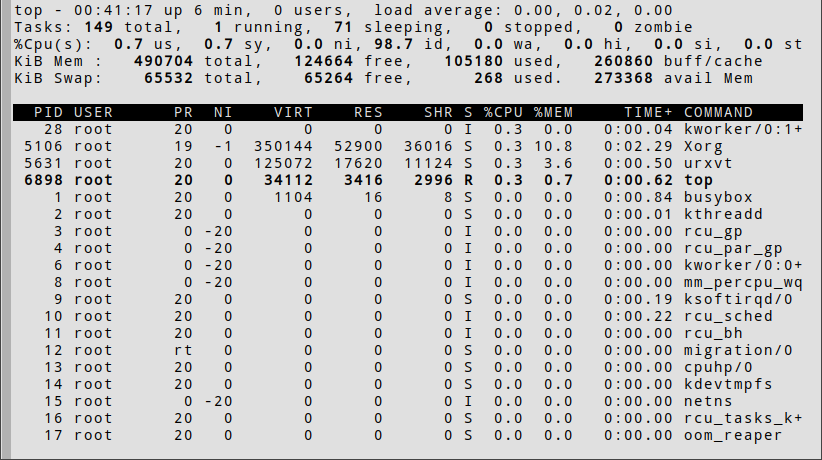
Как видите системе с запасом хватает 512мб ОЗУ. Поэтому если вы счастливый обладатель старого нетбука с ограниченными ресурсами или хотите вернуть к жизни старый ноутбук, хотя бы в роли печатной машинки, то Puppy Linux 8 на ОС Ubuntu станет Вашим идеальным другом!
Огромное спасибо за уделенное время. Надеюсь данная статья окажется для Вас крайне полезной.
Источник


