- Как передавать и обмениваться файлами между Windows и Linux
- 4 способа передачи файлов из Windows в Linux
- 1. Совместное использование сетевых папок между Linux и Windows
- 2. Скопируйте файлы через SSH из Windows в Linux
- 3. Как перенести файлы из Linux в Windows, используя FTP
- 4. Делитесь файлами между Linux и Windows с помощью Resilio Sync
- Putty копировать файл с windows
- Основные возможности PuTTY
- Важность SSH в Windows
- Глава 5: Using PSCP to transfer files securely
- 5.1 Starting PSCP
- 5.2 PSCP Usage
- 5.2.1 The basics
- 5.2.1.1 user
- 5.2.1.2 host
- 5.2.1.3 source
- 5.2.1.4 target
- 5.2.2 Options
- 5.2.2.1 -ls list remote files
- 5.2.2.2 -p preserve file attributes
- 5.2.2.3 -q quiet, don’t show statistics
- 5.2.2.4 -r copies directories recursively
- 5.2.2.5 -batch avoid interactive prompts
- 5.2.2.6 -sftp , -scp force use of particular protocol
- 5.2.2.7 -no-sanitise-stderr : control error message sanitisation
- 5.2.3 Return value
- 5.2.4 Using public key authentication with PSCP
Как передавать и обмениваться файлами между Windows и Linux

Копирование данных с ПК с Windows в Linux — или в другом направлении — поначалу может показаться пугающим. В конце концов, это то, что кажется простым, но оказывается сложным.
По правде говоря, делиться файлами из Windows в Linux легко, но только если вы знаете, как это сделать. Готовы выяснить?
4 способа передачи файлов из Windows в Linux
Перенос данных между операционными системами Windows и Linux проще, чем вы думаете. Мы собрали пять способов сделать это:
- Поделиться сетевыми папками
- Передача файлов с FTP
- Безопасное копирование файлов через SSH
- Обмен данными с помощью программного обеспечения для синхронизации
С помощью каждого из этих методов вы сможете легко (а в некоторых случаях легко) перемещать файлы между операционными системами.
Давайте посмотрим на них по очереди и выясним, какой из них подходит вам больше всего.
1. Совместное использование сетевых папок между Linux и Windows
Наиболее очевидный способ обмена файлами между Linux и Windows — это использование сетевых ресурсов. Этот термин относится к папкам на одном ПК, которые доступны пользователям на других компьютерах. В сети только для Windows это легко настроить. Добавление устройства Linux немного усложняет ситуацию, хотя это можно преодолеть.
Начиная с Windows, щелкните правой кнопкой мыши значок сетевого подключения на панели задач и выберите «Открыть сеть и настройки Интернета». Далее нажмите «Параметры общего доступа» и включите текущий профиль.
- Включить обнаружение сети
- Включите общий доступ к файлам и принтерам
Нажмите «Сохранить изменения» для подтверждения, затем перейдите в папку, содержащую файлы, которыми вы хотите поделиться. Щелкните правой кнопкой мыши папку, выберите «Свойства» и откройте вкладку «Общий доступ». Здесь нажмите «Расширенный общий доступ», затем установите флажок «Поделиться этой папкой».
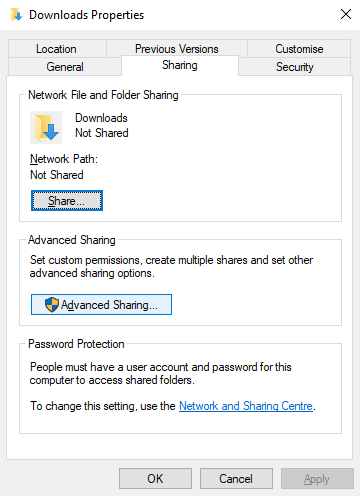
Вы можете управлять доступом к папке через разрешения; это относится к локальным пользователям Windows, а не к сетевым устройствам.
Нажмите OK, чтобы подтвердить изменение, затем откройте вкладку Безопасность в Свойствах. Настройте это, чтобы отразить настройки в поле Полномочия ранее. Вам не нужно делать слишком много здесь, так как Windows 10 должна включать группу под названием Authenticated Users. Это используется для удаленного доступа к вашему компьютеру.
Снова нажмите ОК, когда вы закончите.
Чтобы найти общий ресурс Windows на ПК с Linux, просто откройте браузер файлов и выберите «Сеть». Отсюда перейдите к папке, размещенной в Windows, и начните обмен данными.
Доступ к общему ресурсу Linux из Windows
Чтобы переместить данные в другом направлении, вам нужно установить Samba на ваш компьютер с Linux.
Затем установите имя пользователя для общего ресурса samba.
Вам будет предложено ввести пароль для новой учетной записи (не используйте для этого «имя пользователя»!).
Затем создайте каталог для обмена данными.
Затем отредактируйте файл smb.conf в своем текстовом редакторе:
Добавьте следующее в конец файла конфигурации:
Внесите необходимые изменения в соответствии со своими потребностями, затем нажмите Ctrl + X, чтобы выйти, и нажмите Y, чтобы сохранить. Далее перезапустите Samba:
После этого вы сможете получить доступ к общему ресурсу из Windows. Откройте проводник или браузер и введите IP-адрес или имя хоста удаленного устройства Linux, а затем имя папки. В нашем примере это
2. Скопируйте файлы через SSH из Windows в Linux
С включенным SSH на вашем устройстве Linux вы можете отправлять данные через командную строку с одного компьютера на другой. Однако, чтобы это работало, вам нужно настроить SSH-сервер на вашем Linux-компьютере.
Начните с открытия терминала и обновления и обновления ОС.
После завершения установите сервер SSH. Сервер OpenSSH — хороший вариант.
Подождите, пока он установит. Чтобы в любой момент проверить, работает ли сервер OpenSSH, используйте
Для передачи данных из Windows используйте SSH-клиент, например PuTTY. Это требует загрузки инструмента PSCP в вашу систему Windows для запуска вместе с PuTTY. Найти оба на домашней странице PuTTY.
Обратите внимание, что в то время как PuTTY нужно будет установить, PSCP — нет. Однако его следует сохранить в корне диска C:\ или настроить как переменную среды. Вам также необходимо подтвердить IP-адрес устройства Linux. Отметьте это на коробке с
После установления соединения вы можете отправлять данные следующим образом:
Перед началом передачи вам будет предложено ввести пароль для компьютера с Linux.
Хотите скопировать данные из Linux в Windows в одном сеансе SSH? Эта команда загрузит указанный файл в текущий каталог:
Обратите внимание на одиночный период в конце — включите его, иначе перевод не будет работать.
3. Как перенести файлы из Linux в Windows, используя FTP
Можно также использовать приложение протокола передачи файлов (FTP) с поддержкой SSH. Передача файлов через SFTP в пользовательском интерфейсе, управляемом мышью, возможно, проще, чем полагаться на набранные команды.
Опять же, сервер SSH должен быть запущен на компьютере с Linux перед началом работы. Вы также должны убедиться, что вы установили приложение FTP, такое как FileZilla, которое поддерживает SFTP.
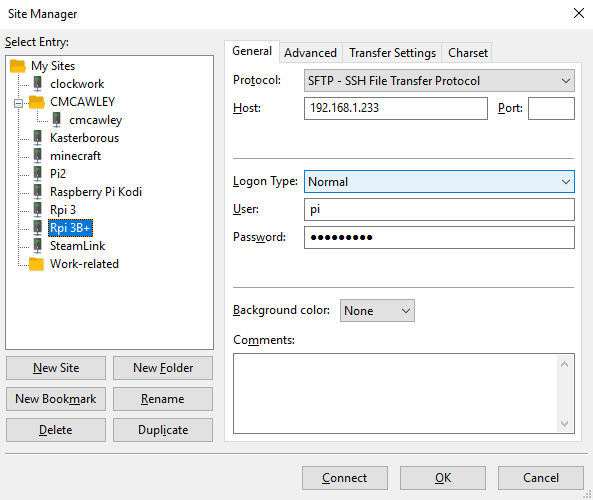
Чтобы использовать этот метод, запустите FileZilla, затем откройте Файл → Менеджер сайтов. Создайте новый сайт, заботясь о том, чтобы установить протокол на SFTP. Добавьте целевой IP-адрес в Host, затем имя пользователя и пароль, установив тип входа в систему как Нормальный.
Нажмите Готово, когда будете готовы, затем используйте интерфейс FTP для перетаскивания файлов между двумя компьютерами.
4. Делитесь файлами между Linux и Windows с помощью Resilio Sync
Другим вариантом, который вы должны рассмотреть, является программа синхронизации файлов. Обычно они кроссплатформенные и используют зашифрованный ключ для управления соединением между устройствами.
Все, что вам нужно сделать, это установить приложение, назначить папку синхронизации, а затем создать ключ. Установите это на втором ПК, и ваши данные будут синхронизированы. Для этого есть два хороших варианта:
- Resilio Sync: ранее известная как BitTorrent Sync, Resilio доступна практически на любой платформе, о которой вы только можете подумать. Есть платная версия, но бесплатного варианта достаточно для синхронизации двух устройств.
- SyncThing: для Linux, Windows, macOS и Android эта альтернатива Resilio Sync предлагает аналогичную функцию без платного компонента.
Совместное использование файлов между Windows и Linux очень просто
Если вы новичок в Linux, или вы находите Windows незнакомой, обмен данными между ними проще, чем вы думаете.
Мы рассмотрели несколько методов. Мы рекомендуем вам попробовать все из них и решить, какой из них вам наиболее удобен.
Putty копировать файл с windows
Добрый день, вот небольшая памятка для себя описывающая, как копировать вставить в PuTTY. Протокол SSH был разработан, как безопасная, зашифрованная замена протокола RSH. RSH используется для удаленного доступа оболочки к системе UNIX (или UNIX-подобной) и когда-то был популярен среди системных администраторов до того, как безопасность сети стала постоянной проблемой, которой она является сейчас. Теперь, благодаря SSH, можно получить надежность, с помощью зашифрованного протокола, известного своей универсальностью и безопасностью. Хотя OpenSSH, вероятно, является наиболее используемой реализацией SSH в мире, и PuTTY, является наиболее часто используемым SSH-клиентом для платформы MS Windows.
Основные возможности PuTTY
Как и OpenSSH, PuTTY — очень универсальный инструмент для удаленного доступа к другому компьютеру. Вероятно, он чаще используется людьми, которым нужен безопасный удаленный доступ к оболочке в системе UNIX или Linux, чем для каких-либо других целей, хотя это только одно из многих его применений. PuTTY — это больше, чем просто клиент SSH. Он поддерживает все следующие протоколы:
- raw: необработанный протокол обычно используется для отладки сети.
- rlogin: это незашифрованный протокол удаленного входа в систему UNIX, который использует порт 513 по умолчанию.
- serial: опция serial используется для подключения к последовательной линии. Наиболее распространенная цель для этого — установить последовательное соединение между компьютерами вместо Ethernet или другого сетевого соединения.
- SSH: Как уже отмечалось, SSH — это зашифрованный протокол безопасного удаленного входа, который по умолчанию использует порт 22.
- Telnet: является незашифрованным протоколом удаленного доступа. Обычно он использует порт 23 и доступен во многих системах, кроме UNIX. Как и rlogin, популярность Telnet снизилась из-за проблем с конфиденциальностью.
- В дополнение к пяти протоколам, поддерживаемым PuTTY, он также поддерживает такие функции, как сохраненные конфигурации сеансов, ведение журнала сеансов, настройки языка (языка) и сеансы прокси.
Важность SSH в Windows
Конечно, есть ряд причин использовать такой инструмент, как PuTTY. Но наиболее распространенные цели связаны с протоколом SSH. Это ужасная идея — подключиться к веб-хосту через незашифрованное соединение для управления веб-хостингом и для передачи файлов. Использование незашифрованного имени входа — это хороший способ сделать вашу учетную запись веб-хостинга «принадлежащей» злоумышленнику. Использование безопасного, зашифрованного протокола, такого как SSH, для таких целей является гораздо лучшим вариантом.
SSH через PuTTY предлагает быстрый и простой способ безопасного доступа к среде оболочки UNIX из системы Windows. Это удобно не только из-за очевидной потребности некоторых людей в работе с системами Windows и UNIX/Linux, но также и для людей, которые вынуждены использовать Windows и хотят получить доступ к возможностям оболочки UNIX. Как и в случае OpenSSH, PuTTY может использоваться в качестве защищенного веб-прокси. PuTTY может использоваться для защиты соединений TortoiseSVN с сервером Subversion.
Глава 5: Using PSCP to transfer files securely
PSCP, the PuTTY Secure Copy client, is a tool for transferring files securely between computers using an SSH connection.
If you have an SSH-2 server, you might prefer PSFTP (see chapter 6) for interactive use. PSFTP does not in general work with SSH-1 servers, however.
5.1 Starting PSCP
PSCP is a command line application. This means that you cannot just double-click on its icon to run it and instead you have to bring up a console window. With Windows 95, 98, and ME, this is called an «MS-DOS Prompt» and with Windows NT, 2000, and XP, it is called a «Command Prompt». It should be available from the Programs section of your Start Menu.
To start PSCP it will need either to be on your PATH or in your current directory. To add the directory containing PSCP to your PATH environment variable, type into the console window:
This will only work for the lifetime of that particular console window. To set your PATH more permanently on Windows NT, 2000, and XP, use the Environment tab of the System Control Panel. On Windows 95, 98, and ME, you will need to edit your AUTOEXEC.BAT to include a set command like the one above.
5.2 PSCP Usage
Once you’ve got a console window to type into, you can just type pscp on its own to bring up a usage message. This tells you the version of PSCP you’re using, and gives you a brief summary of how to use PSCP:
(PSCP’s interface is much like the Unix scp command, if you’re familiar with that.)
5.2.1 The basics
To receive (a) file(s) from a remote server:
So to copy the file /etc/hosts from the server example.com as user fred to the file c:\temp\example-hosts.txt , you would type:
To send (a) file(s) to a remote server:
So to copy the local file c:\documents\foo.txt to the server example.com as user fred to the file /tmp/foo you would type:
You can use wildcards to transfer multiple files in either direction, like this:
However, in the second case (using a wildcard for multiple remote files) you may see a warning saying something like «warning: remote host tried to write to a file called « terminal.c » when we requested a file called « *.c ». If this is a wildcard, consider upgrading to SSH-2 or using the « -unsafe » option. Renaming of this file has been disallowed».
This is due to a fundamental insecurity in the old-style SCP protocol: the client sends the wildcard string ( *.c ) to the server, and the server sends back a sequence of file names that match the wildcard pattern. However, there is nothing to stop the server sending back a different pattern and writing over one of your other files: if you request *.c , the server might send back the file name AUTOEXEC.BAT and install a virus for you. Since the wildcard matching rules are decided by the server, the client cannot reliably verify that the filenames sent back match the pattern.
PSCP will attempt to use the newer SFTP protocol (part of SSH-2) where possible, which does not suffer from this security flaw. If you are talking to an SSH-2 server which supports SFTP, you will never see this warning. (You can force use of the SFTP protocol, if available, with -sftp — see section 5.2.2.6.)
If you really need to use a server-side wildcard with an SSH-1 server, you can use the -unsafe command line option with PSCP:
This will suppress the warning message and the file transfer will happen. However, you should be aware that by using this option you are giving the server the ability to write to any file in the target directory, so you should only use this option if you trust the server administrator not to be malicious (and not to let the server machine be cracked by malicious people). Alternatively, do any such download in a newly created empty directory. (Even in «unsafe» mode, PSCP will still protect you against the server trying to get out of that directory using pathnames including « .. ».)
5.2.1.1 user
The login name on the remote server. If this is omitted, and host is a PuTTY saved session, PSCP will use any username specified by that saved session. Otherwise, PSCP will attempt to use the local Windows username.
5.2.1.2 host
The name of the remote server, or the name of an existing PuTTY saved session. In the latter case, the session’s settings for hostname, port number, cipher type and username will be used.
5.2.1.3 source
One or more source files. Wildcards are allowed. The syntax of wildcards depends on the system to which they apply, so if you are copying from a Windows system to a UNIX system, you should use Windows wildcard syntax (e.g. *.* ), but if you are copying from a UNIX system to a Windows system, you would use the wildcard syntax allowed by your UNIX shell (e.g. * ).
If the source is a remote server and you do not specify a full pathname (in UNIX, a pathname beginning with a / (slash) character), what you specify as a source will be interpreted relative to your home directory on the remote server.
5.2.1.4 target
The filename or directory to put the file(s). When copying from a remote server to a local host, you may wish simply to place the file(s) in the current directory. To do this, you should specify a target of . . For example:
. would copy /home/tom/.emacs on the remote server to the current directory.
As with the source parameter, if the target is on a remote server and is not a full path name, it is interpreted relative to your home directory on the remote server.
5.2.2 Options
PSCP accepts all the general command line options supported by the PuTTY tools, except the ones which make no sense in a file transfer utility. See section 3.8.3 for a description of these options. (The ones not supported by PSCP are clearly marked.)
PSCP also supports some of its own options. The following sections describe PSCP’s specific command-line options.
5.2.2.1 -ls list remote files
If the -ls option is given, no files are transferred; instead, remote files are listed. Only a hostname specification and optional remote file specification need be given. For example:
The SCP protocol does not contain within itself a means of listing files. If SCP is in use, this option therefore assumes that the server responds appropriately to the command ls -la ; this may not work with all servers.
If SFTP is in use, this option should work with all servers.
5.2.2.2 -p preserve file attributes
By default, files copied with PSCP are timestamped with the date and time they were copied. The -p option preserves the original timestamp on copied files.
5.2.2.3 -q quiet, don’t show statistics
By default, PSCP displays a meter displaying the progress of the current transfer:
The fields in this display are (from left to right), filename, size (in kilobytes) of file transferred so far, estimate of how fast the file is being transferred (in kilobytes per second), estimated time that the transfer will be complete, and percentage of the file so far transferred. The -q option to PSCP suppresses the printing of these statistics.
5.2.2.4 -r copies directories recursively
By default, PSCP will only copy files. Any directories you specify to copy will be skipped, as will their contents. The -r option tells PSCP to descend into any directories you specify, and to copy them and their contents. This allows you to use PSCP to transfer whole directory structures between machines.
5.2.2.5 -batch avoid interactive prompts
If you use the -batch option, PSCP will never give an interactive prompt while establishing the connection. If the server’s host key is invalid, for example (see section 2.2), then the connection will simply be abandoned instead of asking you what to do next.
This may help PSCP’s behaviour when it is used in automated scripts: using -batch , if something goes wrong at connection time, the batch job will fail rather than hang.
5.2.2.6 -sftp , -scp force use of particular protocol
As mentioned in section 5.2.1, there are two different file transfer protocols in use with SSH. Despite its name, PSCP (like many other ostensible scp clients) can use either of these protocols.
The older SCP protocol does not have a written specification and leaves a lot of detail to the server platform. Wildcards are expanded on the server. The simple design means that any wildcard specification supported by the server platform (such as brace expansion) can be used, but also leads to interoperability issues such as with filename quoting (for instance, where filenames contain spaces), and also the security issue described in section 5.2.1.
The newer SFTP protocol, which is usually associated with SSH-2 servers, is specified in a more platform independent way, and leaves issues such as wildcard syntax up to the client. (PuTTY’s SFTP wildcard syntax is described in section 6.2.2.) This makes it more consistent across platforms, more suitable for scripting and automation, and avoids security issues with wildcard matching.
Normally PSCP will attempt to use the SFTP protocol, and only fall back to the SCP protocol if SFTP is not available on the server.
The -scp option forces PSCP to use the SCP protocol or quit.
The -sftp option forces PSCP to use the SFTP protocol or quit. When this option is specified, PSCP looks harder for an SFTP server, which may allow use of SFTP with SSH-1 depending on server setup.
5.2.2.7 -no-sanitise-stderr : control error message sanitisation
The -no-sanitise-stderr option will cause PSCP to pass through the server’s standard-error stream literally, without stripping control characters from it first. This might be useful if the server were sending coloured error messages, but it also gives the server the ability to have unexpected effects on your terminal display. For more discussion, see section 7.2.3.5.
5.2.3 Return value
PSCP returns an ERRORLEVEL of zero (success) only if the files were correctly transferred. You can test for this in a batch file, using code such as this:
5.2.4 Using public key authentication with PSCP
Like PuTTY, PSCP can authenticate using a public key instead of a password. There are three ways you can do this.
Firstly, PSCP can use PuTTY saved sessions in place of hostnames (see section 5.2.1.2). So you would do this:
- Run PuTTY, and create a PuTTY saved session (see section 4.1.2) which specifies your private key file (see section 4.23.8). You will probably also want to specify a username to log in as (see section 4.15.1).
- In PSCP, you can now use the name of the session instead of a hostname: type pscp sessionname:file localfile , where sessionname is replaced by the name of your saved session.
Secondly, you can supply the name of a private key file on the command line, with the -i option. See section 3.8.3.18 for more information.
Thirdly, PSCP will attempt to authenticate using Pageant if Pageant is running (see chapter 9). So you would do this:
- Ensure Pageant is running, and has your private key stored in it.
- Specify a user and host name to PSCP as normal. PSCP will automatically detect Pageant and try to use the keys within it.
For more general information on public-key authentication, see chapter 8.


