- Thread: Using Putty for serial connection to a router or switch.
- Using Putty for serial connection to a router or switch.
- Re: Using Putty for serial connection to a router or switch.
- Re: Using Putty for serial connection to a router or switch.
- Re: Using Putty for serial connection to a router or switch.
- Re: Using Putty for serial connection to a router or switch.
- Re: Using Putty for serial connection to a router or switch.
- Re: Using Putty for serial connection to a router or switch.
- Re: Using Putty for serial connection to a router or switch.
- Re: Using Putty for serial connection to a router or switch.
- Re: Using Putty for serial connection to a router or switch.
- Using PuTTY for Serial
- Setup
- Session logging
- Scrollback Buffer
- PuTTY for Linux
- Contents
- How to Install PuTTY on Linux
- Running PuTTY
- Usage
- SSH Key Management and Public Key Authentication
- Глава 3: Using PuTTY
- 3.1 During your session
- 3.1.1 Copying and pasting text
- 3.1.2 Scrolling the screen back
- 3.1.3 The System menu
- 3.1.3.1 The PuTTY Event Log
- 3.1.3.2 Special commands
- 3.1.3.3 Starting new sessions
- 3.1.3.4 Changing your session settings
- 3.1.3.5 Copy All to Clipboard
- 3.1.3.6 Clearing and resetting the terminal
- 3.1.3.7 Full screen mode
- 3.2 Creating a log file of your session
- 3.3 Altering your character set configuration
- 3.4 Using X11 forwarding in SSH
- 3.5 Using port forwarding in SSH
- 3.6 Making raw TCP connections
- 3.7 Connecting to a local serial line
- 3.8 The PuTTY command line
- 3.8.1 Starting a session from the command line
- 3.8.2 -cleanup
- 3.8.3 Standard command-line options
- 3.8.3.1 -load : load a saved session
- 3.8.3.2 Selecting a protocol: -ssh , -telnet , -rlogin , -raw -serial
- 3.8.3.3 -v : increase verbosity
- 3.8.3.4 -l : specify a login name
- 3.8.3.5 -L , -R and -D : set up port forwardings
- 3.8.3.6 -m : read a remote command or script from a file
- 3.8.3.7 -P : specify a port number
- 3.8.3.8 -pw : specify a password
- 3.8.3.9 -agent and -noagent : control use of Pageant for authentication
- 3.8.3.10 -A and -a : control agent forwarding
- 3.8.3.11 -X and -x : control X11 forwarding
- 3.8.3.12 -t and -T : control pseudo-terminal allocation
- 3.8.3.13 -N : suppress starting a shell or command
- 3.8.3.14 -nc : make a remote network connection in place of a remote shell or command
- 3.8.3.15 -C : enable compression
- 3.8.3.16 -1 and -2 : specify an SSH protocol version
- 3.8.3.17 -4 and -6 : specify an Internet protocol version
- 3.8.3.18 -i : specify an SSH private key
- 3.8.3.19 -loghost : specify a logical host name
- 3.8.3.20 -hostkey : manually specify an expected host key
- 3.8.3.21 -pgpfp : display PGP key fingerprints
- 3.8.3.22 -sercfg : specify serial port configuration
- 3.8.3.23 -sessionlog , -sshlog , -sshrawlog : specify session logging
- 3.8.3.24 -proxycmd : specify a local proxy command
- 3.8.3.25 -restrict-acl : restrict the Windows process ACL
Thread: Using Putty for serial connection to a router or switch.
Thread Tools
Display
Using Putty for serial connection to a router or switch.
I am trying to use Putty to connect to a Cisco router via a serial connection. This is to
configure the router out of the box. Security is not a problem until it is connected to a
network. Then it will be confgured with SSH.
Serial line: /dev/ttyUSB0 Baud rate: 9600 Data bits 8 stop bits 1
Using a Cisco USB serial cable.
When I try to connect I get this error.
Putty Fatal Error
Unable to open connection to:
Unable to open serial port
Checked and it looks like it is using the correct paths.
$ echo $PATH
/usr/local/sbin:/usr/local/bin:/usr/sbin:/usr/bin:/sbin:/bin:/usr/games:/usr/loc
ls -l /usr/bin/telnet
lrwxrwxrwx 1 root root 24 Feb 13 22:14 /usr/bin/telnet -> /etc/alternatives/telnet/usr/bin/telne
I have connected via minicom. My friend uses CentOS and is able to use Putty with my
cable.
Also tried CtkTerm. Received this message.
Cannot open /dev/ttyUSB0: Permission denied
Any help would be appreciated.
![]()
Re: Using Putty for serial connection to a router or switch.
Have you tried using putty as root?
Also, is the /dev/ttyUSB0 the correct device for your cable?
Re: Using Putty for serial connection to a router or switch.
Thank you for replying. I am not sure how to use in root? I am new. Would I open Putty from the terminal window?
Re: Using Putty for serial connection to a router or switch.
Here is the usb serial cable. It is currently not connected. Just unplugged it from
my laptop. Looks that I am using the right one?
dmesg | grep tty
[ 0.000000] console [tty0] enabled
[ 1.025308] 0000:00:16.3: ttyS4 at I/O 0x1808 (irq = 17, base_baud = 115200) is a 16550A
[ 1.267114] tty tty7: hash matches
[ 3967.041464] usb 2-1.2: FTDI USB Serial Device converter now attached to ttyUSB0
[ 9125.490026] ftdi_sio ttyUSB0: FTDI USB Serial Device converter now disconnected from ttyUSB0
[10877.163472] usb 2-1.2: FTDI USB Serial Device converter now attached to ttyUSB0
[14115.666926] ftdi_sio ttyUSB0: FTDI USB Serial Device converter now disconnected from ttyUSB0
Tried both of these combos in Putty.
![]()
Re: Using Putty for serial connection to a router or switch.
well if it’s the correct device then try running putty as root.
Re: Using Putty for serial connection to a router or switch.
Isn’t PuTTY a «network» terminal client (does it even do serial directly?)? It would work for network connection to a router or switch that has ssh or telnet. I have never used PuTTY in Linux, since it has native ssh related utilities (I only use PuTTY in Windows).
I have used minicom over the years to connect to dial up modems and other serial devices, just not in recent years, so forgot most of that. To configure it you might first need to do: sudo minicom -s
Not sure what gui serial terminal programs are available, but a quick search in synaptic found gtkterm, so you might try installing that. If it needs to be run as root just use «gksu » (without quotes) before it.
sudo can be used to run things as root from terminal or for X, it is just that gksu does the same with a gui popup for the password.
Re: Using Putty for serial connection to a router or switch.
Thank you. gksudo putty worked. I am so glad. I need this tool and was thinking I would need to go back to windows
for this one app.
Re: Using Putty for serial connection to a router or switch.
Thank you. I am going to try this with gtkterm. I will follow up in a bit.
Re: Using Putty for serial connection to a router or switch.
This also worked. Thank you for taking the time to assist.
Re: Using Putty for serial connection to a router or switch.
By chance is there a way for it to default to open without gksudo command each time?
Источник
Using PuTTY for Serial
PuTTY can replace HyperTerminal for serial communications. It provides logging, a large scroll back buffer, and many other features. You are probably already using PuTTY for SSH and Telnet, but you can also use it for Serial TTY console connections.
If you use an Apple Mac computer, refer to: Mac’s and serial TTY’s.
Setup
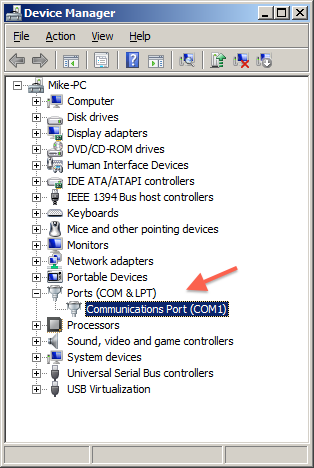
1 Plug in your USB to Serial adapter, and determine its COM port number by opening the Windows Device Manger (a driver must have previously been installed for the adapter).
- Start ➤ Control Panel ➤ Device Manager
— OR —
Right-Click My Computer, and select: Properties ➤ Device Manager
Expand: Ports (COM & LPT)
The serial adapter should be listed:
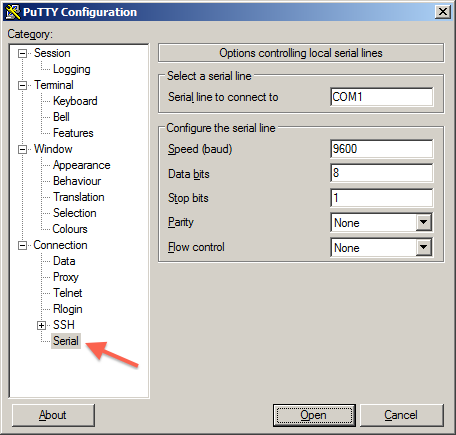
2 Open PuTTY, and click Serial from the Category: Connection. Edit the settings, eg: COM1, 9600, 8, 1, None. Flow control: None.
3 Select Category: Session, click the Serial radio button,
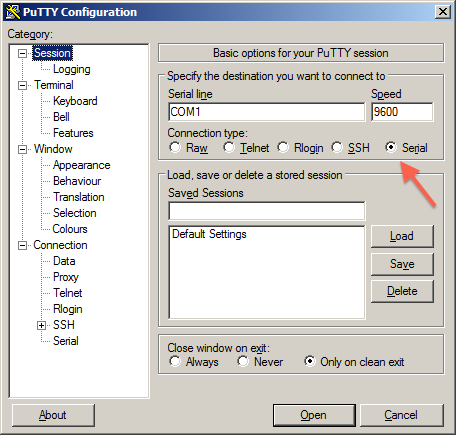
4 If you want to save this session, enter a name in Saved Sessions and click Save. This will ensure that you have quick access to your commonly used sessions. Settings are saved within PuTTY, so copying the application to a different machine will also copy your saved sessions.
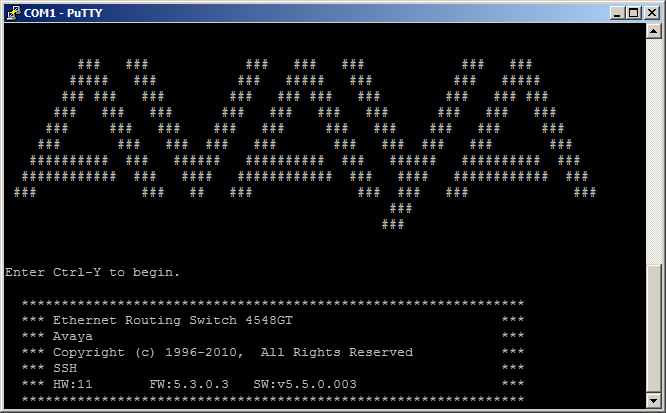
5 Click Open and a serial session will start.
Session logging
To create a text log file, right click on the PuTTY menu bar, and select Change Settings.
 |  |  |
- Click Logging from the Category: Session
- Click the Log All Session Output radio button.
- Click Browse and select a folder and filename for your log file, eg: C:\Users\Mike\Desktop\putty.log
- Click Apply, and the log file should appear in your chosen location.
Scrollback Buffer
To lengthen the scrollback buffer size, right click on the PuTTY menu bar, and select Change Settings.
Источник
PuTTY for Linux
This page is about PuTTY on Linux. For the Windows version, see here . For the Mac version, see here .
PuTTY Linux vesion is a graphical terminal program that supports the SSH , telnet , and rlogin protocols and connecting to serial ports. It can also connect to raw sockets, typically for debugging use.
Since most people would just use the preinstalled OpenSSH in a terminal window on Linux for basic SSH access, the primary use of Putty on Linux is probably debugging: connecting to raw sockets and connecting to serial ports.
Contents
How to Install PuTTY on Linux
Putty is not installed by default on most Linux distributions. On Debian, it can be installed with the following command:
Other related tools come in a separate installation package. To install them, use:
Running PuTTY
The graphical client can be started by just running putty . On most distibutions the command will be available through the menus. It can typically be found in the Internet or Network category.
Usage
When started, PuTTY opens a terminal Window. The Linux version of the client loks and feels almost exactly the same as the Windows version. For guidance on how to use it, see description of the Windows version .
SSH Key Management and Public Key Authentication
PuTTY supports public key authentication . It uses its own key format ( .ppk files).
The puttygen tool is used for generating a private key for authentication.
To enable public key authentication, first run puttygen , typically as:
Then get the public key using:
Copy the public key (or cut-and-paste it) to the .ssh/authorized_keys file on the server that you want to log in to using the key. You may need to create the .ssh directory and the authorized_keys file if they don’t already exist. See more information on authorized keys .
Together with our customers, our mission is to secure their digital business on on-premises, cloud, and hybrid ecosystems cost-efficiently, at scale, and without disruptions to their operations or business continuity.
Источник
Глава 3: Using PuTTY
This chapter provides a general introduction to some more advanced features of PuTTY. For extreme detail and reference purposes, chapter 4 is likely to contain more information.
3.1 During your session
A lot of PuTTY’s complexity and features are in the configuration panel. Once you have worked your way through that and started a session, things should be reasonably simple after that. Nevertheless, there are a few more useful features available.
3.1.1 Copying and pasting text
Often in a PuTTY session you will find text on your terminal screen which you want to type in again. Like most other terminal emulators, PuTTY allows you to copy and paste the text rather than having to type it again. Also, copy and paste uses the Windows clipboard, so that you can paste (for example) URLs into a web browser, or paste from a word processor or spreadsheet into your terminal session.
By default, PuTTY’s copy and paste works entirely with the mouse. (This will be familiar to people who have used xterm on Unix.) In order to copy text to the clipboard, you just click the left mouse button in the terminal window, and drag to select text. When you let go of the button, the text is automatically copied to the clipboard. You do not need to press Ctrl-C or Ctrl-Ins; in fact, if you do press Ctrl-C, PuTTY will send a Ctrl-C character down your session to the server where it will probably cause a process to be interrupted.
Pasting into PuTTY is done using the right button (or the middle mouse button, if you have a three-button mouse and have set it up; see section 4.11.1). (Pressing Shift-Ins, or selecting «Paste» from the Ctrl+right-click context menu, have the same effect.) When you click the right mouse button, PuTTY will read whatever is in the Windows clipboard and paste it into your session. By default, this behaves exactly as if the clipboard contents had been typed at the keyboard; therefore, be careful of pasting formatted text into an editor that does automatic indenting, as you may find that the spaces pasted from the clipboard plus the spaces added by the editor add up to too many spaces and ruin the formatting. (Some remote applications can ask PuTTY to identify text that is being pasted, to avoid this sort of problem; but if your application does not, there is nothing PuTTY can do to avoid this.)
If you double-click the left mouse button, PuTTY will select a whole word. If you double-click, hold down the second click, and drag the mouse, PuTTY will select a sequence of whole words. (You can adjust precisely what PuTTY considers to be part of a word; see section 4.12.1.) If you triple-click, or triple-click and drag, then PuTTY will select a whole line or sequence of lines.
If you want to select a rectangular region instead of selecting to the end of each line, you can do this by holding down Alt when you make your selection. You can also configure rectangular selection to be the default, and then holding down Alt gives the normal behaviour instead: see section 4.11.3 for details.
(In some Unix environments, Alt+drag is intercepted by the window manager. Shift+Alt+drag should work for rectangular selection as well, so you could try that instead.)
If you have a middle mouse button, then you can use it to adjust an existing selection if you selected something slightly wrong. (If you have configured the middle mouse button to paste, then the right mouse button does this instead.) Click the button on the screen, and you can pick up the nearest end of the selection and drag it to somewhere else.
If you are running PuTTY itself on Unix (not just using it to connect to a Unix system from Windows), by default you will likely have to use similar mouse actions in other applications to paste the text you copied from PuTTY, and to copy text for pasting into PuTTY; actions like Ctrl-C and Ctrl-V will likely not behave as you expect. Section 4.11.4 explains why this is, and how you can change the behaviour. (On Windows there is only a single selection shared with other applications, so this confusion does not arise.)
It’s possible for the server to ask to handle mouse clicks in the PuTTY window itself. If this happens, the mouse pointer will turn into an arrow, and using the mouse to copy and paste will only work if you hold down Shift. See section 4.6.2 and section 4.11.2 for details of this feature and how to configure it.
You can customise much of this behaviour, for instance to enable copy and paste from the keyboard; see section 4.11.
3.1.2 Scrolling the screen back
PuTTY keeps track of text that has scrolled up off the top of the terminal. So if something appears on the screen that you want to read, but it scrolls too fast and it’s gone by the time you try to look for it, you can use the scrollbar on the right side of the window to look back up the session history and find it again.
As well as using the scrollbar, you can also page the scrollback up and down by pressing Shift-PgUp and Shift-PgDn. You can scroll a line at a time using Ctrl-PgUp and Ctrl-PgDn, or to the top/bottom of the scrollback with Ctrl-Shift-PgUp and Ctrl-Shift-PgDn. These are still available if you configure the scrollbar to be invisible.
By default the last 2000 lines scrolled off the top are preserved for you to look at. You can increase (or decrease) this value using the configuration box; see section 4.7.3.
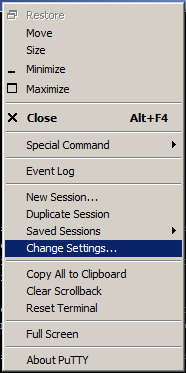
3.1.3 The System menu
If you click the left mouse button on the icon in the top left corner of PuTTY’s terminal window, or click the right mouse button on the title bar, you will see the standard Windows system menu containing items like Minimise, Move, Size and Close.
PuTTY’s system menu contains extra program features in addition to the Windows standard options. These extra menu commands are described below.
(These options are also available in a context menu brought up by holding Ctrl and clicking with the right mouse button anywhere in the PuTTY window.)
3.1.3.1 The PuTTY Event Log
If you choose «Event Log» from the system menu, a small window will pop up in which PuTTY logs significant events during the connection. Most of the events in the log will probably take place during session startup, but a few can occur at any point in the session, and one or two occur right at the end.
You can use the mouse to select one or more lines of the Event Log, and hit the Copy button to copy them to the clipboard. If you are reporting a bug, it’s often useful to paste the contents of the Event Log into your bug report.
(The Event Log is not the same as the facility to create a log file of your session; that’s described in section 3.2.)
3.1.3.2 Special commands
Depending on the protocol used for the current session, there may be a submenu of «special commands». These are protocol-specific tokens, such as a «break» signal, that can be sent down a connection in addition to normal data. Their precise effect is usually up to the server. Currently only Telnet, SSH, and serial connections have special commands.
The «break» signal can also be invoked from the keyboard with Ctrl-Break.
In an SSH connection, the following special commands are available:
Should have no effect.
Repeat key exchange
Only available in SSH-2. Forces a repeat key exchange immediately (and resets associated timers and counters). For more information about repeat key exchanges, see section 4.20.2.
Cache new host key type
Only available in SSH-2. This submenu appears only if the server has host keys of a type that PuTTY doesn’t already have cached, and so won’t consider. Selecting a key here will allow PuTTY to use that key now and in future: PuTTY will do a fresh key-exchange with the selected key, and immediately add that key to its permanent cache (relying on the host key used at the start of the connection to cross-certify the new key). That key will be used for the rest of the current session; it may not actually be used for future sessions, depending on your preferences (see section 4.21.1).
Normally, PuTTY will carry on using a host key it already knows, even if the server offers key formats that PuTTY would otherwise prefer, to avoid host key prompts. As a result, if you’ve been using a server for some years, you may still be using an older key than a new user would use, due to server upgrades in the meantime. The SSH protocol unfortunately does not have organised facilities for host key migration and rollover, but this allows you to manually upgrade.
Only available in SSH-2, and only during a session. Optional extension; may not be supported by server. PuTTY requests the server’s default break length.
Signals (SIGINT, SIGTERM etc)
Only available in SSH-2, and only during a session. Sends various POSIX signals. Not honoured by all servers.
The following special commands are available in Telnet:
- Are You There
- Break
- Synch
- Erase Character
PuTTY can also be configured to send this when the Backspace key is pressed; see section 4.17.3.
Should have no effect.
PuTTY can also be configured to send this when Ctrl-C is typed; see section 4.17.3.
PuTTY can also be configured to send this when Ctrl-Z is typed; see section 4.17.3.
With a serial connection, the only available special command is «Break».
3.1.3.3 Starting new sessions
PuTTY’s system menu provides some shortcut ways to start new sessions:
- Selecting «New Session» will start a completely new instance of PuTTY, and bring up the configuration box as normal.
- Selecting «Duplicate Session» will start a session in a new window with precisely the same options as your current one — connecting to the same host using the same protocol, with all the same terminal settings and everything.
- In an inactive window, selecting «Restart Session» will do the same as «Duplicate Session», but in the current window.
- The «Saved Sessions» submenu gives you quick access to any sets of stored session details you have previously saved. See section 4.1.2 for details of how to create saved sessions.
3.1.3.4 Changing your session settings
If you select «Change Settings» from the system menu, PuTTY will display a cut-down version of its initial configuration box. This allows you to adjust most properties of your current session. You can change the terminal size, the font, the actions of various keypresses, the colours, and so on.
Some of the options that are available in the main configuration box are not shown in the cut-down Change Settings box. These are usually options which don’t make sense to change in the middle of a session (for example, you can’t switch from SSH to Telnet in mid-session).
You can save the current settings to a saved session for future use from this dialog box. See section 4.1.2 for more on saved sessions.
3.1.3.5 Copy All to Clipboard
This system menu option provides a convenient way to copy the whole contents of the terminal screen (up to the last nonempty line) and scrollback to the clipboard in one go.
3.1.3.6 Clearing and resetting the terminal
The «Clear Scrollback» option on the system menu tells PuTTY to discard all the lines of text that have been kept after they scrolled off the top of the screen. This might be useful, for example, if you displayed sensitive information and wanted to make sure nobody could look over your shoulder and see it. (Note that this only prevents a casual user from using the scrollbar to view the information; the text is not guaranteed not to still be in PuTTY’s memory.)
The «Reset Terminal» option causes a full reset of the terminal emulation. A VT-series terminal is a complex piece of software and can easily get into a state where all the text printed becomes unreadable. (This can happen, for example, if you accidentally output a binary file to your terminal.) If this happens, selecting Reset Terminal should sort it out.
3.1.3.7 Full screen mode
If you find the title bar on a maximised window to be ugly or distracting, you can select Full Screen mode to maximise PuTTY «even more». When you select this, PuTTY will expand to fill the whole screen and its borders, title bar and scrollbar will disappear. (You can configure the scrollbar not to disappear in full-screen mode if you want to keep it; see section 4.7.3.)
When you are in full-screen mode, you can still access the system menu if you click the left mouse button in the extreme top left corner of the screen.
3.2 Creating a log file of your session
For some purposes you may find you want to log everything that appears on your screen. You can do this using the «Logging» panel in the configuration box.
To begin a session log, select «Change Settings» from the system menu and go to the Logging panel. Enter a log file name, and select a logging mode. (You can log all session output including the terminal control sequences, or you can just log the printable text. It depends what you want the log for.) Click «Apply» and your log will be started. Later on, you can go back to the Logging panel and select «Logging turned off completely» to stop logging; then PuTTY will close the log file and you can safely read it.
See section 4.2 for more details and options.
3.3 Altering your character set configuration
If you find that special characters (accented characters, for example, or line-drawing characters) are not being displayed correctly in your PuTTY session, it may be that PuTTY is interpreting the characters sent by the server according to the wrong character set. There are a lot of different character sets available, and no good way for PuTTY to know which to use, so it’s entirely possible for this to happen.
If you click «Change Settings» and look at the «Translation» panel, you should see a large number of character sets which you can select, and other related options. Now all you need is to find out which of them you want! (See section 4.10 for more information.)
3.4 Using X11 forwarding in SSH
The SSH protocol has the ability to securely forward X Window System graphical applications over your encrypted SSH connection, so that you can run an application on the SSH server machine and have it put its windows up on your local machine without sending any X network traffic in the clear.
In order to use this feature, you will need an X display server for your Windows machine, such as Cygwin/X, X-Win32, or Exceed. This will probably install itself as display number 0 on your local machine; if it doesn’t, the manual for the X server should tell you what it does do.
You should then tick the «Enable X11 forwarding» box in the X11 panel (see section 4.26) before starting your SSH session. The «X display location» box is blank by default, which means that PuTTY will try to use a sensible default such as :0 , which is the usual display location where your X server will be installed. If that needs changing, then change it.
Now you should be able to log in to the SSH server as normal. To check that X forwarding has been successfully negotiated during connection startup, you can check the PuTTY Event Log (see section 3.1.3.1). It should say something like this:
If the remote system is Unix or Unix-like, you should also be able to see that the DISPLAY environment variable has been set to point at display 10 or above on the SSH server machine itself:
If this works, you should then be able to run X applications in the remote session and have them display their windows on your PC.
For more options relating to X11 forwarding, see section 4.26.
3.5 Using port forwarding in SSH
The SSH protocol has the ability to forward arbitrary network (TCP) connections over your encrypted SSH connection, to avoid the network traffic being sent in clear. For example, you could use this to connect from your home computer to a POP-3 server on a remote machine without your POP-3 password being visible to network sniffers.
In order to use port forwarding to connect from your local machine to a port on a remote server, you need to:
- Choose a port number on your local machine where PuTTY should listen for incoming connections. There are likely to be plenty of unused port numbers above 3000. (You can also use a local loopback address here; see below for more details.)
- Now, before you start your SSH connection, go to the Tunnels panel (see section 4.27). Make sure the «Local» radio button is set. Enter the local port number into the «Source port» box. Enter the destination host name and port number into the «Destination» box, separated by a colon (for example, popserver.example.com:110 to connect to a POP-3 server).
- Now click the «Add» button. The details of your port forwarding should appear in the list box.
Now start your session and log in. (Port forwarding will not be enabled until after you have logged in; otherwise it would be easy to perform completely anonymous network attacks, and gain access to anyone’s virtual private network.) To check that PuTTY has set up the port forwarding correctly, you can look at the PuTTY Event Log (see section 3.1.3.1). It should say something like this:
Now if you connect to the source port number on your local PC, you should find that it answers you exactly as if it were the service running on the destination machine. So in this example, you could then configure an e-mail client to use localhost:3110 as a POP-3 server instead of popserver.example.com:110 . (Of course, the forwarding will stop happening when your PuTTY session closes down.)
You can also forward ports in the other direction: arrange for a particular port number on the server machine to be forwarded back to your PC as a connection to a service on your PC or near it. To do this, just select the «Remote» radio button instead of the «Local» one. The «Source port» box will now specify a port number on the server (note that most servers will not allow you to use port numbers under 1024 for this purpose).
An alternative way to forward local connections to remote hosts is to use dynamic SOCKS proxying. In this mode, PuTTY acts as a SOCKS server, which SOCKS-aware programs can connect to and open forwarded connections to the destination of their choice, so this can be an alternative to long lists of static forwardings. To use this mode, you will need to select the «Dynamic» radio button instead of «Local», and then you should not enter anything into the «Destination» box (it will be ignored). PuTTY will then listen for SOCKS connections on the port you have specified. Most web browsers can be configured to connect to this SOCKS proxy service; also, you can forward other PuTTY connections through it by setting up the Proxy control panel (see section 4.16 for details).
The source port for a forwarded connection usually does not accept connections from any machine except the SSH client or server machine itself (for local and remote forwardings respectively). There are controls in the Tunnels panel to change this:
- The «Local ports accept connections from other hosts» option allows you to set up local-to-remote port forwardings (including dynamic port forwardings) in such a way that machines other than your client PC can connect to the forwarded port.
- The «Remote ports do the same» option does the same thing for remote-to-local port forwardings (so that machines other than the SSH server machine can connect to the forwarded port.) Note that this feature is only available in the SSH-2 protocol, and not all SSH-2 servers honour it (in OpenSSH, for example, it’s usually disabled by default).
You can also specify an IP address to listen on. Typically a Windows machine can be asked to listen on any single IP address in the 127.*.*.* range, and all of these are loopback addresses available only to the local machine. So if you forward (for example) 127.0.0.5:79 to a remote machine’s finger port, then you should be able to run commands such as finger fred@127.0.0.5 . This can be useful if the program connecting to the forwarded port doesn’t allow you to change the port number it uses. This feature is available for local-to-remote forwarded ports; SSH-1 is unable to support it for remote-to-local ports, while SSH-2 can support it in theory but servers will not necessarily cooperate.
(Note that if you’re using Windows XP Service Pack 2, you may need to obtain a fix from Microsoft in order to use addresses like 127.0.0.5 — see question A.7.17.)
For more options relating to port forwarding, see section 4.27.
If the connection you are forwarding over SSH is itself a second SSH connection made by another copy of PuTTY, you might find the «logical host name» configuration option useful to warn PuTTY of which host key it should be expecting. See section 4.14.5 for details of this.
3.6 Making raw TCP connections
A lot of Internet protocols are composed of commands and responses in plain text. For example, SMTP (the protocol used to transfer e-mail), NNTP (the protocol used to transfer Usenet news), and HTTP (the protocol used to serve Web pages) all consist of commands in readable plain text.
Sometimes it can be useful to connect directly to one of these services and speak the protocol «by hand», by typing protocol commands and watching the responses. On Unix machines, you can do this using the system’s telnet command to connect to the right port number. For example, telnet mailserver.example.com 25 might enable you to talk directly to the SMTP service running on a mail server.
Although the Unix telnet program provides this functionality, the protocol being used is not really Telnet. Really there is no actual protocol at all; the bytes sent down the connection are exactly the ones you type, and the bytes shown on the screen are exactly the ones sent by the server. Unix telnet will attempt to detect or guess whether the service it is talking to is a real Telnet service or not; PuTTY prefers to be told for certain.
In order to make a debugging connection to a service of this type, you simply select the fourth protocol name, «Raw», from the «Protocol» buttons in the «Session» configuration panel. (See section 4.1.1.) You can then enter a host name and a port number, and make the connection.
3.7 Connecting to a local serial line
PuTTY can connect directly to a local serial line as an alternative to making a network connection. In this mode, text typed into the PuTTY window will be sent straight out of your computer’s serial port, and data received through that port will be displayed in the PuTTY window. You might use this mode, for example, if your serial port is connected to another computer which has a serial connection.
To make a connection of this type, simply select «Serial» from the «Connection type» radio buttons on the «Session» configuration panel (see section 4.1.1). The «Host Name» and «Port» boxes will transform into «Serial line» and «Speed», allowing you to specify which serial line to use (if your computer has more than one) and what speed (baud rate) to use when transferring data. For further configuration options (data bits, stop bits, parity, flow control), you can use the «Serial» configuration panel (see section 4.29).
After you start up PuTTY in serial mode, you might find that you have to make the first move, by sending some data out of the serial line in order to notify the device at the other end that someone is there for it to talk to. This probably depends on the device. If you start up a PuTTY serial session and nothing appears in the window, try pressing Return a few times and see if that helps.
A serial line provides no well defined means for one end of the connection to notify the other that the connection is finished. Therefore, PuTTY in serial mode will remain connected until you close the window using the close button.
3.8 The PuTTY command line
PuTTY can be made to do various things without user intervention by supplying command-line arguments (e.g., from a command prompt window, or a Windows shortcut).
3.8.1 Starting a session from the command line
These options allow you to bypass the configuration window and launch straight into a session.
To start a connection to a server called host :
If this syntax is used, settings are taken from the Default Settings (see section 4.1.2); user overrides these settings if supplied. Also, you can specify a protocol, which will override the default protocol (see section 3.8.3.2).
For telnet sessions, the following alternative syntax is supported (this makes PuTTY suitable for use as a URL handler for telnet URLs in web browsers):
To start a connection to a serial port, e.g. COM1:
In order to start an existing saved session called sessionname , use the -load option (described in section 3.8.3.1).
3.8.2 -cleanup
If invoked with the -cleanup option, rather than running as normal, PuTTY will remove its registry entries and random seed file from the local machine (after confirming with the user). It will also attempt to remove information about recently launched sessions stored in the «jump list» on Windows 7 and up.
Note that on multi-user systems, -cleanup only removes registry entries and files associated with the currently logged-in user.
3.8.3 Standard command-line options
PuTTY and its associated tools support a range of command-line options, most of which are consistent across all the tools. This section lists the available options in all tools. Options which are specific to a particular tool are covered in the chapter about that tool.
3.8.3.1 -load : load a saved session
The -load option causes PuTTY to load configuration details out of a saved session. If these details include a host name, then this option is all you need to make PuTTY start a session.
You need double quotes around the session name if it contains spaces.
If you want to create a Windows shortcut to start a PuTTY saved session, this is the option you should use: your shortcut should call something like
(Note that PuTTY itself supports an alternative form of this option, for backwards compatibility. If you execute putty @sessionname it will have the same effect as putty -load «sessionname» . With the @ form, no double quotes are required, and the @ sign must be the very first thing on the command line. This form of the option is deprecated.)
3.8.3.2 Selecting a protocol: -ssh , -telnet , -rlogin , -raw -serial
To choose which protocol you want to connect with, you can use one of these options:
- -ssh selects the SSH protocol.
- -telnet selects the Telnet protocol.
- -rlogin selects the Rlogin protocol.
- -raw selects the raw protocol.
- -serial selects a serial connection.
These options are not available in the file transfer tools PSCP and PSFTP (which only work with the SSH protocol).
These options are equivalent to the protocol selection buttons in the Session panel of the PuTTY configuration box (see section 4.1.1).
3.8.3.3 -v : increase verbosity
Most of the PuTTY tools can be made to tell you more about what they are doing by supplying the -v option. If you are having trouble when making a connection, or you’re simply curious, you can turn this switch on and hope to find out more about what is happening.
3.8.3.4 -l : specify a login name
You can specify the user name to log in as on the remote server using the -l option. For example, plink login.example.com -l fred .
These options are equivalent to the username selection box in the Connection panel of the PuTTY configuration box (see section 4.15.1).
3.8.3.5 -L , -R and -D : set up port forwardings
As well as setting up port forwardings in the PuTTY configuration (see section 4.27), you can also set up forwardings on the command line. The command-line options work just like the ones in Unix ssh programs.
To forward a local port (say 5110) to a remote destination (say popserver.example.com port 110), you can write something like one of these:
To forward a remote port to a local destination, just use the -R option instead of -L :
To specify an IP address for the listening end of the tunnel, prepend it to the argument:
To set up SOCKS-based dynamic port forwarding on a local port, use the -D option. For this one you only have to pass the port number:
For general information on port forwarding, see section 3.5.
These options are not available in the file transfer tools PSCP and PSFTP.
3.8.3.6 -m : read a remote command or script from a file
The -m option performs a similar function to the «Remote command» box in the SSH panel of the PuTTY configuration box (see section 4.19.1). However, the -m option expects to be given a local file name, and it will read a command from that file.
With some servers (particularly Unix systems), you can even put multiple lines in this file and execute more than one command in sequence, or a whole shell script; but this is arguably an abuse, and cannot be expected to work on all servers. In particular, it is known not to work with certain «embedded» servers, such as Cisco routers.
This option is not available in the file transfer tools PSCP and PSFTP.
3.8.3.7 -P : specify a port number
The -P option is used to specify the port number to connect to. If you have a Telnet server running on port 9696 of a machine instead of port 23, for example:
(Note that this option is more useful in Plink than in PuTTY, because in PuTTY you can write putty -telnet host.name 9696 in any case.)
This option is equivalent to the port number control in the Session panel of the PuTTY configuration box (see section 4.1.1).
3.8.3.8 -pw : specify a password
A simple way to automate a remote login is to supply your password on the command line. This is not recommended for reasons of security. If you possibly can, we recommend you set up public-key authentication instead. See chapter 8 for details.
Note that the -pw option only works when you are using the SSH protocol. Due to fundamental limitations of Telnet and Rlogin, these protocols do not support automated password authentication.
3.8.3.9 -agent and -noagent : control use of Pageant for authentication
The -agent option turns on SSH authentication using Pageant, and -noagent turns it off. These options are only meaningful if you are using SSH.
See chapter 9 for general information on Pageant.
These options are equivalent to the agent authentication checkbox in the Auth panel of the PuTTY configuration box (see section 4.23.3).
3.8.3.10 -A and -a : control agent forwarding
The -A option turns on SSH agent forwarding, and -a turns it off. These options are only meaningful if you are using SSH.
See chapter 9 for general information on Pageant, and section 9.4 for information on agent forwarding. Note that there is a security risk involved with enabling this option; see section 9.5 for details.
These options are equivalent to the agent forwarding checkbox in the Auth panel of the PuTTY configuration box (see section 4.23.6).
These options are not available in the file transfer tools PSCP and PSFTP.
3.8.3.11 -X and -x : control X11 forwarding
The -X option turns on X11 forwarding in SSH, and -x turns it off. These options are only meaningful if you are using SSH.
For information on X11 forwarding, see section 3.4.
These options are equivalent to the X11 forwarding checkbox in the X11 panel of the PuTTY configuration box (see section 4.26).
These options are not available in the file transfer tools PSCP and PSFTP.
3.8.3.12 -t and -T : control pseudo-terminal allocation
The -t option ensures PuTTY attempts to allocate a pseudo-terminal at the server, and -T stops it from allocating one. These options are only meaningful if you are using SSH.
These options are equivalent to the «Don’t allocate a pseudo-terminal» checkbox in the SSH panel of the PuTTY configuration box (see section 4.25.1).
These options are not available in the file transfer tools PSCP and PSFTP.
3.8.3.13 -N : suppress starting a shell or command
The -N option prevents PuTTY from attempting to start a shell or command on the remote server. You might want to use this option if you are only using the SSH connection for port forwarding, and your user account on the server does not have the ability to run a shell.
This feature is only available in SSH protocol version 2 (since the version 1 protocol assumes you will always want to run a shell).
This option is equivalent to the «Don’t start a shell or command at all» checkbox in the SSH panel of the PuTTY configuration box (see section 4.19.2).
This option is not available in the file transfer tools PSCP and PSFTP.
3.8.3.14 -nc : make a remote network connection in place of a remote shell or command
The -nc option prevents Plink (or PuTTY) from attempting to start a shell or command on the remote server. Instead, it will instruct the remote server to open a network connection to a host name and port number specified by you, and treat that network connection as if it were the main session.
You specify a host and port as an argument to the -nc option, with a colon separating the host name from the port number, like this:
You might want to use this feature if you needed to make an SSH connection to a target host which you can only reach by going through a proxy host, and rather than using port forwarding you prefer to use the local proxy feature (see section 4.16.1 for more about local proxies). In this situation you might select «Local» proxy type, set your local proxy command to be « plink %proxyhost -nc %host:%port », enter the target host name on the Session panel, and enter the directly reachable proxy host name on the Proxy panel.
This feature is only available in SSH protocol version 2 (since the version 1 protocol assumes you will always want to run a shell). It is not available in the file transfer tools PSCP and PSFTP. It is available in PuTTY itself, although it is unlikely to be very useful in any tool other than Plink. Also, -nc uses the same server functionality as port forwarding, so it will not work if your server administrator has disabled port forwarding.
(The option is named -nc after the Unix program nc, short for «netcat». The command « plink host1 -nc host2:port » is very similar in functionality to « plink host1 nc host2 port », which invokes nc on the server and tells it to connect to the specified destination. However, Plink’s built-in -nc option does not depend on the nc program being installed on the server.)
3.8.3.15 -C : enable compression
The -C option enables compression of the data sent across the network. This option is only meaningful if you are using SSH.
This option is equivalent to the «Enable compression» checkbox in the SSH panel of the PuTTY configuration box (see section 4.19.3).
3.8.3.16 -1 and -2 : specify an SSH protocol version
The -1 and -2 options force PuTTY to use version 1 or version 2 of the SSH protocol. These options are only meaningful if you are using SSH.
These options are equivalent to selecting the SSH protocol version in the SSH panel of the PuTTY configuration box (see section 4.19.4).
3.8.3.17 -4 and -6 : specify an Internet protocol version
The -4 and -6 options force PuTTY to use the older Internet protocol IPv4 or the newer IPv6 for most outgoing connections.
These options are equivalent to selecting your preferred Internet protocol version as «IPv4» or «IPv6» in the Connection panel of the PuTTY configuration box (see section 4.14.4).
3.8.3.18 -i : specify an SSH private key
The -i option allows you to specify the name of a private key file in *.PPK format which PuTTY will use to authenticate with the server. This option is only meaningful if you are using SSH.
If you are using Pageant, you can also specify a public key file (in RFC 4716 or OpenSSH format) to identify a specific key file to use. (This won’t work if you’re not running Pageant, of course.)
For general information on public-key authentication, see chapter 8.
This option is equivalent to the «Private key file for authentication» box in the Auth panel of the PuTTY configuration box (see section 4.23.8).
3.8.3.19 -loghost : specify a logical host name
This option overrides PuTTY’s normal SSH host key caching policy by telling it the name of the host you expect your connection to end up at (in cases where this differs from the location PuTTY thinks it’s connecting to). It can be a plain host name, or a host name followed by a colon and a port number. See section 4.14.5 for more detail on this.
3.8.3.20 -hostkey : manually specify an expected host key
This option overrides PuTTY’s normal SSH host key caching policy by telling it exactly what host key to expect, which can be useful if the normal automatic host key store in the Registry is unavailable. The argument to this option should be either a host key fingerprint, or an SSH-2 public key blob. See section 4.21.2 for more information.
You can specify this option more than once if you want to configure more than one key to be accepted.
3.8.3.21 -pgpfp : display PGP key fingerprints
This option causes the PuTTY tools not to run as normal, but instead to display the fingerprints of the PuTTY PGP Master Keys, in order to aid with verifying new versions. See appendix E for more information.
3.8.3.22 -sercfg : specify serial port configuration
This option specifies the configuration parameters for the serial port (baud rate, stop bits etc). Its argument is interpreted as a comma-separated list of configuration options, which can be as follows:
- Any single digit from 5 to 9 sets the number of data bits.
- « 1 », « 1.5 » or « 2 » sets the number of stop bits.
- Any other numeric string is interpreted as a baud rate.
- A single lower-case letter specifies the parity: « n » for none, « o » for odd, « e » for even, « m » for mark and « s » for space.
- A single upper-case letter specifies the flow control: « N » for none, « X » for XON/XOFF, « R » for RTS/CTS and « D » for DSR/DTR.
For example, « -sercfg 19200,8,n,1,N » denotes a baud rate of 19200, 8 data bits, no parity, 1 stop bit and no flow control.
3.8.3.23 -sessionlog , -sshlog , -sshrawlog : specify session logging
These options cause the PuTTY network tools to write out a log file. Each of them expects a file name as an argument, e.g. « -sshlog putty.log » causes an SSH packet log to be written to a file called « putty.log ». The three different options select different logging modes, all available from the GUI too:
- -sessionlog selects «All session output» logging mode.
- -sshlog selects «SSH packets» logging mode.
- -sshrawlog selects «SSH packets and raw data» logging mode.
For more information on logging configuration, see section 4.2.
3.8.3.24 -proxycmd : specify a local proxy command
This option enables PuTTY’s mode for running a command on the local machine and using it as a proxy for the network connection. It expects a shell command string as an argument.
See section 4.16.1 for more information on this, and on other proxy settings. In particular, note that since the special sequences described there are understood in the argument string, literal backslashes must be doubled (if you want \ in your command, you must put \\ on the command line).
3.8.3.25 -restrict-acl : restrict the Windows process ACL
This option (on Windows only) causes PuTTY (or another PuTTY tool) to try to lock down the operating system’s access control on its own process. If this succeeds, it should present an extra obstacle to malware that has managed to run under the same user id as the PuTTY process, by preventing it from attaching to PuTTY using the same interfaces debuggers use and either reading sensitive information out of its memory or hijacking its network session.
This option is not enabled by default, because this form of interaction between Windows programs has many legitimate uses, including accessibility software such as screen readers. Also, it cannot provide full security against this class of attack in any case, because PuTTY can only lock down its own ACL after it has started up, and malware could still get in if it attacks the process between startup and lockdown. So it trades away noticeable convenience, and delivers less real security than you might want. However, if you do want to make that tradeoff anyway, the option is available.
A PuTTY process started with -restrict-acl will pass that on to any processes started with Duplicate Session, New Session etc. (However, if you’re invoking PuTTY tools explicitly, for instance as a proxy command, you’ll need to arrange to pass them the -restrict-acl option yourself, if that’s what you want.)
Источник


